KeepAlived+Redis | 高可用 | 主从复制 | 健康检查 | 故障自动切换
本文讲解如何使用KeepAlived配合健康检查脚本来配置Redis高可用(主从数据同步,故障自动切换)。
PS:在使用前请先安装好KeepAlived Redis等相关软件,需要设置为系统服务,但不要设置成为开机启动。
CentOS(7.x64位) 安装Redis3.2 并设置为系统服务
CentOS7 安装Keepalived以及基本配置
CentOS7 下配置Keepalived为系统服务,开机自动启动。
软件环境
CentOS7 X64 | Keepalived v1.2.22 | redis-3.2.0
系统架构图
1:正常情况下VIP绑定到Redis-Master主服务器上(128),由主服务器对外提供服务,Redis-Slave(132)为备用服务器,异步备份主服务器上的数据。
2:当Redis-Master出现故障后,VIP绑定到Redis-Slave服务器上(132),这时通过脚本提升 Redis-Slave 为新的主,对外提供服务。
3:当Redis-Master服务器恢复正常后,通过脚本将它设置备用服务器,同时设置它去新的主服务器(132)上同步数据。
4:只要俩台服务器不同时宕机,即可实现Redis的高可用,故障自动切换功能。
PS:上诉架构仍然存在一些问题,就是当主服务器的缓存内容改变后,此时备份服务器还没来得急更新数据,如果在这时主服务器宕机,那么备份服务器会丢失这部分数据。
命令脚本
1:redis-to-master.sh 当Redis提升为主时执行的脚本。
#!/bin/sh
# redis-to-master.sh

rediscli="/home/redis/redis-3.2.0/src/redis-cli"

$rediscli slaveof no one

perl -pi -e 's/^slaveof.*/slaveof no one/' /home/redis/redis-3.2.0/redis.conf

echo $(date "+%Y-%m-%d %H:%M:%S") "the redis is to be the master." >> /home/redis/redis_rdb/redis-keepalived.log
rediscli="/home/redis/redis-3.2.0/src/redis-cli" 定义redis客户端的位置。
$rediscli slaveof no one 执行Redis客户端命令,设置不去任何地方同步数据(提升为主)。
perl -pi -e 's/^slaveof.*/slaveof no one/' /home/redis/redis-3.2.0/redis.conf 修改配置文件
echo $(date "+%Y-%m-%d %H:%M:%S") "the redis is to be the master." >> /home/redis/redis_rdb/redis-keepalived.log 记录日志。
2:redis-to-slave.sh 当Redis变成备时执行的脚本
#!/bin/sh
# redis-to-slave.sh

rediscli="/home/redis/redis-3.2.0/src/redis-cli"
PEER_HOST="192.168.80.132"
PEER_PORT=6379
$rediscli slaveof $PEER_HOST $PEER_PORT
perl -pi -e "s/^slaveof.*/slaveof $PEER_HOST $PEER_PORT/" /home/redis/redis-3.2.0/redis.conf

echo $(date "+%Y-%m-%d %H:%M:%S") "the redis is to be the slave." >> /home/redis/redis_rdb/redis-keepalived.log
$rediscli slaveof $PEER_HOST $PEER_PORT 执行Redis客户端命令,设置其去主服务器同步数据(变成备)。
3:redis-check.sh KeepAlived健康检查脚本。
#!/bin/sh
# redis-check.sh

rediscli="/home/redis/redis-3.2.0/src/redis-cli"
logfile="/home/redis/redis_rdb/redis-keepalived.log"

# echo $(date "+%Y-%m-%d %H:%M:%S") keepaliced checking >> $logfile

for TRIES in `seq 1 3`
do
  RESULT=`$rediscli ping`
  if [ "${RESULT}" = "PONG" ]; then
    exit 0
  fi
  echo $(date "+%Y-%m-%d %H:%M:%S") "ping failed ${TRIES}" >> $logfile
  sleep 1
done
echo $(date "+%Y-%m-%d %H:%M:%S")  "redis server was down. shutdown keepalived."  >> $logfile
systemctl stop keepalived.service
exit 1
for TRIES in `seq 1 3` 循环3次
RESULT=`$rediscli ping` 执行客户端命令Ping
if [ "${RESULT}" = "PONG" ]; then exit 0 如果返回正常值,则退出脚本。
否则记录日志,暂停1秒,等3次循环结束则 结束keepalived服务 systemctl stop keepalived.service
PS:当停掉主服务器(128)上的KeepAlived后,VIP会票到备份服务器(132)上面,同时出发脚本提成(132)上面的Redis为主。
KeepAlived配置文件
主服务器配置:
! Configuration File for keepalived

global_defs {
   notification_email {
     root@localhost
   }
   notification_email_from root@localhost
   smtp_server localhost
   smtp_connect_timeout 30
   router_id  NodeA
}


vrrp_instance VI_1 {
    state BACKUP
    interface eno16777736
    virtual_router_id 51
    priority 100
    nopreempt
    advert_int 5
    authentication {
        auth_type PASS
        auth_pass 1111
    }
    virtual_ipaddress {
        192.168.80.120
    }

    notify_master /home/redis/redis-shell/redis-to-master.sh
    notify_backup /home/redis/redis-shell/redis-to-slave.sh
    #notify_fault  /home/keepshell/notify_fault.sh
    #notify_stop   /home/keepshell/notify_stop.sh
}

virtual_server 127.0.0.1 16379 {
    delay_loop 5
    lb_algo rr
    real_server 127.0.0.1 6379 {
        MISC_CHECK {
            misc_path "/home/redis/redis-shell/redis-check.sh"
            misc_timeout 30
        }
    }
}
备服务器配置: 只贴出不同之处。
router_id NodeB (名字不同)
priority 90 (权重低一些)。
PS: nopreempt:不抢占VIP state BACKUP(全不都为BACKUP模式) 需要注意无论主备服务器都需要设置为BACKUP,与以往KeepAlived的配置不同,其目的就是防止主服务器恢复后重新抢回VIP,导致Redis切换从而影响稳定。
==========================================================================
notify_master /home/redis/redis-shell/redis-to-master.sh
当KeepAlived提升为主时执行的脚本,设置Redis变成主。
notify_backup /home/redis/redis-shell/redis-to-slave.sh
当KeepAlived变成Backup时执行的脚本,设置Redis变成备,并且去主同步数据。
misc_path "/home/redis/redis-shell/redis-check.sh"
健康检查脚本,默认执行间隔时间5秒,脚本中如果连续3次ping redis失败,则停止KeepAlived服务。
系统测试
1:首先启动主服务器的redis与keepalived
systemctl start redis.service
systemctl status keepalived.service
启动后观察日志: cat /home/redis/redis_rdb/redis-keepalived.log
2016-09-09 17:20:00 the redis is to be the slave.
2016-09-09 17:20:19 the redis is to be the master.
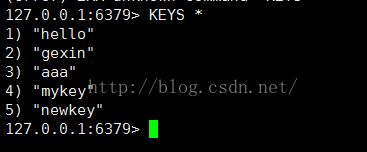
这个时候主服务器上的Redis与Keep就正常了,通过客户端插入一些值,怎么插入就不做介绍了
可以看到值已经插入进去了。
2:启动备服务器的Redis与KeepAlived。
systemctl start redis.service
systemctl start keepalived.service
systemctl start keepalived.service
查看日志:cat /home/redis/redis_rdb/redis-keepalived.log
2016-09-09 17:28:11 the redis is to be the slave.
3:测试数据同步与客户端连接。
1、可以在主服务器写入数据,然后去备服务器查看数据是否同步,这里就不做截图演示了。
2、写一个客户端去连接VIP上的Redis读取数据。
package com;

import java.util.ArrayList;
import java.util.HashSet;
import java.util.List;
import java.util.Random;
import java.util.Set;
import java.util.concurrent.LinkedBlockingQueue;
import java.util.concurrent.ThreadPoolExecutor;
import java.util.concurrent.TimeUnit;

import redis.clients.jedis.HostAndPort;
import redis.clients.jedis.Jedis;
import redis.clients.jedis.JedisCluster;
import redis.clients.jedis.JedisPool;
import redis.clients.jedis.JedisPoolConfig;
import redis.clients.jedis.JedisShardInfo;
import redis.clients.jedis.ShardedJedis;
import redis.clients.jedis.ShardedJedisPool;
import redis.clients.util.ClusterNodeInformationParser;

public class RedisDemo {

	public static void main(String[] args) throws Exception {
		JedisPoolConfig cfg = new JedisPoolConfig();

		final JedisPool pool = new JedisPool(cfg, "192.168.80.120", 6379, 8000);
		ThreadPoolExecutor executor = new ThreadPoolExecutor(10, 10, 0,
				TimeUnit.SECONDS, new LinkedBlockingQueue());


		for (int i = 0; i < 1000; i++) {
			Jedis jedis = null;

			try {
				jedis = pool.getResource();
				System.out.println(jedis.keys("*"));
			} catch (Exception e) {
				e.printStackTrace();
			} finally {
				if (jedis != null) {
					jedis.close();
				}
			}

			Thread.sleep(2000);
		}

		pool.destroy();
	}

}
4:模拟服务器异常。
1、首先停掉主服务器上的redis ,查看日志,看到keep也已经被停止了,这时VIP会漂到备机上。
2016-09-09 17:20:00 the redis is to be the slave.
2016-09-09 17:20:19 the redis is to be the master.
2016-09-09 17:34:14 ping failed 1
2016-09-09 17:34:15 ping failed 2
2016-09-09 17:34:16 ping failed 3
2016-09-09 17:34:17 redis server was down. shutdown keepalived.
2016-09-09 17:28:11 the redis is to be the slave.
2016-09-09 17:34:23 the redis is to be the master.
3、这时恢复主服务器,重新启动Redis与KeepAlived
systemctl start redis.service
systemctl start keepalived.service
通过客户端 INFO 命令查看状态,可以看到原来的主,现在变成了备份服务器。又变成了新一轮的主备模式。


