Libgdx实现和原生view进行层级透明叠加,修改GLSurfaceView为GLTextureview
一、简介
使用Libgdx的都知道,Libgdx使用的是GLSurfaceView,GLSurfaceView从Android 1.5(API level 3)开始加入,作为SurfaceView的补充。它可以看做是SurfaceView的1种典型使用模式。在SurfaceView的基础上,它加入了EGL的管理,并自带了渲染线程。
所以,GLSurfaceView还是和SurfaceView一样,有一个致命的点,就是SurfaveView是独立于Activity的view的,所以,GLSurfaceView只能在当前Activity的View的最上层或者最下层。
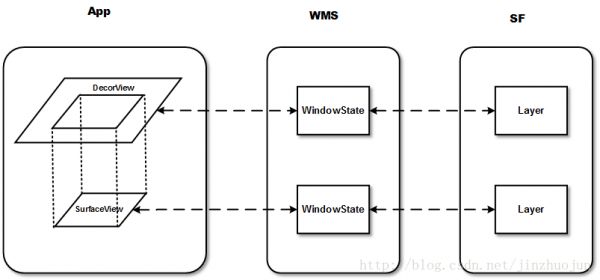
Activity包括的多个View会组成View hierachy的树形结构,只有最顶层的DecorView,也就是根结点视图,才是对WMS可见的。这个DecorView在WMS中有1个对应的WindowState,在SF中有对应的Layer。而SurfaceView自带1个Surface,这个Surface在WMS中有自己对应的WindowState,在SF中也会有自己的Layer。。简单理解如下图(图来源于互联网):

所以,一般的Libgdx用法有三种:
-
整个游戏都是Libgdx,只有一个GLSurfaceView
这种方法是官方推荐使用的方法了,就是纯游戏引擎的。不多说。 -
和原生结合,在部分页面嵌入Libgdx
部分页面使用和正常使用非常相似,不多说。 -
和原生结合,在部分页面的部分View嵌入Libgdx
这种方法因为上诉所说的原因,只能把GLSurfaceView放到最上层或者最下层,而且想要透明背景的话,只能放最上层
放置最上层的方法,初始化view完毕之后,转换为SurfaceView,然后设置setZOrderOnTop:
    val view = initializeForView(application, cfg)
    if (view is SurfaceView) {
        //设置透明
        view.holder.setFormat(PixelFormat.TRANSLUCENT)
        //置于顶部
        view.setZOrderOnTop(true)
    }
放置最下层的方法,设置setZOrderMediaOverlay,此方法不能透明。
    val view = initializeForView(application, cfg)
    if (view is SurfaceView) {
        view.setZOrderMediaOverlay(true)
    }
二、解决方案
根据一的分析之后,如果我们想和原生的view进行随意透明层叠,好像几乎是不可能!!!
但是,有解决方案。TextureView在4.0(API level 14)中引入,与SurfaceView一样继承View, 它可以将内容流直接投影到View中,它可以将内容流直接投影到View中,可以用于实现Live preview等功能。和SurfaceView不同,它不会在WMS中单独创建窗口,而是作为View hierachy中的一个普通View,因此可以和其它普通View一样进行移动,旋转,缩放,动画等变化。 但是它既然有优点,也有缺点:
- 优点:支持移动、旋转、缩放等动画,支持截图
- 缺点:必须在硬件加速的窗口中使用,占用内存比SurfaceView高,在5.0以前在主线程渲染,5.0以后有单独的渲染线程。
所以,上面所说的内容,俗话说就是:
SurfaceView 出现最早,解决类似视频播放的问题(可以用单独一个线程来渲染UI)。后来发现用起来不方便, 渲染线程需要单独编写,一大堆都可以独立成模板。所以后来就出现了GLSurfaceView, 概括一句话就是使用了模板的SurfaceView。再后来发现GLSurfaceView不能根据屏幕的变化而变化,这是由于SurfaceView同应用的Surface不是在同一层导致的问题。人们就想到把这个GLSurfaceView弄到应用的Surface中, 所以就产生了TextureView.
其实Android官方在Android4.0以后推出TextureView,本意就是想代替GLSurfaceView。可是TextureView在里面并没有像GLSurfaceView那样封装好一个绘制线程以及OpenGL的初始化。所以,在网友的努力下,GLTextureView出来了。
三、实现
确定了方案之后,我们就把Libgdx的GLSurfaceview替换为GLTextureView来实现和原生view进行层叠的效果,这里用到的GLTextureview如下:
点我查看GLTextureview(貌似需要科学上网)
1. 下载backends源码
去github下载libgdx的源码,把gdx-backend-android的源码作为module导入到as,因为GLSurfaceview的创建就是这个包里面
可以看到,Surfaceview在AndroidGraphics的139行的createGLSurfaceView方法进行初始化
2. 增加GLTextureView
Surfaceview同级目录,创建textureview,把下载的GLTextureView放进去。然后在这个目录创建GLTextureView20,然后参照GLSurfaceView20编写,如下:
/**
 * 针对Libgdx的GLTextureView
 * @date 2019.03.13
 * @author Skyhand
 */
public class GLTextureView20 extends GLTextureView {

    static String TAG = "GLTextureView20";

    final ResolutionStrategy resolutionStrategy;
    static int targetGLESVersion;

    public GLTextureView20 (Context context, ResolutionStrategy resolutionStrategy, int targetGLESVersion) {
        super(context);
        GLTextureView20.targetGLESVersion = targetGLESVersion;
        this.resolutionStrategy = resolutionStrategy;
        init(false, 16, 0);
    }

    public GLTextureView20 (Context context, ResolutionStrategy resolutionStrategy) {
        this(context, resolutionStrategy, 2);
    }

    public GLTextureView20 (Context context, boolean translucent, int depth, int stencil, ResolutionStrategy resolutionStrategy) {
        super(context);
        this.resolutionStrategy = resolutionStrategy;
        init(translucent, depth, stencil);

    }


    @Override
    protected void onMeasure (int widthMeasureSpec, int heightMeasureSpec) {
        ResolutionStrategy.MeasuredDimension measures = resolutionStrategy.calcMeasures(widthMeasureSpec, heightMeasureSpec);
        setMeasuredDimension(measures.width, measures.height);
    }


    @Override
    public InputConnection onCreateInputConnection (EditorInfo outAttrs) {

        // add this line, the IME can show the selectable words when use chinese input method editor.
        if (outAttrs != null) {
            outAttrs.imeOptions = outAttrs.imeOptions | EditorInfo.IME_FLAG_NO_EXTRACT_UI;
        }

        BaseInputConnection connection = new BaseInputConnection(this, false) {
            @Override
            public boolean deleteSurroundingText (int beforeLength, int afterLength) {
                int sdkVersion = android.os.Build.VERSION.SDK_INT;
                if (sdkVersion >= 16) {
                    /*
                     * In Jelly Bean, they don't send key events for delete. Instead, they send beforeLength = 1, afterLength = 0. So,
                     * we'll just simulate what it used to do.
                     */
                    if (beforeLength == 1 && afterLength == 0) {
                        sendDownUpKeyEventForBackwardCompatibility(KeyEvent.KEYCODE_DEL);
                        return true;
                    }
                }
                return super.deleteSurroundingText(beforeLength, afterLength);
            }

            @TargetApi(16)
            private void sendDownUpKeyEventForBackwardCompatibility (final int code) {
                final long eventTime = SystemClock.uptimeMillis();
                super.sendKeyEvent(new KeyEvent(eventTime, eventTime, KeyEvent.ACTION_DOWN, code, 0, 0,
                        KeyCharacterMap.VIRTUAL_KEYBOARD, 0, KeyEvent.FLAG_SOFT_KEYBOARD | KeyEvent.FLAG_KEEP_TOUCH_MODE));
                super.sendKeyEvent(new KeyEvent(SystemClock.uptimeMillis(), eventTime, KeyEvent.ACTION_UP, code, 0, 0,
                        KeyCharacterMap.VIRTUAL_KEYBOARD, 0, KeyEvent.FLAG_SOFT_KEYBOARD | KeyEvent.FLAG_KEEP_TOUCH_MODE));
            }
        };
        return connection;
    }


    private void init (boolean translucent, int depth, int stencil) {

        this.setEGLContextFactory(new GLTextureView20.ContextFactory());
        this.setEGLConfigChooser(translucent ? new GLTextureView20.ConfigChooser(8, 8, 8, 8, depth, stencil) : new GLTextureView20.ConfigChooser(5, 6, 5, 0, depth, stencil));
        this.setSurfaceTextureListener(this);

        if(translucent){
            setOpaque(false);
        }

    }

    static class ContextFactory implements GLTextureView.EGLContextFactory {
        private static int EGL_CONTEXT_CLIENT_VERSION = 0x3098;

        @Override
        public EGLContext createContext (EGL10 egl, EGLDisplay display, EGLConfig eglConfig) {
            Log.w(TAG, "creating OpenGL ES " + GLTextureView20.targetGLESVersion + ".0 context");
            checkEglError("Before eglCreateContext "+targetGLESVersion, egl);
            int[] attrib_list = {EGL_CONTEXT_CLIENT_VERSION, GLTextureView20.targetGLESVersion, EGL10.EGL_NONE};
            EGLContext context = egl.eglCreateContext(display, eglConfig, EGL10.EGL_NO_CONTEXT, attrib_list);
            boolean success = checkEglError("After eglCreateContext "+targetGLESVersion, egl);

            if ((!success || context == null) && GLTextureView20.targetGLESVersion > 2) {
                Log.w(TAG, "Falling back to GLES 2");
                GLTextureView20.targetGLESVersion = 2;
                return createContext(egl, display, eglConfig);
            }
            Log.w(TAG, "Returning a GLES "+targetGLESVersion+" context");
            return context;
        }

        @Override
        public void destroyContext (EGL10 egl, EGLDisplay display, EGLContext context) {
            egl.eglDestroyContext(display, context);
        }
    }

    static boolean checkEglError (String prompt, EGL10 egl) {
        int error;
        boolean result = true;
        while ((error = egl.eglGetError()) != EGL10.EGL_SUCCESS) {
            result = false;
            Log.e(TAG, String.format("%s: EGL error: 0x%x", prompt, error));
        }
        return result;
    }

    private static class ConfigChooser implements GLTextureView.EGLConfigChooser {

        public ConfigChooser (int r, int g, int b, int a, int depth, int stencil) {
            mRedSize = r;
            mGreenSize = g;
            mBlueSize = b;
            mAlphaSize = a;
            mDepthSize = depth;
            mStencilSize = stencil;
        }


        private static int EGL_OPENGL_ES2_BIT = 4;
        private static int[] s_configAttribs2 = {EGL10.EGL_RED_SIZE, 4, EGL10.EGL_GREEN_SIZE, 4, EGL10.EGL_BLUE_SIZE, 4,
                EGL10.EGL_RENDERABLE_TYPE, EGL_OPENGL_ES2_BIT, EGL10.EGL_NONE};

        @Override
        public EGLConfig chooseConfig (EGL10 egl, EGLDisplay display) {


            int[] num_config = new int[1];
            egl.eglChooseConfig(display, s_configAttribs2, null, 0, num_config);

            int numConfigs = num_config[0];

            if (numConfigs <= 0) {
                throw new IllegalArgumentException("No configs match configSpec");
            }

            EGLConfig[] configs = new EGLConfig[numConfigs];
            egl.eglChooseConfig(display, s_configAttribs2, configs, numConfigs, num_config);

            return chooseConfig(egl, display, configs);
        }

        public EGLConfig chooseConfig (EGL10 egl, EGLDisplay display, EGLConfig[] configs) {
            for (EGLConfig config : configs) {
                int d = findConfigAttrib(egl, display, config, EGL10.EGL_DEPTH_SIZE, 0);
                int s = findConfigAttrib(egl, display, config, EGL10.EGL_STENCIL_SIZE, 0);

                if (d < mDepthSize || s < mStencilSize) {
                    continue;
                }

                int r = findConfigAttrib(egl, display, config, EGL10.EGL_RED_SIZE, 0);
                int g = findConfigAttrib(egl, display, config, EGL10.EGL_GREEN_SIZE, 0);
                int b = findConfigAttrib(egl, display, config, EGL10.EGL_BLUE_SIZE, 0);
                int a = findConfigAttrib(egl, display, config, EGL10.EGL_ALPHA_SIZE, 0);

                if (r == mRedSize && g == mGreenSize && b == mBlueSize && a == mAlphaSize) {
                    return config;
                }
            }
            return null;
        }

        private int findConfigAttrib (EGL10 egl, EGLDisplay display, EGLConfig config, int attribute, int defaultValue) {

            if (egl.eglGetConfigAttrib(display, config, attribute, mValue)) {
                return mValue[0];
            }
            return defaultValue;
        }

        private void printConfigs (EGL10 egl, EGLDisplay display, EGLConfig[] configs) {
            int numConfigs = configs.length;
            Log.w(TAG, String.format("%d configurations", numConfigs));
            for (int i = 0; i < numConfigs; i++) {
                Log.w(TAG, String.format("Configuration %d:\n", i));
                printConfig(egl, display, configs[i]);
            }
        }

        private void printConfig (EGL10 egl, EGLDisplay display, EGLConfig config) {
            int[] attributes = {EGL10.EGL_BUFFER_SIZE, EGL10.EGL_ALPHA_SIZE, EGL10.EGL_BLUE_SIZE, EGL10.EGL_GREEN_SIZE,
                    EGL10.EGL_RED_SIZE, EGL10.EGL_DEPTH_SIZE, EGL10.EGL_STENCIL_SIZE, EGL10.EGL_CONFIG_CAVEAT, EGL10.EGL_CONFIG_ID,
                    EGL10.EGL_LEVEL, EGL10.EGL_MAX_PBUFFER_HEIGHT, EGL10.EGL_MAX_PBUFFER_PIXELS, EGL10.EGL_MAX_PBUFFER_WIDTH,
                    EGL10.EGL_NATIVE_RENDERABLE, EGL10.EGL_NATIVE_VISUAL_ID, EGL10.EGL_NATIVE_VISUAL_TYPE,
                    0x3030, // EGL10.EGL_PRESERVED_RESOURCES,
                    EGL10.EGL_SAMPLES, EGL10.EGL_SAMPLE_BUFFERS, EGL10.EGL_SURFACE_TYPE, EGL10.EGL_TRANSPARENT_TYPE,
                    EGL10.EGL_TRANSPARENT_RED_VALUE, EGL10.EGL_TRANSPARENT_GREEN_VALUE, EGL10.EGL_TRANSPARENT_BLUE_VALUE, 0x3039, // EGL10.EGL_BIND_TO_TEXTURE_RGB,
                    0x303A, // EGL10.EGL_BIND_TO_TEXTURE_RGBA,
                    0x303B, // EGL10.EGL_MIN_SWAP_INTERVAL,
                    0x303C, // EGL10.EGL_MAX_SWAP_INTERVAL,
                    EGL10.EGL_LUMINANCE_SIZE, EGL10.EGL_ALPHA_MASK_SIZE, EGL10.EGL_COLOR_BUFFER_TYPE, EGL10.EGL_RENDERABLE_TYPE, 0x3042 // EGL10.EGL_CONFORMANT
            };
            String[] names = {"EGL_BUFFER_SIZE", "EGL_ALPHA_SIZE", "EGL_BLUE_SIZE", "EGL_GREEN_SIZE", "EGL_RED_SIZE",
                    "EGL_DEPTH_SIZE", "EGL_STENCIL_SIZE", "EGL_CONFIG_CAVEAT", "EGL_CONFIG_ID", "EGL_LEVEL", "EGL_MAX_PBUFFER_HEIGHT",
                    "EGL_MAX_PBUFFER_PIXELS", "EGL_MAX_PBUFFER_WIDTH", "EGL_NATIVE_RENDERABLE", "EGL_NATIVE_VISUAL_ID",
                    "EGL_NATIVE_VISUAL_TYPE", "EGL_PRESERVED_RESOURCES", "EGL_SAMPLES", "EGL_SAMPLE_BUFFERS", "EGL_SURFACE_TYPE",
                    "EGL_TRANSPARENT_TYPE", "EGL_TRANSPARENT_RED_VALUE", "EGL_TRANSPARENT_GREEN_VALUE", "EGL_TRANSPARENT_BLUE_VALUE",
                    "EGL_BIND_TO_TEXTURE_RGB", "EGL_BIND_TO_TEXTURE_RGBA", "EGL_MIN_SWAP_INTERVAL", "EGL_MAX_SWAP_INTERVAL",
                    "EGL_LUMINANCE_SIZE", "EGL_ALPHA_MASK_SIZE", "EGL_COLOR_BUFFER_TYPE", "EGL_RENDERABLE_TYPE", "EGL_CONFORMANT"};
            int[] value = new int[1];
            for (int i = 0; i < attributes.length; i++) {
                int attribute = attributes[i];
                String name = names[i];
                if (egl.eglGetConfigAttrib(display, config, attribute, value)) {
                    Log.w(TAG, String.format("  %s: %d\n", name, value[0]));
                } else {
                    // Log.w(TAG, String.format("  %s: failed\n", name));
                    while (egl.eglGetError() != EGL10.EGL_SUCCESS)
                        ;
                }
            }
        }

        protected int mRedSize;
        protected int mGreenSize;
        protected int mBlueSize;
        protected int mAlphaSize;
        protected int mDepthSize;
        protected int mStencilSize;
        private int[] mValue = new int[1];
    }
}
然后还得新建一个GdxEglConfigChooser,参照surefaceview里面的GdxEglConfigChooser进行编写,这里不贴出来了,只是改了接口,其他一模一样的。 接下来会有用到这个类
此时,目录是这样子的:
3. 修改AndroidGraphics
- 为了能够让用户配置使用
Surfaceview还是TextureView,加一个配置,在AndroidApplicationConfiguration添加是否使用textureview的配置
public boolean useTextureView = true;
- 添加getTextureEglConfigChooser方法:
	protected GLTextureView.EGLConfigChooser getTextureEglConfigChooser () {
		return new com.badlogic.gdx.backends.android.textureview.GdxEglConfigChooser(config.r, config.g, config.b, config.a, config.depth, config.stencil, config.numSamples);
	}
- 接下来修改创建
SurfaceView的操作,看到createGLSurfaceView方法,添加TextureView的判断创建
	protected View createGLSurfaceView (AndroidApplicationBase application, final ResolutionStrategy resolutionStrategy) {
		if (!checkGL20()) throw new GdxRuntimeException("Libgdx requires OpenGL ES 2.0");

		if(config.useTextureView){  //利用GLTextureView的方式创建
			GLTextureView.EGLConfigChooser configChooser = this.getTextureEglConfigChooser();

			GLTextureView view = new GLTextureView20(application.getContext(), resolutionStrategy, this.config.useGL30 ? 3 : 2);
			if (configChooser != null) {
				view.setEGLConfigChooser(configChooser);
			} else {
				view.setEGLConfigChooser(this.config.r, this.config.g, this.config.b, this.config.a, this.config.depth, this.config.stencil);
			}

			view.setOpaque(false);
			view.setRenderer(this);
			return view;

		}else{
			 ....旧版的GLSurfaceView创建
		}
	}
- 修改
preserveEGLContextOnPause方法,增加GLTextureView20的判断
	protected void preserveEGLContextOnPause () {
		int sdkVersion = android.os.Build.VERSION.SDK_INT;
		if (view instanceof GLTextureView20 || (sdkVersion >= 11 && view instanceof GLSurfaceView20) || view instanceof GLSurfaceView20API18) {
			try {
				view.getClass().getMethod("setPreserveEGLContextOnPause", boolean.class).invoke(view, true);
			} catch (Exception e) {
				Gdx.app.log(LOG_TAG, "Method GLSurfaceView.setPreserveEGLContextOnPause not found");
			}
		}
	}
- 修改
onPauseGLSurfaceView方法,增加GLTextureView20的判断
	public void onPauseGLSurfaceView () {
		if (view != null) {
			if (view instanceof GLTextureView20) ((GLTextureView20)view).onPause();
			if (view instanceof GLSurfaceViewAPI18) ((GLSurfaceViewAPI18)view).onPause();
			if (view instanceof GLSurfaceView) ((GLSurfaceView)view).onPause();
		}
	}
- 修改
onResumeGLSurfaceView方法,增加GLTextureView20的判断
	public void onResumeGLSurfaceView () {
		if (view != null) {
			if (view instanceof GLTextureView20) ((GLTextureView20)view).onResume();
			if (view instanceof GLSurfaceViewAPI18) ((GLSurfaceViewAPI18)view).onResume();
			if (view instanceof GLSurfaceView) ((GLSurfaceView)view).onResume();
		}
	}
- 修改
setContinuousRendering方法,增加GLTextureView20的判断
	@Override
	public void setContinuousRendering (boolean isContinuous) {
		if (view != null) {
			// ignore setContinuousRendering(false) while pausing
			this.isContinuous = enforceContinuousRendering || isContinuous;
			int renderMode = this.isContinuous ? GLSurfaceView.RENDERMODE_CONTINUOUSLY : GLSurfaceView.RENDERMODE_WHEN_DIRTY;
			if (view instanceof GLTextureView20) ((GLTextureView20)view).setRenderMode(renderMode);
			if (view instanceof GLSurfaceViewAPI18) ((GLSurfaceViewAPI18)view).setRenderMode(renderMode);
			if (view instanceof GLSurfaceView) ((GLSurfaceView)view).setRenderMode(renderMode);
			mean.clear();
		}
	}
- 修改
requestRendering方法,增加GLTextureView20的判断
	@Override
	public void requestRendering () {
		if (view != null) {
			if (view instanceof GLTextureView20) ((GLTextureView20)view).requestRender();
			if (view instanceof GLSurfaceViewAPI18) ((GLSurfaceViewAPI18)view).requestRender();
			if (view instanceof GLSurfaceView) ((GLSurfaceView)view).requestRender();
		}
	}
4. 修改AndroidGraphicsLiveWallpaper
修改createGLSurfaceView即可,参考上面的修改AndroidGraphics
四、Github开源
完成上面的步骤就已经完成了,然后Demo和例子已经开源到Github,欢迎Star。Github点我
原版SurfaceView置于底部效果:
原版SurfaceView透明置于顶部效果:
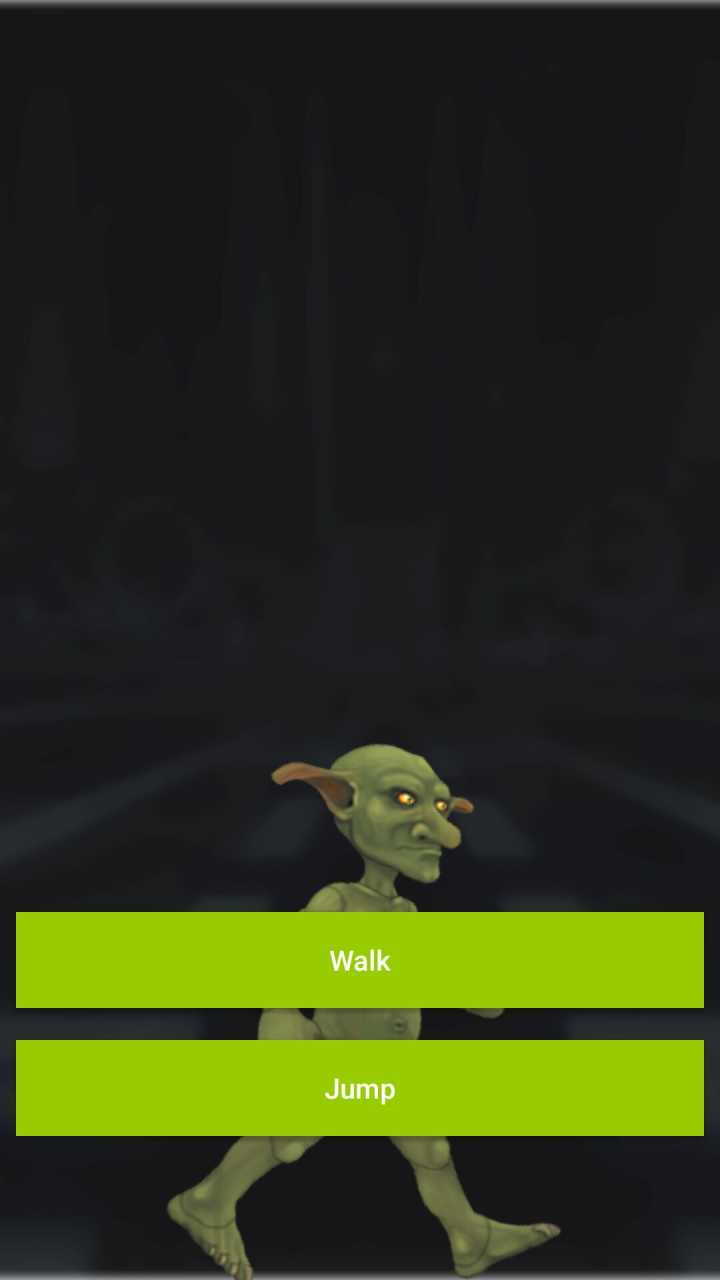
修改之后的TextureView与原生View进行透明层叠效果:


