Xcode操作流
1.Xcode IDE概览
说明:从左到右,依次是“导航窗格(Navigator)->边列(Gutter)->焦点列(Ribbon)->代码编辑窗口(Standard/Primary Editor)”。
- 边列(Gutter):显示行号和断点。
- 焦点列(Ribbon):灰色深度与代码嵌套深度相关:鼠标悬停可突出显示右侧相应代码块(Focus code blocks on hover),鼠标单击可折叠右侧相应代码块(Code folding)。
2.偏好设置
通过 “command+,” 快捷键或 ”Xcode|Preferences” 菜单可呼出偏好设置。
(1)主题及字体(Preferences->Fonts & Colors)
选中一种主题(theme),例如“Midnight”,推荐使用Monokai、Ciapre。将 `*.dvtcolortheme` 文件拷贝到 `~/Library/Developer/Xcode/UserData/FontAndColorThemes/`即可安装主题, 重启 Xcode 即可选用。
Xcode默认字体为menlo,也可选择 Consolas、Monaco、Consolas、Droid Sans Mono、Source Code Pro、Bitstream Vera Sans 等其他等宽字体。
shift 选择主题 Source Editor/Console 中的所有项,点击 Fonts 可更改字体(大小)。
(2)编辑器配置(Preferences->Text Editing)
Editing:
Indentation:
- Show Line Numbers:在gutter中显示行号。
- Code folding ribbon:显示焦点列。
Focus code blocks on hover:鼠标悬停时突出显示右侧相应代码块。
- Page guide at column:显示一行最多支持80个字符的提示分割线。
- Prefer indent using:Spaces(为保持一致的视觉呈现和行末注释对齐,建议使用空格)
- Tab width:4 spaces(tab expand,1个tab=4个空格)
- Indent width:4 spaces(自动缩进步长=4个空格)
(3)跳转打开方式(Preferences->Navigation)
- Activation:When a tab or window opens,make it active。当新建窗口或标签时,立即激活聚焦。
- Navigation:Uses Primary/Focused Editor。打开Project Navigator中指定的文件时,在主编辑器窗口/当前聚焦窗口打开,建议选择Focused。
- Optional Navigation:Uses Single Assistant Editor。打开Project Navigator中指定的文件或跳转到符号定义所在文件(command+单击)时,若按下option键,则在辅助窗口打开。
- Double Click Navigation:Uses Separate Tab。双击打开Project Navigator中指定的文件或跳转到符号定义所在文件(command+双击)时,新建标签页。
(4)SCM(Preferences->Source Control)
- Enable Source Control:启用/禁用Xcode自带Source Control Manager(SCM)。
- Comparison View:Show local revision in [Right] Side。打开version editor比较窗口时,左侧显示服务器基线版本(base),[右侧]显示本地修改过的工作拷贝(local working copy)。
(5)SDK/Simulator(Preferences->Downloads)
Downloads:可下载Components(SDK&Simulator)和Documentation。
(6)构建输出目录(Preferences->Locations->Locations)
不建议使用绝对路径,因为写死之后,换环境或换平台,又要重新修改路径,且同名project target的build folder会覆盖,建议使用相对路径( Relative)
- 当选择为Default时,Derived Data的目录为~/Library/Developer/Xcode/DerivedData。
- 当选择为Relative时,Derived Data的目录为当前*.xcodeproj所在的目录。
- 当选择为Custom时,Derived Data的目录需自定义。
3.代码阅读
(1)Help
option+点按:查看选中符号的帮助提示(Quick Help for Selected Item)。option+双击:打开选中符号的帮助文档。
(2)View Navigator
option+command+T:Show/Hide Toolbar
command+0:Show/Hide left tool panel(Navigator Area)
command+1-8:Project/Source Control/Symbol/Find/Issue/Test/Debug/Breakpoint/Report Navigator
option+command+0:Show/Hide right tool panel(Utility Area)
option+command+1/2:show the file/quick help inspector
再按下 ⌥⌘T 隐藏顶部工具栏,再按下 ⌘0 / ⌥⌘0 隐藏左右侧边栏,聚焦中间的编辑区(Standard/Primary Editor),有效利用屏幕编码。
(3)View Editor Organization
control+1:Show Related Items(例如 Superclasses/Subclasses、Callers/Callees、Protocol Implementor/Implemented、Includes/Included By),支持即时搜,比较常用。
control+2/3:Show Previous/Next History,支持即时搜。
control+4: Show Top Level Items。
control+5:Show Group Files(当前文件夹内的所有文件),支持即时搜。control+6:Show Document Items,打开当前文件的函数符号列表(Symbols List),支持即时搜,非常实用。
(4)Eidtor Window/Tab Switch
command+shift+[/]:切换标签页单/双指左右滑动(control+command+←/→):在单标签页打开的多个文件间切换(Go Back/Forward)
(5)Symbol Jump
command+L:跳转到指定行。
shift+command+O:Open Quickly,快速全局查找文件、符号,高频实用!
command+click:点击跳转到光标所在的符号定义(jump to definition)。
control+command+J:跳转到指定符号的定义处或实现处(Go to Declaration/Definition)。有时工程正在Loading、Indexing或Processing files时,“command+点击”无法响应,此时可试试 control+command+J。
control+command+↑/↓:切换头文件/实现文件(switch between a source file (.m,*.mm,*.cc) and the associated header file(.h),Jump to Previous/Next Counterpart)。
在Project Navigator中选中文件右键或通过菜单“File->Show in Finder”:在Finder中定位该文件。
(6)Symbol Navigator
command+2可聚焦左侧导航栏中的符号导航器。
- filter0:底部编辑框输入符号(show symbols with matching name)= filter1 result+filter3 result
- filter1:show only class and protocol symbols (hide other global symbol types),包括project和system层次。
- filter2:show only project-defined symbols,过滤显示当前工程中的符号。filter2的结果是filter1的子集,较常用。
- filter3:show only containers(hide members),过滤显示包含该单词的符号。
注意:^6 只列出当前文件代码中的符号,而 Symbol Navigator 是当前工程(Project Scope)的所有符号列表的Hierarchy,符号种类包括 Classes/Protocols/Functions/Structs/Unions/Enums/Types/Globals。
编辑器中光标所在符号处,Navigate 菜单或右键快捷菜单可[Reveal in Symbol Navigator],在符号导航器中定位当前符号,亦可查看当前符号所属类的层次。
(7)Code Folding
option+command+←/→:折叠当前代码块,包括@interface …@end、@implementation …@endoption+shift+command+←/→:折叠该文件内所有代码块(方法/函数:{ Methods&Functions })
control+shift+command+←/→:折叠当前注释块(/*Comment Blocks*/)
(8)Focus Switch
(shift+)option+command+`:Move Focus to Previous/Next Area.
command+J:焦点切换(Move Focus),可配合鼠标和方向键。带‘+’的“Move focus to a new assistant editor”可以快速在辅助编辑窗口中打开头文件(*.h)/实现文件(*.m,*.mm)。
shift+command+J:在项目导航中定位当前编辑器中打开的文件(Reveal in Project Navigator)。
4.代码编辑
(1)File | New
control+command+N:File | New | Workspace
shift+command+N:File | New | Project
(2)Text Editing
command+X/C/V:剪切/复制/粘贴
command+Z(+shift):撤销(重做)/Undo(Redo)
command+[/]:向前/向后缩进(Shift Left/Right)
option+command+[/]:将当前光标所在行代码上移/下移一行(Move Line Up/Down)
command+/:以双斜杠(//)注释选中的代码,再此按下可取消
Parentheses/Brackets/Braces Matching:双击某个分隔符(如()、[]、{} 等),Xcode会选中匹配代码块。
Editor→Structure→Balance Delimiter:根据当前光标代码所在位置,自动向外扩展选择外层代码块。
(3)Auto Completion
esc(control+.)就当前输入上下文呼出/隐藏智能提示列表(Auto Completion List);
上下方向键(↑/↓)在智能提示列表中选择选项。当然,也可以用control+.;enter 选中列表中备选的消息符号;
tab 在輸入符号不完整时可一截一截匹配;选中消息符号后,tab 可在各个参数占位符之间移动,enter 可选中参数占位符先临时补位填充。
输入Objective-C对象及消息名,然后输入 ],自动补充对象名左侧的[,完成中缀符(infix natation)包围。
(4)Find菜单(control+单击)
当鼠标定位或选中某个符号时,可呼叫 右键快捷菜单:
- Find Selected Text in Workspace:在当前工作空间查找选中文本或光标所在行的OC冒号分割方法名。
- Find Selected Symbol in Workspace(control+shift+command+F):在当前工作空间查找选中文本符号或光标所在行的OC冒号分割方法符号。
- Find Call Hierarchy(control+shift+command+H):查找符号或光标所在行的OC冒号分割方法符号的调用者(Callers)。
说明:^1|Callers 只能看到一级调用者,Find Call Hierarchy 可向上追溯更高层级的调用者。
(5)Find & Replace
command+F:当前文件查找。
shift+command+F(command+3):在Find Navigator中全局查找。可在[Preferences-General]中设置Find Navigator Detail的显示行数(当Navigator Area较窄挤压时)。
- Find:可指定查找内容(Text/References/Definitions/Regular Expression);
- 放大镜:下拉可查看最近查找历史;
- In Project:查找范围(可指定Group);
- Text:匹配规则(可指定Containing,Matching,Starting with,Ending with);
- Case:是否区分大小写(可指定 Matching/Ignoring)。
对于查找出来的结果可以delete删除非预期干扰结果条目,也可以多择或全选Find Results拷贝出来整理分析。
option+command+F:当前文件替换。
option+shift+command+F:在Find Navigator中全局替换。
- Replace:逐个替换;
- All:所有替换;
- Done:替换完成。
(6)Copy Symbol
例如,光标停留在NSMutableArray的insertObject:atIndex的前半截单词insertObject上时:
有三种复制方式:
- command+C:Copy(光标所在位置的单词):insertObject
- control+shift+command+C:Copy Symbol Name(光标所在位置的消息符号名称):-insertObject:atIndex:
- option+control+shift+command+C:Copy Qualified Symbol Name(光标所在位置的消息符号全名,带所属类名):-[NSMutableArray insertObject:atIndex:]
通过后两种快捷方式,可以便捷地复制Objective-C特殊的冒号分隔的消息符号名称。
(7)Open with External Editor——SublimeText
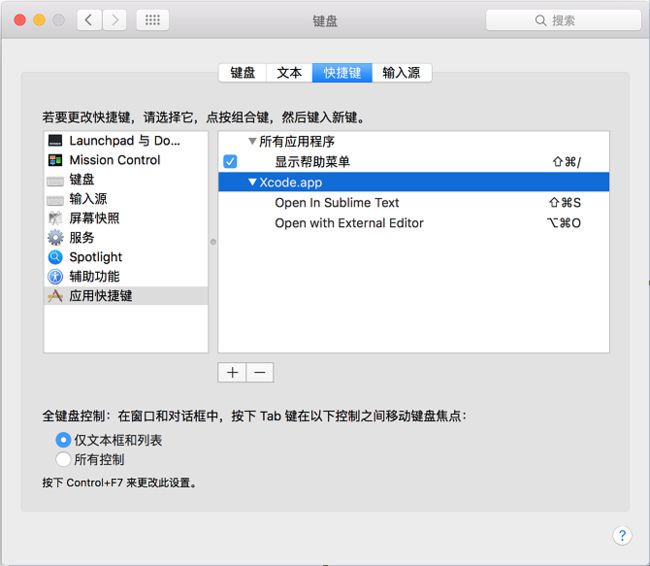
<1>在左侧导航栏(Project Navigator)中选中某个文件右键快捷菜单中有【Open with External Editor】,默认呼叫Mac OS X自带的文本编辑器(TextEdit)打开。我们可以按照以下步骤设置快捷键:
- 【系统偏好设置(System Preferences)->键盘(Keyboard)->快捷键(Shortcuts)->应用快捷键(App Shortcuts)】,
- 点击+号,选择应用程序【Xcode.app】
- 准确填写[菜单标题],即菜单命令名称【Open with External Editor】,聚焦[键盘快捷键]编辑框时,同时按下想要设置的组合键即可,例如option+command+O(⌥⌘O)。
可针对Xcode工程代码文件(*.h/*.hh/*.c/*.cc/*.m/*.mm)设置默认打开程序为Sublime Text.app:右键Get Info(command+I),Open With选择Sublime Text.app并且Change All。然后,Xcode|Open with External Editor将在Sublime Text打开选中文件。
<2>另外,可下载安装OpenInSublimeText插件,支持呼叫SublimeText打开Xcode当前正在编辑的文件。
- 从github下载打开OpenInSublimeText.xcodeproj工程进行编译(command+B),生成的插件OpenInSublimeText.xcplugin将被集成到Xcode插件目录(~/Library/Application\ Support/Developer/Shared/Xcode/Plug-ins)下。
- 重启Xcode将警告提示Unexpected code bundle "OpenInSublimeText.xcplugin",忽略警告选择[Load Bundle]即可。
- Xcode Editor菜单中将新增[Open In Sublime Text]项,可设置其快捷键位为shift+command+S(⇧⌘S)。
5.辅助编辑(Assistant Editor)
(1)打开/关闭辅助编辑窗口
Assistant Editor有点类似VC中的Code Definition Window,可实现分屏查看代码Counterpart,方便交叉参考代码编辑。
- option+command+enter/,:打开Assistant Editor。
- command+enter:关闭 Assistant Editor。
可通过菜单[View|Assistant Editor]设置Assistant Editors的方向,例如On Right。
(2)呼叫辅助编辑窗口(option+)
在Mac OS X日常操作中,我们已经认识到option这把单刀双掷开关的妙用:按住鼠标移动或三指触控移动时,按下option键可实现竖直块选;调节音量/亮度时,按住option+shift 可以四分之一单位微调。
使用Xcode快捷键进行切换或跳转动作时,若同时按下option可以在辅助编辑窗口中打开相应文件或符号(For optional navigation (Option-clicking or Option-choosing a file), opens the file in a new Assistant editor pane.)。若在辅助窗口中操作,则在主窗口(Standard Editor)中打开。
- option+点击Project Navigator中选中的文件:在辅助编辑窗口中打开选中文件。
- option+command+点击Editor中选中的符号:在辅助编辑窗口中打开符号定义(jump to definition in assistant editor)。
- option+command+J:在辅助编辑窗口中打开指定符号的定义处或实现处(Go to Declaration/Definition)。
- option+control+command+↑/↓:在辅助编辑窗口中打开对应的头文件(*.h)/实现文件(*.m,*.mm,*.cc)。
点击查看 shift+command+O、shift+command+F(command+3)选中的文件或符号时,可同时按下option在辅助编辑窗口中打开。在control+1~6中打开选择结果时,均可同时按下option在辅助编辑窗口中打开。
(3)导航窗格(option+shift+)
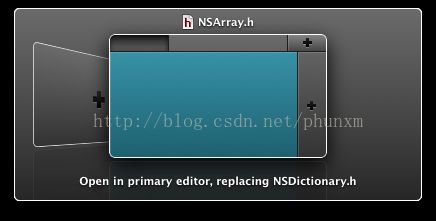
在Xcode以上种种切换跳转操作时,按下option的同时按下shift,通常会呼出一个导航窗格(option+command+<),可选择在new window/tab/assistant-editor打开显示。
For Option-Shift navigation (Option-Shift-click or Option-Shift-choose a file), Xcode displays a graphical navigation chooser showing the current layout. The chooser prompts you to open the file in any open editor pane in any window and tab, or to open the file in a new editor pane, window, or tab.
6.环境变量(Build Setting Macros)
(1)查看环境变量宏
命令行进入HelloWorld工程目录,执行xcodebuild命令并带上“-showBuildSettings”参数:
$ xcodebuild -project HelloWorld.xcodeproj -target HelloWorld -configuration Debug -showBuildSettings > xcodebuild_showBuildSettings.txt
则xcodebuild_showBuildSettings.txt中保存了Build settings for action build and target "HelloWorld”,其中dump了所有的环境变量。
> 关于 xcodebuild 参考《了解 xcodebuild 命令》、《iOS 自动构建命令——xcodebuild》;
(2)Xcode5(Mac OS X 10.9)的部分环境变量
约定1:~=当前账户的HOME目录,例如“/Users/faner”。
约定2:build构建基础路径:BUILD_PATH = ~/Library/Developer/Xcode/DerivedData/Build。可通过“File->Project Settings”查看Derived Data Location。
约定3:环境变量宏(Build Setting Macros)引用格式:${MACRO},同Build Phases Run Script中的语法。
下面是摘选自xcodebuild_showBuildSettings.txt的部分常用环境变量。
(a) ARCH & PLATFORM & SDK
ARCHS = i386
CURRENT_ARCH = i386
PLATFORM_DIR = /Applications/Xcode.app/Contents/Developer/Platforms/MacOSX.platform
PLATFORM_NAME = macosx
SDKROOT = /Applications/Xcode.app/Contents/Developer/Platforms/MacOSX.platform/Developer/SDKs/MacOSX10.9.sdk
SDK_DIR = /Applications/Xcode.app/Contents/Developer/Platforms/MacOSX.platform/Developer/SDKs/MacOSX10.9.sdk
SDK_NAME = macosx10.9
(b) PROJECT & SOURCE
PROJECT = HelloWorld
PROJECT_DIR =~/Projects/Learn Objective-C/HelloWorld
PROJECT_FILE_PATH =${PROJECT_DIR}/HelloWorld.xcodeproj
PROJECT_NAME = HelloWorld
SOURCE_ROOT =${PROJECT_DIR}
SRCROOT =${PROJECT_DIR}
(c) BUILD & CONFIGURATION
BUILD_DIR =BUILD_PATH/Products
BUILD_ROOT =BUILD_PATH/Products
BUILT_PRODUCTS_DIR =BUILD_PATH/Products/Debug
CONFIGURATION = Debug
CONFIGURATION_BUILD_DIR =BUILD_PATH/Products/Debug
CONFIGURATION_TEMP_DIR =BUILD_PATH/Intermediates/HelloWorld.build/Debug
(d) PRODUCT & TARGET
PRODUCT_NAME = HelloWorld
PRODUCT_TYPE = com.apple.product-type.tool// Project Template: Command Line Tool
TARGET_BUILD_DIR =BUILD_PATH/Products/Debug
TARGET_NAME = HelloWorld
(3)设置环境变量
Product -> Edit Scheme(option+command+R)->Arguments->Environment Variables中可以添加自定义环境变量(Name为名称,Value为值)。
在Xcode|Build Phases中Add Run Script Build Phase的Run Script将会使用到环境变量。
7.构建配置
关于 iOS 工具链编译链接原理,可参考《浅谈 Xcode 编译过程》、《iOS 编译过程的原理和应用》和《深入剖析 iOS 编译 Clang / LLVM》。
(1)Target & Scheme
一个Target是指在一个Project中构建的一个产品,它包含了构建该产品的所有文件,以及如何构建该产品的配置。
一个定义好构建过程的Target成为一个Scheme,可在Scheme中定义Target的六种构建过程:Build/Run/Test/Profile/Analyze/Archive。
- Run 为编译运行调试;
- Build 为只编译不运行;
- Analyze 用于进行静态代码分析,可检测潜在的内存泄露(不对称 retain/release 导致的 Potential Leak)或野指针(Use of memory after it is freed)问题。编译时可选择 Build Configuration 为 Debug 沿用证书配置;
- Profile 将调起 Instruments 工具进行动态代码分析,例如 使用 Allocations/Leaks 动态跟踪分析内存泄露。编译时可选择 Build Configuration 为 Debug沿用证书配置;
- Test 用于运行测试,模拟器会启动并执行测试套件;
- Archive 可以Export as Xcode Archive,然后将 .archive 中的 .app 拖入 itunes 可 打包生成 ipa 包。
Product ->Edit Scheme(编辑配置,快捷键为 option+command+R 或 shift+command+,/command+<)->Manage Schemes可对Scheme的六种构建过程进行配置(可配置项包括Info、Arguments、Options)。
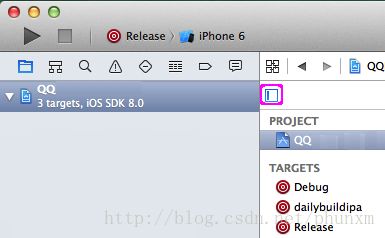
在 Project Navigator 中选中某个 xcodeproj(例如 QQ.xcodeproj),将进入 Project Setting 页面,可点击左侧图标 show/hide project and targets list:
点击 targets 项可分别设置各 target 的 Build Settings;右击可对 target 进行 delete。
(2)Build Settings
Architectures:Supported Platforms(OS X、iOS),Base SDK,(Valid)Architectures(armv7、arm64、i386)。
- Build Active Architecture Only:一般Debug会选择YES,表示只是编译连接调试的目标真机对应的CPU指令集;对于Release Archive版本,需要选择NO,这样编译出来的安装包才能同时支持在armv7、arm64机型上安装。
Build Locations:配置构建目录,包括Intermediate Build Files Path、Build Products Path及其针对Per-Configuration的配置。
Build Options:
Code Signing:包括Entitlements、Identity和Provisioning Profile,详情参考《 iOS Provisioning Profile(Certificate)与Code Signing详解》。
- Compiler for C/C++/Objective-C默认时Apple LLVM 7.0;
- Debug Information Format:真机连接调试时,可断点定位跟踪调试,可选择DWARF以加快编译速度;但是真机断开Xcode运行出现crash时,没有调试符号将无法逆向解析定位出问题的代码符号及其所在具体位置,故一般要选择DWARF with dSYM File。
- 此外还包括Bitcode和Testability两个使能开关。
Deployment:配置发布及安装选项。
Linking:
- Dead Code Stripping:一般对Debug关闭,对Release版本开启以去除无效路径僵尸代码,压缩安装包体积。
- Display Mangled Names(LINKER_DISPLAYS_MANGLED_NAMES):针对C++ symbols,ld --no-demangle链接开关,一般选择NO。
- Mach-O type:Static Library、Dynamic Library、Executable、Bundle、Relocatable Object File(Position-Dependent )。
- Other Linker Flags:例如fobjc-arc(可在Build Rules中针对单个文件配置ARC开关)、-force_load。
- Write Link Map File:写LinkMap文件。
- Path to Link Map File:指定链接LinkMap文件路径。
Packaging:
- Info.plist File:指定plist文件,对应顶部Info标签。
- Product Name:为应用名称,例如QQ。
- Wrapper Extension:为应用扩展,例如app。
Search Paths:
- Info.plist File:指定plist文件,对应顶部Info标签。
- Framework Search Paths: *.framework搜索路径。
- Header Search Paths:*.h/*.hh头文件搜索路径。
- Library Search Paths:静态库、动态库搜索路径。
Apple LLVM 7.0配置:
⭐️Code Generation:⭐️Custom Complier Flags:
- Generate Debug Symbols:YES
- Optimization Level:优化级别,-Os
⭐️Language⭐️Preprocessing:定义Preprocessor Macros,例如DEBUG、NDEBUG=1。
- language-Objective-C:Objective-C Automatic Reference Counting,ARC开关。
⭐️Warning Policies:例如可以提高警告级别当作错误(Treat Warnings as Errors:YES)。(3)Build Phases
Target Dependencies:设置依赖target。
Copy Bundle Resources:拷贝的资源文件。
Compile Sources:该target需要编译的源代码文件。可输入搜索源代码文件名(xxx.mm),查看或编辑其编译选项(Compiler Flags),例如 -fobjc-arc 表示 ARC(__has_feature(objc_arc))。
Link Binary with Libraries:需要链接的库(*.a、*.framework)。
Embed App Extensions:该APP对应的扩展插件。
可以点击加号,New Run Script Phase,配置custom actions after compiling the Xcode project,相当于Visual Studio的Post-builtstep。
当然,也可以在Edit Scheme中设置Pre-actions(custom actions after compiling the Xcode project)、Post-actions(将在编译链接完成后执行脚本)。
以下Shell脚本将生成的二进制(Unix executable)文件HelloWorld拷贝到~/Software,然后cd到该目录下并执行HelloWorld:
(4)Build
shift+command+K:清除products|debug或release下的Unix executable文件。
option+shift+command+K:删除构建目录(Delete/Clean Build Folder),清理Derived Data对应target目录下的Build文件夹(包括intermediate和products)。通常用于重新编译整个工程,尝试解决增量编译时部分符号陈旧导致链接不通过的问题。
Product -> Edit Scheme(option+command+R)->Info->Build Configuration:选择生成版本(Debug or Release)
command + B:构建(Buid)
command+8 可聚焦左侧导航栏中的日志报告导航器,其中可以查看Build日志。
(5)Issue & Errors
command+4可定位Issue Navigator:
当编译错误(error)和警告(warning)过多时,点击底端的感叹号,即可忽略编译警告,只显示编译错误:
(6)Run
command + R:运行(Run),可能会重新编译链接。
option+command + R:如果确定代码没有改动,加option键可免重新编译链接,直接运行上次build成功的product(Run Without Building)。
command + .:停止运行(Stop)。
(7)Devices & Destination
定义好Target构建配置后,接下来需要指定目标机编译。
shift+command+2:可以查看当前连接的Device和支持的Simulator。
control+option+command+[/]:Select Previous/Next Destination,在连接多个真机或模拟器之间切换。
目标机的iPhoneOS.platform必须>=Deployment Target,且Xcode必须支持该机型:/Applications/Xcode.app/Contents/Developer/Platforms/iPhoneOS.platform/DeviceSupport/目录下必须含有对应iOS系统版本的DeveloperDiskImage.dmg,否则真机编译会提示Could not find developer disk image。
最新的 Xcode 8 最低支持 iOS 8.0,如果连接的设备运行 iOS 7 则无法编译,则提示:
可以将 Xcode 7 中的 /Applications/Xcode.app/Contents/Developer/Platforms/iPhoneOS.platform/DeviceSupport 中的 7.0、7.1 的 DeveloperDiskImage(DeveloperDiskImage.dmg & DeveloperDiskImage.dmg.signature)拷贝到 Xcode 8 对应目录,然后在项目配置 General | Deployment Info | Deployment Target 硬性填写 7.0,即可 在 Xcode 8 中调试 iOS 7 真机设备。Could not locate device support files.《This iPhone 5 (Model A1429) is running iOS 7.0.4 (11B554a), which may not be supported by this version of Xcode.》XCode 8.0 解决没有 iPhone 4s 模拟器问题 的方法。
8.运行调试
(1)Console
shift+command+Y:显示控制台(Show/Hide the debug area)
shift+command+C:激活聚焦控制台,光标定位到控制台呈可输入状态
command+K:清除控制台(Debug->Debug Workflow->Clear Console)
可安装BBUDebuggerTuckAway插件,在打字coding时,自动隐藏调试控制台
(2)Breakpoint
command + \:当前行设置/取消断点;通过鼠标点击边列中的蓝色断点来启用/禁用当前行断点。
command + Y:全局激活或禁用所有的断点,激活进入调试模式(此时断点蓝色可见)。
边列(Gutter)中的断点/警告可右键呼出Reveal in Breakpoint/Issue Navigator。
trick:编辑断点(Edit Breakpoint):
Condition:设置断点的触发条件,例如“i==3”(注意不能有空格)表示当i等于3时该断点才会被触发。
Ignore:设置断点需要被忽略多少次才会中断,若设置成5则表示第6次遇到该断点时才触发。
Action:设置断点触发时的动作,可以为Debugger Command、Log Message、Shell Command或Sound。
例如可设置以下Debugger Command:
[1]读取std::string sig的内存buffer值:mem read sig.c_str() -c sig.size();
[2]打印NSData实例sig:po sig
(3)Debug
F6:下一步(Step Over),逐过程单步调试,不进入函数体。
(fn+)F7:进入(Step Into)函数体。可能与多媒体键有冲突,故需要fn辅助(建议将功能键F1-F12设置为标准的功能键)。
(fn+)F8:跳出(Step Out)函数体。可能与多媒体键有冲突,例如呼叫iTunes,故需要fn辅助。
control+command+Y:逐断点继续执行(Pause/Continue)。
control+command+C:执行到当前光标所在行(Continue to current line)。
trick:移动指令指针(Move the instruction pointer):
断点调试运行时,可以将绿色指针箭头(Line 47)移动到其他行(Line 49)或其他断点(Line 51)实现跳转执行。command+8可聚焦左侧导航栏中的日志报告导航器,其中可以查看Debug日志。
(4)Watch
shift+command+M:Debug Workflow->View Memory。
Debug Workflow->Show Disassembly When Debugging,可进行汇编指令级调试。
trick:修改变量内存值(change memory value while debugging):
调试运行时,可以在底部的调试窗口(Debug Area,可通过Shift+Command+Y呼出)右键某个变量,除了可以进行View Memory/View Value As之外,还可以选择Edit Value运行时编辑内存变量的值。
在调试验证某些难以复现的bug或进行边界测试时非常有用,可减少每次修改测量样本值(hardcode)重新编译链接的痛苦。
(5)lldb调试命令
- n/next:step over,等效于F6;
- s/step:step into,等效于(fn+)F7;
- finish:step out,等效于(fn+)F8;
- c/continue:goto next breakpoint,等效于^⌘Y;
- expr/expression:Evaluate a C/ObjC/C++ expression(动态执行C/ObjC/C++表达式);
- p/print/expr/expression:print as a C/C++ basic variable;
// 打印SYSTEM_VERSION(可能要加UIDevice*转换)
(lldb)p [[[UIDevicecurrentDevice] systemVersion] doubleValue]
- po/expr -O/expression -O:Print as an Objective-C object;
// 打印屏幕bounds(可能要加UIScreen*转换)
(lldb)po NSStringFromCGRect([[UIScreen mainScreen] bounds])
// 打印状态栏frame(可能要加UIApplication*转换)
(lldb)po NSStringFromCGRect([UIApplication sharedApplication].statusBarFrame)
// 打印当前keyWindow的根视图(可能要加UIViewController*转换)
(lldb)po [[[UIApplication sharedApplication] keyWindow] rootViewController]
- call:调用。其实上述p/po后接表达式(expression)也有调用的功能,一般只在不需要显式输出,或是无返回值时使用call,用于动态调试插入调用代码。
例如可以在viewDidLoad:里面设置断点,然后在程序中断的时候输入以下命令:
// 调用后,继续运行程序,view的背景色将变成红色
(lldb) call [self.view setBackgroundColor:[UIColor redColor]]
- bt(backtrace),打印当前调用堆栈(crash堆栈),“bt all”可打印所有thread的堆栈(相当于command+6的Debug Session Navigation)。
- image:可用于寻址,有多个组合命令,比较实用的一种用法是寻找栈地址对应的代码(行)位置。
例如某个UITableView总共有2个section,当其引用的currentSection.index≥2时将会引起[UITableView rectForHeaderInSection:]调用异常,可使用expr动态改值制造crash场景模拟调试。
此时crash时的控制台bt显示异常出现在应用层代码“0x00d055b8 - [FACategoryTableView FACategorySectionHeaderDidTouched:] + 744”处(其中0x00d055b8为当前栈(代码段)偏移量,744为栈帧偏移量——PC指针相对函数入口的偏移)。
那么具体是FACategoryTableView.m文件哪一行代码调用引起的异常呢?此时通过“image lookup --address”后接bt的call stack中的代码段偏移地址(0x00d055b8)即可定位出异常调用的代码行位置。
x/memory read:dump指定地址的内存(Read from the memory of the process being debugged),后接起止地址或-c指定count加起始地址。可help mem read查看帮助:
Syntax:
memory read
[ ]
Command Options Usage:
size指定内存块(block/chunk)的大小
--size
):The size in bytes to use when displaying with the selected format.
count指定内存块(block/item)的个数,可配合起始地址使用。
-c
( --count ):The number of total items to display.
format指定内容显示格式,格式符同print:c-char,s-string,d-decimal,x-hex。
-f
( --format ):Specify a format to be used for display.
Command Samples:
(a)起止地址,以下基于起始地址偏移量指定截至地址。
(lldb)mem read 0x10b88f0c 0x10b88f0c+9
0x10b88f0c: 39 38 37 36 35 34 33 32 31 987654321
(b)可在起始地址后使用-c指定需要dump的字节数,以上等效:
(lldb)mem read 0x10b88f0c -c 9
0x10b88f0c: 39 38 37 36 35 34 33 32 31 987654321
(c)起始地址+内存块size+内存块count(dump hex format)
(lldb)memory read -s 1 -f x -c 9 0x10b88f0c
0x10b88f0c: 0x39 0x38 0x37 0x36 0x35 0x34 0x33 0x32
0x10b88f14: 0x31
说明:dump的memory chunk为1byte,以上总共dump了chunk size*chunk count=9byte。
(d)起始地址+内存块size+内存块count(dump char format)
(lldb)memory read -s 1 -f c -c 9 0x10b88f0c
0x10b88f0c: 987654321
(e)起始地址+内存块size+内存块count(dump string format)
(lldb)mem read 0x10b5cf2c -f s -c 1
0x10b88f0c: "987654321"
(f)起始地址+内存块size+内存块count(dump int format)
(lldb)memory read -s 4 -f x -c 3 0x10b88f0c
0x10b88f0c: 0x36373839 0x32333435 0x109f0031
说明:以上指定chunk尺寸为4byte(-s 4),chunk数量为3,共dump了12个byte。
- memory write:改写指定地址的内存(Write to the memory of the process being debugged)。可自行help mem write查看帮助:
Syntax: memory write
[ [...]]
trick:lldb打印无效问题
在使用LLDB调试命令p/po打印C类型(包括复合类型)或Objective-C对象时,可能会遇到属性不存在或类型不匹配的问题。
例1——断点调试,打印当前UIViewController的frame:
- 由于Xcode lldb本身的bug,对属性的点引用有时会无法识别,例如执行(lldb) p self.view.frame报错:property 'frame' not found on object of type 'UIView *'
- 将对属性的点引用改为对属性的getter调用,执行(lldb) p [self.view frame]依旧报错:no known method '-frame'; cast the message send to the method's return type
- 由于Xcode lldb本身的bug,对返回的复合类型也无法直接识别,此时可采用显示类型转换,执行(lldb) p (CGRect)[self.view frame]不会报错!
例2——断点调试,打印当前UIViewController的navigationController堆栈和childViewControllers数组:
点引用报错写法(property not found):(lldb) po self.navigationController.viewControllers
调用getter正确打印:(lldb) po [[self navigationController] viewControllers]
点引用报错写法(property not found):(lldb) po self.childViewControllers
调用getter正确打印:(lldb) po [self childViewControllers]
(6)启用NSZombieEnabled调试EXC_BAD_ACCESS
当你对已释放的对象发送消息(90%的可能是对引用计数为0的对象再release)或release那些autorelease对象时,就会出现报EXC_BAD_ACCESS这样的错误。
默认设置下 Xcode不会给你定位具体是哪一行代码不该去使用已释放的对象,或者release用错了。
Product -> Edit Scheme(option+command+R) -> Diagnostics ,勾选“Objective-C”之后的“Enable Zombie Objects”。
设置NSZombieEnabled环境变量后,一个对象销毁时会被转化为_NSZombie;设置NSZombieEnabled后,当你向一个已经释放的对象发送消息,这个对象就不只是报EXC_BAD_ACCESS Crash,还会放出一个错误消息,然后以一种可预测的可以产生debug断点的方式消失, 因此我们可以找到具体或者大概是哪个对象被错误的释放或引用了。
注意:NSZombieEnabled只能在调试的时候使用,千万不要忘记在产品发布的时候去掉,因为NSZombieEnabled不会真正去释放dealloc对象的内存,一直开启后果自负!
参考
《Xcode Overview-About Xcode》《Xcode Keyboard Shortcuts and Gestures》
《Xcode Key Bindings & Gestures》《提升Xcode效率的小技巧》
《Xcode5.1离线安装》《Xcode插件》
《用Vim编辑器辅助Xcode》《Vim命令图解和xVim使用》《升级Xcode7后XVim插件失效的修复办法》
《Xcode的文件组织》《Xcode设置命令行启动参数》
《Xcode环境变量及路径设置》《Xcode构建输出目录》
《从VC到Xcode》《workspace & subProject & target》
《Xcode创建静态库》《Xcode4制作静态库 1》《Xcode4制作静态库 2》
《Xcode4.3下制作framework》《Xcode添加依赖的静态库工程》
《Building static libraries with the iPhone SDK》《Static Libraries and Cross-Project References》
《iOS开发之统计Xcode代码行数》《Start Developing iOS Apps Today》
《使用Xcode创建Hello World项目》《使用Xcode5和Interface Builder创建Hello World App》
《LLDB Quick Start Guide》《LLDB to GDB Command Map》《Xcode gdb/lldb调试命令》
《Xcode LLDB Debug教程》《LLDB调试命令初探》《iOS应用崩溃日志揭秘》《经营你的iOS应用日志》
《让lldb提升你的效率》《iOS/OSX 调试:跳舞吧!与LLDB共舞华尔兹》《NSLog效率低下的原因及尝试lldb断点打印Log》


