Detect-and-Track论文:3D Mask R-CNN Caffe2源代码解析——4. 网络头解析
在第三部分,我们对3D Mask R-CNN的RPN和FPN进行了详解,在特征图经过RoIAlign过程之后,我们得到了Resize后的特征图。下一步就是将这些维度相同的特征图送入“网络头/Net Head”部分进行最终处理。这篇文章我们就一起探究以下这两个网络头:Cls_Head和Key_Head。
参考内容链接如下:
Detect-and-Track论文:【网页链接】
Detect-and-Track源代码:【网页链接】
Fast R-CNN论文:【网页链接】
目录
一、框架详解
二、Fast R-CNN回顾
三、Net_Head代码详解
1. Fast R-CNN网络头
1) add_roi_frcn_head_func()
2)add_fast_rcnn_outputs()
2. Mask分支
3.关键点支路
1) add_roi_keypoint_head_func()
2) add_heatmap_outputs()
四、一些感想
一、框架详解
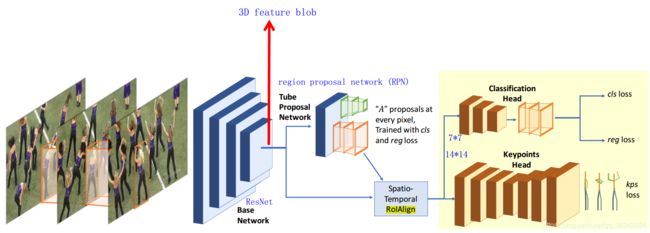
上图中HighLight出来的部分就是网络头。网络头由一对姊妹支流构成:Fast R-CNN Head(又简称Cls_Head)和Key Point_Head,两路支路功能如下:
- Fast R-CNN Head:之所以这样起名是因为这个结构初创于Fast R-CNN,其中cls用于确定目标类别,reg是对RoI进行Bounding Box回归。其中的cls使用softmax损失值,reg使用L1损失值。
- Key Point Head:这个分支用于生成人体关键点。所采用的方法是:先使用8层卷积将RoI变小,之后使用两层DeConv层得到Heatmap。这一层使用的是空间softmax损失值。
二、Fast R-CNN回顾
论文网址已经贴在上边了,具体的内容用一张核心的图就可以表示出来:
好了,这个部分我们主要还是了解一下Fast R-CNN的作者:Ross Girshick。免得以后人家再出了大文章我们不认识。首先来看一下Fast R-CNN的题目:
够霸气吧……一个人独立完成了RCNN向Fast R-CNN的进化。Ross Girshick的个人主页在这里:http://www.rossgirshick.info/ ,2012年芝加哥大学博士毕业,先后在Microsoft Research和FAIR工作,后来又去U.C. Berkeley做博士后。在这里膜拜一下大佬,希望大佬保佑我早日毕业!
三、Net_Head代码详解
model_builder()一直都是Key Point R-CNN构建的核心函数,上节分析到了RPN和FPN,现在继续。我们到了这一段。三个星星将三段程序完美地隔开:第一段程序是添加Fast R-CNN头;第二段程序是生成Mask;第三段程序是生成关键点。我们依次分开来看。
1. Fast R-CNN网络头
# ★  Add the Fast R-CNN branch(生成cls和reg)
		blob_frcn, dim_frcn, spatial_scale_frcn = add_roi_frcn_head_func(model, blob_conv, dim_conv, spatial_scale_conv)
# ResNet3D.add_ResNet18_roi_conv5_head
		add_fast_rcnn_outputs(model, blob_frcn, dim_frcn, is_head_3d=head_3d)
首先由add_roi_frcn_head_func()添加网络头,生成的参数都在最后添加了frcn。之后用add_fast_rcnn_outputs()直接生成了cls和reg结果。我们分开来看:
1) add_roi_frcn_head_func()
实质是ResNet3D.add_ResNet18_roi_conv5_head,定位到此函数:
def add_ResNet18_roi_conv5_head(*args, **kwargs):
	""" Usable with R18/34 models. """
	kwargs['dim_out'] = 512		# 修改输出维度为512
	kwargs['block_counts'] = 2	# 含有2个bottleneck block
	return add_ResNet_roi_conv5_head(*args, **kwargs)
核心程序是add_ResNet_roi_conv5_head()函数,再定位到此函数。可以发现,首先对输入的张量使用RoIFeatureTransform()进行了RoIAlign变换,应该是变换成为7*7的小特征图。之后通过了两个bottleneck blocks,最后通过维度扩展得到了3*4的张量。
def add_ResNet_roi_conv5_head(model, blob_in, dim_in, spatial_scale, block_counts=3, dim_out=2048):
	"""Adds an RoI feature transformation (e.g., RoI pooling) followed by a res5/conv5 head applied to each RoI."""
	# TODO(rbg): This contains Fast R-CNN specific config options making it non-
	# reusable; make this more generic with model-specific wrappers

	# 进行RoI特征变换
	model.RoIFeatureTransform(
		blob_in, 'pool5',
		blob_rois='rois',
		method=cfg.FAST_RCNN.ROI_XFORM_METHOD,	# RoIAlign
		resolution=cfg.FAST_RCNN.ROI_XFORM_RESOLUTION,	# 分辨率:7
		sampling_ratio=cfg.FAST_RCNN.ROI_XFORM_SAMPLING_RATIO,	# 采样率:2
		spatial_scale=spatial_scale)

	dim_bottleneck = cfg.RESNETS.NUM_GROUPS * cfg.RESNETS.WIDTH_PER_GROUP	# 1*64
	stride_init = int(cfg.FAST_RCNN.ROI_XFORM_RESOLUTION / 7)	# 步长

	# 添加2个bottleneck blocks
	s, dim_in = add_stage(4, model, 'res5', 'pool5', block_counts, dim_in, dim_out, dim_bottleneck * 8, 1, stride_init)

	# Reduce mean across all dimensions (h,w,t)
	model.ReduceBackMean(s, 'res5_pool_w')
	model.ReduceBackMean('res5_pool_w', 'res5_pool')

	# Do not pool on time as well, as I use a 3D head on top, so leave it as a
	# 3D blob so I can do 3D conv on it.
	# s = model.ReduceBackMean('res5_pool', 'res5_pool')
	s = model.ExpandDims('res5_pool', 'res5_pool', dims=[3, 4])	# 扩展为3*4的,与3帧图像有关
	return s, dim_out, spatial_scale
2)add_fast_rcnn_outputs()
作用是生成分类结果和回归结果。cls_score由一次卷积直接得出;final_shape由一次卷积和多次Resize得出。如果不是3D模式,则使用全连接层。
def add_fast_rcnn_outputs(model, blob_in, dim, is_head_3d):

	# 将3D张量卷积为2D
	if is_head_3d:
		# As per the changes to ResNet head, the output will be a 3D blob
		# so that I can run 3D convolutions on it. But be careful to output a 2D
		# blob from here
		cls_score = model.ConvNd(	# 进行卷积
			blob_in, 'cls_score_1', dim, model.num_classes,
			[1, 1, 1], pads=2 * [0, 0, 0], strides=[1, 1, 1],
			weight_init=('GaussianFill', {'std': 0.01}),
			bias_init=('ConstantFill', {'value': 0.}))
		# Does not support inplace operations! WOW
		model.ReduceBackMean(model.ReduceBackMean(model.ReduceBackMean(
			cls_score, 'cls_score_2'), 'cls_score_3'), 'cls_score')

	# 如果不是3D模式,就用全连接层
	else:
		# Original code
		model.FC(
			blob_in, 'cls_score', dim, model.num_classes,
			weight_init=('GaussianFill', {'std': 0.01}),
			bias_init=('ConstantFill', {'value': 0.}))

	# 只有测试的时候才用softmax
	if not model.train:  # == if test
		# Only add softmax when testing; during training the softmax is combined
		# with the label cross entropy loss for numerical stability
		model.Softmax('cls_score', 'cls_prob', engine='CUDNN')

	if is_head_3d:
		model.ConvNd(
			blob_in, 'bbox_pred_1', dim,
			4 * model.num_classes, [1, 1, 1],	# 4倍个种类
			pads=2 * [0, 0, 0], strides=[1, 1, 1],
			weight_init=('GaussianFill', {'std': 0.01}),
			bias_init=('ConstantFill', {'value': 0.}))
		# 接下来是一系列的张量操作,不停地调整维度
		# Convert into the format bbox losses expect (Same as RPN)

		# Convert the Bx(4C)xTxHxW -> BxCx4xTxHxW
		model.ExpandDims('bbox_pred_1', 'bbox_pred_2', dims=[2])		# 扩展一个维度
		model.Reshape(['bbox_pred_2'], ['bbox_pred_3', model.net.NextName()],	# 自动填充这个维度
					  shape=(0, -1, 4, 0, 0, 0))

		# Convert the BxCx4xTxHxW -> BxCxTx4xHxW
		model.Transpose('bbox_pred_3', 'bbox_pred_4',	# 重新调整维度次序
						axes=(0, 1, 3, 2, 4, 5))

		# Convert the BxCxTx4xHxW -> Bx(C*T*4)xHxW
		batch_size = model.GetShapeDimIdx(blob_in, 0)
		ht = model.GetShapeDimIdx(blob_in, 3)
		wd = model.GetShapeDimIdx(blob_in, 4)
		final_shape = model.GetNewShape(batch_size, -1, ht, wd)
		model.Reshape(['bbox_pred_4', final_shape],
					  ['bbox_pred_5', model.net.NextName()])

		# Does not support inplace operations! WOW
		model.ReduceBackMean(model.ReduceBackMean('bbox_pred_5', 'bbox_pred_6'), 'bbox_pred')
	else:
		model.FC(
			blob_in, 'bbox_pred', dim, model.num_classes * 4,
			weight_init=('GaussianFill', {'std': 0.001}),
			bias_init=('ConstantFill', {'value': 0.}))
2. Mask分支
这个框架没有使用到Mask,仅仅只是预测关键点。
# ★  Add the mask branch(生成Mask),但是在KeyPoint R-CNN中没有使用到Mask
		if cfg.MODEL.MASK_ON:
			if is_inference:
				bbox_net = copy.deepcopy(model.net.Proto())

			# Add the mask branch
			blob_mrcn, dim_mrcn, _ = add_roi_mask_head_func(model, blob_conv, dim_conv, spatial_scale_conv)
			blob_mask = add_mask_rcnn_outputs(model, blob_mrcn, dim_mrcn)

			if is_inference:
				# Extract the mask prediction net, store it as its own network,
				# then restore the primary net to the bbox-only network
				model.mask_net, blob_mask = get_suffix_net(
					'mask_net', bbox_net.op, model.net, [blob_mask])
				model.net._net = bbox_net
3.关键点支路
此支路用于生成HeatMap关键点。
# ★  Add the keypoint branch(关键点支路)
		if cfg.MODEL.KEYPOINTS_ON:
			if is_inference:	# 测试模式
				bbox_net = copy.deepcopy(model.net.Proto())

			# RoIAlign操作和8层3D卷积
			blob_krcnn, dim_krcnn, _ = add_roi_keypoint_head_func(	# keypoint_rcnn_heads.add_roi_pose_head_v1convX_3d
				model, blob_conv, dim_conv, spatial_scale_conv)

			# 生成热图
			blob_keypoint = add_heatmap_outputs(
				model, blob_krcnn, dim_krcnn, time_dim=out_time_dim, is_head_3d=head_3d)

			if is_inference:
				model.keypoint_net, keypoint_blob_out = get_suffix_net(
					'keypoint_net', bbox_net.op, model.net, [blob_keypoint])
				model.net._net = bbox_net
1) add_roi_keypoint_head_func()
此函数通过add_roi_pose_head_v1convX()函数进行链接,内容是完成8层Conv的添加。
def add_roi_pose_head_v1convX(model, blob_in, dim_in, spatial_scale, nd=False):
	# 先经过RoIAlign,再通过8层3D卷积
    hidden_dim = cfg.KRCNN.CONV_HEAD_DIM		# 512
    kernel_size = cfg.KRCNN.CONV_HEAD_KERNEL
    pad_size = kernel_size // 2

    current = model.RoIFeatureTransform(
        blob_in, '_[pose]_roi_feat',
        blob_rois='keypoint_rois',
        method=cfg.KRCNN.ROI_XFORM_METHOD,	# RoIAlign
        resolution=cfg.KRCNN.ROI_XFORM_RESOLUTION,	# 14
        sampling_ratio=cfg.KRCNN.ROI_XFORM_SAMPLING_RATIO,	# 2
        spatial_scale=spatial_scale)

    for i in range(cfg.KRCNN.NUM_STACKED_CONVS):	# 8
        if nd:	# 执行N维卷积
            current = model.ConvNd(
                current, 'conv_fcn' + str(i + 1), dim_in, hidden_dim,
                [cfg.VIDEO.TIME_KERNEL_DIM.HEAD_KPS, kernel_size, kernel_size],
                pads=2 * [cfg.VIDEO.TIME_KERNEL_DIM.HEAD_KPS // 2, pad_size, pad_size],
                strides=[1, 1, 1],
                weight_init=(cfg.KRCNN.CONV_INIT, {'std': 0.01}),
                bias_init=('ConstantFill', {'value': 0.}))
        else:
            current = model.Conv(
                current, 'conv_fcn' + str(i + 1), dim_in, hidden_dim,
                kernel_size, stride=1, pad=pad_size,
                weight_init=(cfg.KRCNN.CONV_INIT, {'std': 0.01}),
                bias_init=('ConstantFill', {'value': 0.}))
        current = model.Relu(current, current)
        dim_in = hidden_dim

    return current, hidden_dim, spatial_scale
2) add_heatmap_outputs()
按照配置文件添加解卷积层,生成heatmap。这个程序实在是太长了我就不放了。。。
四、一些感想
都说caffe代码比较“乱”,个人感觉的确是有一点,因为找函数要不停地跳。其实现在看代码只到了比较宏观的程度,还没有具体到代码的细节,如每个张量的维度、每个操作的函数。还是有很长的路要走啊。
今天公司里新到了DGX工作站,价格是50万,操作界面都是命令行,看来要彻底抛弃Ubuntu界面了。加油,早日跑起D&T来!


