【Android】入门——六大布局详解
本博文对LinearLayout、RelativeLayout、自定义ViewGroup、FrameLayout、TableLayout、AbsoluteLayout六种布局进行详细的讲解。
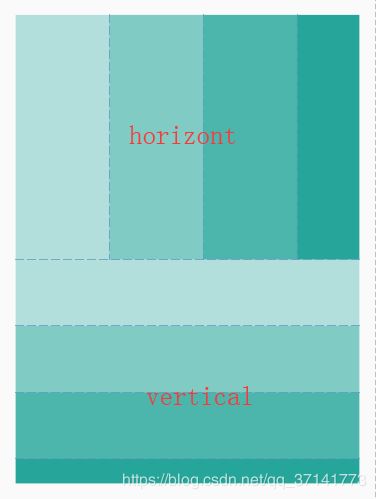
一.LinearLayout布局
二.RelativeLayout布局
参考其他控件进行布局,默认为父控件。
有三种类型的属性:
属性值是true或false
android:layout_centerHrizontal 水平居中
android:layout_centerVertical 垂直居中
android:layout_centerInparent 相对于父元素完全居中。
android:layout_alignParentBottom 位于父元素的下边缘
android:layout_alignParentTop 位于父元素的上边缘
android:layout_alignParentLeft 位于父元素的左边缘
android:layout_alignParentRight 位于父元素的右边缘
属性值是”@id/*“
android:layout_below 在某元素的下方
android:layout_above 在某元素的上方
andorid:layout_toRightOf 在某元素的右方
android:layout_toLeftOf 在某元素的左方
android:layout_alignBottom 和某元素下方对齐
android:layout_alignTop 和某元素上方对齐
android:layout_alignRight 和某元素右方对齐
android:layout_alignLeft 和某元素左方对齐
属性值是数值
android:layout_marginLeft 离某元素左边缘的距离
android:layout_marginRight 离某元素右边缘的距离
android:layout_marginTop 离某元素上边缘的距离
android:layout_marginBottom 离某元素下边缘的距离
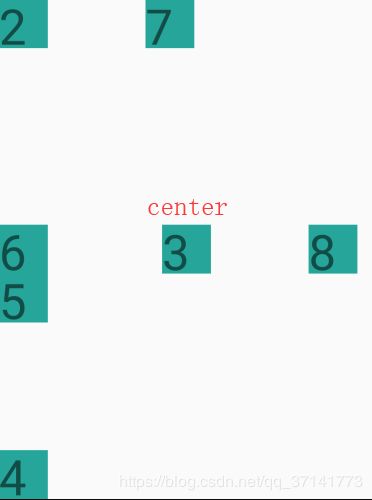
下面为举例:
注意:
如果没有定义左右,那么默认在左边,如果没有定义上下,默认在上边。
相同位置,新定义的元素会覆盖旧的元素。例:2下面其实还有1,但是1被2覆盖了。
4只定义了在父元素的下部,左右没有定义,于是默认就在左边了。
android:layout_below,在某元素的下部并不意味着就一定是紧随某元素,只是在下部的默认位置。例如:5是在3的下部,但是是在下部的默认左边。
6为下边缘对齐3,7为marginLeft=150dp。
8为多个属性共同定义的结果。首先是在3的右部,然后是垂直居中,然后marginLeft=100dp得到最后位置。
三.MyLayout布局(自定义ViewGroup)
自定义布局主要是重写两个方法:
- onMeasure() 这个是写自定义容器的大小。
- onLayout() 这个是写子元素的布局。
我自己写了一个自定义布局,是顺序填充会延对角线进行排列。
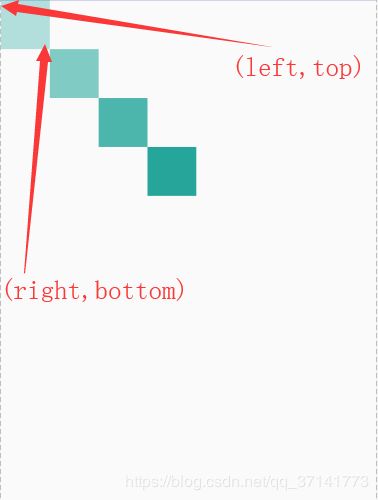 onLayout()方法的作用是设置摆放子元素的位置。其中onLayout()传入的l、t、r、b分别是这样
l,t分别对应子元素左上角的left,top坐标
r,b分别对应子元素右下角的right,bottom坐标
并且可以使用childview.getMeasuredWidth()和childView.getMeasureHeight()得到子元素的宽和高。
这样就可以来对每个子元素进行布局了。
我称这个方法为“定位置”。定完位置后那么子元素就被放到了我们想要的地方。
这样一个自定义ViewGroup就可以使用了。
public class MyLayout extends ViewGroup {


    public MyLayout(Context context) {
        super(context);
    }
    public MyLayout(Context context, AttributeSet attrs) {
        super(context, attrs);
    }
    public MyLayout(Context context, AttributeSet attrs, int defStyleAttr) {
        super(context, attrs, defStyleAttr);
    }


    @Override
    protected void onMeasure(int widthMeasureSpec, int heightMeasureSpec) {
        /**
         * 获得此ViewGroup上级容器为其推荐的宽和高,以及计算模式
         */
        int widthMode = MeasureSpec.getMode(widthMeasureSpec);
        int heightMode = MeasureSpec.getMode(heightMeasureSpec);
        int sizeWidth = MeasureSpec.getSize(widthMeasureSpec);
        int sizeHeight = MeasureSpec.getSize(heightMeasureSpec);

        // 计算出所有的childView的宽和高
        measureChildren(widthMeasureSpec, heightMeasureSpec);
        /**
         * 记录如果是wrap_content是设置的宽和高
         */
        int width = 0;
        int height = 0;

        int cCount = getChildCount();

        int cWidth = 0;
        int cHeight = 0;

        //根据childView计算的出的宽和高,以及设置的margin计算容器的宽和高,主要用于容器是warp_content时
        for (int i = 0; i < cCount; i++) {
            View childView = getChildAt(i);
            cWidth = childView.getMeasuredWidth();
            cHeight = childView.getMeasuredHeight();
            width += cWidth;
            height += cHeight;
        }
        //如果是wrap_content设置为我们计算的值否则:直接设置为父容器计算的值

        setMeasuredDimension((widthMode == MeasureSpec.EXACTLY) ? sizeWidth
                : width, (heightMode == MeasureSpec.EXACTLY) ? sizeHeight
                : height);
    }

    @Override
    protected void onLayout(boolean changed, int l, int t, int r, int b) {
        int cCount = getChildCount();

        //遍历所有childView根据其宽和高,以及margin进行布局
        for (int i = 0; i < cCount; i++) {
            View childView = getChildAt(i);
            r = l + childView.getMeasuredWidth();
            b = t + childView.getMeasuredHeight();
            childView.layout(l, t, r, b);
            l += childView.getMeasuredWidth();
            t += childView.getMeasuredHeight();
        }
    }
}
首先要说一下布局计算模式,即最后的EXACTLY。一共有三种计算模式:
MeasureSpec.EXACTLY:精确尺寸,相当于具体数值和match_parent。
MeasureSpec.AT_MOST:最大尺寸,相当于 warp_content。
MeasureSpec.UNSPECIFIED:未指定尺寸,这种情况不多,一般用于AdapterView。
最后的设定大小时,如果是精确尺寸就是用sizeWidth即获取的尺寸,如果是最大尺寸就是要我们自己计算的那个尺寸了。
onMeasure()最主要的功能就是计算wrap_content的尺寸和设置尺寸。
这个方法称为“建画布”,先建了画布才能在上面绘图,XML文件如下:
四.FrameLayout布局
帧布局,这个布局的特点是从左上角开始,后面的会覆盖前面的控件。

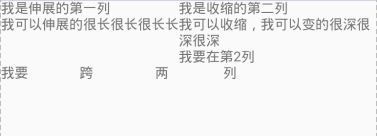
五.TableLayout布局
表格布局。
它遵循着以下结构:
还有几个重要属性:
写在TableLayout中的属性
android:stretchColumns 设置第几列为伸展(0表示第一列)
android:shrinkColumns 设置第几列为收缩
android:collapseColumns 设置第几列为隐藏
写在TableRow里的控件里的属性
android:layout_column 设置控件在第几列
android:layout_span 设置控件能跨多少列
六.AbsoluteLayout布局
绝对布局,极力不推荐,官方已经舍弃。在此不做深究。