今天抽空整理了一下NavMesh寻路,对比了A算法机制(下一篇作为专题写),创建了实例Demo,希望尽快集成到项目中分发回调。由于版本支持和2/3D的差异化,先就原始用法作简单描述,再深入5.6版本展开分析。由于时间紧迫,不免疏漏,望读者包容体谅。在此感谢Dracoooo及官文支持。
A算法:
A*搜寻算法俗称A星算法。这是一种在图形平面上,有多个节点的路径,求出最低通过成本的算法。常用于游戏中的NPC的移动计算,或线上游戏的BOT的移动计算上。实际应用不做多说,资料蛮多的自己查阅。http://www.cnblogs.com/yangyxd/articles/5447889.html
http://blog.csdn.net/huang9012/article/details/26391211
NavMesh寻路:
Unity3D 导航网格自动寻路(Navigation Mesh)
NavMesh(导航网格)是3D游戏世界中用于实现动态物体自动寻路的一种技术,将游戏中复杂的结构组织关系简化为带有一定信息的网格,在这些网格的基础上通过一系列的计算来实现自动寻路。。导航时,只需要给导航物体挂载导航组建,导航物体便会自行根据目标点来寻找最直接的路线,并沿着该线路到达目标点。
下面通过一个简单的Sample来介绍NavMesh的应用:
1.在Scene中新建三个Cube,如下图摆放。

2.选中上图三个Cube,并在Inspector面板中选中为静态(static)下拉选项的Navigation Static,如下图。

3.依次选择菜单栏中的Windows - Navigation ,打开后面板如下

单击该面板右下角的Bake按钮,即可生成导航网格,下图为已生成的导航网格。

4.下面就可以让一个运动体根据一个导航网格运动到目标位置。
首先新建一个Cube为目标位置,起名TargetCube。然后创建一个capsule(胶囊)运动体,为该胶囊挂在一个Nav Mesh Agent(Component - Navigation - Nav Mesh Agent);最后写一个脚本就可以实现自动寻路了。脚本如下:
using UnityEngine;
using System.Collections;
public class Run : MonoBehaviour {

   public GameObject target;
    // Use this for initialization
    void Start () {

    }

    // Update is called once per frame
    void Update () {
        //鼠标左键点击
       if(Input.GetMouseButtonDown(0))
        {
            Ray ray = Camera.main.ScreenPointToRay(Input.mousePosition);
            RaycastHit hit;
            if (Physics.Raycast(ray, out hit))
            {
                // target.transform.position = hit.point;
                GetComponent().destination = hit.point;
            }
       }

    }
}
脚本新建完成后挂载到胶囊体上,然后将TargetCube赋予给胶囊体的Run脚本,运行场景,如下图,胶囊体会按照箭头的方向运动到Cube位置。

这样一个简单的自动寻路就完成了,如果要更精细的寻路,或要实现上坡,钻"桥洞"等,可根据下面介绍的相关参数进行调节。
下面介绍 Navigation 组件和 Nav Mesh Agent 组件的相关参数。
Navigation
Object:物体参数面板
Navigation Static:勾选后表示该对象参与导航网格的烘培。
OffMeshLink Generation:勾选后可跳跃(Jump)导航网格和下落(Drop)。
Bake:烘培参数面板
Radius:具有代表性的物体半径,半径越小生成的网格面积越大。
Height:具有代表性的物体的高度。
Max Slope:斜坡的坡度。
Ste Height:台阶高度。
Drop Height:允许最大的下落距离。
Jump Distance:允许最大的跳跃距离。
Min Region Area:网格面积小于该值则不生成导航网格。
Width Inaccuracy:允许最大宽度的误差。
Height Inaccuracy:允许最大高度的误差。
Height Mesh:勾选后会保存高度信息,同时会消耗一些性能和存储空间。
Nav Mesh Agent:导航组建参数面板
Radius:物体的半径
Speed:物体的行进最大速度
Acceleration:物体的行进加速度
Augular Speed:行进过程中转向时的角速度。
Stopping Distance:离目标距离还有多远时停止。
Auto Traverse Off Mesh Link:是否采用默认方式度过链接路径。
Auto Repath:在行进某些原因中断后是否重新开始寻路。
Height:物体的高度。
Base Offset:碰撞模型和实体模型之间的垂直偏移量。
Obstacle Avoidance Type:障碍躲避的的表现登记,None选项为不躲避障碍,另外等级越高,躲避效果越好,同时消耗的性能越多。
Avoidance Priority:躲避优先级。
NavMesh Walkable:该物体可以行进的网格层掩码。
Unity 提供了相关的接口:NavMesh.CalculateTriangulation
利用这个接口能够获取到NavMesh 的数据,顶点以及顶点索引。
熟悉GL或DX的童鞋知道有了顶点以及顶点索引就可以画出模型来。
下面是我写的一个简单的示例,用来把NavMesh 数据导出到一个 obj 文件,obj 是一种文本形式存储的模型文件格式。导出之后直接拖到Unity 中可以看到NavMesh 的形状。
/************************************************
 * 文件名:ExportNavMesh.cs
 * 描述:导出NavMesh数据给服务器使用
 * 创建人:吕磊
 * 创建日期:20170808
 * ************************************************/

using UnityEngine;
using System.Collections;
using UnityEditor;
using System.IO;
using UnityEngine.SceneManagement;

public class ExportNavMesh:MonoBehaviour
{
    [MenuItem("NavMesh/Export")]
    static void Export()
    {
        Debug.Log("ExportNavMesh");

       UnityEngine.AI.NavMeshTriangulation tmpNavMeshTriangulation = UnityEngine.AI.NavMesh.CalculateTriangulation();

        //新建文件
        string tmpPath = Application.dataPath + "/" + SceneManager.GetActiveScene().name + ".obj";
        StreamWriter tmpStreamWriter = new StreamWriter(tmpPath);

        //顶点
        for (int i=0;i
Unity5.6新功能High-level NavMesh之组件介绍
unity5.6作为Unity5最后的一个版本,的确起到了一个承上启下的作用。除了上一篇文章《进击的AssetBundles和它的工具们》中提到的AssetBundles-Browser,本文还会介绍另一个在Github开源的,用于Unity5.6+的新寻路功能。
曾经的痛点

但是曾经的navmesh系统却也存在着一些性能上的和使用场景上的缺陷。一个常见的问题,由于要预先烘焙场景的navmesh,因此我们很难方便的在运行时动态的修改navmesh。更不用说,有一些游戏的场景并非提前制作好的,需要在运行时动态的生成,这种情况下就无法使用navmesh了。另一个问题是,如果场景过大的话,烘焙之后的navmesh也会保存很多数据,在运行时会造成一些内存上的开销。当然,抛开这些不谈,另外一个让我吐槽navmesh的一点就是,它竟然不支持垂直面的导航。

组件化的navmesh
不过还好,虽然新的navmesh系统并没有随着unity的正式版本一同发布。但是,我们还是可以通过github来获取这些新的功能:
NavMeshComponents
需要注意的是,Unity的版本要求在5.6以上。
我们可以看到,其实这里只有4个高层的C#脚本文件:

利用这4个脚本文件,就能基本解决我们之前的烦恼了。
其中NavMeshSurface这个脚本将navmesh组件化,利用这个组件就可以很方便的烘焙挂载该组件的对象的navmesh信息,而无需打开一个navigation窗口对整个场景进行烘焙了。我们甚至可以将挂载这个脚本的GameObject烘焙后保存为一个prefab,这个带有navmesh信息的prefab跟其他的prefab一样。
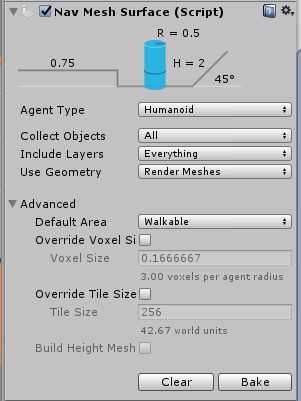
为对象添加NavMeshSurface组件很简单。在这里我们可以看到和之前navigation窗口类似一些设置,但是请注意,这里已经不是整个场景烘焙了。navmesh已经组件化了,它只会烘焙挂载它的对象。
只要点击一下这个组件下的Bake按钮,挂载它的对象就被烘焙好了。那么GameObject能否挂载多个NavMeshSurface组件呢?这一种需求也的确存在,例如怪物和玩家的寻路策略不同,有些地方玩家能通过而怪物却不能通过。这的确也是可以的,同一个GameObject能够同时挂载多个NavMeshSurface组件,并且烘焙不同的navmesh供不同的角色使用。
这样,我们针对不同的角色的NavMeshAgent组件设置不同的agent type并和烘焙好的两个navmesh匹配好就可以了。
好了,借助NavMeshSurface组件我们实现了navmesh的组件化。那么是不是我们就能很方便的实现在垂直面上烘焙navmesh了呢?各位想想我们是否能很轻松的让一个游戏对象的角度改变呢?答案是是的。那么这个游戏对象上如果有navmesh信息的话,我们只需要把这个游戏对象从水平变为垂直是否就行了呢?是的。因此实现游戏角色的在垂直面上飞檐走壁的功能就变得十分简单了。
当然了,在水平面的navmesh和垂直面的navmesh之间我们还会用到NavMeshLink这个组件来链接二者。各位自己在实践的时候需要留意一下这一点。
在运行时烘焙navmesh
接下来就让我们看看新的navmesh系统带给我们的新的惊喜——在运行时烘焙navmesh。这是一个很现实的需求,例如一些动态生成场景的游戏,我们无法在一开始就确定这个场景到底是什么样子的,所以也无法使用之前的navmesh系统,因为以前的navmesh只能在editor内烘焙。但是现在我们使用新的navmesh系统就能够很方便的在运行时烘焙navmesh了。
如图,这是一个空场景,在游戏运行之后场景才生成出来场景内的各种道路,此时单击鼠标,navmesh就生成了。其实在新的navmesh系统内,实现这个机制十分简单。只需要调用游戏对象上挂的NavMeshSurface组件的BuildNavMesh()方法。
void Start(){ surface = GetComponent
场景太大不用愁
官方文档 High-level NavMesh组件
背景:之前一段时间用Unity5.5在开发一款需要强寻路AI的游戏,NavMesh是最方便的一种导航方式,但是旧版本Unity并没有完全提供一个开放自由的API。但由于动态障碍物众多,再加上巨大的场景,使用NavMeshObstacle挖洞的方式并不是很理想,故一直在寻求一个更完美的解决方案,直到看到了Unity5.6版本NavMesh的新功能,便开启了High-level NavMesh的学习之旅。
-
旧的NavMesh存在的缺陷
我们都知道,要传统的要烘培NavMesh时的做法,就是将一个地板设置为Navigation Static属性,然后bake就出来了。但这样做的缺陷在于烘培的NavMesh是静态的,不能随地形变化而变化,如下图所示:
 这里写图片描述
此时,由于NavMesh的静止,导致AI寻路逻辑的玩法就缺少了很多可能性
同时,旧的NavMesh是在游戏开发时就把NavMesh烘培出来,便不能满足游戏进行中游戏地图的随机生成,亦或者是游戏过程中游戏地图会出现多种变化情况的需求
2.High-Level NavMesh实时动态烘培
LocalNavMeshBuilder组件:该组件是High-level NavMesh组件包的一个脚本组件,用来构建并实时更新绑定有NavMeshSourceTag组件的物体局部的NavMesh,面板属性介绍如下:

Size: 局部烘培NavMesh的范围大小
NavMeshSourceTag组件:该组件用来标识那些物体被用于 LocalNavMeshBuilder组件的NevMesh烘培中,支持 mesh-filter 和 terrain,能被拓展到 physics 或 primitives
新建一个空物体,添加LocalNavMeshBuilder组件,会出现一个线框方块。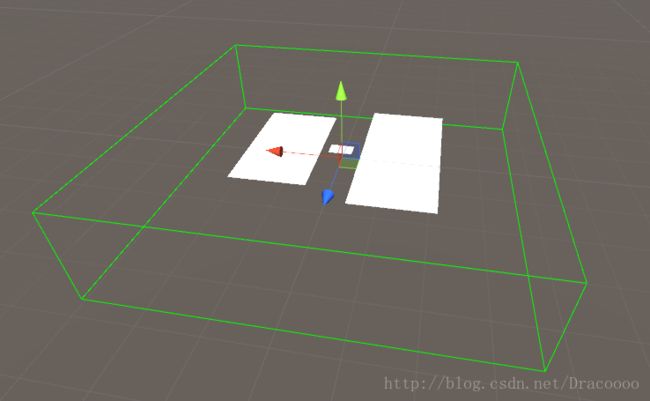
此时,将需要参与实时烘培的地面添加NavMeshSourceTag组件即可,线框方块所包围之内的所有绑有NavMeshSourceTag组件的游戏物体都将是烘培的对象,不需要Navigation Static属性,效果如下:

- 如何使用NavMesh新组件
NavMesh的新组件一共有4个:
NavMeshSurface
NavMeshModifier
NavMeshModifierVolume
NavMeshLink
这4个新组件并不是在Unity5.6版本里面默认就有的,需要自己导入到工程中,下载->导入
接下来对4个组件逐个介绍
2.NavMesh Surface组件

High-level NavMesh 最核心的组件
NavMeshSuface组件代表agent可以走的区域,定义世界中哪部分应该被bake成NavMesh 一个场景中可以有多个NavMesh Surface组件
NavMeshSurface组件可以被加在任何游戏物体上,可以用来定义那些物体可以用来生成NavMesh( 有了该组件后可以不需要设置物体Navigition static的静态属性,以前的静态属性只适用于editor模式,不适用于实时bake的特性)
参数介绍: Agent Type: 用来匹配NavMeshAgent
Collect Object: 定义哪些物体用来bake生成NavMesh All: 使用全部激活状态的物体(无论是否是父子物体)

Volume: 被体积盒包围的物体,或者是包围在内的物体的部分

Children: 有NavMeshSurface组件的物体及其子物体

Include Layers: 定义哪些层的物体要被bake
Use Geometry: 选择使用网格或者碰撞体来bake Render Meshes - 使用Mesh Renderer 和 Terrains
Physics Colliders - 使用Colliders和Terrains(推荐)
Advanced:高级设置(一般默认就可以) Default Area: 默认生成区域类型
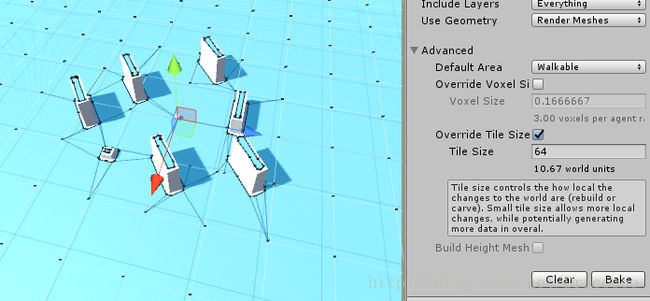
Override Voxel Size: 覆盖默认的Voxel Size,体素尺寸,用来调整精度,场景比较精密的可以把该值调小,值越小精度越高,精度越高,bake越慢,该值与Tile Size共同影响bake的效果
Override Tile Size: 覆盖默认的Tile Size,块大小,默认是256voxel作为一块,为了让bake有较多平行与增加内存效率才有了此设置,在障碍物多的时候,可以将块减小以提升运行效率。或者打算实时bake的时候,可以用更小的Tile Size来降低内存消耗

Build Height Mesh: 不再被支持
其它说明: NavMesh Surface组件用来设置一片大范围内要被bake的物体的信息,而用NavMeshModifer组件可以对这些物体逐个进行微调
如果物体身上有NavMesh Agent或者NavMesh Obstacle组件则不会被bake进去,会在bake的时候剔除他们,因为他们是来用NavMesh的,不是来建造这个NavMesh的
3.NavMesh Modifier组件

(上图用NavMeshModifier定义某一小块区域为Lava(岩浆)类型的区域)
NavMesh Modifier组件允许对一些要用来被NavMeshSurface组件bake的物体进行微调
NavMesh Modifier组件的作用效果包括其下的所有子物体
NavMesh Modifier组件可用于实时bake,且不需要static标志
参数说明:
Ignore From Build: 是否无视bake
Override Area Type:生成区域类型
Affected Agents: 针对某个agents的微调,比如可以选择排除该agents的某些特定的障碍
4.NavMesh Modifier Volume 组件

(上图用NavMesh Modifier Volume将门的一片区域设置为不可走)
NavMesh Modifier Volume与NavMesh Modifier差不多
前者作用于对体积盒包围的所有物体(或物体的部分),后者只作用于自身及其子物体
参数说明: Size和Center:调整体积盒的大小位置,其它和NavMesh Modifier一样
5.NavMesh Link 组件
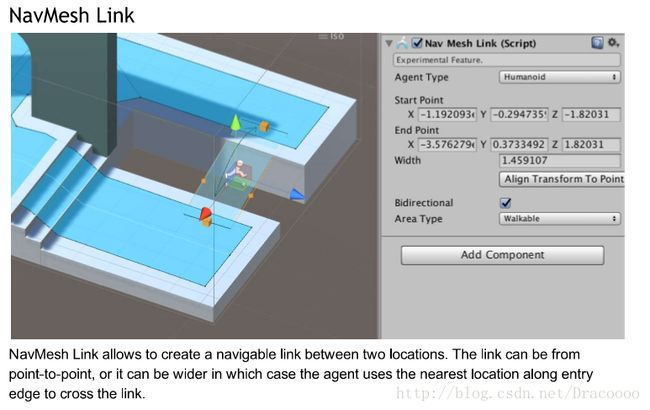
NavMesh Link组件允许在两个区域间创建一条可通行的通道
NavMesh Link组件对于连接两个不同的NavMesh Surfaces是必须的
参数说明:
Agent Type: 哪种Agent才可以使用这个NavMesh Link
Start Point:开始点
End Point:结束点
Align Transform To Points: 将绑定该NavMesh Link组件的物体的Tranfrom属性与Link匹配,位置移动到link的中心,方向也对着link的方向
Cost Modifier: 测试不出有什么用,默认即可,原文→(when the cost modifier value is non-negative the cost of moving over the NavMeshLink is equivalent to the cost modifier value times the Euclidean distance between NavMeshLink and points.)
Bidirectional: 勾上时线的方向为双向,没勾时只能start-to-end单向
Area Type: 区域类型
-
将多个NavMesh Surfaces连接注意事项
 多个NavMesh Surfaces连接
可以使用多个 NavMesh Link连接多个NavMesh surfaces
Link和Sufaces都必须有相同的agent类型
Link的开始点和结束点都必须各种在一个surfaces内,两个surfaces叠在一起会不清楚开始点或结束点连接放在哪个surface上
如果场景中已经有了Link,然后再添加NavMesh Surface的时候检测会不会连接到不想连接的Surface
官网叙述:
High‐level NavMesh Building Components
Here we introduce four high level components for the navigation system:
● NavMeshSurface – for building and enabling a navmesh surface for one agent type.
● NavMeshModifier – affects the navmesh generation of navmesh area types, based on
the transform hierarchy.
● NavMeshModifierVolume – affects the navmesh generation of navmesh area types,
based on volume.
● NavMeshLink – connects same or different navmesh surfaces for one agent type.
These components comprise the high level controls for building and using NavMeshes at runtime as well as edit time.
NavMeshSurface
The NavMeshSurface component represents the walkable area for a specific agent type. The NavMesh Surface component defines a part of the world where a NavMesh should be built. A scene can contain multiple NavMesh Surfaces.
The preferred way to use the NavMeshSurface component is to create an empty Game Object containing the NavMeshSurface component. There’s a menu option for that: GameObject > AI > NavMesh Surface. This creates an empty Game Object with a NavMeshSurface component attached to it.
The NavMeshSurface component can be also added to any game object. This is useful for cases where you want to use the Hierarchy to define which objects contribute to the NavMesh.
Parameters
● Agent Type – the agent type which will use this NavMesh Surface. The agent type is used
for bake settings, as well as to match a NavMeshAgent to proper surface during
pathfinding.
● Collect Objects – defines on a high level which objects should be used for baking.
○ All – use all active objects.
○ Volume – use all active objects overlapping the bounding volume (defined later)
○ Children – use all active objects which are children to the NavMeshSurface
component, in addition to the object the component is placed on.
● Include Layers – defines the layers on which the objects must be to be included in the
bake. This allows further culling of objects from inclusion in the bake e.g. effects or
animated characters.
● Use Geometry – selects which geometry is used for baking.
○ Render Meshes – use geometry from rendered meshes and terrains
○ Physics Colliders – use geometry from colliders and terrains. When using physics
this is usually a better option than Render Meshes. This way the agents will be closer to the physical bounds of the environment.
The main settings for the NavMesh Surface component allow you to filter the input geometry on a broad scale. To fine tune how input geometry is treated on a perobject level when building a navmesh, see NavMeshModifer component.
Game Objects which have a NavMesh Agent or NavMesh Obstacle will be excluded from the baking process automatically. They are dynamic users of the navmesh – and hence should not contribute to the navmesh building.
Advanced Settings
The main settings will cater for most use cases, but for anything not covered by the main settings, the advanced section has the following additional parameters
● Default Area – defines the area type generated when building the navmesh. The default value is Walkable. The NavMeshModifer component can be used to modify the area type in more detail.
● Override Voxel Size – The override voxel size controls how accurately the input geometry is processed for NavMesh baking. It is a tradeoff between speed and accuracy. A good value to start with is 3 voxels per agent radius (6 per diameter). This allows to capture most of the narrow passages, like doors and still have quick baking. If you have big open areas, you might go down to 1 or 2 to speed things up. Or if you have tight indoor spots, you can use smaller voxels, and use maybe 46 voxels per radius. More than 8 is usually not really worth it.
● Override Tile Size – In order to make the bake process parallel and memory efficient, the world is divided into tiles for baking. The white lines you can see on your NavMesh are tile boundaries. The default tiles size is 256 voxels. It is a good tradeoff between memory usage and NavMesh fragmentation. The smaller the tiles are the more fragmented the NavMesh is, and this can sometimes cause nonoptimal paths. NavMesh carving also operates on tiles. If you have a lot of obstacles, you can potentially speed up carving by making the tile size smaller, say 64128. Also, if you plan to bake the NavMesh at runtime, you may choose to use smaller tile size to keep the maximum memory usage low.
● Build Height Mesh – Not supported yet.
Advanced Debug Visualization [Not yet available]
The debug visualization is not generally needed, but when things go south, this can be a valuable tool to let us help you to find the culprit.
The different options show each step of the NavMesh building process from input scene voxelization to region splitting, contour generation and finally the NavMesh polygons. Since the process can generate a lot of data, some of which overlapping, the Focus Points helps you to narrow down the visualization for just one tile.
NavMesh Modifier
NavMesh Modifier allows to fine tune how a specific object behaves during NavMesh baking. In the above picture, the lower platform has modifier attached to it, which sets the object to have Lava area type.
The NavMesh Modifier affects hierarchically, that is, the Game Object where the Components is attached and all of its’ children are affected. If another NavMesh Modifier is found further down the transform hierarchy it will override the modification for its children.
The NavMesh Modifier affects the NavMesh generation process, this means the NavMesh has to be updated to reflect changes to NavMesh Modifiers.
Note: This component is a replacement for the old setting which could be enabled from the Navigation window Objects tab as well as the static flags dropdown on the GameObject. This component is available for baking at runtime, whereas the static flags are available in the editor only.
Parameters
● Ignore From Build – when checked, the object and all if its’ children are skipped from the
build process.
● Override Area Type – when checked the area type will be overridden for the game object
containing the Modifier and all of it’s children.
○ Area Type – new area type to apply
● Affected Agents – a selection of agents the Modifier affects. For example, you may choose to exclude certain obstacles from specific agent.
NavMesh Modifier Volume
NavMesh Modifier Volume allows you to mark the area that falls inside the volume with specific area type. Where NavMesh Modifier marks certain objects with an area type, the Modifier Volume allows change the area type even more locally based on a volume.
The modifier is useful for annotating certain areas over walkable surfaces which might not be represented as separate geometry, e.g. danger areas. It can be even be used to make certain areas nonwalkable.
The NavMesh Modifier Volume affects the NavMesh generation process, this means the NavMesh has to be updated to reflect changes to NavMesh Modifier Volumes.
Parameters
● Size – dimensions of the modifier volume.
● Center – center of the modifier volume relative to the GameObject center.
● Area Type – describes the area type which the volume applies.
● Affected Agents – a selection of agents the Modifier affects. For example, you may
choose to create danger zone for specific agent type only.
NavMesh Link
NavMesh Link allows to create a navigable link between two locations. The link can be from pointtopoint, or it can be wider in which case the agent uses the nearest location along entry edge to cross the link.
The link is necessary to connect different NavMesh Surfaces
● Agent Type – the agent type which can use the link.
● Start Point – start point of the link, relative to the Game Object.
● End Point – end point of the link, relative to the Game Object.
● Align Transform To Points – clicking this button will move the Game Object at the links
center point and alight the transform’s forward axis towards the end point.
● Cost Modifier – When the cost modifier value is nonnegative the cost of moving over the
NavMeshLink is equivalent to the cost modifier value times the Euclidean distance
between NavMeshLink end points.
● Bidirectional – when checked the link can be traversed from starttoend and
endtostart, when unchecked only from starttoend.
● Area Type – the area type of the link (affects path finding cost)
Techniques
Connecting Multiple NavMesh Surfaces Together
If it is desired to allow an agent to move along multiple NavMesh Surfaces in a Scene, the surfaces need to be connected together using NavMesh Links.
In the example scene above, the blue and red NavMeshes are defined in different NavMesh Surfaces. A wide NavMesh Link is added, it spans from one surface to another.
Things to keep in mind when connecting surfaces:
● You can connect surfaces using multiple links.
● Both the surfaces and the link must have same agent type.
● The link’s start and end point must be only on one surface. It is OK to have multiple
NavMeshes at the same location, but then selecting a NavMesh becomes ambiguous.
● If you are loading a second NavMesh Surface additively and you have “dangling” links in
the first scene, check that they do not connect to unwanted surfaces.
API Reference NavMesh Surface
Properties
● agentTypeID – ID describing the agent type the NavMesh should be built for.
● collectObjects – defines how input geometry is collected from the scene, one of UnityEngine.AI.CollectObjects:
○ All – use all objects in the scene.
○ Volume – use all objects in the scene which touch the bounding volume (see size
and center)
○ Children – use all objects which are children to the Game Object where the
NavMesh Surface is attached to.
● size – dimensions of the build volume. The size is not affected by scaling.
● center – center of the build volume relative to the Transform center.
● layerMask – bitmask defining the layers on which the objects must be to be included in the
baking.
● useGeometry – defined which geometry is used for baking, one of
UnityEngine.AI.NavMeshCollectGeometry:
○ RenderMeshes – use geometry from render meshes and terrains
○ PhysicsColliders – use geometry from colliders and terrains.
● defaultArea – default area type for all input geometries, unless otherwise specified
● ignoreNavMeshAgent – true if Game Objects with a NavMeshAgent components should
be ingnored as input
● ignoreNavMeshObstacle – true if Game Objects with a NavMeshAgent components
should be ingnored as input
● overrideTileSize – true if tile size is set
● tileSize – tile size in voxels (the component desc has explanation how to choose tile size)
● overrideVoxelSize – true if the voxel size is set
● voxelSize – size of the voxel in world units (the component desc has explanation how to
choose tile size)
● buildHeightMesh – Not implemented.
● navMeshData – reference to the NavMeshData the surface uses, or null if not set.
● activeSurfaces – list of all active NavMeshSurfaces
Note: The above values affect how the bake results, thus, you must call BuildNavMesh() to make them count.
Public Functions
void BuildNavMesh ()
Builds a new NavMeshData based on the parameters set on NavMesh Surface. The data can be accessed via navMeshData.
NavMesh Modifier
Properties
● overrideArea – true if the modifier overrides area type
● area – new area type to apply
● ignoreFromBuild – true if the GameObject which contains the modifier and its’ children
should be not be used to NavMesh baking.
● activeModifiers – list of all active NavMeshModifiers
Public Functions
bool AffectsAgentType(int agentTypeID)
Returns true if the modifier applies to the specified agent type, otherwise false.
NavMesh Modifier Volume
Properties
● size – size of the bounding volume in local space units. Transform affects the size.
● center – center of the bounding volume in local space units. Transform affects the center.
● area – area type to apply for the NavMesh areas that are inside the bounding volume.
Public Functions
bool AffectsAgentType(int agentTypeID)
Returns true of the the modifier applies for the specified agent type.
NavMesh Link
Properties
● agentTypeID – the type of agent that can use the link.
● startPoint – start point of the link in local space units. Transform affects the location.
● endPoint – end point of the link in local space units. Transform affects the location.
● width – width of the link in world length units.
● costModifier – when the cost modifier value is nonnegative the cost of moving over the
NavMeshLink is equivalent to the cost modifier value times the Euclidean distance
between NavMeshLink end points.
● bidirectional – if true the link can be traversed both ways, if false the link can be traversed
only from start to end.
● autoUpdate – if true the link updates the endpoints to follow the transform of the
GameObject every frame.
● area – area type of the link (used for pathfinding cost).
Public Functions
void UpdateLink()
Updates the link to match the associated transform. This is useful for updating a link explicitly after e.g. changing the transform position. It is not necessary if the autoUpdate property is enabled. However calling UpdateLink can have a much smaller performance impact if you rarely change the link transform.

优秀参考:
http://critterai.org/projects/cainav/doc/html/6fb3041b-e9be-4f03-868b-dcac944df19b.htm
http://blog.csdn.net/huutu/article/details/52672505
http://blog.csdn.net/liujunjie612/article/details/70240338
http://blog.csdn.net/tel18820517199/article/details/76862664
http://blog.csdn.net/qq_35957011/article/details/76038984
关于 Unity NavMesh 数据的导出和使用