View绘制流程(二)
最近在学习View的绘制流程,看了几篇不错的博客(ViewRootImpl的独白,我不是一个View(布局篇)、Android应用层View绘制流程与源码分析)自己对照源码,梳理了一遍。
相关类
- Activity:一个Activity是一个应用程序组件,提供一个屏幕,用户可以用来交互为了完成某项任务,例如拨号、拍照。
- View:作为所有图形的基类。
- ViewGroup:对View继承扩展为视图容器类。
- Window:它概括了Android窗口的基本属性和基本功能。(抽象类)
- PhoneWindow:Window的子类。
- DecorView:界面的根View,PhoneWindow的内部类。
- ViewRootImpl:ViewRoot是GUI管理系统与GUI呈现系统之间的桥梁。
- WindowManangerService:简称WMS,它的作用是管理所有应用程序中的窗口,并用于管理用户与这些窗口发生的的各种交互。
View树的绘图流程是在ViewRootImpl类的performTraversals()方法开始的
ViewRootImpl简介
ViewRootImpl是View中的最高层级,属于所有View的根(但ViewRootImpl不是View,只是实现了ViewParent接口),实现了View和WindowManager之间的通信协议。
ViewRootImpl的初始化

WindowManager继承ViewManger,从ViewManager这个类名来看就是用来对View类进行管理的,从ViewManager接口中的添加、更新、删除View的方法也可以看出来WindowManager对View的管理。
WindowManagerImpl为WindowManager的实现类。WindowManagerImpl内部方法实现都是由代理类WindowManagerGlobal完成,而WindowManagerGlobal是一个单例,也就是一个进程中只有一个WindowManagerGlobal对象服务于所有页面的View。
public final class WindowManagerGlobal {
    /*******部分代码省略**********/
    //所有Window对象中的View
    private final ArrayList mViews = new ArrayList();
    //所有Window对象中的View所对应的ViewRootImpl
    private final ArrayList mRoots = new ArrayList();
    //所有Window对象中的View所对应的布局参数
    private final ArrayList mParams = new ArrayList();
    /*******部分代码省略**********/
}
WindowManagerGlobal在其内部存储着ViewRootImpl和View实例的映射关系(顺序存储)。
在Activity的onResume之后,当前Activity的Window对象中的View会被添加在WindowManager中。
public final class ActivityThread {
    /*******部分代码省略**********/
    final void handleResumeActivity(IBinder token,
            boolean clearHide, boolean isForward, boolean reallyResume) {
        /*******部分代码省略**********/
        ActivityClientRecord r = performResumeActivity(token, clearHide);
        if (r != null) {
            /*******部分代码省略**********/
            if (r.window == null && !a.mFinished && willBeVisible) {
                r.window = r.activity.getWindow();
                View decor = r.window.getDecorView();
                decor.setVisibility(View.INVISIBLE);
                ViewManager wm = a.getWindowManager();
                WindowManager.LayoutParams l = r.window.getAttributes();
                a.mDecor = decor;
                //window的类型:一个应用窗口类型(所有的应用窗口类型都展现在最顶部)。
                l.type = WindowManager.LayoutParams.TYPE_BASE_APPLICATION;
                l.softInputMode |= forwardBit;
                if (a.mVisibleFromClient) {
                    a.mWindowAdded = true;
                    //将decor添加在WindowManager中
                    wm.addView(decor, l);
                }
            /*******部分代码省略**********/
        } else {
            try {
                ActivityManagerNative.getDefault()
                    .finishActivity(token, Activity.RESULT_CANCELED, null, false);
            } catch (RemoteException ex) {
            }
        }
    }
}
wm.addView(decor, l);方法的具体实现是在WindowManager的代理类WindowManagerGlobal中
public final class WindowManagerGlobal {
    /*******部分代码省略**********/
    public void addView(View view, ViewGroup.LayoutParams params,
            Display display, Window parentWindow) {
         /*******部分代码省略**********/
        final WindowManager.LayoutParams wparams = (WindowManager.LayoutParams)params;
        //声明ViwRootImpl
        ViewRootImpl root;
        View panelParentView = null;
        synchronized (mLock) {
            // Start watching for system property changes.
            if (mSystemPropertyUpdater == null) {
                mSystemPropertyUpdater = new Runnable() {
                    @Override public void run() {
                        synchronized (mLock) {
                            for (int i = mRoots.size() - 1; i >= 0; --i) {
                                mRoots.get(i).loadSystemProperties();
                            }
                        }
                    }
                };
                SystemProperties.addChangeCallback(mSystemPropertyUpdater);
            }
            /*******部分代码省略**********/
            //创建ViwRootImpl
            root = new ViewRootImpl(view.getContext(), display);
            view.setLayoutParams(wparams);
            //将Window所对应的View、ViewRootImpl、LayoutParams顺序添加在WindowManager中
            mViews.add(view);
            mRoots.add(root);
            mParams.add(wparams);
        }
        try {
            //把将Window所对应的View设置给创建的ViewRootImpl
            //通过ViewRootImpl来更新界面并完成Window的添加过程。
            root.setView(view, wparams, panelParentView);
        } catch (RuntimeException e) {
            /*******部分代码省略**********/
        }
    }
}
创建ViewRootImpl实例后,将将Window所对应的View、ViewRootImpl、LayoutParams顺序添加在WindowManager中,然后将Window所对应的View设置给创建的ViewRootImpl: root.setView(view, wparams, panelParentView);
public final class ViewRootImpl implements ViewParent,
        View.AttachInfo.Callbacks, HardwareRenderer.HardwareDrawCallbacks {
    /*******部分代码省略**********/
    public void setView(View view, WindowManager.LayoutParams attrs, View panelParentView) {
        synchronized (this) {
            if (mView == null) {
                //ViewRootImpl成员变量view进行复制,以后操作的都是mView。
                mView = view;
                /*******部分代码省略**********/
                //Window在添加完之前先进行一次布局,确保以后能再接受系统其它事件之后重新布局。
                //对View完成异步刷新,执行View的绘制方法。
                requestLayout();
                if ((mWindowAttributes.inputFeatures
                        & WindowManager.LayoutParams.INPUT_FEATURE_NO_INPUT_CHANNEL) == 0) {
                    mInputChannel = new InputChannel();
                }
                try {
                    mOrigWindowType = mWindowAttributes.type;
                    mAttachInfo.mRecomputeGlobalAttributes = true;
                    collectViewAttributes();
                    //将该Window添加到屏幕。
                    //mWindowSession实现了IWindowSession接口,它是Session的客户端Binder对象.
                    //addToDisplay是一次AIDL的跨进程通信,通知WindowManagerService添加IWindow
                    res = mWindowSession.addToDisplay(mWindow, mSeq, mWindowAttributes,
                            getHostVisibility(), mDisplay.getDisplayId(),
                            mAttachInfo.mContentInsets, mAttachInfo.mStableInsets, mInputChannel);
                } catch (RemoteException e) {
                    /*******部分代码省略**********/
                } finally {
                    if (restore) {
                        attrs.restore();
                    }
                }
                /*******部分代码省略**********/
                //设置当前View的mParent
                view.assignParent(this);
                /*******部分代码省略**********/
            }
        }
    }
}
requestLayout(); 方法请求view绘制,其过程主要是在ViewRootImpl的performTraversals方法中。
public final class ViewRootImpl implements ViewParent,
        View.AttachInfo.Callbacks, HardwareRenderer.HardwareDrawCallbacks {
    /*******部分代码省略**********/
    //请求对界面进行布局
    @Override
    public void requestLayout() {
        if (!mHandlingLayoutInLayoutRequest) {
            checkThread();
            mLayoutRequested = true;
            scheduleTraversals();
        }
    }
    /*******部分代码省略**********/
    //安排任务
    void scheduleTraversals() {
        if (!mTraversalScheduled) {
            mTraversalScheduled = true;
            mTraversalBarrier = mHandler.getLooper().postSyncBarrier();
            mChoreographer.postCallback(
                    Choreographer.CALLBACK_TRAVERSAL, mTraversalRunnable, null);
            if (!mUnbufferedInputDispatch) {
                scheduleConsumeBatchedInput();
            }
            notifyRendererOfFramePending();
        }
    }

    final TraversalRunnable mTraversalRunnable = new TraversalRunnable();

    final class TraversalRunnable implements Runnable {
        @Override
        public void run() {
            doTraversal();
        }
    }
    //做任务
    void doTraversal() {
        if (mTraversalScheduled) {
            mTraversalScheduled = false;
            mHandler.getLooper().removeSyncBarrier(mTraversalBarrier);
            if (mProfile) {
                Debug.startMethodTracing("ViewAncestor");
            }
            Trace.traceBegin(Trace.TRACE_TAG_VIEW, "performTraversals");
            try {
                //执行任务
                performTraversals();
            } finally {
                Trace.traceEnd(Trace.TRACE_TAG_VIEW);
            }

            if (mProfile) {
                Debug.stopMethodTracing();
                mProfile = false;
            }
        }
    }
}
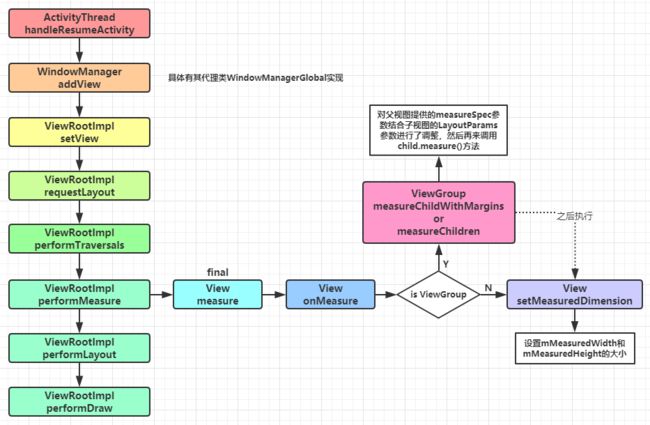
整个View树的绘图流程是在ViewRootImpl类的performTraversals()方法(这个方法巨长)开始的,该方法做的执行过程主要是根据之前设置的状态,判断是否重新计算视图大小(measure)、是否重新放置视图的位置(layout)、以及是否重绘 (draw),其核心也就是通过判断来选择顺序执行这三个方法。
private void performTraversals() {
        ......
        //最外层的根视图的widthMeasureSpec和heightMeasureSpec由来
        //lp.width和lp.height在创建ViewGroup实例时等于MATCH_PARENT
        int childWidthMeasureSpec = getRootMeasureSpec(mWidth, lp.width);
        int childHeightMeasureSpec = getRootMeasureSpec(mHeight, lp.height);
        ......
        performMeasure(childWidthMeasureSpec, childHeightMeasureSpec);
        ......
        performLayout(lp, desiredWindowWidth, desiredWindowHeight);
        ......
        performDraw();
        ......
 }
这里的最外层根视图是
DecorView,也就是mView,在WindowManagerGlobal中的addview中传递过来的。
private static int getRootMeasureSpec(int windowSize, int rootDimension) {
    int measureSpec;
    switch (rootDimension) {

        case ViewGroup.LayoutParams.MATCH_PARENT:
        // Window can't resize. Force root view to be windowSize.
        measureSpec = View.MeasureSpec.makeMeasureSpec(windowSize, View.MeasureSpec.EXACTLY);
        break;
        ......
    }
    return measureSpec;
}
该方法的是用来测Root View的。上面传入参数后这个函数走的是
MATCH_PARENT,使用MeasureSpec.makeMeasureSpec方法组装一个MeasureSpec,MeasureSpec的specMode等于EXACTLY,specSize等于windowSize,也就是为何根视图总是全屏的原因。
View的测量
ViewRootImpl调用performMeasure执行Window对应的View的测量。
- ViewRootImpl的
performMeasure;- DecorView(FrameLayout)的
measure;- DecorView(FrameLayout)的
onMeasure;- DecorView(FrameLayout)所有子View的
measure;
private fun performMeasure(childWidthMeasureSpec: Int, childHeightMeasureSpec: Int) {
    if (mView == null) {
        return
    }
    Trace.traceBegin(Trace.TRACE_TAG_VIEW, "measure")
    try {
        //mView在Activity中为DecorView(FrameLayout)
        mView.measure(childWidthMeasureSpec, childHeightMeasureSpec)
    } finally {
        Trace.traceEnd(Trace.TRACE_TAG_VIEW)
    }
}
public class View implements Drawable.Callback, KeyEvent.Callback,
        AccessibilityEventSource {
    ......
    //final方法,子类不可重写
    public final void measure(int widthMeasureSpec, int heightMeasureSpec) {
        ......
        //回调onMeasure()方法
        onMeasure(widthMeasureSpec, heightMeasureSpec);
        ......
    }
}
为整个View树计算实际的大小,然后设置实际的高和宽,每个View控件的实际宽高都是由父视图和自身决定的。实际的测量是在
onMeasure方法进行,所以在View的子类需要重写onMeasure方法,这是因为measure方法是final的,不允许重载,所以View子类只能通过重载onMeasure来实现自己的测量逻辑。
int widthMeasureSpec:他由两部分组成,高2位表示MODE,定义在MeasureSpec类(View的内部类)中,有三种类型,MeasureSpec.EXACTLY表示确定大小, MeasureSpec.AT_MOST表示最大大小, MeasureSpec.UNSPECIFIED不确定。低30位表示size,也就是父View的大小。对于系统Window类的DecorVIew对象Mode一般都为MeasureSpec.EXACTLY ,而size分别对应屏幕宽高。对于子View来说大小是由父View和子View共同决定的。
//View的onMeasure默认实现方法
protected void onMeasure(int widthMeasureSpec, int heightMeasureSpec) {
    setMeasuredDimension(getDefaultSize(getSuggestedMinimumWidth(), widthMeasureSpec),
            getDefaultSize(getSuggestedMinimumHeight(), heightMeasureSpec));
}
onMeasure默认的实现仅仅调用了setMeasuredDimension,它对View的成员变量mMeasuredWidth和mMeasuredHeight变量赋值,measure的主要目的就是对View树中的每个View的mMeasuredWidth和mMeasuredHeight进行赋值,所以一旦这两个变量被赋值意味着该View的测量工作结束。
默认的尺寸大小即传入的参数都是通过getDefaultSize返回的,我们就看一下该方法的实现。
public static int getDefaultSize(int size, int measureSpec) {
    int result = size;
    //通过MeasureSpec解析获取mode与size
    int specMode = MeasureSpec.getMode(measureSpec);
    int specSize = MeasureSpec.getSize(measureSpec);

    switch (specMode) {
    case MeasureSpec.UNSPECIFIED:
        result = size;
        break;
    case MeasureSpec.AT_MOST:
    case MeasureSpec.EXACTLY:
        result = specSize;
        break;
    }
    return result;
}
specMode等于AT_MOST或EXACTLY就返回specSize。
protected int getSuggestedMinimumWidth() {
    return (mBackground == null) ? mMinWidth : max(mMinWidth, mBackground.getMinimumWidth());
}

protected int getSuggestedMinimumHeight() {
    return (mBackground == null) ? mMinHeight : max(mMinHeight, mBackground.getMinimumHeight());
}
建议的最小宽度和高度都是由View的Background尺寸与通过设置View的
miniXXX属性共同决定的。也只有当Mode为MeasureSpec.UNSPECIFIED时才会使用该尺寸。
到此一次最基础的元素View的measure过程就完成了。
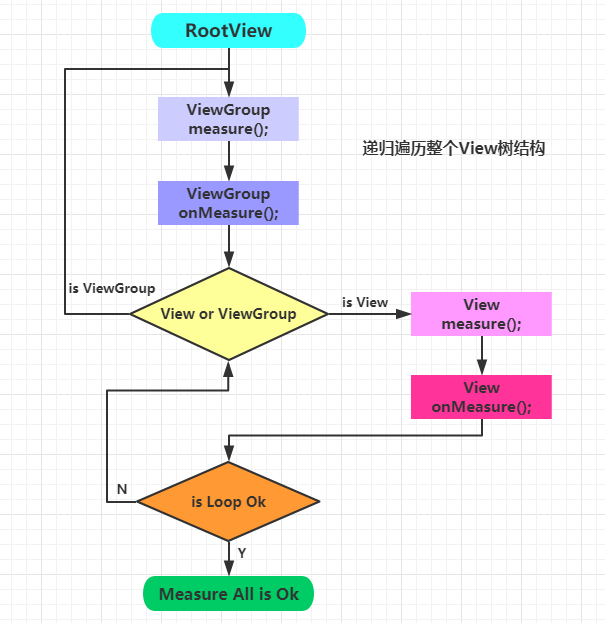
View实际是嵌套的,而且measure是递归传递的,所以每个View都需要measure,能够嵌套的View都是ViewGroup的子类,所以在ViewGroup中定义了measureChildren, measureChild, measureChildWithMargins方法来对子视图进行测量,measureChildren内部实质只是循环调用measureChild,measureChild和measureChildWithMargins的区别就是是否把margin和padding也作为子视图的大小。ViewGroup本身不调用measureChildWithMargins和measureChildren方法,由继承类通过for循环调用此方法进行子View的测量。下面看一下ViewGroup中稍微复杂的measureChildWithMargins方法。
protected void measureChildWithMargins(View child,
        int parentWidthMeasureSpec, int widthUsed,
        int parentHeightMeasureSpec, int heightUsed) {
    //获取子视图的LayoutParams
    final MarginLayoutParams lp = (MarginLayoutParams) child.getLayoutParams();
    //调整MeasureSpec
    //通过这两个参数以及本身的LayoutParams来共同决定子视图的测量规则
    final int childWidthMeasureSpec = getChildMeasureSpec(parentWidthMeasureSpec,
            mPaddingLeft + mPaddingRight + lp.leftMargin + lp.rightMargin
                    + widthUsed, lp.width);
    final int childHeightMeasureSpec = getChildMeasureSpec(parentHeightMeasureSpec,
            mPaddingTop + mPaddingBottom + lp.topMargin + lp.bottomMargin
                    + heightUsed, lp.height);
    //调运子View的measure方法,子View的measure中会回调子View的onMeasure方法
    child.measure(childWidthMeasureSpec, childHeightMeasureSpec);
}
该方法就是对父视图提供的
measureSpec参数结合子视图的LayoutParams参数进行了调整,然后再来调用child.measure()方法,具体通过方法getChildMeasureSpec来进行参数调整。
public static int getChildMeasureSpec(int spec, int padding, int childDimension) {
    //获取当前Parent View的Mode和Size
    int specMode = MeasureSpec.getMode(spec);
    int specSize = MeasureSpec.getSize(spec);
    //获取Parent size与padding差值(也就是Parent剩余大小),若差值小于0直接返回0
    int size = Math.max(0, specSize - padding);
    //定义返回值存储变量
    int resultSize = 0;
    int resultMode = 0;
    //依据当前Parent的Mode进行switch分支逻辑
    switch (specMode) {
    // Parent has imposed an exact size on us
    //默认Root View的Mode就是EXACTLY
    case MeasureSpec.EXACTLY:
        if (childDimension >= 0) {
            //如果child的layout_wOrh属性在xml或者java中给予具体大于等于0的数值
            //设置child的size为真实layout_wOrh属性值,mode为EXACTLY
            resultSize = childDimension;
            resultMode = MeasureSpec.EXACTLY;
        } else if (childDimension == LayoutParams.MATCH_PARENT) {
            //如果child的layout_wOrh属性在xml或者java中给予MATCH_PARENT
            // Child wants to be our size. So be it.
            //设置child的size为size,mode为EXACTLY
            resultSize = size;
            resultMode = MeasureSpec.EXACTLY;
        } else if (childDimension == LayoutParams.WRAP_CONTENT) {
            //如果child的layout_wOrh属性在xml或者java中给予WRAP_CONTENT
            //设置child的size为size,mode为AT_MOST
            // Child wants to determine its own size. It can't be
            // bigger than us.
            resultSize = size;
            resultMode = MeasureSpec.AT_MOST;
        }
        break;
    ......
    //其他Mode分支类似
    }
    //将mode与size通过MeasureSpec方法整合为32位整数返回
    return MeasureSpec.makeMeasureSpec(resultSize, resultMode);
}

getChildMeasureSpec的逻辑是通过其父View提供的MeasureSpec参数得到specMode和specSize,然后根据计算出来的specMode以及子View的childDimension(layout_width或layout_height)来计算自身的measureSpec,如果其本身包含子视图,则计算出来的measureSpec将作为调用其子视图measure函数的参数,同时也作为自身调用setMeasuredDimension的参数,如果其不包含子视图则默认情况下最终会调用onMeasure的默认实现,并最终调用到setMeasuredDimension。
最终决定View的
measure大小是View的setMeasuredDimension方法,所以我们可以通过setMeasuredDimension设定死值来设置View的mMeasuredWidth和mMeasuredHeight的大小,但是一个好的自定义View应该会根据子视图的measureSpec来设置mMeasuredWidth和mMeasuredHeight的大小,这样的灵活性更大
View测量总结
在Activity的onResume之后,当前Activity的Window对象中的View(DecorView)会被添加在WindowManager中。也就是在ActivityThread的handleResumeActivity方法中调用wm.addView(decor, l);将DecorView添加到WindowManager中;
WindowManager继承ViewManager,它的实现类为WindowManagerImpl,该类中的方法的具体实现是由其代理类WindowManagerGlobal实现的;
在它的addView方法中会创建ViewRootImpl的实例,然后将Window对应的View(DecorView),ViewRootImpl,LayoutParams顺序添加在WindowManager中,最后将Window所对应的View设置给创建的ViewRootImpl,通过ViewRootImpl来更新界面并完成Window的添加过程;
设置view调用的是ViewRootImpl的setView方法,在该方法中调用requestLayout();方法来异步执行view的绘制方法;之后将Window添加到屏幕,通过WMS(跨进程通信)
在requestLayout方法中最终会调用ViewRootImpl的performTraversals();方法,该方法做的执行过程主要是根据之前设置的状态,判断是否重新计算视图大小(measure)、是否重新放置视图的位置(layout)、以及是否重绘 (draw),其核心也就是通过判断来选择顺序执行这三个方法:performMeasure、performLayout、performDraw;
在performMeasure方法中调用的是View的measure方法,该方法是final修饰,不能被子类重写,在该方法中实际调用的是View的onMeasure方法,子类可以重写onMeasure方法来实现自己的测量规则。
View默认的onMeasure方法很简单只是调用了setMeasuredDimension方法,该方法的作用是给View的成员变量mMeasuredWidth和mMeasuredHeight赋值,View的测量主要就是给这两个变量赋值,这两个变量一旦赋值,也就意味着测量过程的结束。
setMeasuredDimension方法传入的尺寸是通过getDefaultSize(int size, int measureSpec);方法返回的,在
getDefaultSize方法中解析measureSpec的Mode和Size,如果Mode为MeasureSpec.AT_MOST或者MeasureSpec.EXACTLY,最终的size的值为解析后的size;如果Mode为MeasureSpec.UNSPECIFIED,最终的size为建议的最小值=getSuggestedMinimumWidth,该方法的具体实现为return (mBackground == null) ? mMinWidth : max(mMinWidth, mBackground.getMinimumWidth());,建议的最小宽度和高度都是由View的Background尺寸与通过设置View的miniXXX属性共同决定的
measureSpec是由getRootMeasureSpec方法决定的:measureSpec = View.MeasureSpec.makeMeasureSpec(windowSize, View.MeasureSpec.EXACTLY);根布局的大小是Window的大小,Window大小是不能改变的,总是全屏的。
View实际是嵌套的,而且measure是递归传递的,所以每个View都需要measure,能够嵌套的View都是ViewGroup的子类,所以在ViewGroup中定义了measureChildren, measureChild, measureChildWithMargins方法来对子视图进行测量,measureChildren内部实质只是循环调用measureChild,measureChild和measureChildWithMargins的区别就是是否把margin和padding也作为子视图的大小。
measureChildWithMargins方法的作用就是对父View提供的measureSpec参数结合子View的LayoutParams参数进行了调整,然后再来调用child.measure()方法,具体通过方法getChildMeasureSpec方法来进行参数调整。计算出来自身的measureSpec作为调用其子视图measure方法的参数,同时也作为自身调用setMeasuredDimension的参数,如果其不包含子视图则默认情况下最终会调用onMeasure的默认实现,并最终调用到setMeasuredDimension。
最终决定View的measure大小是View的setMeasuredDimension方法,该方法就是设置mMeasuredWidth和mMeasuredHeight的大小,ViewGroup在onMeasure 方法调用setMeasuredDimension之前调整了measureSpec。