实验一内容:
- 阅读《Linux内核完全注释》的第6章,对计算机和Linux0.11的引导过程进行初步的了解;
- 按照下面的要求改写0.11的引导程序bootsect.s
- 修改build.c,以便可以使用 make BootImage命令
实验步骤:
- 修改bootsect.s中的提示信息及相关代码;
- 在目录linux-0.11\boot下,分别用命令as86 -0 -a -o bootsect.obootsect.s和ld86 -0 -s -o bootsect bootsect.o编译和链接bootsect.s,生成bootsect文件;
- 用命令dd bs=1 if=bootsect of=Image skip=32去掉bootsect的文件头生成Image文件,并复制Image到linux-0.11目录下;
- 运行run命令验证运行结果是否正确;
- 重新用make命令生成BootImage,结合提示信息和makefile文件修改build.c;
- 验证:用make是否能成功生成BootImage。
(一)改写bootsect.s主要完成的如下功能:
bootsect.s能在屏幕上打印一段提示信息“XXX booting...”,其中XXX是你给自己的操作系统起的名字,例如LZJos、Sunix等
关键代码:
! 首先读入光标位置
    mov ah,#0x03
    xor bh,bh
    int 0x10

    ! 显示字符串“LZJos is running...”
    mov cx,#25          ! 要显示的字符串长度
    mov bx,#0x0007      ! page 0, attribute 7 (normal)
    mov bp,#msg1
    mov ax,#0x1301      ! write string, move cursor
    int 0x10

inf_loop:
    jmp inf_loop        ! 后面都不是正经代码了,得往回跳呀
    ! msg1处放置字符串

msg1:  //msg1 为要输出的字符串  ,13为换行,10为回车
    .byte 13,10         ! 换行+回车
    .ascii "LZJos is running..."
    .byte 13,10,13,10           ! 两对换行+回车
    !设置引导扇区标记0xAA55
    .org 510
boot_flag:
    .word 0xAA55            ! 必须有它,才能引导
我们需要改的就是msg1中的内容,以及mov cx,#25 这里的字符串长度
注意计算字符串的长度;
比如这样
 Print some inane message

    mov ah,#0x03        ! read cursor pos
    xor bh,bh
    int 0x10

    mov cx,#27                  !修改这里
    mov bx,#0x0007      ! page 0, attribute 7 (normal)
    mov bp,#msg1
    mov ax,#0x1301      ! write string, move cursor
    int 0x10
msg1:
    .byte 13,10
    .ascii "Jinux OS is booting ..."
    .byte 13,10,13,10
然后修改build.c 该文件位于 linux-0.11/tools/build.c
build.c从命令行参数得到bootsect、setup和system内核的文件名,将三者做简单的整理后一起写入Image。其中system是第三个参数(argv[3])。当“make all”或者“makeall”的时候,这个参数传过来的是正确的文件名,build.c会打开它,将内容写入Image。而“make BootImage”时,传过来的是字符串"none"。所以,改造build.c的思路就是当argv[3]是"none"的时候,只写bootsect和setup,忽略所有与system有关的工作,或者在该写system的位置都写上“0”。
要修改的部分在build.c文件尾端:
bulid.c 之前为:
    if ((id=open(argv[3],O_RDONLY,0))<0)
            die("Unable to open 'system'");
    //  if (read(id,buf,GCC_HEADER) != GCC_HEADER)
    //      die("Unable to read header of 'system'");
    //  if (((long *) buf)[5] != 0)
    //      die("Non-GCC header of 'system'");
        for (i=0 ; (c=read(id,buf,sizeof buf))>0 ; i+=c )
            if (write(1,buf,c)!=c)
                die("Write call failed");
        close(id);
        fprintf(stderr,"System is %d bytes.\n",i);
        if (i > SYS_SIZE*16)
            die("System is too big");
        return(0);
修改为:
     if(strcmp("none",argv[3]) == 0)    //添加判断
          return 0;
    if ((id=open(argv[3],O_RDONLY,0))<0)
          die("Unable to open 'system'");
//    if (read(id,buf,GCC_HEADER) != GCC_HEADER)
//        die("Unable to read header of 'system'");
//    if (((long *) buf)[5] != 0)
//        die("Non-GCC header of 'system'");
    for (i=0 ; (c=read(id,buf,sizeof buf))>0 ; i+=c )
        if (write(1,buf,c)!=c)
            die("Write call failed");
    close(id);
    fprintf(stderr,"System is %d bytes.\n",i);
    if (i > SYS_SIZE*16)
        die("System is too big");

    return(0);
现在,显示部分就做好了;
编译与运行:
cd ~/oslab/linux-0.11/boot/
as86 -0 -a -o bootsect.o bootsect.s
ld86 -0 -s -o bootsect bootsect.o
其中bootsect.o是中间文件。bootsect是编译、链接后的目标文件。
需要留意的文件是bootsect的文件大小是544字节,而引导程序必须要正好占用一个磁盘扇区,即512个字节。造成多了32个字节的原因是ld86产生的是Minix可执行文件格式,
struct exec {
    unsigned char a_magic[2];  //执行文件魔数
    unsigned char a_flags;
    unsigned char a_cpu;       //CPU标识号
    unsigned char a_hdrlen;    //头部长度,32字节或48字节
    unsigned char a_unused;
    unsigned short a_version;
    long a_text; long a_data; long a_bss; //代码段长度、数据段长度、堆长度
    long a_entry;    //执行入口地址
    long a_total;    //分配的内存总量
    long a_syms;     //符号表大小
};
算一算:6 char(6字节)+1 short(2字节)+6 long(24字节)=32,正好是32个字节,去掉这32个字节后就可以放入引导扇区了(这是tools/build.c的用途之一)。
dd bs=1 if=bootsect of=Image skip=32
//该命令是删除bootsect那32个字节并保存为Image文件
cp Image ../Image
//复制到 linux-0.11/目录中

../run //运行oslab目录下的run命令
神奇画面出现了:
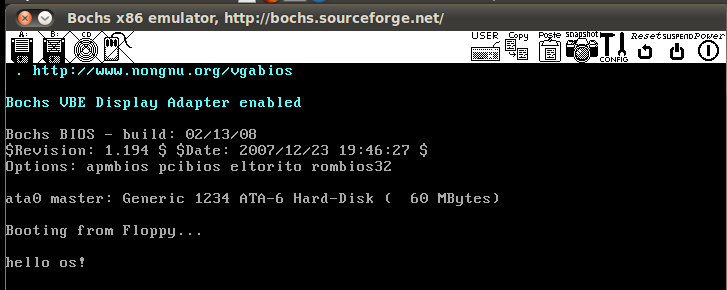
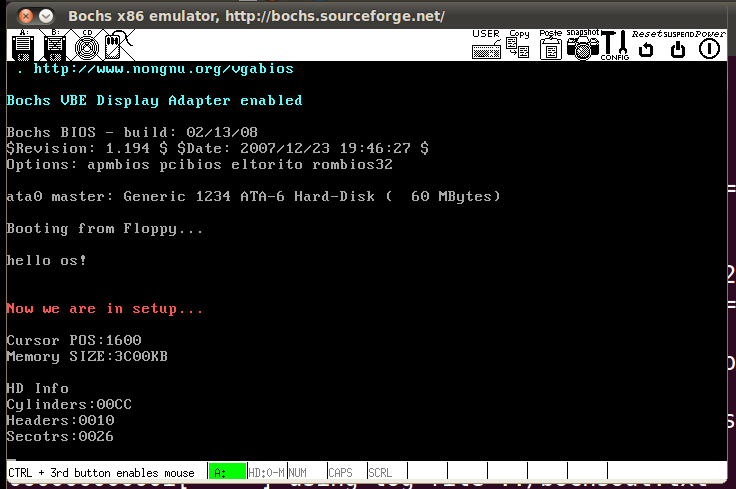
(二)改写bootsect.s 读入setup.s
我们需要改写bootsect.s 使输出 “XXX is booting..." 后跳转到setup.s 中,并在setup.s 中输出"Now we are in SETUP"
开撸:
既然输出"XXX is booting..."后跳转到setup.s 那 除了数据段 后面的代码就是多余的(当然 ,你留着也行)
.globl begtext, begdata, begbss, endtext, enddata, endbss
.text
begtext:
.data
begdata:
.bss
begbss:
.text

SETUPLEN = 4                ! setup程序代码占用扇区数
BOOTSEG  = 0x07c0           ! bootsect程序代码所在内存原始地址
INITSEG  = 0x9000           ! 将bootsect移动到0x9000处
SETUPSEG = 0x9020           ! setup程序开始的地址

entry _start
_start:

! 下面这段代码将自身复制到0x9000处
    mov ax,#BOOTSEG
    mov ds,ax
    mov ax,#INITSEG
    mov es,ax
    mov cx,#256
    sub si,si
    sub di,di
    rep
    movw

! 复制完成从0x9000的go标号处开始执行
    jmpi    go,INITSEG
go: mov ax,cs
    mov ds,ax  !设置ds=es=cs
    mov es,ax

! 加载setup.s程序
load_setup:
    mov dx,#0x0000      ! drive 0, head 0
    mov cx,#0x0002      ! sector 2, track 0
    mov bx,#0x0200      ! address = 512, in INITSEG
    mov ax,#0x0200+SETUPLEN ! service 2, nr of sectors
    int 0x13            ! read it
    jnc ok_load_setup       ! ok - continue
    !加载错误
    mov dx,#0x0000
    mov ax,#0x0000      ! reset the diskette
    int 0x13
    j   load_setup

ok_load_setup:

!输出一些信息

    mov ah,#0x03        ! read cursor pos
    xor bh,bh
    int 0x10

    mov cx,#15
    mov bx,#0x000c      ! page 0, attribute c
    mov bp,#msg1        ! es:bp 指向待显示 字符串
    mov ax,#0x1301      ! write string, move cursor
    int 0x10
!输出后开始执行setup代码
    jmpi 0,SETUPSEG

msg1:
    .byte 13,10
    .ascii "hello os!"
    .byte 13,10,13,10

.org 510
boot_flag:
    .word 0xAA55
.text
endtext:
.data
enddata:
.bss
endbss:
setup.s 代码:
.globl begtext, begdata, begbss, endtext, enddata, endbss
.text
begtext:
.data
begdata:
.bss
begbss:
.text

BOOTSEG  = 0x07c0           ! original address of boot-sector
INITSEG  = 0x9000           ! we move boot here - out of the way
SETUPSEG = 0x9020           ! setup starts here

entry _start
_start:

!设置cs=ds=es
    mov ax,cs
    mov ds,ax
    mov es,ax

    mov ah,#0x03        ! read cursor pos
    xor bh,bh
    int 0x10

    mov cx,#28
    mov bx,#0x000c      ! page 0, attribute c
    mov bp,#msg1
    mov ax,#0x1301      ! write string, move cursor
    int 0x10

! ok, the read went well so we get current cursor position and save it for
! posterity.
! 获取光标位置 =>  0x9000:0
    mov ax,#INITSEG ! this is done in bootsect already, but...
    mov ds,ax
    mov ah,#0x03    ! read cursor pos
    xor bh,bh
    int 0x10        ! save it in known place, con_init fetches
    mov [0],dx      ! it from 0x90000.

! Get memory size (extended mem, kB)
! 获取拓展内存大小 => 0x9000:2
    mov ah,#0x88
    int 0x15
    mov [2],ax

! Get hd0 data
! 获取硬盘参数 => 0x9000:80  大小:16B
    mov ax,#0x0000
    mov ds,ax
    lds si,[4*0x41]
    mov ax,#INITSEG
    mov es,ax
    mov di,#0x0080
    mov cx,#0x10
    rep
    movsb

! 前面修改了ds寄存器,这里将其设置为0x9000
    mov ax,#INITSEG
    mov ds,ax
    mov ax,#SETUPSEG
    mov es,ax

!显示 Cursor POS: 字符串
    mov ah,#0x03        ! read cursor pos
    xor bh,bh
    int 0x10
    mov cx,#11
    mov bx,#0x0007      ! page 0, attribute c
    mov bp,#cur
    mov ax,#0x1301      ! write string, move cursor
    int 0x10

!调用 print_hex 显示具体信息
    mov ax,[0]
    call print_hex
    call print_nl

!显示 Memory SIZE: 字符串
    mov ah,#0x03        ! read cursor pos
    xor bh,bh
    int 0x10
    mov cx,#12
    mov bx,#0x0007      ! page 0, attribute c
    mov bp,#mem
    mov ax,#0x1301      ! write string, move cursor
    int 0x10

!显示 具体信息
    mov ax,[2]
    call print_hex

!显示相应 提示信息
    mov ah,#0x03        ! read cursor pos
    xor bh,bh
    int 0x10
    mov cx,#25
    mov bx,#0x0007      ! page 0, attribute c
    mov bp,#cyl
    mov ax,#0x1301      ! write string, move cursor
    int 0x10

!显示具体信息
    mov ax,[0x80]
    call print_hex
    call print_nl

!显示 提示信息
    mov ah,#0x03        ! read cursor pos
    xor bh,bh
    int 0x10
    mov cx,#8
    mov bx,#0x0007      ! page 0, attribute c
    mov bp,#head
    mov ax,#0x1301      ! write string, move cursor
    int 0x10

!显示 具体信息
    mov ax,[0x80+0x02]
    call print_hex
    call print_nl

!显示 提示信息
    mov ah,#0x03        ! read cursor pos
    xor bh,bh
    int 0x10
    mov cx,#8
    mov bx,#0x0007      ! page 0, attribute c
    mov bp,#sect
    mov ax,#0x1301      ! write string, move cursor
    int 0x10

!显示 具体信息
    mov ax,[0x80+0x0e]
    call print_hex
    call print_nl

!死循环
l:  jmp l

!以16进制方式打印ax寄存器里的16位数
print_hex:
    mov cx,#4   ! 4个十六进制数字
    mov dx,ax   ! 将ax所指的值放入dx中,ax作为参数传递寄存器
print_digit:
    rol dx,#4  ! 循环以使低4比特用上 !! 取dx的高4比特移到低4比特处。
    mov ax,#0xe0f  ! ah = 请求的功能值,al = 半字节(4个比特)掩码。
    and al,dl ! 取dl的低4比特值。
    add al,#0x30  ! 给al数字加上十六进制0x30
    cmp al,#0x3a
    jl outp  !是一个不大于十的数字
    add al,#0x07  !是a~f,要多加7
outp:
    int 0x10
    loop print_digit
    ret

!打印回车换行
print_nl:
    mov ax,#0xe0d
    int 0x10
    mov al,#0xa
    int 0x10
    ret

msg1:
    .byte 13,10
    .ascii "Now we are in setup..."
    .byte 13,10,13,10
cur:
    .ascii "Cursor POS:"
mem:
    .ascii "Memory SIZE:"
cyl:
    .ascii "KB"
    .byte 13,10,13,10
    .ascii "HD Info"
    .byte 13,10
    .ascii "Cylinders:"
head:
    .ascii "Headers:"
sect:
    .ascii "Secotrs:"

.text
endtext:
.data
enddata:
.bss
endbss:
修改后,进入linux-0.11目录重新一键编译
#编译
make BootImage

#运行
../run
好啦,惊喜出现: