概述
如题,实现上述需求
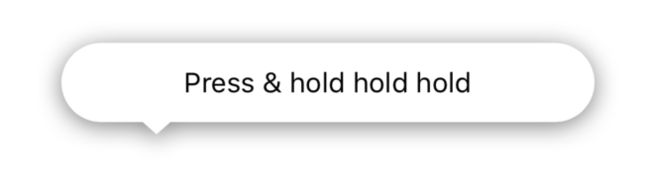
image.png
思路
- 添加 contentView,contentView 首先添加一个 shapeLayer
- 继续向 contentView 添加一个 Label,
Label.backgroundColor = .clear - 在 contentView layoutSubviews() 中配置 shapeLayer,并且 shapeLayer 传入的是 Label.bounds
override func layoutSubviews() {
        super.layoutSubviews()
        configShadowLayer()
}
其中, configShadowLayer() 主要是通过 UIBezierPath 绘制 Label 的形状,并添加阴影
struct CornerRadii {
    let topLeft: CGFloat
    let topRight: CGFloat
    let bottomLeft: CGFloat
    let bottomRight: CGFloat

    init(topLeft: CGFloat, topRight: CGFloat, bottomLeft: CGFloat, bottomRight: CGFloat) {
        self.topLeft = topLeft
        self.topRight = topRight
        self.bottomLeft = bottomLeft
        self.bottomRight = bottomRight
    }
}
    private func CYPathCreateWIthRoundedRect(bounds: CGRect, cornerRadii: CornerRadii) -> UIBezierPath {
        let minX = bounds.minX
        let minY = bounds.minY
        let maxX = bounds.maxX
        let maxY = bounds.maxY

        let topLeftCenterX = minX + cornerRadii.topLeft
        let topLeftCenterY = minY + cornerRadii.topLeft

        let topRightCenterX = maxX - cornerRadii.topRight
        let topRightCenterY = minY + cornerRadii.topRight

        let bottomLeftCenterX = minX + cornerRadii.bottomLeft
        let bottomLeftCenterY = maxY - cornerRadii.bottomLeft

        let bottomRightCenterX = maxX - cornerRadii.bottomRight
        let bottomRightCenterY = maxY - cornerRadii.bottomRight

        let path = UIBezierPath.init()
        path.move(to: CGPoint(x: topLeftCenterX, y: minY))
        // 顶左
        path.addArc(withCenter: CGPoint(x: topLeftCenterX, y: topLeftCenterY), radius: cornerRadii.topLeft, startAngle: CGFloat.pi / 2 * 3, endAngle: CGFloat.pi, clockwise: false)
        path.addLine(to: CGPoint(x: minX, y: bottomLeftCenterY))
        // 底左
        path.addArc(withCenter: CGPoint(x: bottomLeftCenterX, y: bottomLeftCenterY), radius: cornerRadii.bottomLeft, startAngle: CGFloat.pi, endAngle: CGFloat.pi / 2, clockwise: false)
        // 画三角形
        path.addLine(to: CGPoint(x: bottomLeftCenterX + 21, y: maxY))
        path.addLine(to: CGPoint(x: bottomLeftCenterX + 21 + 7, y: maxY + 6.2))
        path.addLine(to: CGPoint(x: bottomLeftCenterX + 21 + 14, y: maxY))

        path.addLine(to: CGPoint(x: bottomRightCenterX, y: maxY))
        // 底右
        path.addArc(withCenter: CGPoint(x: bottomRightCenterX, y: bottomRightCenterY), radius: cornerRadii.bottomRight, startAngle: CGFloat.pi / 2, endAngle: 0, clockwise: false)
        path.addLine(to: CGPoint(x: maxX, y: topRightCenterY))
        // 顶右
        path.addArc(withCenter: CGPoint(x: topRightCenterX, y: topRightCenterY), radius: cornerRadii.topRight, startAngle: 0, endAngle: CGFloat.pi / 2 * 3, clockwise: false)
        path.close()
        return path
    }

    func configShadowLayer() {
        let cornerRadii = CornerRadii(topLeft: 20, topRight: 20, bottomLeft: 20, bottomRight: 20)
        let path = CYPathCreateWIthRoundedRect(bounds: tipsLabel.bounds, cornerRadii: cornerRadii)
        shadowLayer.fillColor = UIColor.white.cgColor
        shadowLayer.path = path.cgPath
        shadowLayer.shadowPath = path.cgPath
        shadowLayer.shadowOpacity = 1
        shadowLayer.shadowColor = UIColor.gray.cgColor
        shadowLayer.shadowRadius =  6
        shadowLayer.shadowOffset = CGSize(width: 0, height: 2)
    }
注意:path.addArc(withCenter: CGPoint(x: topLeftCenterX, y: topLeftCenterY), radius: cornerRadii.topLeft, startAngle: CGFloat.pi / 2 * 3, endAngle: CGFloat.pi, clockwise: false) 中 圆角的startAngle 与 endAngle 均为顺时针角度,具体如图

图一
拓展
1. 有圆角的UIView 添加阴影
思路:
view.backgroundColor = .clear- 按照上文思路,设置 CAShapeLayer,作为 shadowLayer,然后
layer.addSublayer(shadowLayer),如果所有的圆角半径都一样的话,可以使用如下方法更简单一些let berPath = UIBezierPath(roundedRect: bounds, byRoundingCorners: [.topRight , .topLeft, .bottomLeft, .bottomRight], cornerRadii: CGSize(width: 8, height: 8)) - 添加一个 containerView, 其它所有的控件添加到这个 containerView 上,同时设置
containerView.layer.maskToBounds = true, 以及 borderColor、borderWidth 等 - 如果使用 SnapKit, 需要
override func layoutSubviews(),在layoutSubviews()方法中调用 生成 shadowLayer 的方法,或者在确定当前 view 尺寸以后再调用也可以。
2. 绘制分别有不同的圆角的 UIView
也可以通过上述方法绘制 UIView 四个角分别有不同的圆角,原理与设置圆角的几种方式类似