首先手机系统升级为iOS13,相应的xcode的版本要升级为11
注意: 使用xcode 10 编译的APP 在iOS13 上运行时没有问题的(如果你线上的包是使用xcode10 编译 且打包的,那么不用担心安装在iOS13上会有问题), 但是使用xcode11 编译的APP 放在iOS13 上可能会有问题,所以对项目做iOS13 的适配 是必不可少的!!!!
下面就看看都有哪些问题出现了?!
1、UITextField 的私有属性 _placeholderLabel 被禁止访问了
[self.textField setValue:self.placeholderColor forKeyPath:@"_placeholderLabel.textColor"];
应该改为:
UITextField有个attributedPlaceholder的属性,我们可以自定义这个富文本来达到我们需要的结果。
NSMutableAttributedString *placeholderString = [[NSMutableAttributedString alloc] initWithString:placeholder attributes:@{NSForegroundColorAttributeName : self.placeholderColor}];
_textField.attributedPlaceholder = placeholderString;
注意:iOS 13 通过 KVC 方式修改私有属性,有 Crash 风险,谨慎使用!并不是所有KVC都会Crash,要尝试!
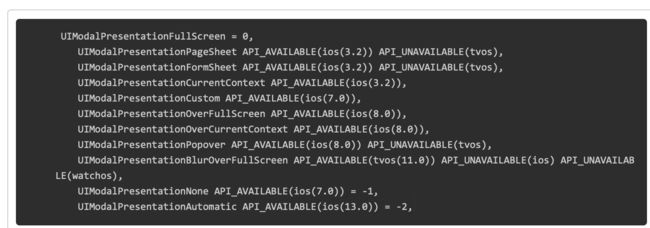
2、控制器的 modalPresentationStyle 默认值变了
有的present 出来的页面 你会发现 样式不一样了 ,并不是整个屏幕了,是因为 ios13 把默认出场方式给变,有一点注意的是,我们原来以全屏的样式弹出一个页面,那么将这个页面弹出的那个 ViewController 会依次调用 viewWillDisappear 和 viewDidDisappear。然后在这个页面被 dismiss 的时候,将他弹出的那个 ViewController 的 viewWillAppear 和 viewDidAppear 会被依次调用。然而使用默认的视差效果弹出页面,将他弹出的那个 ViewController 并不会调用这些方法,原先写在这四个函数中的代码以后都有可能会存在问题。
解决方法:
如果你完全接受苹果的这个默认效果,那就不需要去修改任何代码。如果,你原来就比较细心,已经设置了modalPresentationStyle的值,那你也不会有这个影响。对于想要找回原来默认交互的同学,直接设置如下即可:self.modalPresentationStyle = UIModalPresentationOverFullScreen;
3、MPMoviePlayerController 在iOS 13已经不能用了
4、iOS 13 DeviceToken有变化:
NSString *dt = [deviceToken description];
dt = [dt stringByReplacingOccurrencesOfString: @"<" withString: @""];
dt = [dt stringByReplacingOccurrencesOfString: @">" withString: @""];
dt = [dt stringByReplacingOccurrencesOfString: @" " withString: @""];
这段代码运行在 iOS 13 上已经无法获取到准确的DeviceToken字符串了,iOS 13 通过[deviceToken description]获取到的内容已经变了。
解决:
- (void)application:(UIApplication *)application didRegisterForRemoteNotificationsWithDeviceToken:(NSData *)deviceToken
{
if (![deviceToken isKindOfClass:[NSData class]]) return;
const unsigned *tokenBytes = [deviceToken bytes];
NSString *hexToken = [NSString stringWithFormat:@"%08x%08x%08x%08x%08x%08x%08x%08x",
ntohl(tokenBytes[0]), ntohl(tokenBytes[1]), ntohl(tokenBytes[2]),
ntohl(tokenBytes[3]), ntohl(tokenBytes[4]), ntohl(tokenBytes[5]),
ntohl(tokenBytes[6]), ntohl(tokenBytes[7])];
NSLog(@"deviceToken:%@",hexToken);
}
5、Sign in with Apple -提供第三方登录的注意啦
如果你的应用使用了第三方登录,那么你可能也需要加下 「Sign in with Apple」
Sign In with Apple will be available for beta testing this summer. It will be required as an option for users in apps that support third-party sign-in when it is commercially available later this year
(即如果你的应用使用了第三方登录,那么也必须加上苹果的登录,使用Apple ID,具体怎么使用,待研究后上传)。
6、即将废弃的 LaunchImage
从 iOS 8 的时候,苹果就引入了 LaunchScreen,我们可以设置 LaunchScreen来作为启动页。当然,现在你还可以使用LaunchImage来设置启动图。不过使用LaunchImage的话,要求我们必须提供各种屏幕尺寸的启动图,来适配各种设备,随着苹果设备尺寸越来越多,这种方式显然不够 Flexible。而使用 LaunchScreen的话,情况会变的很简单, LaunchScreen是支持AutoLayout+SizeClass的,所以适配各种屏幕都不在话下。
注意啦⚠️,从2020年4月开始,所有使⽤ iOS13 SDK的 App将必须提供 LaunchScreen,LaunchImage即将退出历史舞台。
7、tabBar 选中时的颜色 不起作用了(ios13 以前 设置选中的 颜色 是全局设置的)
NSDictionary * normalAttrs = @{NSForegroundColorAttributeName:UIColorFromRGB(0x222222)};
NSDictionary * selectAttrs = @{NSForegroundColorAttributeName:UIColorFromRGB(0xFF8301)};
[[UITabBarItem appearance]setTitleTextAttributes:normalAttrs forState:UIControlStateNormal];
[[UITabBarItem appearance]setTitleTextAttributes:selectAttrs forState:UIControlStateSelected];
iOS13 以后 适配方式如下:
if (@available(iOS 13.0, *)) {
//未选中下的颜色(ios10以后才有)
UITabBar.appearance.unselectedItemTintColor = UIColorFromRGB(0x222222);
//选中下的颜色(代替selectedImageTintColor)
UITabBar.appearance.tintColor = UIColorFromRGB(0xFF8301);
}else{
NSDictionary * normalAttrs = @{NSForegroundColorAttributeName:UIColorFromRGB(0x222222)};
NSDictionary * selectAttrs = @{NSForegroundColorAttributeName:UIColorFromRGB(0xFF8301)};
[[UITabBarItem appearance]setTitleTextAttributes:normalAttrs forState:UIControlStateNormal];
[[UITabBarItem appearance]setTitleTextAttributes:selectAttrs forState:UIControlStateSelected];
}
但是值得注意的是,@available(iOS 13.0, *) 这个代码如果在xcode11 上编译过了 放在xcode10 上可能会崩溃,因为xcode11 对 这个方法的API 做了变动,所以可以直接换成 判断系统版本
[UIDevice currentDevice].systemVersion.floatValue >=13.0
9、navigationBar的 frame 改变
iOS13以后 navigationbar的frame 为(0,0,screenWidth,44)
而 iOS13 以下 的frame 为(0,statuBar_hight,screenWidth,44)
10、UISearchBar 黑线处理导致崩溃(未经实证,可以测试一下)
之前为了处理搜索框的黑线问题,通常会遍历 searchBar 的 subViews,找到并删除 UISearchBarBackground,在 iOS13 中这么做会导致 UI 渲染失败,然后直接崩溃,崩溃信息如下:
解决办法是设置 UISearchBarBackground 的 layer.contents 为 nil:
11、使用 UISearchDisplayController 导致崩溃
在 iOS 8 之前,我们在 UITableView 上添加搜索框需要使用 UISearchBar + UISearchDisplayController 的组合方式,而在 iOS 8 之后,苹果就已经推出了 UISearchController 来代替这个组合方式。在 iOS 13 中,如果还继续使用 UISearchDisplayController 会直接导致崩溃,崩溃信息如下:
12、在 iOS 13 中终于可取直接获取搜索的文本框
13、UISegmentedControl 默认样式改变
默认样式变为白底黑字,如果设置修改过颜色的话,页面需要修改。原本设置选中颜色的 tintColor 已经失效,新增了 selectedSegmentTintColor 属性用以修改选中的颜色。
14、Xcode 11 创建的工程在低版本设备上运行黑屏
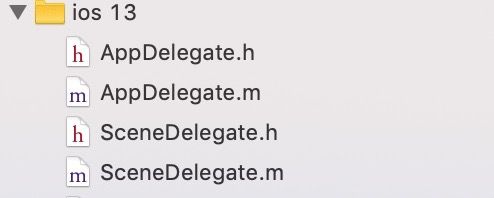
使用 Xcode 11 创建的工程,运行设备选择 iOS 13.0 以下的设备,运行应用时会出现黑屏。这是因为 Xcode 11 默认是会创建通过 UIScene 管理多个 UIWindow 的应用,工程中除了 AppDelegate 外会多一个 SceneDelegate:
多了两个文件 SceneDelegate.h SceneDelegate.m
这是因为iOS13的生命周期发生了改动,大家都知道,应用生命周期这个东西,一直到目前的iOS 12这个版本都是在AppDelegate里头(也就是UIApplicationDelegate里面),但是ios13版本包括之后,AppDelegate(UIApplicationDelegate)控制生命周期的行为交给了SceneDelegate(UIWindowSceneDelegate)
工程启动的时候 会运行以下方法,而不是appdelegate 中的application:(UIApplication *)application didFinishLaunchingWithOptions:(NSDictionary *)launchOptions方法
所以如果你将代码放到
这个方法中,会发现启动的时候 黑屏了,如果你不想用 ipad 的 多窗口 就不建议使用。如果还想保持原来的方式,该怎么做呢?
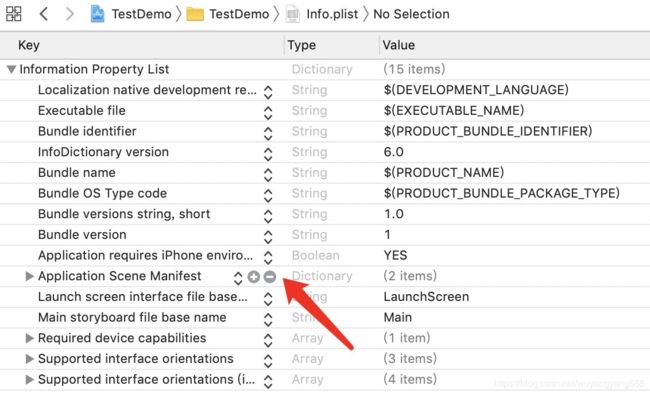
1.找到 info.plist 文件,删掉如下图所示
2.项目目录,删掉Scenedelegate.h和Scenedelegate.m这两个文件
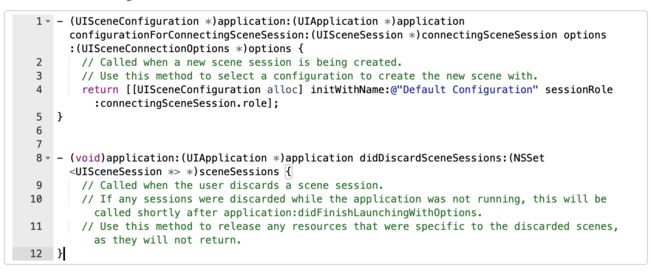
3、再进入APPdelegate.m,注释或者删掉图示里面内容
4.最后一步,别忘了在APPdelegate.h里面添加window属性
@property (strong, nonatomic) UIWindow * window;
最后,希望本篇文章对您有帮助,不对的地方还请各大网友批评指正!


