一、前言
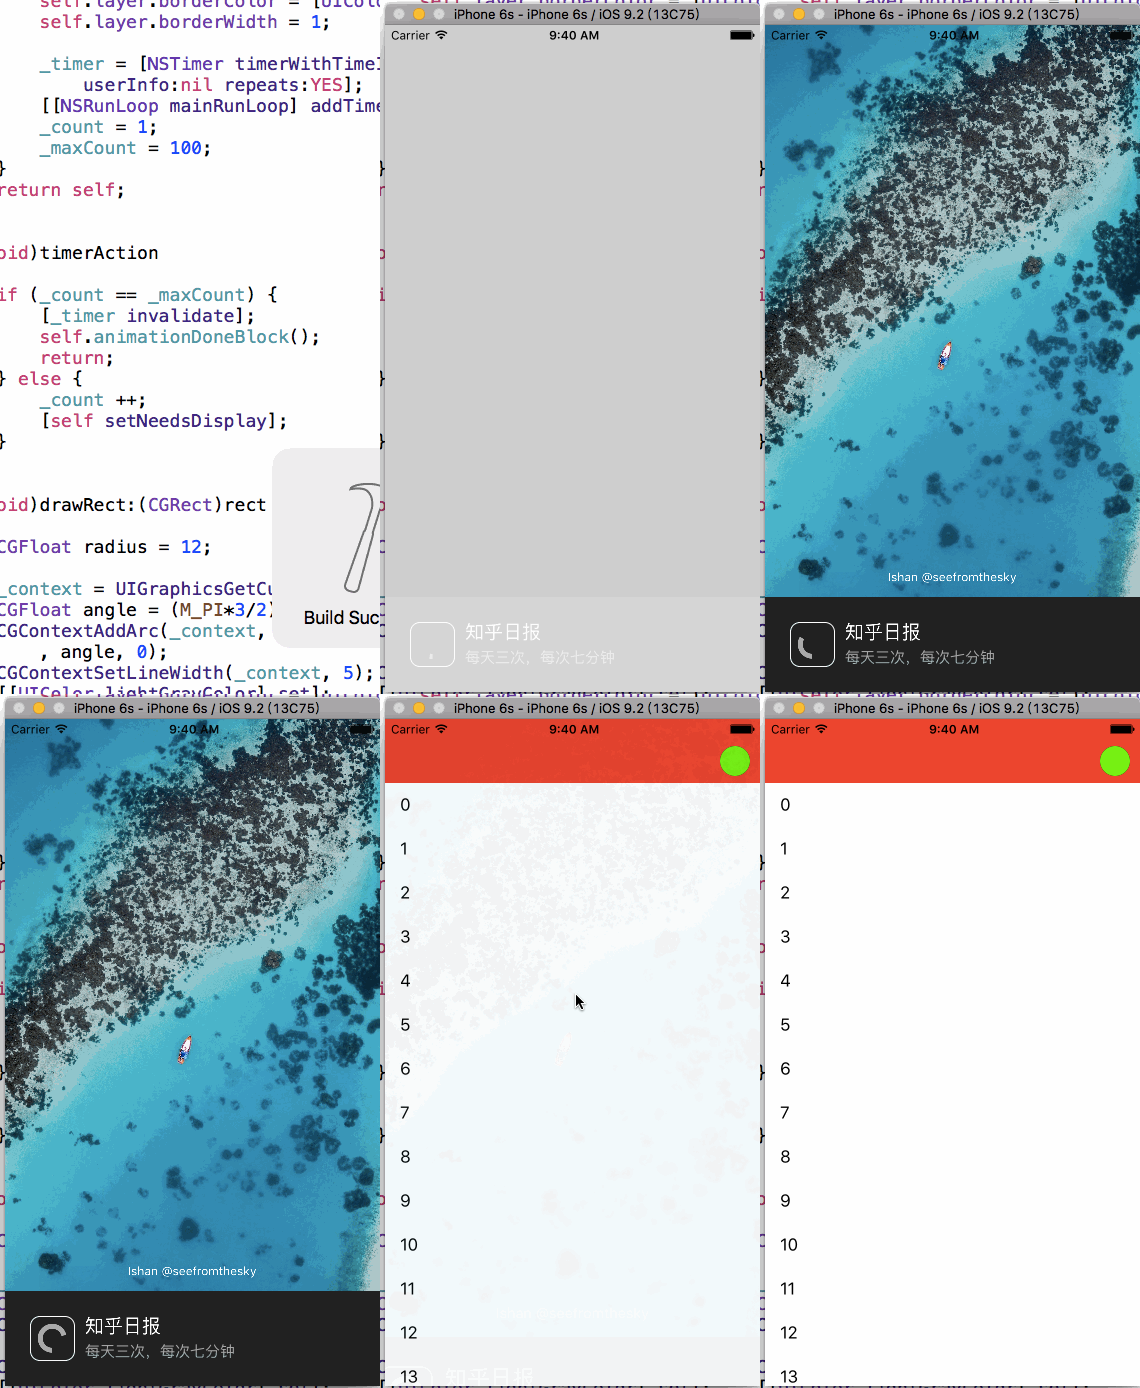
刚开始看到知乎日报的启动界面时,下面的动画logo以及配上好看的图片,特别舒服。然后老毛病又犯了,想着怎么去实现它,好了,下面还是说说这效果的实现。
二、效果图
三、需要掌握的
这里的重点在于logo动画的实现。这里用到的是用CGContextRef画图。 思路为自定义一个继承UIView的view,然后重写drawRect方法,在这个方法里画图。Graphics Context是图形上下文,可以将其理解为一块画布,我们可以在上面进行绘画操作,绘制完成后,将画布放到我们的view中显示即可,view看作是一个画框。
下面介绍一些常用的图形
a. 画圆
//context就相当于是画布
CGContextRef context = UIGraphicsGetCurrentContext();
//画笔线的颜色
CGContextSetRGBStrokeColor(context, 1, 1, 1, 1.0);
//设置填充颜色 (这里没什么用)
CGContextSetRGBFillColor (context,  1, 0, 0, 1.0);
//线的宽度
CGContextSetLineWidth(context, 1.0);
//参数分别为:哪个画布,圆点坐标x,圆点坐标y,半径,开始的弧度,结束的弧度,clockwise 0为顺时针,1为逆时针。
//添加一个圆
CGContextAddArc(context, 100, 20, 15, 0, 2*M_PI, 0);
//绘制路径
CGContextDrawPath(context, kCGPathStroke);
注:这里最后的kCGPathStroke有很多类型:
typedef CF_ENUM (int32_t, CGPathDrawingMode) {
  kCGPathFill, // 填充
  kCGPathEOFill,
  kCGPathStroke, // 只画边框
  kCGPathFillStroke,
  kCGPathEOFillStroke // 填充和边框
};
b. 直线
CGPoint aPoints[3];//坐标点
aPoints[0] = CGPointMake(100, 80);//坐标1
aPoints[1] = CGPointMake(130, 80);//坐标2
aPoints[2] = CGPointMake(130, 100);//坐标3
//参数分别为:哪个画布,坐标数组, 个数。
CGContextAddLines(context, aPoints, 3);//添加线
CGContextDrawPath(context, kCGPathStroke); //根据坐标绘制路径
c. 矩形
CGContextSetFillColorWithColor(context, [UIColor blueColor].CGColor);//填充颜色CGContextSetStrokeColorWithColor(context, [UIColor yellowColor].CGColor);//线框颜色
CGContextAddRect(context,CGRectMake(140, 120, 60, 30));//画方框
CGContextDrawPath(context, kCGPathFillStroke);//绘画路径
其实矩形完全可以用画直线的方式实现。
四、实现
新建一个view继承UIView并重写drawRect方法
- (instancetype)initWithFrame:(CGRect)frame
{
    if (self = [super initWithFrame:frame]) {
        self.backgroundColor = [UIColor clearColor];
        self.layer.cornerRadius = 10;
        self.layer.borderColor = [UIColor whiteColor].CGColor;
        self.layer.borderWidth = 1;
    }
    return self;
}

- (void)drawRect:(CGRect)rect
{
    CGFloat radius = 12;
    CGContextRef context = UIGraphicsGetCurrentContext();
    CGContextAddArc(context, self.bounds.size.width * 0.5, self.bounds.size.width * 0.5, radius, M_PI/2, 0, 0);
    CGContextSetLineWidth(context, 5);
    [[UIColor lightGrayColor] set];
    CGContextStrokePath(context);
}
先看效果:
已经有了logo但是没有动画。动画实现的思路是使用定时器。代码如下:
- (instancetype)initWithFrame:(CGRect)frame
{
    if (self = [super initWithFrame:frame]) {
        self.backgroundColor = [UIColor clearColor];
        self.layer.cornerRadius = 10;
        self.layer.borderColor = [UIColor whiteColor].CGColor;
        self.layer.borderWidth = 1;

        _timer = [NSTimer timerWithTimeInterval:0.01 target:self selector:@selector(timerAction) userInfo:nil repeats:YES];
        [[NSRunLoop mainRunLoop] addTimer:_timer forMode:NSRunLoopCommonModes];
        _count = 1;
        _maxCount = 100;
    }
    return self;
}

- (void)timerAction
{
    if (_count == _maxCount) {
        [_timer invalidate];
        self.animationDoneBlock();
        return;
    } else {
        _count ++;
        [self setNeedsDisplay];
    }
}

- (void)drawRect:(CGRect)rect
{
    CGFloat radius = 12;
    CGContextRef context = UIGraphicsGetCurrentContext();
    // 重点,计算当前的终点角度
    CGFloat angle = (M_PI*3/2)/_maxCount * _count + M_PI/2;
    CGContextAddArc(context, self.bounds.size.width * 0.5, self.bounds.size.width * 0.5, radius, M_PI/2, angle, 0);
    CGContextSetLineWidth(context, 5);
    [[UIColor lightGrayColor] set];
    CGContextStrokePath(context);
}
解释一下代码,每0.01秒执行一次timerAction方法,如果当前的count没有到达maxCount,那就重绘视图,然后angle会根据当前的终点角度,由于每0.01秒重绘一次,就会有较光滑的动画效果。
当到达maxCount时候,回调。告诉控制器动画结束。
控制器代码:
- (void)viewDidLoad
{
    [super viewDidLoad];

    [self setupView];

    [self getData];
}

- (void)setupView
{
    self.imageView = [UIImageView new];
    self.imageView.frame = [UIScreen mainScreen].bounds;
    self.imageView.backgroundColor = [UIColor blackColor];
    [self.view addSubview:self.imageView];


    self.textLabel = [UILabel new];
    self.textLabel.frame = CGRectMake(0, [UIScreen mainScreen].bounds.size.height-125, [UIScreen mainScreen].bounds.size.width, 20);
    self.textLabel.textColor = [UIColor whiteColor];
    self.textLabel.font = [UIFont systemFontOfSize:12];
    self.textLabel.textAlignment = NSTextAlignmentCenter;
    [self.imageView addSubview:self.textLabel];


    UIView *bottomView = [UIView new];
    bottomView.frame = CGRectMake(0, [UIScreen mainScreen].bounds.size.height-95, [UIScreen mainScreen].bounds.size.width, 95);
    bottomView.backgroundColor = [UIColor colorWithWhite:0.13 alpha:1.0];
    [self.imageView addSubview:bottomView];

    // 创建logoView
    self.logoView = [[YQLogoView alloc] initWithFrame:CGRectMake(25, 25, 45, 45)];
    __weak __typeof(self) weakSelf  = self;
    [self.logoView setAnimationDoneBlock:^{
        [weakSelf hide];
    }];
    [bottomView addSubview:self.logoView];

    UILabel *label1 = [UILabel new];
    label1.frame = CGRectMake(80, 20, 200, 30);
    label1.font = [UIFont systemFontOfSize:19];
    label1.text = @"知乎日报";
    label1.textColor = [UIColor whiteColor];
    [bottomView addSubview:label1];

    UILabel *label2 = [UILabel new];
    label2.frame = CGRectMake(80, 50, 200, 20);
    label2.font = [UIFont systemFontOfSize:15];
    label2.text = @"每天三次,每次七分钟";
    label2.textColor = [UIColor lightGrayColor];
    [bottomView addSubview:label2];
}

- (void)getData
{
    // 获得NSURLSession对象
    NSURLSession *session = [NSURLSession sharedSession];

    // 创建请求
    NSString *urlStr = @"http://news-at.zhihu.com/api/4/start-image/1080*1776";
    NSURLRequest *request = [NSURLRequest requestWithURL:[NSURL URLWithString:urlStr]];

    // 创建任务
    NSURLSessionDataTask *task = [session dataTaskWithRequest:request completionHandler:^(NSData *data, NSURLResponse *response, NSError *error) {
        NSDictionary *dic = [NSJSONSerialization JSONObjectWithData:data options:kNilOptions error:nil];
        NSData *imageData = [NSData dataWithContentsOfURL:[NSURL URLWithString:dic[@"img"]]];
        dispatch_async(dispatch_get_main_queue(), ^{
            self.textLabel.text = dic[@"text"];
            self.imageView.image = [UIImage imageWithData:imageData];
        });
    }];

    // 启动任务
    [task resume];
}

- (void)hide
{
    [UIView animateWithDuration:0.8 delay:1.0 options:0 animations:^{
        self.view.transform = CGAffineTransformMakeScale(1.2, 1.2);
        self.view.alpha = 0.01;
    } completion:^(BOOL finished) {
        [self.view removeFromSuperview];
    }];
}
拓展
展示启动界面的方法也有很多,我这里使用的是建一个UIWindow的分类,并自定义展示方法。方法的实现:
- (void)showLanuchPage
{
    YQLaunchViewController *launchVC = [[YQLaunchViewController alloc] init];
    [self addSubview:launchVC.view];
}
使用:
- (BOOL)application:(UIApplication *)application didFinishLaunchingWithOptions:(NSDictionary *)launchOptions
{
    self.window = [[UIWindow alloc] initWithFrame:[UIScreen mainScreen].bounds];
    self.window.backgroundColor = [UIColor whiteColor];
    self.window.rootViewController = [[ViewController alloc] init];
    [self.window makeKeyAndVisible];
    [self.window showLanuchPage];
    return YES;
}

