最新文章 [ 17.05.18 利用POI导出百万级别的Excel文件 ],用更好的方式导出Excel文件。
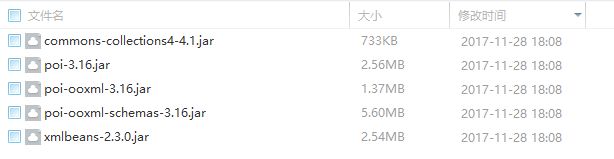
需求:利用poi进行Excel的导出与导入,这里用的poi的jar包是3.16版
- 导入jar包
链接: https://pan.baidu.com/s/1c2uCQy8#list/path=%2F
一、Excel的导出:
点击按钮后,会弹出下载框,可下载到用户自定义的路径
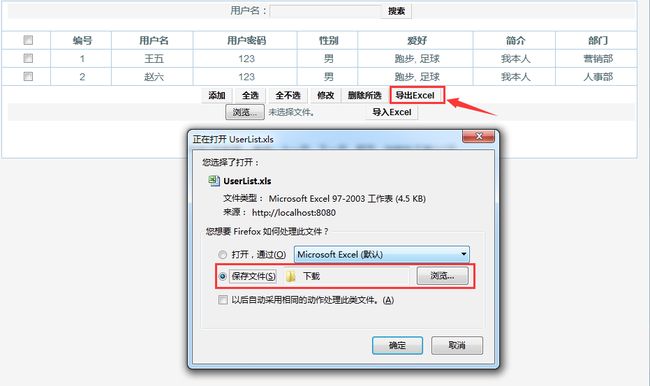
效果图
实现过程:
1、jsp页面
        $("#btn6").click(function() {
            location = "u_exportExcel";
        });
------------------------------------------------------------------------------------------------------------------------
2、工具类ExportExcel,可以复用
package utils;

import java.io.IOException;
import java.io.OutputStream;
import java.util.ArrayList;
import java.util.List;

import javax.servlet.http.HttpServletResponse;

import org.apache.poi.hssf.usermodel.HSSFCell;
import org.apache.poi.hssf.usermodel.HSSFCellStyle;
import org.apache.poi.hssf.usermodel.HSSFFont;
import org.apache.poi.hssf.usermodel.HSSFRichTextString;
import org.apache.poi.hssf.usermodel.HSSFRow;
import org.apache.poi.hssf.usermodel.HSSFSheet;
import org.apache.poi.hssf.usermodel.HSSFWorkbook;
import org.apache.poi.hssf.util.HSSFColor;
import org.apache.poi.ss.util.CellRangeAddress;

/**
 * 导出Excel公共方法
 */
public class ExportExcel {

    // 显示的导出表的标题
    private String title;
    // 导出表的列名
    private String[] rowName;

    private List dataList = new ArrayList();

    HttpServletResponse response;

    // 构造方法,传入要导出的数据
    public ExportExcel(String title, String[] rowName, List dataList) {
        this.dataList = dataList;
        this.rowName = rowName;
        this.title = title;
    }

    /*
     * 导出数据
     */
    public void export(OutputStream out) throws Exception {
        try {
            HSSFWorkbook workbook = new HSSFWorkbook(); // 创建工作簿对象
            HSSFSheet sheet = workbook.createSheet(title); // 创建工作表

            // 产生表格标题行
            HSSFRow rowm = sheet.createRow(0);
            HSSFCell cellTiltle = rowm.createCell(0);

            // sheet样式定义【getColumnTopStyle()/getStyle()均为自定义方法 - 在下面 - 可扩展】
            HSSFCellStyle columnTopStyle = this.getColumnTopStyle(workbook);// 获取列头样式对象
            HSSFCellStyle style = this.getStyle(workbook); // 单元格样式对象

            sheet.addMergedRegion(new CellRangeAddress(0, 1, 0,
                    (rowName.length - 1)));
            cellTiltle.setCellStyle(columnTopStyle);
            cellTiltle.setCellValue(title);

            // 定义所需列数
            int columnNum = rowName.length;
            HSSFRow rowRowName = sheet.createRow(2); // 在索引2的位置创建行(最顶端的行开始的第二行)

            // 将列头设置到sheet的单元格中
            for (int n = 0; n < columnNum; n++) {
                HSSFCell cellRowName = rowRowName.createCell(n); // 创建列头对应个数的单元格
                cellRowName.setCellType(HSSFCell.CELL_TYPE_STRING); // 设置列头单元格的数据类型
                HSSFRichTextString text = new HSSFRichTextString(rowName[n]);
                cellRowName.setCellValue(text); // 设置列头单元格的值
                cellRowName.setCellStyle(columnTopStyle); // 设置列头单元格样式
            }

            // 将查询出的数据设置到sheet对应的单元格中
            for (int i = 0; i < dataList.size(); i++) {

                Object[] obj = dataList.get(i);// 遍历每个对象
                HSSFRow row = sheet.createRow(i + 3);// 创建所需的行数

                for (int j = 0; j < obj.length; j++) {
                    HSSFCell cell = null; // 设置单元格的数据类型
                    if (j == 0) {
                        cell = row.createCell(j, HSSFCell.CELL_TYPE_NUMERIC);
                        cell.setCellValue(i + 1);
                    } else {
                        cell = row.createCell(j, HSSFCell.CELL_TYPE_STRING);
                        if (!"".equals(obj[j]) && obj[j] != null) {
                            cell.setCellValue(obj[j].toString()); // 设置单元格的值
                        }
                    }
                    cell.setCellStyle(style); // 设置单元格样式
                }
            }
            // 让列宽随着导出的列长自动适应
            for (int colNum = 0; colNum < columnNum; colNum++) {
                int columnWidth = sheet.getColumnWidth(colNum) / 256;
                for (int rowNum = 0; rowNum < sheet.getLastRowNum(); rowNum++) {
                    HSSFRow currentRow;
                    // 当前行未被使用过
                    if (sheet.getRow(rowNum) == null) {
                        currentRow = sheet.createRow(rowNum);
                    } else {
                        currentRow = sheet.getRow(rowNum);
                    }
                    if (currentRow.getCell(colNum) != null) {
                        HSSFCell currentCell = currentRow.getCell(colNum);
                        if (currentCell.getCellType() == HSSFCell.CELL_TYPE_STRING) {
                            int length = currentCell.getStringCellValue()
                                    .getBytes().length;
                            if (columnWidth < length) {
                                columnWidth = length;
                            }
                        }
                    }
                }
                if (colNum == 0) {
                    sheet.setColumnWidth(colNum, (columnWidth - 2) * 256);
                } else {
                    sheet.setColumnWidth(colNum, (columnWidth + 4) * 256);
                }
            }
            workbook.write(out);
        } catch (Exception e) {
            e.printStackTrace();
        }

    }

    /*
     * 列头单元格样式
     */
    public HSSFCellStyle getColumnTopStyle(HSSFWorkbook workbook) {

        // 设置字体
        HSSFFont font = workbook.createFont();
        // 设置字体大小
        font.setFontHeightInPoints((short) 11);
        // 字体加粗
        font.setBoldweight(HSSFFont.BOLDWEIGHT_BOLD);
        // 设置字体名字
        font.setFontName("Courier New");
        // 设置样式;
        HSSFCellStyle style = workbook.createCellStyle();
        // 设置底边框;
        style.setBorderBottom(HSSFCellStyle.BORDER_THIN);
        // 设置底边框颜色;
        style.setBottomBorderColor(HSSFColor.BLACK.index);
        // 设置左边框;
        style.setBorderLeft(HSSFCellStyle.BORDER_THIN);
        // 设置左边框颜色;
        style.setLeftBorderColor(HSSFColor.BLACK.index);
        // 设置右边框;
        style.setBorderRight(HSSFCellStyle.BORDER_THIN);
        // 设置右边框颜色;
        style.setRightBorderColor(HSSFColor.BLACK.index);
        // 设置顶边框;
        style.setBorderTop(HSSFCellStyle.BORDER_THIN);
        // 设置顶边框颜色;
        style.setTopBorderColor(HSSFColor.BLACK.index);
        // 在样式用应用设置的字体;
        style.setFont(font);
        // 设置自动换行;
        style.setWrapText(false);
        // 设置水平对齐的样式为居中对齐;
        style.setAlignment(HSSFCellStyle.ALIGN_CENTER);
        // 设置垂直对齐的样式为居中对齐;
        style.setVerticalAlignment(HSSFCellStyle.VERTICAL_CENTER);

        return style;

    }

    /*
     * 列数据信息单元格样式
     */
    public HSSFCellStyle getStyle(HSSFWorkbook workbook) {
        // 设置字体
        HSSFFont font = workbook.createFont();
        // 设置字体大小
        // font.setFontHeightInPoints((short)10);
        // 字体加粗
        // font.setBoldweight(HSSFFont.BOLDWEIGHT_BOLD);
        // 设置字体名字
        font.setFontName("Courier New");
        // 设置样式;
        HSSFCellStyle style = workbook.createCellStyle();
        // 设置底边框;
        style.setBorderBottom(HSSFCellStyle.BORDER_THIN);
        // 设置底边框颜色;
        style.setBottomBorderColor(HSSFColor.BLACK.index);
        // 设置左边框;
        style.setBorderLeft(HSSFCellStyle.BORDER_THIN);
        // 设置左边框颜色;
        style.setLeftBorderColor(HSSFColor.BLACK.index);
        // 设置右边框;
        style.setBorderRight(HSSFCellStyle.BORDER_THIN);
        // 设置右边框颜色;
        style.setRightBorderColor(HSSFColor.BLACK.index);
        // 设置顶边框;
        style.setBorderTop(HSSFCellStyle.BORDER_THIN);
        // 设置顶边框颜色;
        style.setTopBorderColor(HSSFColor.BLACK.index);
        // 在样式用应用设置的字体;
        style.setFont(font);
        // 设置自动换行;
        style.setWrapText(false);
        // 设置水平对齐的样式为居中对齐;
        style.setAlignment(HSSFCellStyle.ALIGN_CENTER);
        // 设置垂直对齐的样式为居中对齐;
        style.setVerticalAlignment(HSSFCellStyle.VERTICAL_CENTER);

        return style;

    }
}
3、UserAction中的exportExcel方法
    public String exportExcel() throws Exception {

        // 初始化HttpServletResponse对象
        HttpServletResponse response = ServletActionContext.getResponse();

        // 定义表的标题
        String title = "员工列表一览";

        //定义表的列名
        String[] rowsName = new String[] { "员工编号", "姓名", "性别", "特长", "学历",
                "入职时间", "简历", "照片", "部门" };

        //定义表的内容
        List dataList = new ArrayList();
        Object[] objs = null;
        List listPerson = ps.listPerson();
        for (int i = 0; i < listPerson.size(); i++) {
            Person per = listPerson.get(i);
            objs = new Object[rowsName.length];
            objs[0] = per.getPid();
            objs[1] = per.getPname();
            objs[2] = per.getPsex();
            objs[3] = per.getSkilled();
            objs[4] = per.getDegree();
            SimpleDateFormat df = new SimpleDateFormat("yyyy-MM-dd");
            String date = df.format(per.getJobtime());
            objs[5] = date;
            objs[6] = per.getResume();
            objs[7] = per.getFilepath();
            objs[8] = per.getDept().getDname();
            dataList.add(objs);
        }

        // 创建ExportExcel对象
        ExportExcel ex = new ExportExcel(title, rowsName, dataList);

        // 输出Excel文件
        try {
            OutputStream output = response.getOutputStream();
            response.reset();
            response.setHeader("Content-disposition",
                    "attachment; filename=PersonList.xls");
            response.setContentType("application/msexcel");
            ex.export(output);
            output.close();
        } catch (IOException e) {
            e.printStackTrace();
        }

        return "tolist";// 返回列表显示
    }
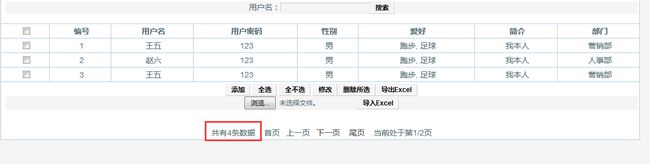
3、配置完成后,在jsp页面中调用这个方法即可导出Excel文件,效果如图
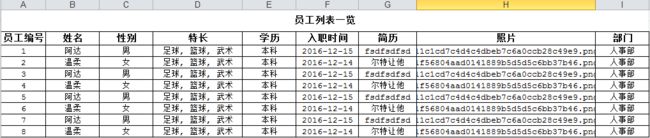
导出excel效果
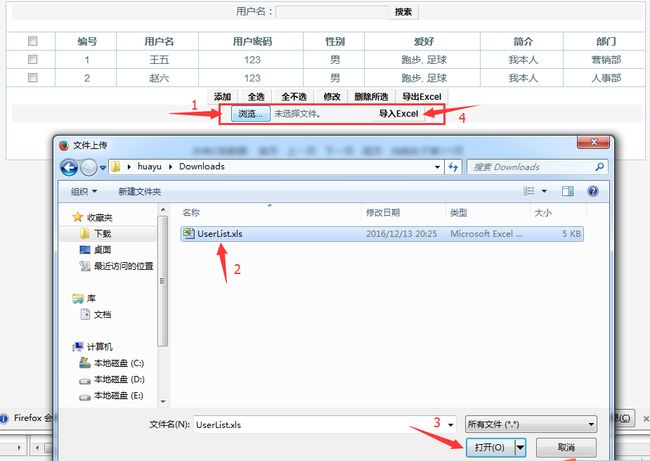
二、Excel的导入:
让用户选择Excel文件,然后再上传至服务器中
Excel的导入有两个关键点:
一是先把Excel文件上传至服务器中,然后找到所在路径
二是数据库插入数据时t_user表中的did字段,先要获取数据库的部门列表,再与Excel表中的部门信息进行匹配,匹配成功后获取对应的did,再插入到t_user表中。
1、jsp页面
<%@ taglib prefix="s" uri="/struts-tags"%>

------------------------------------------------------------------------------------------------------------------------
        $("#btn7").click(function() {
            var aa = $("#upload").val();
            if (aa != "") {
                kk.submit();
            } else {
                alert("请选择Excel文件!");
            }
        });
------------------------------------------------------------------------------------------------------------------------
2、UserAction中的importExcel方法
    public String importExcel() throws Exception {

        // 初始化HttpServletRequest对象
        HttpServletRequest request = ServletActionContext.getRequest();

        // 获得文件名
        String filename = getMyfileFileName();

        // 上传文件到服务器中
        filename = FileUpload2.upload(filename, myfile);

        User user = new User();// 新建一个user对象
        Dept dept = new Dept();// 新建一个dept对象

        // 获取服务器中文件的路径
        String path = request.getSession().getServletContext().getRealPath("")
                + "/upload/" + filename;

        try {
            InputStream is = new FileInputStream(path);
            HSSFWorkbook hssfWorkbook = new HSSFWorkbook(is);

            // 循环工作表Sheet
            for (int numSheet = 0; numSheet < hssfWorkbook.getNumberOfSheets(); numSheet++) {
                HSSFSheet hssfSheet = hssfWorkbook.getSheetAt(numSheet);
                if (hssfSheet == null) {
                    continue;
                }

                // 循环行Row
                for (int rowNum = 3; rowNum <= hssfSheet.getLastRowNum(); rowNum++) {
                    HSSFRow hssfRow = hssfSheet.getRow(rowNum);
                    if (hssfRow == null) {
                        continue;
                    }

                    // 循环列Cell
                    // "姓名","密码","性别","爱好","简介","部门did"};
                    user.setName(getValue(hssfRow.getCell(1)));
                    user.setPwd(getValue(hssfRow.getCell(2)));
                    user.setSex(getValue(hssfRow.getCell(3)));
                    user.setHobby(getValue(hssfRow.getCell(4)));
                    user.setJl(getValue(hssfRow.getCell(5)));

                    //这里很重要,通过部门列表然后与excel中的部门字段进行对比,匹配后获取对应的did
                    String dname = getValue(hssfRow.getCell(6));//获取excel中的部门字段
                    listDept = dbDept.listDept();//得到数据库中的部门列表
                    for (Dept dd : listDept) {//增强for循环
                        if (dd.getDname().equals(dname)) {//如果两者匹配
                            dept.setDid(dd.getDid());//则得到对应的did,并设置dept对象的did
                            user.setDept(dept);//再把dept对象设置到user对象中
                        }
                    }

                    dbUser.addUser(user);//写入到数据中
                }
            }
        } catch (Exception e) {
            // TODO: handle exception
            e.printStackTrace();
        }

        return "show";//返回列表显示
    }

    /**
     * 得到Excel表中的值
     *
     * @param hssfCell
     *            Excel中的每一个格子
     * @return Excel中每一个格子中的值
     */
    @SuppressWarnings("static-access")
    private static String getValue(HSSFCell hssfCell) {
        if (hssfCell.getCellType() == hssfCell.CELL_TYPE_BOOLEAN) {
            // 返回布尔类型的值
            return String.valueOf(hssfCell.getBooleanCellValue());
        } else if (hssfCell.getCellType() == hssfCell.CELL_TYPE_NUMERIC) {
            // 返回数值类型的值
            return String.valueOf(hssfCell.getNumericCellValue());
        } else {
            // 返回字符串类型的值
            return String.valueOf(hssfCell.getStringCellValue());
        }

    }
3、然后插入新的内容后,返回到列表显示页面
导入Excel文件后效果图
注:目前暂时只实现了原有内容上的增加,也可对数据库进行清空然后再插入新的数据
项目下载:
链接:http://pan.baidu.com/s/1kVkCswZ 密码:yjlk