前言
最近项目中使用到了Mybatis持久层框架,由于从来没有深入的了解过基于Java语言实现的持久层框架,于是有点心血来潮,所以就有了这篇长文。下面是来自mybatis官网对其的简单介绍。
MyBatis 是支持定制化 SQL、存储过程以及高级映射的优秀的持久层框架。MyBatis 避免了几乎所有的 JDBC 代码和手动设置参数以及获取结果集。MyBatis 可以对配置和原生Map使用简单的 XML 或注解,将接口和 Java 的 POJOs(Plain Old Java Objects,普通的 Java对象)映射成数据库中的记录。
深入方式
个人觉得最好的学习新东西的方式就是demo,所以打算从头到位搭建一个demo来贯通整篇文章,下面一一介绍demo中用到的文件,完整示例可参考附件。
Demo入口 (MybatisDemo.java)
import com.hackx.hackspring.domain.memeber.MemberDO;
import com.hackx.hackspring.mapper.member.MemberMapper;
import org.apache.ibatis.io.Resources;
import org.apache.ibatis.session.SqlSession;
import org.apache.ibatis.session.SqlSessionFactory;
import org.apache.ibatis.session.SqlSessionFactoryBuilder;

import java.io.IOException;
import java.io.InputStream;

/**
* Created by hackx on 9/26/16.
*/
public class MybatisDemo {

public static void main(String[] args) throws IOException {
String resource = "mybatis-demo-config.xml";
InputStream inputStream = Resources.getResourceAsStream(resource);
SqlSessionFactory sqlSessionFactory = new SqlSessionFactoryBuilder().build(inputStream);

SqlSession session = sqlSessionFactory.openSession();
try {
MemberMapper memberMapper = session.getMapper(MemberMapper.class);
MemberDO memberDO = memberMapper.queryById(1L);
System.out.println(memberDO.toString());
} finally {
session.close();
}
}
}
Mybatis配置 (mybatis-demo-config.xml)
Mapper XML (member-mapper.xml)
id, gmt_create, gmt_modified, name, age, email, password
Mapper 接口(MemberMapper.java)
import com.hackx.hackspring.domain.memeber.MemberDO;
import org.apache.ibatis.annotations.Mapper;

/**
* Created by hackx on 8/21/16.
*/
@Mapper
public interface MemberMapper {

MemberDO queryById(Long id);
}
DataObject (MemberDO.java)
import java.io.Serializable;
import java.util.Date;

/**
* Created by hackx on 8/21/16.
*/
public class MemberDO implements Serializable {
/**
* 主键ID
*/
private Long id;
/**
* 创建时间
*/
private Date gmtCreate;
/**
* 修改时间
*/
private Date gmtModified;
/**
* 会员名称
*/
private String name;
/**
* 会员年龄
*/
private Integer age;
/**
* 会员邮箱地址
*/
private String email;
/**
* 会员密码
*/
private String password;

public Long getId() {
return id;
}

public void setId(Long id) {
this.id = id;
}

public Date getGmtCreate() {
return gmtCreate;
}

public void setGmtCreate(Date gmtCreate) {
this.gmtCreate = gmtCreate;
}

public Date getGmtModified() {
return gmtModified;
}

public void setGmtModified(Date gmtModified) {
this.gmtModified = gmtModified;
}

public String getName() {
return name;
}

public void setName(String name) {
this.name = name;
}

public Integer getAge() {
return age;
}

public void setAge(Integer age) {
this.age = age;
}

public String getEmail() {
return email;
}

public void setEmail(String email) {
this.email = email;
}

public String getPassword() {
return password;
}

public void setPassword(String password) {
this.password = password;
}

@Override
public String toString() {
return "MemberDO{" +
"id=" + id +
", gmtCreate=" + gmtCreate +
", gmtModified=" + gmtModified +
", name='" + name + '\'' +
", age=" + age +
", email='" + email + '\'' +
", password='" + password + '\'' +
'}';
}
}
上述就是此Demo用到的所有相关的文件,下面按照程序运行的顺序依次介绍Mybatis的核心功能模块。
Mybatis应用入口之配置文件
每个基于 MyBatis 的应用都是以一个 SqlSessionFactory 的实例为中心的。SqlSessionFactory 的实例可以通过 SqlSessionFactoryBuilder 获得。而 SqlSessionFactoryBuilder 则可以从 XML 配置文件或一个预先定制的 Configuration 的实例构建出 SqlSessionFactory 的实例。所以Mybatis的入口点加载Mybatis的配置文件(本示例中的mybatis-demo-config.xml), Mybatis源码中org.apache.ibatis.io包下负责文件的读取,将本地文件以Reader(字符)或者InputStream(字节)的方式读入内存. 下面两行代码完成了Mybatis配置文件的加载过程。
String resource = "mybatis-demo-config.xml";
InputStream inputStream = Resources.getResourceAsStream(resource);
加载过程中,主要涉及了两个类:Resources和ClassLoaderWrapper,两个类都在包org.apache.ibatis.io下。下面我们先简单介绍下Resources类:
Resources类
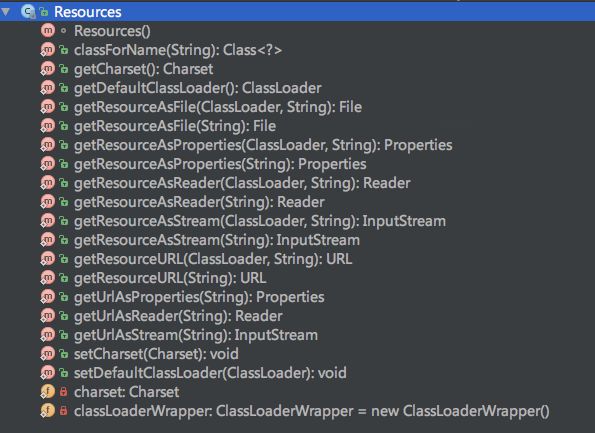
上图是Resources类中含有的成员变量和方法的签名,其中有几个比较重要的方法:
public static URL getResourceURL(ClassLoader, String)
public static InputStream getResourceAsStream(ClassLoader, String)
public static Properties getResourceAsProperties(ClassLoader, String)
public static Reader getResourceAsReader(ClassLoader, String)
public static File getResourceAsFile(ClassLoader, String)
以上几个不同的方法提供了文件在内存的不同表现形式,相信每个方法的意义,我们从字面上就已经很好的理解了。对于加载Mybatis配置XML文件而言,最常用的是下面两个方法:
public static InputStream getResourceAsStream(ClassLoader, String)
public static Reader getResourceAsReader(ClassLoader, String)
ClassLoaderWrapper类

Resources类在Mybatis配置文件加载的过程中,仅仅是为Mybatis框架提供接口,并不参与真正的文件加载操作。而真正的文件加载到内容的操作是由ClassLoaderWrapper完成的。ClassLoaderWrapper封装了java.lang.ClassLoader这个类,而配置文件的加载是使用ClassLoader完成的。下图是配置文件加载的时序图。
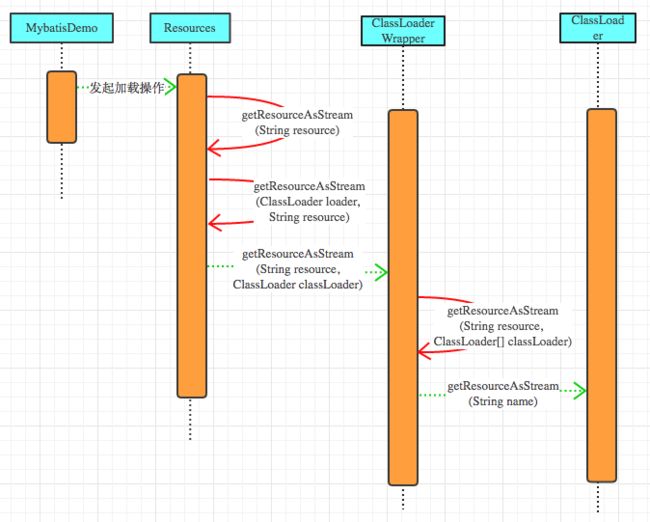
ClassLoader是java提供对外开放的类加载机制,至于ClassLoader的详细使用,可以参考这两篇文章深入分析Java ClassLoader原理 , Java Classloader Wiki 详细了解下,本文不再做过多的介绍。
SqlSessionFactory创建
SqlSessionFactory sqlSessionFactory = new SqlSessionFactoryBuilder().build(inputStream);
SqlSessionFactoryBuilder根据Resources类生成返回的配置文件inputStream来构建SqlSessionFactory,一旦创建了SqlSessionFactory,就不再需要它了,其中涉及到的相关类的关系如下:
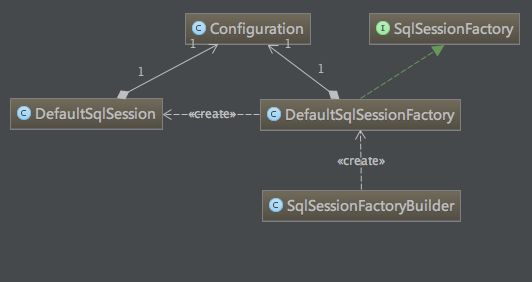
SqlSessionFactoryBuilder实例调用build方法,返回SqlSessionFactory实例
public SqlSessionFactory build(InputStream inputStream) {
return build(inputStream, null, null);
}
而真正执行build逻辑的是下面通的用build方法,注意这里的environment和properties均为null
public SqlSessionFactory build(InputStream inputStream, String environment, Properties properties) {
try {
XMLConfigBuilder parser = new XMLConfigBuilder(inputStream, environment, properties);
return build(parser.parse());
} catch (Exception e) {
throw ExceptionFactory.wrapException("Error building SqlSession.", e);
} finally {
ErrorContext.instance().reset();
try {
inputStream.close();
} catch (IOException e) {
// Intentionally ignore. Prefer previous error.
}
}
}
从上述代码中我们可以看出,首先创建了XMLConfigBuilder实例,暂时先忽略XMLConfigBuilder的执行逻辑,后面会详细介绍;然后调用XMLConfigBuilder实例的parse方法,返回一个Configuration对象,然后将返回的Configuration对象当作参数传给下面的build方法,生成SqlSessionFactory实例。
public SqlSessionFactory build(Configuration config) {
return new DefaultSqlSessionFactory(config);
}
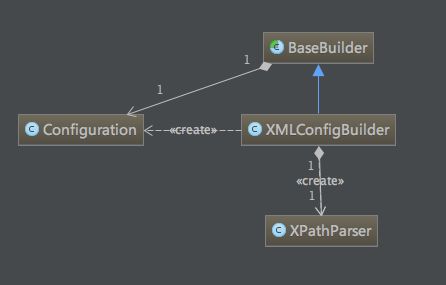
在SqlSessionFactory创建过程中,我们用到了XMLConfigBuilder,它与Configuration类的关系如下图,
XMLConfigBuilder构造方法
//创建XPathParser实例
public XMLConfigBuilder(InputStream inputStream, String environment, Properties props) {
this(new XPathParser(inputStream, true, props, new XMLMapperEntityResolver()), environment, props);
}
其中比较重要的部分是创建XPathParser实例
//创建XPathParser实例
public XPathParser(InputStream inputStream, boolean validation, Properties variables, EntityResolver entityResolver) {
commonConstructor(validation, variables, entityResolver);
this.document = createDocument(new InputSource(inputStream));
}
commonConstructor完成的工作如下,最重要的是创建了了xpath实例对象,有了它,我们有可以使用JDK提供的Xpath工具类来来解析XML文件了(此处为mybatis-demo-config.xml)
private void commonConstructor(boolean validation, Properties variables, EntityResolver entityResolver) {
this.validation = validation;
this.entityResolver = entityResolver;
this.variables = variables;
XPathFactory factory = XPathFactory.newInstance();
this.xpath = factory.newXPath();
}
构建了XMLConfigBuilder的实例后,调用其parse()方法,其中parser.evalNode("/configuration")获取到的是根结点
public Configuration parse() {
if (parsed) {
throw new BuilderException("Each XMLConfigBuilder can only be used once.");
}
parsed = true;
parseConfiguration(parser.evalNode("/configuration"));
return configuration;
}
然后通过以parser.evalNode("/configuration")返回的根节点为参数,调用parseConfiguration,分别将对应的值解析出来塞进
Configuration实例configuration中
private void parseConfiguration(XNode root) {
try {
Properties settings = settingsAsPropertiess(root.evalNode("settings"));
//issue #117 read properties first
propertiesElement(root.evalNode("properties"));
loadCustomVfs(settings);
typeAliasesElement(root.evalNode("typeAliases"));
pluginElement(root.evalNode("plugins"));
objectFactoryElement(root.evalNode("objectFactory"));
objectWrapperFactoryElement(root.evalNode("objectWrapperFactory"));
reflectionFactoryElement(root.evalNode("reflectionFactory"));
settingsElement(settings);
// read it after objectFactory and objectWrapperFactory issue #631
environmentsElement(root.evalNode("environments"));
databaseIdProviderElement(root.evalNode("databaseIdProvider"));
typeHandlerElement(root.evalNode("typeHandlers"));
mapperElement(root.evalNode("mappers"));
} catch (Exception e) {
throw new BuilderException("Error parsing SQL Mapper Configuration. Cause: " + e, e);
}
}
}
从parseConfiguration中我们可以看出mybatis配置文件的大致结构,根节点为configuration,子节点包括properties、typeAliases、plugins、objectFactory、objectWrapperFactory、reflectionFactory、environments、databaseIdProvider、typeHandlers、mappers、settings等,因为我们平时大部分都是使用Spring来进行管理的,所有有些配置项可能会比较陌生,随后我们会重点解释。上述代码中比较重要的类有XNode,XPathParser;XNode是Node类的扩展,XPathParser是xml文件的解析器工具类。XPathParser中比较重要的方法是:public XNode evalNode(String expression)而evalNode最终调用的是com.sun.org.apache.xpath.internal.jaxp.XPathImpl
里的public Object evaluate(String expression, Object item, QName returnType).
下面是解析mappers的源码,供参考。
private void mapperElement(XNode parent) throws Exception {
if (parent != null) {
for (XNode child : parent.getChildren()) {
if ("package".equals(child.getName())) {
String mapperPackage = child.getStringAttribute("name");
configuration.addMappers(mapperPackage);
} else {
String resource = child.getStringAttribute("resource");
String url = child.getStringAttribute("url");
String mapperClass = child.getStringAttribute("class");
if (resource != null && url == null && mapperClass == null) {
ErrorContext.instance().resource(resource);
InputStream inputStream = Resources.getResourceAsStream(resource);
XMLMapperBuilder mapperParser = new XMLMapperBuilder(inputStream, configuration, resource, configuration.getSqlFragments());
mapperParser.parse();
} else if (resource == null && url != null && mapperClass == null) {
ErrorContext.instance().resource(url);
InputStream inputStream = Resources.getUrlAsStream(url);
XMLMapperBuilder mapperParser = new XMLMapperBuilder(inputStream, configuration, url, configuration.getSqlFragments());
mapperParser.parse();
} else if (resource == null && url == null && mapperClass != null) {
Class mapperInterface = Resources.classForName(mapperClass);
configuration.addMapper(mapperInterface);
} else {
throw new BuilderException("A mapper element may only specify a url, resource or class, but not more than one.");
}
}
}
}
}
SqlSession创建
SqlSession session = sqlSessionFactory.openSession();
通过调用sqlSessionFactory的openSession方法来创建SqlSession实例
//DefaultSqlSessionFactory里的openSession
public SqlSession openSession() {
return openSessionFromDataSource(configuration.getDefaultExecutorType(), null, false);
}
private SqlSession openSessionFromDataSource(ExecutorType execType, TransactionIsolationLevel level, boolean autoCommit) {
Transaction tx = null;
try {
final Environment environment = configuration.getEnvironment();
final TransactionFactory transactionFactory = getTransactionFactoryFromEnvironment(environment);
tx = transactionFactory.newTransaction(environment.getDataSource(), level, autoCommit);
final Executor executor = configuration.newExecutor(tx, execType);
return new DefaultSqlSession(configuration, executor, autoCommit);
} catch (Exception e) {
closeTransaction(tx); // may have fetched a connection so lets call close()
throw ExceptionFactory.wrapException("Error opening session. Cause: " + e, e);
} finally {
ErrorContext.instance().reset();
}
}
上述代码涉及到了执行器,因为最终我们是要执行SQL的,所以这东西一定不能少。执行器有三类:SIMPLE(普通执行器),REUSE(执行器会重用预处理语句)和BATCH(执行器将重用语句并批量执行)
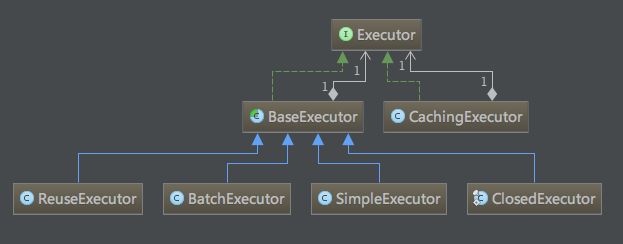
//执行器生成过程
public Executor newExecutor(Transaction transaction, ExecutorType executorType) {
executorType = executorType == null ? defaultExecutorType : executorType;
executorType = executorType == null ? ExecutorType.SIMPLE : executorType;
Executor executor;
if (ExecutorType.BATCH == executorType) {
executor = new BatchExecutor(this, transaction);
} else if (ExecutorType.REUSE == executorType) {
executor = new ReuseExecutor(this, transaction);
} else {
executor = new SimpleExecutor(this, transaction);
}
if (cacheEnabled) {
executor = new CachingExecutor(executor);
}
executor = (Executor) interceptorChain.pluginAll(executor);
return executor;
}
在生成执行器时有个是否缓存的判断if (cacheEnabled),这个配置时二级缓存的开关,在配置mybatis的时候,可按照下面的配置将二级缓存打开
执行器创建后,通过生成DefaultSqlSession的实例对象,最终创建SqlSession,需要注意的是SqlSession 实例不是线程安全的,是不能被共享的,所以它的最佳范围是请求或方法范围.每个线程都应该有自己的SqlSession实例.
public DefaultSqlSession(Configuration configuration, Executor executor, boolean autoCommit) {
this.configuration = configuration;
this.executor = executor;
this.dirty = false;
this.autoCommit = autoCommit;
}
Member对象创建及SQL执行
这个过程没看太懂,其中涉及了一些Proxy代理的东西,先把代码罗列在这,后续在慢慢补充。
MemberMapper memberMapper = session.getMapper(MemberMapper.class);
MemberDO memberDO = memberMapper.queryById(1L);
public  T getMapper(Class type) {
return configuration.getMapper(type, this);
}
public  T getMapper(Class type, SqlSession sqlSession) {
return mapperRegistry.getMapper(type, sqlSession);
}
final MapperProxyFactory mapperProxyFactory = (MapperProxyFactory) knownMappers.get(type);
if (mapperProxyFactory == null) {
throw new BindingException("Type " + type + " is not known to the MapperRegistry.");
}
try {
return mapperProxyFactory.newInstance(sqlSession);
} catch (Exception e) {
throw new BindingException("Error getting mapper instance. Cause: " + e, e);
}
public T newInstance(SqlSession sqlSession) {
final MapperProxy mapperProxy = new MapperProxy(sqlSession, mapperInterface, methodCache);
return newInstance(mapperProxy);
}
protected T newInstance(MapperProxy mapperProxy) {
return (T) Proxy.newProxyInstance(mapperInterface.getClassLoader(), new Class[] { mapperInterface }, mapperProxy);
}