1:说明
网上这类文章 太多, 一搜一大把 ,但是要不是知识太过于老旧,就是配置没有说名清楚,你的项目按照他的配置却不能正常运行:
所以本文的目的: 配置swagger 2 那swagger 1 不说一下吗,我觉得没有必要了,确实需要以jar包方式构建 或者 维护老项目,那么参考下面的连接
https://github.com/swagger-api/swagger-ui/tree/2.x/dist 下载这个路径内容,导入相关依赖即可,不建议使用
2: swagger2 部署方式1
2.1: 导入lib
    io.springfox
    springfox-swagger2
    2.9.2


    io.springfox
    springfox-swagger-ui
    2.9.2
2.2 2: 创建配置类
@Configuration
@EnableSwagger2
public class Swagger2 {
    @Bean
    public Docket createRestApi() {
        return new Docket(DocumentationType.SWAGGER_2)
                .apiInfo(apiInfo())
                .select()
                // 扫描包路径
                .apis(RequestHandlerSelectors.basePackage("com.dgw.controller"))
                // 扫描@APi 标记的Class
                //.apis(RequestHandlerSelectors.withClassAnnotation(ApiOperation.class))
                .paths(PathSelectors.any())
                .build();
    }
    private ApiInfo apiInfo() {
        return new ApiInfoBuilder()
                .title("Swagger2构建RESTful APIs")
                .description(" 项目 ")
                .contact(new Contact("dgw", "https://www.cnblogs.com/dgwblog/", "[email protected]"))
                .version("1.0")
                .build();
    }
}
2.3 基本上到这里 网上那些教程让你启动 http://localhost:8080/swagger-ui.html# 访问查看,然后介绍API就完事了 ? 他难道没有用到 拦截器 Spring Boot 访问映射 ? 你开发项目 就是一个hello world? 哈哈
下面你必须配置资源映射 sping boot 2 在webmvcconfigurationsupport中配置
/**
 * 支持webjars
 */
registry.addResourceHandler("/webjars/**")
        .addResourceLocations("classpath:/META-INF/resources/webjars/");
/**
 * 支持swagger
 */
// 解决 SWAGGER 404报错
registry.addResourceHandler("/swagger-ui.html").addResourceLocations("classpath:/META-INF/resources/");
2.4 如果你的项目展示没有使用到拦截器 那么是可以成功访问的 ,但是最好知道需要配置拦截器
registry.addInterceptor(new LoginIntercepter()).addPathPatterns("/**")
        .excludePathPatterns("/user/login","/","/index")
           // swagger 排除规则
           .excludePathPatterns("/swagger-ui.html")
           .excludePathPatterns("/swagger-resources/**")
           .excludePathPatterns("/error")
           .excludePathPatterns("/webjars/**");
这个时候 访问一下: 没有问题:
对了 如果你的项目用到 spring security 还需要排除以下配置
@Configuration
public class WebSecurityConfiguration extends WebSecurityConfigurerAdapter {

    @Override
    public void configure(WebSecurity web) throws Exception {
        web.ignoring().antMatchers("/v2/api-docs", "/configuration/ui", "/swagger-resources", "/configuration/security", "/swagger-ui.html", "/webjars/**");
    }

}
3: swagger2 部署方式2 推荐
导入lib'
    com.spring4all
    swagger-spring-boot-starter
    1.9.0.RELEASE


    org.springframework.boot
    spring-boot-starter-thymeleaf
application.xml配置
swagger.title=spring-boot-starter-swagger
swagger.description=Starter for swagger 2.x
swagger.version=1.4.0.RELEASE
swagger.license=Apache License, Version 2.0
swagger.licenseUrl=https://www.apache.org/licenses/LICENSE-2.0.html
swagger.termsOfServiceUrl=https://github.com/dyc87112/spring-boot-starter-swagger
swagger.contact.name=didi
swagger.contact.url=https://www.cnblogs.com/dgwblog/
swagger.contact.email=[email protected]
# 扫描包路径
swagger.base-package=com.dgw.controller
swagger.base-path=/**
启动配置swagger 扫描
@SpringBootApplication 这个注解
@EnableSwagger2Doc
public class DemoApplication {

    public static void main(String[] args) {
        SpringApplication.run(DemoApplication.class, args);
    }
}
这里如果出现了 建议看前面的 文章 ,自己考虑一下 为什么不能访问.
这里写个测试
@Controller
@Api("接口说明")
public class HelloController {
    @ApiOperation(value = "hello方法 ",notes = "返回index")
    @GetMapping("/hello")
    public String hello(){
        return  "index";
    }
}
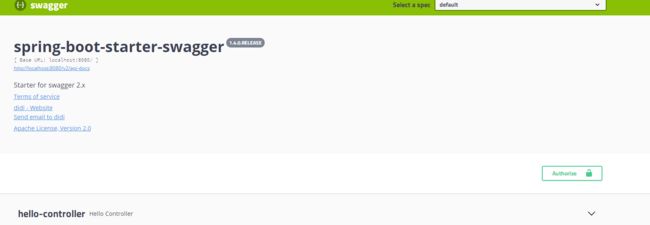
能够正常访问:
![]()

