一、概述
通知分为本地通知和远程推送通知,iOS10中对于通知这一块改变较大,本文主要针对iOS10的通知,iOS10中的通知基于UserNotifications框架,相比于iOS10之前的通知,UserNotifications框架的功能更加强大,主要具有以下几个方面:
- UserNotification支持自定义通知音效和启动图
- UserNotification支持向通知内容中添加媒体附件,例如音频,视频
- UserNotification支持完全自定义通知界面
- UserNotification支持自定义通知中的用户交互按钮
闲话少说,程序员还是拿代码来说事,接下来就上代码,手把手教你从注册通知到完全定制一个通知界面的全过程。(注:本文仅针对在iOS10中的情况)
二、配置环境
首先使项目支持远程推送服务
-
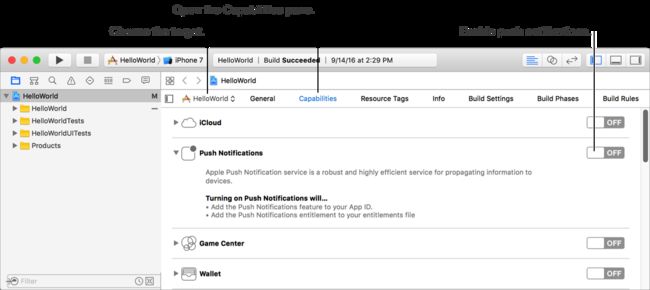
Target->Capabilities->Push Notifications设置为ON,如下图所示
 ca_enablepushnotifications.png
 - Target->Capabilities->Background Modes选中Remote notifications,如下图所示

三、注册通知
1.注册远程推送
- (BOOL)application:(UIApplication *)application didFinishLaunchingWithOptions:(NSDictionary *)launchOptions {

    UNUserNotificationCenter *center = [UNUserNotificationCenter currentNotificationCenter];
    //注册通知类型(当收到服务端推送过来的通知的时候,会根据里面的identifier在已经注册的category里面去匹配,然后显示出来的通知样式就会和匹配成功的那个category一样,如果所有注册的category都不匹配,就显示一个默认的不带任何action的样式)
    [center setNotificationCategories:[self createNotificationCategoryActions]];
    //必须写代理,不然无法监听通知的接收与点击
    center.delegate = self;
    //获取通知设置信息
    [center getNotificationSettingsWithCompletionHandler:^(UNNotificationSettings * _Nonnull settings) {
        if (settings.authorizationStatus == UNAuthorizationStatusNotDetermined) {
            [center requestAuthorizationWithOptions:(UNAuthorizationOptionAlert | UNAuthorizationOptionBadge | UNAuthorizationOptionSound) completionHandler:^(BOOL granted, NSError * _Nullable error) {
                if (granted) {
                    NSLog(@"granted");
                    //注册远程推送
                    [application registerForRemoteNotifications];
                } else {
                    NSLog(@"not granted");
                }
            }];
        }else{
            //do other things
            NSLog(@"do other things");
        }
    }];

    return YES;
}

- (NSSet *)createNotificationCategoryActions{
    //定义通知交互按钮(最好不要超过4个)
    UNNotificationAction *action1 = [UNNotificationAction actionWithIdentifier:@"action1" title:@"操作一" options:UNNotificationActionOptionDestructive|UNNotificationActionOptionForeground];
    UNNotificationAction *action2 = [UNNotificationAction actionWithIdentifier:@"action2" title:@"操作二" options:UNNotificationActionOptionDestructive|UNNotificationActionOptionForeground];
    UNNotificationAction *action3 = [UNNotificationAction actionWithIdentifier:@"action3" title:@"操作三" options:UNNotificationActionOptionDestructive|UNNotificationActionOptionForeground];

    //定义文本框的action
    UNTextInputNotificationAction *inputAction = [UNTextInputNotificationAction actionWithIdentifier:@"text" title:@"输入框" options:UNNotificationActionOptionAuthenticationRequired|UNNotificationActionOptionDestructive|UNNotificationActionOptionForeground];

    //将这些action带入category
    UNNotificationCategory *category1 = [UNNotificationCategory categoryWithIdentifier:@"category1" actions:@[action1,action2,action3] intentIdentifiers:@[@"action1",@"action2",@"action3"] options:UNNotificationCategoryOptionNone];

    UNNotificationCategory *category2 = [UNNotificationCategory categoryWithIdentifier:@"category2" actions:@[inputAction] intentIdentifiers:@[@"text"] options:UNNotificationCategoryOptionNone];

    return [NSSet setWithObjects:category1,category2,nil];
}
2.获取deviceToken
#pragma mark - 注册deviceToken失败
- (void)application:(UIApplication *)application didFailToRegisterForRemoteNotificationsWithError:(NSError *)error{
    NSLog(@"error=%@",error);
}

#pragma mark - 注册并成功获取deviceToken
- (void)application:(UIApplication *)application didRegisterForRemoteNotificationsWithDeviceToken:(NSData *)deviceToken{
    //注意:deviceToken在某些情况下是会改变的,同时长度也不是固定的,如果在APP运行的时候deviceToken改变了,将会重新调用此方法,重新获取新的deviceToken
    NSLog(@"deviceToken=%@",deviceToken);
}
3.实现通知的代理方法,实现对通知的处理
#pragma mark - 收到远程推送
//iOS10之前
- (void)application:(UIApplication *)application didReceiveRemoteNotification:(NSDictionary *)userInfo;{
    NSLog(@"收到远程推送");
}

//iOS10之后(静默通知)
- (void)application:(UIApplication *)application didReceiveRemoteNotification:(NSDictionary *)userInfo fetchCompletionHandler:(void (^)(UIBackgroundFetchResult))completionHandler{
    NSLog(@"收到静默通知");
    completionHandler(UIBackgroundFetchResultNewData);
}

#pragma mark - UNUserNotificationCenterDelegate
//当APP处于后台模式或者没有运行的时候不会调用此方法,方法的最后,调用completionHandler处理通知数据,在通知展示之前调用此方法
- (void)userNotificationCenter:(UNUserNotificationCenter *)center willPresentNotification:(UNNotification *)notification withCompletionHandler:(void (^)(UNNotificationPresentationOptions options))completionHandler{
    /*
     UNNotificationRequest *request = notification.request; // 原始请求
     NSDictionary *userInfo = request.content.userInfo;// userInfo数据
     UNNotificationContent *content = request.content; // 原始内容
     NSString *title = content.title;  // 标题
     NSString *subtitle = content.subtitle;  // 副标题
     NSNumber *badge = content.badge;  // 角标
     NSString *body = content.body;    // 推送消息体
     UNNotificationSound *sound = content.sound;  // 指定的声音
     */
    if ([notification isKindOfClass:[UNPushNotificationTrigger class]]) {
        NSLog(@"iOS10 收到远程通知");
    }else{
        NSLog(@"iOS10 收到本地通知");
    }

    // 回调block,将设置传入
    //如果括号中选项为UNNotificationPresentationOptionNone则在APP处于前台的时候不显示通知栏,否则在APP处于前台的时候依然可以显示通知栏
    completionHandler(UNNotificationPresentationOptionBadge|UNNotificationPresentationOptionSound|UNNotificationPresentationOptionAlert);
}

//用户与通知进行交互后的response,比如说用户直接点开通知打开App、用户点击通知的按钮或者进行输入文本框的文本
- (void)userNotificationCenter:(UNUserNotificationCenter *)center didReceiveNotificationResponse:(UNNotificationResponse *)response withCompletionHandler:(void(^)())completionHandler{
    NSLog(@"与用户交互完成处理交互结果");
    /*
    UNNotificationRequest *request = response.notification.request; // 原始请求
    NSDictionary *userInfo = request.content.userInfo;// userInfo数据
    UNNotificationContent *content = request.content; // 原始内容
    NSString *title = content.title;  // 标题
    NSString *subtitle = content.subtitle;  // 副标题
    NSNumber *badge = content.badge;  // 角标
    NSString *body = content.body;    // 推送消息体
    UNNotificationSound *sound = content.sound;
     */
    //在此,可判断response的种类和request的触发器是什么,可根据远程通知和本地通知分别处理,再根据action进行后续回调
    //可根据actionIdentifier来做业务逻辑
    if ([response isKindOfClass:[UNTextInputNotificationResponse class]]) {
        //输入框action的处理
        UNTextInputNotificationResponse *textResponse = (UNTextInputNotificationResponse *)response;
        NSString *text = textResponse.userText;
        //do something
        UIAlertController *alert = [UIAlertController alertControllerWithTitle:@"文本框输入" message:text preferredStyle:UIAlertControllerStyleAlert];
        [alert addAction:[UIAlertAction actionWithTitle:@"确定" style:UIAlertActionStyleDefault handler:nil]];
        [self.window.rootViewController presentViewController:alert animated:YES completion:nil];
    } else{
        if ([response.actionIdentifier isEqualToString:@"action1"]) {
            NSLog(@"操作一");
        }
        if ([response.actionIdentifier isEqualToString:@"action2"]) {
            NSLog(@"操作二");
        }
        if ([response.actionIdentifier isEqualToString:@"action3"]) {
            NSLog(@"操作三");
        }

        UIAlertController *alert = [UIAlertController alertControllerWithTitle:response.actionIdentifier message:response.notification.request.content.body preferredStyle:UIAlertControllerStyleAlert];
        [alert addAction:[UIAlertAction actionWithTitle:@"确定" style:UIAlertActionStyleDefault handler:nil]];
        [[UIApplication sharedApplication].keyWindow.rootViewController presentViewController:alert animated:YES completion:nil];
    }
    completionHandler();
}
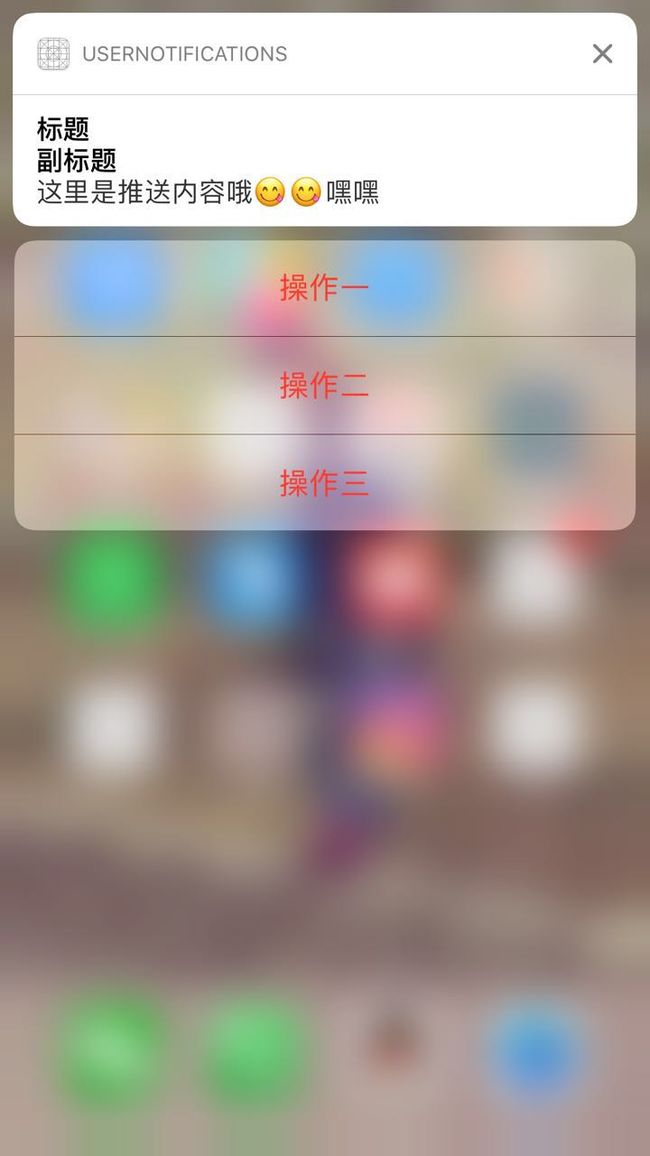
4.通知效果展示
- category1通知效果
- category2通知效果

四、本地通知
本地通知和远程推送通知一样,无论APP是在前台还是后台,或者是不是运行中,都可以收到通知,下面举一个简单的例子说明构造一条本地通知的过程
#pragma mark - 创建一条本地通知
- (void)createOneLocalNotification{
    UNMutableNotificationContent *content = [[UNMutableNotificationContent alloc] init];
    content.title = @"标题";
    content.subtitle = @"副标题";
    content.body = @"这里是通知内容";
    content.badge = @0;
    NSString *path = [[NSBundle mainBundle] pathForResource:@"image1" ofType:@"png"];
    NSError *error = nil;
    UNNotificationAttachment *img_attachment = [UNNotificationAttachment attachmentWithIdentifier:@"att1" URL:[NSURL fileURLWithPath:path] options:nil error:&error];
    if (error) {
        NSLog(@"%@", error);
    }
    content.attachments = @[img_attachment];
    //设置为@""以后,进入app将没有启动页
    content.launchImageName = @"";
    //收到通知时候的声音文件名(音频文件必须在bundle中或者在Library/Sounds目录下)
    UNNotificationSound *sound = [UNNotificationSound soundNamed:@"sound.wav"];
    content.sound = sound;
    //一秒后收到通知,并且不重复
    UNTimeIntervalNotificationTrigger *time_trigger = [UNTimeIntervalNotificationTrigger triggerWithTimeInterval:1 repeats:NO];
    NSString *requestIdentifer = @"requestIdentifer";
    content.categoryIdentifier = @"category1";
    UNNotificationRequest *request = [UNNotificationRequest requestWithIdentifier:requestIdentifer content:content trigger:time_trigger];

    [[UNUserNotificationCenter currentNotificationCenter] addNotificationRequest:request withCompletionHandler:^(NSError * _Nullable error) {
        NSLog(@"%@",error);
    }];
}
五、修改通知内容
利用UNNotificationServiceExtension可以在通知显示之前改变内容,添加notification service app extension的步骤
- 给项目添加一个新的target
New->Target->Add Target->iOS->Notification Service Extension->next

2.在新的target中生成的NotificationService.m中修改通知内容
- (void)didReceiveNotificationRequest:(UNNotificationRequest *)request withContentHandler:(void (^)(UNNotificationContent * _Nonnull))contentHandler {
    self.contentHandler = contentHandler;
    self.bestAttemptContent = [request.content mutableCopy];

    // Modify the notification content here...
    //修改标题
    self.bestAttemptContent.title = [NSString stringWithFormat:@"%@ [modified]", self.bestAttemptContent.title];
    //修改副标题
    self.bestAttemptContent.subtitle = [NSString stringWithFormat:@"%@ [modified]", self.bestAttemptContent.subtitle];
    //修改内容
    self.bestAttemptContent.body = [NSString stringWithFormat:@"%@ [modified]", self.bestAttemptContent.body];
    //添加附件
    NSString *path = [[NSBundle mainBundle] pathForResource:@"image2.png" ofType:nil];
    NSError *error = nil;
    UNNotificationAttachment *img_attachment = [UNNotificationAttachment attachmentWithIdentifier:@"att1" URL:[NSURL fileURLWithPath:path] options:nil error:&error];
    if (error) {
        NSLog(@"%@", error);
    }
    self.bestAttemptContent.attachments = @[img_attachment];
    self.contentHandler(self.bestAttemptContent);

}

- (void)serviceExtensionTimeWillExpire {
    NSLog(@"最后一个改变的机会,然后结束服务");
    // Called just before the extension will be terminated by the system.
    // Use this as an opportunity to deliver your "best attempt" at modified content, otherwise the original push payload will be used.
    self.contentHandler(self.bestAttemptContent);
}
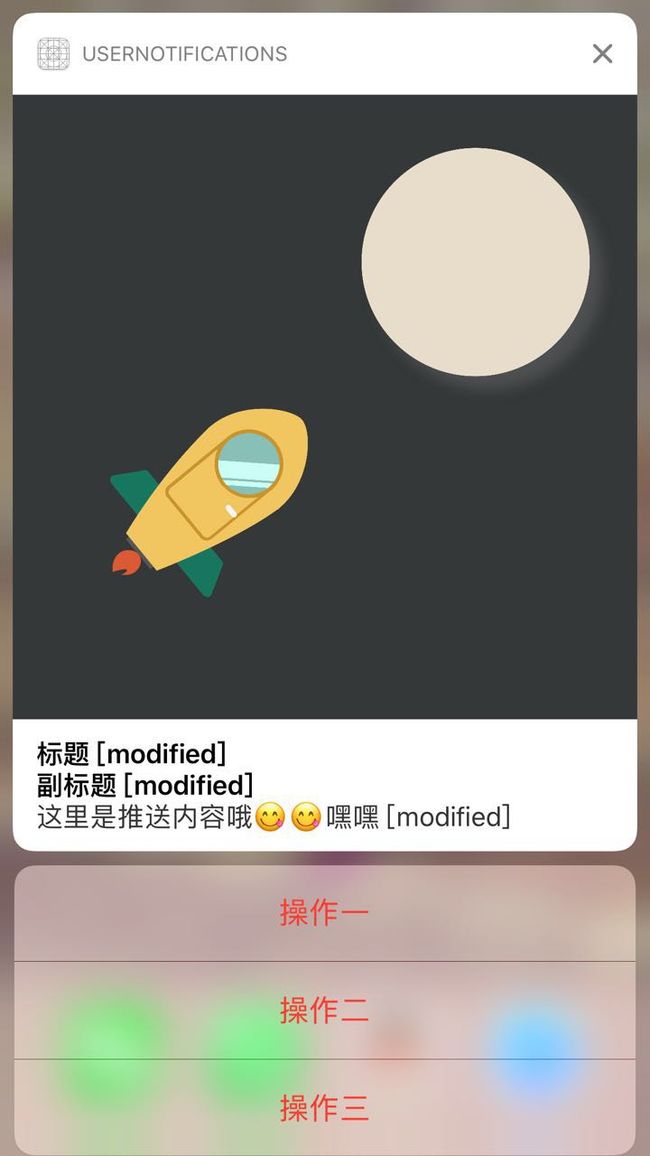
3.修改内容后通知效果展示
- category1
*category2

六、自定义通知界面
利用UNNotificationContentExtension可以自定义一个通知界面,添加notification content app extension的步骤
- 给项目添加一个新的target
New->Target->Add Target->iOS->Notification Content Extension->next

2.在新生成的NotificationViewController.m或MainInterface.storyboard中自定义通知样式
3.在info.plist中NSExtension配置说明

- UNNotificationExtensionCategory(必填):可以为String也可以为Array,value里面是AppDelegate中注册的UNNotificationCategory的identifier,如果在AppDelegate没有对应的UNNotificationCategory,则显示系统默认通知界面
- UNNotificationExtensionInitialContentSizeRatio(必填):一个float型数字,表示展示通知的高宽比,图中的0.2表示这个通知的高度是宽度的0.2倍
- UNNotificationExtensionDefaultContentHidden(选填):BOOL类型,为YES的时候表示,仅仅显示你自定义的通知界面,为NO的时候,同时显示自定义和系统通知界面(融合而不是显示2条),默认为NO(需要注意的是:不管为YES还是NO,通知下面的action都是显示的,不受影响)
- UNNotificationExtensionOverridesDefaultTitle(选填):BOOL类型,为YES的时候,用当前控制器的标题作为通知的标题,为NO的时候,用项目名作为通知的标题,默认为NO
4.NotificationViewController.m代码展示
@interface NotificationViewController ()

@property IBOutlet UILabel *titleView;

@property IBOutlet UILabel *subTitleView;

@property IBOutlet UILabel *contentView;

@end

@implementation NotificationViewController

- (void)viewDidLoad {
    [super viewDidLoad];
    //title在这里设置无法成为通知上面的标题
    self.title = @"这是一个自定义通知界面";
}

- (void)didReceiveNotification:(UNNotification *)notification {
    //title设置在这里才有效,在viewDidLoad里面无效
    self.title = @"这是一个自定义通知界面哦~";
    //标题
    self.titleView.text = notification.request.content.title;
    //副标题
    self.subTitleView.text = notification.request.content.subtitle;
    //内容
    self.contentView.text = notification.request.content.body;
}
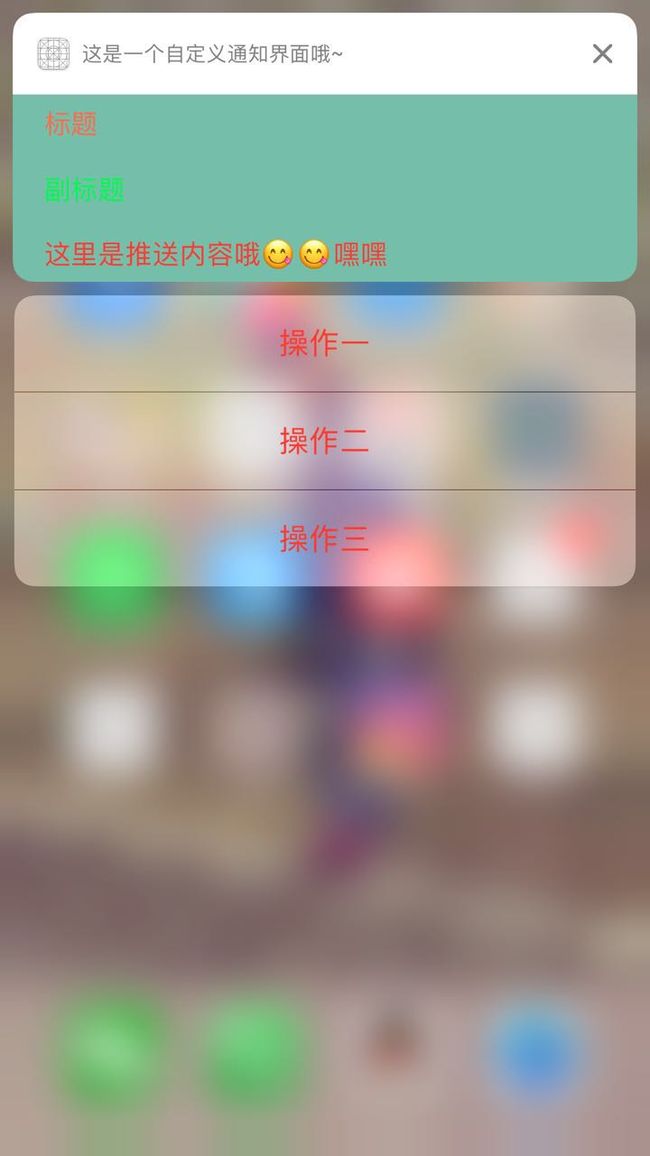
5.MainInterface.storyboard展示

6.通知效果展示
七、结语
测试工具:NWPusher
Demo github地址:UserNotifications
参考资料:
- <<国内 90%以上的 iOS 开发者,对 APNs 的认识都是错的>>
- <
> - <
>