1)py -3 -m pip install pytest
2)py.test --version --验证安装
2、简单实例
https://github.com/luopan001/pytest_learn
3、如何编写pytest测试样例
通过上面的实例,我们发现编写pytest测试样例非常简单,只需要按照下面的规则:
测试文件以test_开头(以_test结尾也可以)
测试类以Test开头,并且不能带有 __init__ 方法
测试函数以test_开头
断言使用基本的assert即可
4、如何执行pytest测试样例
1)无参数:运行目录中符合条件的测试函数
>py.test
2)参数是文件名:参数文件中符合条件的测试函数
>py.test 文件名
3)参数是目录地址:参数目录中符合条件的测试函数
>py.test 目录
4)参数是文件地址:参数文件中符合条件的测试函数
>py.test 文件路径
5)参数是字符串:运行目录中类名或者函数名称包含参数字符串的测试函数
>py.test -k two
6)代码中执行
5、测试报告
pytest可以方便的生成测试报告,即可以生成HTML的测试报告,也可以生成XML格式的测试报告用来与持续集成工具集成。
1)生成xml格式报告
py.test test_class.py --junitxml=./log/log.xml
2)生成txt格式报告
py.test test_class.py --resultlog=./log/log.txt
3)生成html格式报告。需要安装pytest的扩展--pytest-html
3.1)安装 py -3 -m pip install pytest-html
3.2)生成报告 py.test test_class.py --html=./log/report.html
4)第3方插件pytest-allure-adaptor--待研究
4.1)安装
4.2)运行py.test --alluredir ./log
6、fixtures
fixtures不太好翻译,可看作是夹心饼干最外层的两片饼干。通常用setup/teardown来表示。它主要用来包裹测试用例,为什么需要这样的饼干呢?我们以web自动化测试为例,例如,要测试的某系统需要登录/退出。那么每一条用例执行前都需要登录,执行完又都需要退出,这样每条用例重复编写登录和退出就很麻烦,当然,你也可以把登录和退出封装为方法调用,但是每个用例中都写调用也很麻烦。有了fixtures就变得简便很多。
6.1)简单实例(test_fixtures.py)
#coding=utf-8
import pytest
# 功能函数
def multiply(a,b):
return a * b
# =====fixtures========
def setup_module(module):
print ("\n")
print ("setup_module================>")
def teardown_module(module):
print ("teardown_module=============>")
def setup_function(function):
print ("setup_function------>")
def teardown_function(function):
print ("teardown_function--->")
# =====测试用例========
def test_numbers_3_4():
print ('test_numbers_3_4')
assert multiply(3,4) == 12
def test_strings_a_3():
print('test_strings_a_3')
assert multiply('a',3) == 'aaa'
if __name__ == '__main__':
pytest.main("-s test_fixtures.py")
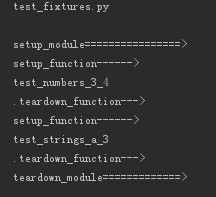
运行结果:
总结:1)setup_module/teardown_module 在所有测试用例执行之后和之后执行。
2)setup_function/teardown_function 在每个测试用例之后和之后执行。
6.2)第二个实例(test.py)
# coding=utf-8
import pytest
# 功能函数
def multiply(a, b):
return a * b
class TestUM:
# =====fixtures========
def setup(self):
print("setup----->")
def teardown(self):
print("teardown-->")
def setup_class(cls):
print("\n")
print("setup_class=========>")
def teardown_class(cls):
print("teardown_class=========>")
def setup_method(self, method):
print("setup_method----->>")
def teardown_method(self, method):
print("teardown_method-->>")
# =====测试用例========
def test_numbers_5_6(self):
print('test_numbers_5_6')
assert multiply(5, 6) == 30
def test_strings_b_2(self):
print('test_strings_b_2')
assert multiply('b', 2) == 'bb'
if __name__ == '__main__':
pytest.main("-s test.py")
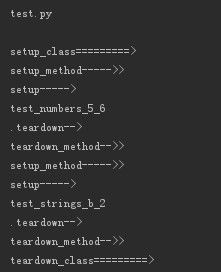
运行结果:
总结:1)setup_class/teardown_class 在当前测试类的开始与结束执行。
2)setup/treadown 在每个测试方法开始与结束执行。
3)setup_method/teardown_method 在每个测试方法开始与结束执行,与setup/treadown级别相同。
7、断言
1)使用python的assert进行断言
2)assert可以使用直接使用“==”、“!=”、“<”、“>”、“>=”、"<=" 等符号来比较相等、不相等、小于、大于、大于等于和小于等于。示例:assert add(3,4) == 7
3)assert 可以直接使用 in 和not in 来比较包含与不包含。示例:assert b in a
4)通过assert不需要任何辅助符号,直接判断对象是否为ture,而assert not 用于判断是否为false。示例:assert is_prime(13)
8、pycharm如何设置为pytest
1)pycharm中,缺省用的是unittest
2)设置:files-》settings-》tools=》python integrated tools=》设定default test runner为py.test
9、常用参数
pytest -q 静默模式,只输出异常case
pytest -v 详细,显示明细及case结果标志灯
pytest casefile.py 指定case文件执行
pytest casedir 指定路径运行
pytest casedir/casefile::caseclass::casefunc 运行具体的case方法、类等
pytest --pyargs pkgname 指定包执行,根据系统文件路径定位case,后期可以用pip安装包的方法部署执行case
pytest -k "key_words_1 and not key_words_1" 执行符合key_words_1命名规则的文件、类及方法,忽略key_words_2命名规则的文件、类及方法
pytest -m "mark_name" 需要在指定case方法上添加@pytest.mark.mark_name来指定方法属于哪个mark
pytest --junitxml=file.xml 生成xml报告,方便对执行结果进一步分析,后期可以通过xmltodict库转成json格式分析入库及自定义报告
10、Pytest框架集成Allure
1)安装pytest-allure-adaptor
2)使用Allure Pytest Adaptor改造基于Pytest的测试用例
2.1)生成测试报告所需的数据
pytest -s -q --alluredir D:\project_pro\InterfaceTestModel\report\xml
2.2)安装allure
步骤一,下载zip安装包:https://bintray.com/qameta/generic/allure2
步骤二,将bin路径配置到环境变量PATH
步骤三,验证安装,allure --version
2.3)生成测试报告
allure generate D:\project_pro\InterfaceTestModel\report\xml -o D:\project_pro\InterfaceTestModel\report\html
2.4)可在pycharm中打开index.html文件即可看到
2.5)定制报告
Feature: 标注主要功能模块
Story: 标注Features功能模块下的分支功能
Severity: 标注测试用例的重要级别
Step: 标注测试用例的重要步骤
Issue和TestCase: 标注Issue、Case,可加入URL
@allure.feature('test_module_01')
@allure.story('test_story_01')
@allure.severity('blocker')
@allure.issue("http://www.baidu.com")
@allure.testcase("http://www.testlink.com")
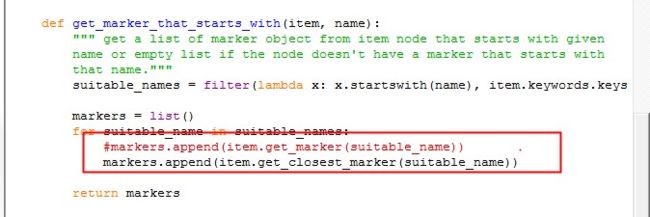
11、allure运行报错
修改源文件utils.py:
12、进入虚拟环境运行
1)进入工程所在的虚拟环境:
cd D:\project_pro\InterfaceTestModel\venv\Scripts
2)执行
3)生成allure-xml文件
py.test D:\project_pro\InterfaceTestModel\TestCase --alluredir D:\project_pro\InterfaceTestModel\report\xml
4)生成html文件
allure generate D:\project_pro\InterfaceTestModel\report\xml -o D:\project_pro\InterfaceTestModel\report\html


