前言
在上一篇Android---EventBus3.0版本的使用及说明中,介绍了EventBus3.0的基础知识,并且也指出了如果在涉及activity,fragment间的通信时,可以优先的考虑使用EventBus。
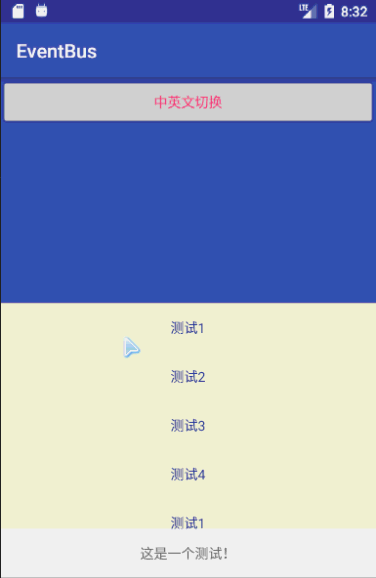
结合项目中的需求,同时针对不同的用户群体,讲述如何利用EventBus实现Android APP的内部实现中英文切换的功能。先上效果图:
一、准备工作
1. 添加依赖库
compile 'com.jakewharton:butterknife:8.8.1'
annotationProcessor 'com.jakewharton:butterknife-compiler:8.8.1'
compile 'org.greenrobot:eventbus:3.1.1'
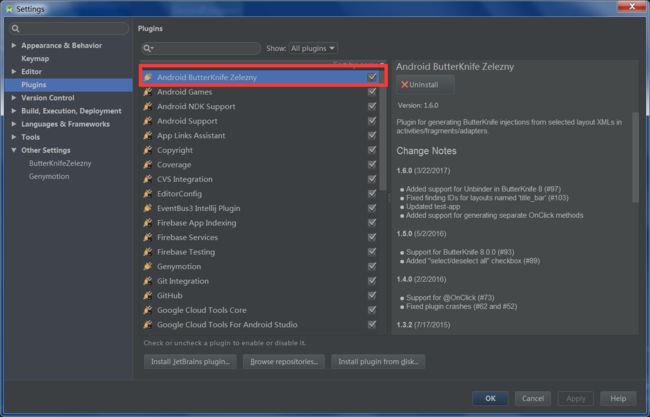
特别推荐使用ButterKnife,非常好用,帮你省去很多findViewBy(R.id.*)的工作,而且搭配下图中的plugin--->Android ButterKnife Zelezny,简直不要太爽。关于Zelezny的用法,可以参考:ButterknifeZelezny在AndroidStudio中的配置与使用方法
2. 布局activity_main.xml
包含两个fragment和一个textview
3. 布局first_fragment.xml
很简单就一个按钮
4. 布局second_fragmeng.xml
也就几个简单的textview
二、创建一个支持多语言切换功能的strings.xml
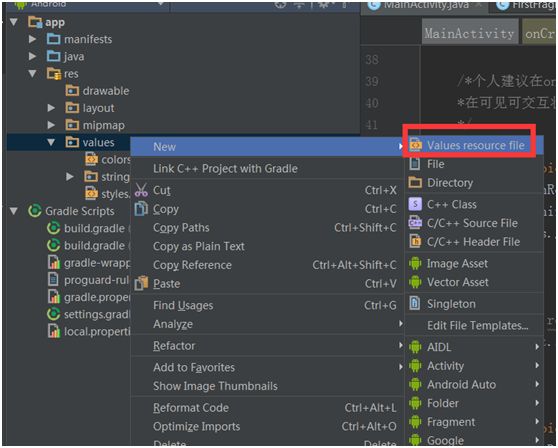
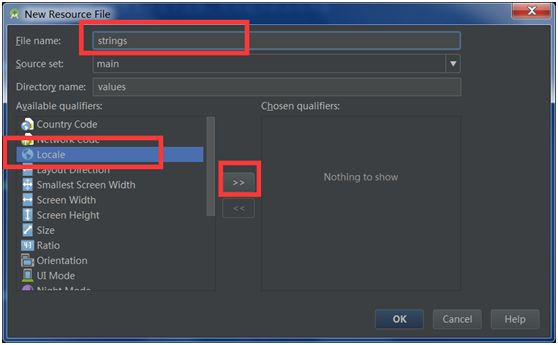
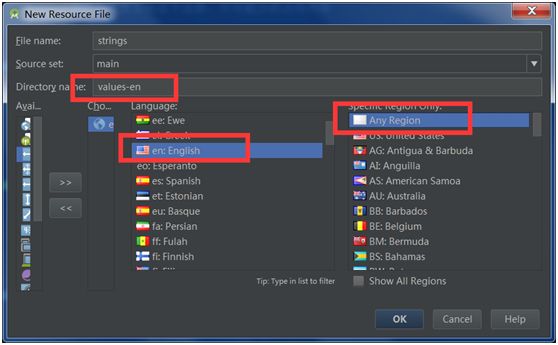
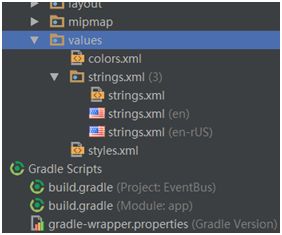
在按照图示建好后,需要向其中的strings.xml中输入内容,记住在默认的menu中输入的是:
这是一个测试!
而在strings.xml(en)中输入的是,相当于是中文的译文。
This is a test!
其他
在以上的准备工作完成后,开始正式的coding。
三、事件的建立
自定义一个事件类,根据需求可以是空类,也可以非空,根据需求,中英文的切换采用的是空类,仅作为一个事件的发送通知而已。
public class ChangeLanguageEvent {
}
3.1 MainActivity
public class MainActivity extends AppCompatActivity {
    @BindView(R.id.main_text)
    TextView mainText;

    @Override
    protected void onCreate(Bundle savedInstanceState) {
        super.onCreate(savedInstanceState);
        setContentView(R.layout.activity_main);
        ButterKnife.bind(this);
        FragmentManager manager = getFragmentManager();
        FragmentTransaction transaction = manager.beginTransaction();

        FirstFragment fragment1 = new FirstFragment();
        SecondFragment fragment2 = new SecondFragment();

        transaction.add(R.id.fragment1, fragment1);
        transaction.add(R.id.fragment2, fragment2);
        transaction.commit();
    }

    /*个人建议在onResume注册EventBus
    *在可见可交互状态下注册,尽可能少的占用内存
    */
    @Override
    protected void onResume() {
        super.onResume();
        ButterKnife.bind(this);
        EventBus.getDefault().register(this);
    }

    /*个人建议在onPause注册EventBus(将当前Activity注册为事件订阅者)
     *不影响功能的情况下提早解除注册,尽可能少的占用内存
     */
    @Override
    protected void onPause() {
        super.onPause();
        EventBus.getDefault().unregister(this);
    }
    /**
     *用于实现内容的刷新,完成中英文的切换
     */
    @Subscribe
    public void refreshView(ChangeLanguageEvent event) {
        mainText.setText(getString(R.string.menu_text));
    }
}
代码很简洁,主要实现的功能是在activity中添加fragment,添加butterknife和eventbus的绑定和解绑。
重点来了,那么如何实现在fragment1中按下按钮,完成所有控件的中英文的切换呢?先上FirstFragment.class的代码:
public class FirstFragment extends Fragment {
    private static final String TAG = "AA";

    @BindView(R.id.btn1)
    Button btn1;

    private int checkedItem = 0;

    @Override
    public View onCreateView(LayoutInflater inflater, ViewGroup container, Bundle savedInstanceState) {
//        super.onCreateView(inflater, container, savedInstanceState);
        View view = inflater.inflate(R.layout.first_fragment, container, false);
        ButterKnife.bind(this,view);
        EventBus.getDefault().register(this);
        return view;
    }

    @OnClick(R.id.btn1)
    public void onViewClicked() {
        AlertDialog.Builder builder = new AlertDialog.Builder(getActivity());
        String[] language = {"中文","英文"};

        builder.setTitle(getString(R.string.btn1));
        builder.setSingleChoiceItems(language, checkedItem, new DialogInterface.OnClickListener() {
            @Override
            public void onClick(DialogInterface dialogInterface, int i) {
                checkedItem = i;
                Log.i(TAG, "onClick: i = " + i);
            }
        });
        builder.setPositiveButton("确定", new DialogInterface.OnClickListener() {
            @Override
            public void onClick(DialogInterface dialog, int i) {
                dialog.dismiss();
                if (checkedItem == 0) {
                    updateLanguage(Locale.SIMPLIFIED_CHINESE);//切换中文
                    EventBus.getDefault().post(new ChangeLanguageEvent());
                } else {
                    updateLanguage(Locale.ENGLISH);//切换英文
                    EventBus.getDefault().post(new ChangeLanguageEvent());
                }
            }
        });
        builder.create().show();
    }

    private void updateLanguage(Locale locale){
        Resources resources = getResources();//获得res资源对象
        Configuration config = resources.getConfiguration();//获得设置对象
        DisplayMetrics dm = resources.getDisplayMetrics();//获得屏幕参数:主要是分辨率,像素等
        config.locale = locale;
        Log.i(TAG, "onClick: 当前语言:" + config.locale);
        resources.updateConfiguration(config,dm);
    }

    @Subscribe
    public void refreshView(ChangeLanguageEvent event){
        btn1.setText(getString(R.string.btn1));
    }
}
其中比较重要的是事件的发布,以及系统语言的设置:参考官网Android开发者官网中的Configuration:Configuration 包含了设备的所有的配置信息,这些配置信息会影响应用获取的资源。例如 string 资源,就是根据 Configuration 的 locale 属性来判断该取哪种语言的 string 资源,默认是 value 文件夹下的。因此语言的更新代码如下:
private void updateLanguage(Locale locale){
    Resources resources = getResources();//获得res资源对象
    Configuration config = resources.getConfiguration();//获得设置对象
    DisplayMetrics dm = resources.getDisplayMetrics();//获得屏幕参数:主要是分辨率,像素等
    config.locale = locale;
    Log.i(TAG, "onClick: 当前语言:" + config.locale);
    resources.updateConfiguration(config,dm);
}
事件的发布,根据不同的语言设定,将事件发布即可。
EventBus.getDefault().post(new ChangeLanguageEvent());
SecondFragment.class的代码直接如下:
public class SecondFragment extends Fragment {

    @BindView(R.id.text1)
    TextView text1;
    @BindView(R.id.text2)
    TextView text2;
    @BindView(R.id.text3)
    TextView text3;
    @BindView(R.id.text4)
    TextView text4;

    @Override
    public View onCreateView(LayoutInflater inflater, ViewGroup container, Bundle savedInstanceState) {
//        super.onCreateView(inflater, container, savedInstanceState);
        View view = inflater.inflate(R.layout.second_fragment, container, false);
        ButterKnife.bind(this, view);
        EventBus.getDefault().register(this);
        return view;
    }

    @Subscribe(sticky = true)
    public void refreshView(ChangeLanguageEvent event){
        text1.setText(getString(R.string.text1));
        text2.setText(getString(R.string.text2));
        text3.setText(getString(R.string.text3));
        text4.setText(getString(R.string.text4));
    }
}
运行,测试即可得出如以上动态演示中的中英文切换的效果。
四、后续
本篇中讲述的中英文的切换仅仅是众多语言切换中的一种,用户可以根据需求,自行的设定 Locale 中的预设值。此外,此功能是与真机中的默认的语言有关系的,这里你可以自行根据示例代码验证。