项目开发需求
- 应用场景:项目中用到了答疑提问的功能,这个功能的应用就是学员端提交答案和教师端回答问题,两端配合使用,那么考虑到学员提问的时候对问题描述不清晰以及在教师回答问题的时候更加方便快速,所以就加上了录音答疑的功能。
音频相关知识介绍:
文件格式(不同的文件格式,可保存不同的编码格式的文件)
1.1 WAV:
特点:音质最好的格式,对应PCM编码
适用:多媒体开发,保存音乐和音效素材。
1.2 MP3:
特点:音质好,压缩比比较高,被大量软件和硬件支持。
适用:适合用于比较高要求的音乐欣赏。
1.3 caf:
特点:适用于几乎iOS中所有的编码格式。编码格式
2.1 PCM
PCM:脉冲编码调制,是一种非压缩音频数字化技术,是一种未压缩的原音重现,数字模式下,音频的初始化信号是PCM.
2.2 MP3
2.3 AAC
AAC:其实是“高级音频编码(advanced audio coding)”的缩写,他是被设计用来取代MPC格式的。
2.4 HE-AAC
HE-AAC是AAC的一个超集,这个“High efficiency”,HE-AAC是专门为低比特率所优化的一种音频编码格式。
2.5 AMR
AMR全称是“Adaptive Multi-Rate”,它也是另一个专门为“说话(speech)”所优化的编码格式,也是适合低比特率环境下采用。
2.6 ALAC
它全称是“Apple Lossless”,这是一种没有任何质量损失的音频编码方式,也就是我们说的无损压缩。
2.7 IMA4
IMA4:这是一个在16-bit音频文件下按照4:1的压缩比来进行压缩的格式。
考虑到服务端要保证iOS端和安卓端的同样的效果,因此在iOS端录音所生成的Caf格式录音文件转码为Mp3后进行上传,这样就保证两端音频播放的一致性。
功能实现核心代码
因为我会在文章的最后面附上完整的demo,因此这里只展示核心代码部分,以及注意事项。
- 创建录音并设置参数
#pragma mark - 创建录音
-(void)createRecorder{

    // Setup audio session
    AVAudioSession *session = [AVAudioSession sharedInstance];
    [session setCategory:AVAudioSessionCategoryPlayAndRecord error:nil];

    if ([session respondsToSelector:@selector(requestRecordPermission:)]) {

        [session requestRecordPermission:^(BOOL available) {

            if (available) {
            }
            else
            {
                dispatch_async(dispatch_get_main_queue(), ^{

                    [[[UIAlertView alloc] initWithTitle:@"无法录音" message:@"请在“设置-隐私-麦克风”选项中允许xx访问你的麦克风" delegate:nil cancelButtonTitle:@"确定" otherButtonTitles:nil] show];
                    return ;
                });
            }
        }];

    }

    //录音参数设置设置
    NSMutableDictionary *settingDic = [[NSMutableDictionary alloc] init];
    //设置录音格式
    [settingDic setValue:[NSNumber numberWithInt:kAudioFormatLinearPCM] forKey:AVFormatIDKey];
    //设置录音采样率(Hz) 如:AVSampleRateKey==8000/44100/96000(影响音频的质量)//11025.0
    [settingDic setValue:[NSNumber numberWithFloat:11025.0] forKey:AVSampleRateKey];
    //录音通道数  1 或 2
    [settingDic setValue:[NSNumber numberWithInt:2] forKey:AVNumberOfChannelsKey];
    //线性采样位数  8、16、24、32
    [settingDic setValue:[NSNumber numberWithInt:16] forKey:AVLinearPCMBitDepthKey];
    //录音的质量
//    [settingDic setValue:[NSNumber numberWithInt:AVAudioQualityMin] forKey:AVEncoderAudioQualityKey];
    [settingDic setValue:[NSNumber numberWithInt:AVAudioQualityHigh] forKey:AVEncoderAudioQualityKey];

    //录音文件最终地址
    _recordURL=[CDPAudioRecorder getAudioRecordFilePath];
    NSError *error=nil;

    //初始化AVAudioRecorder
    _recorder = [[AVAudioRecorder alloc] initWithURL:_recordURL settings:settingDic error:&error];
    //开启音量分贝数监测
    _recorder.meteringEnabled = YES;
    _recorder.delegate=self;

    if (_recorder&&[_recorder prepareToRecord]) {

    }
    else{
        DLog(@"CDPAudioRecorder录音初始化失败error:%@",error);
    }
}
- 录音后会生成Caf格式的文件,然后把文件转化为Mp3格式,
现在最主流的就是用lame框架来实现啦
不过lame只支持32位的,这对64位的很坑
不过我们可以下载lame的源码然后自己转成64位的就可以用啦
下面就是步骤,跟着动起来吧!
一、下载lame的最新版。地址https://sourceforge.net/projects/lame/files/lame/
这个就行啦
二、还需要下载一个脚本,地址https://github.com/kewlbear/lame-ios-build
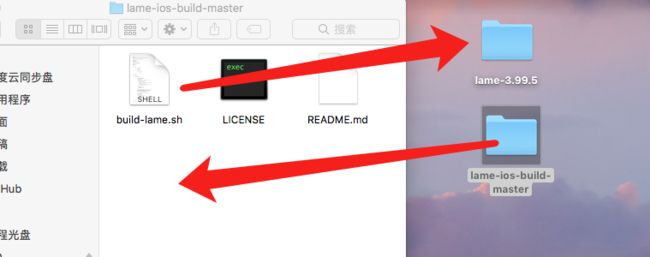
三、这两个就是我下载的两个文件夹,在桌面上
四、打开lame-ios-build-master 文件,把里面的build-lame.sh 放到lame-3.99.5 文件夹中
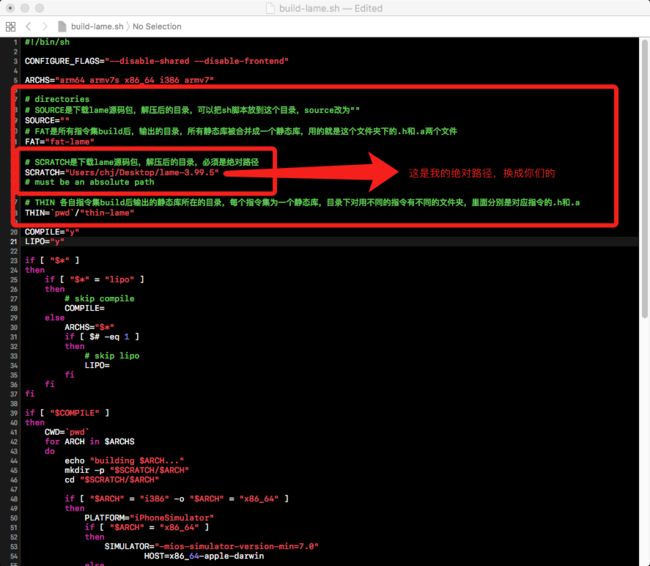
五、最重要的来啦。打开build-lame.sh文件,找到如图所示的地方,注释很清楚啦,保存关闭
六、打开终端,cd到lame-3.99.5这个目录下,就是下载lame源码的目录
输入
chmod 777 build-lame.sh
再输入
./build-lame.sh
然后等待编译,差不多不用1分钟就编译完了
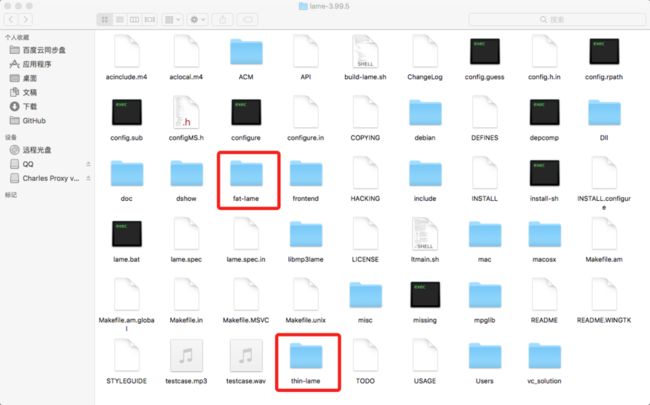
七、打开lame-3.99.5目录,在里面会看到两个文件夹
thin-lame目录下有几个文件夹,里面放的是不同指令下的我们要用到的.h和.a文件
fat-lame目录下则是不同指令下合并编译出来的.h和.a文件,也就是我们最终会用到的
拿到我们想要的就可以去转MP3啦
录音转换为mp3格式:
- (void)audio_PCMtoMP3 {
    NSString *path = [NSSearchPathForDirectoriesInDomains(NSDocumentDirectory, NSUserDomainMask, YES) lastObject];
    NSString *filePath = [path stringByAppendingPathComponent:@"CDPAudioFiles/CDPAudioRecord.caf"];
    NSString *audioPath = [LameTool audioToMP3:filePath isDeleteSourchFile:NO];
    if ([audioPath isEqualToString:@"fail"]) {
        NSLog(@"上传失败");
    } else {
        self.audioString = audioPath;
        [_recorder setRecordURL:[NSURL URLWithString:audioPath]];
    }
    NSLog(@"转码amr格式成功----文件地址为:%@",filePath);
}
+ (NSString *)audioToMP3: (NSString *)sourcePath isDeleteSourchFile:(BOOL)isDelete {

    // 输入路径
    NSString *inPath = sourcePath;
    // 判断输入路径是否存在
    NSFileManager *fm = [NSFileManager defaultManager];
    if (![fm fileExistsAtPath:sourcePath]) {
        NSLog(@"文件不存在");
        return @"fail";
    }
    // 输出路径
    NSString *outPath = [[sourcePath stringByDeletingPathExtension] stringByAppendingString:@".mp3"];
    @try {
        int read, write;

        FILE *pcm = fopen([inPath cStringUsingEncoding:1], "rb");  //source 被转换的音频文件位置

        if(pcm == NULL) {
            NSLog(@"file not found");
            return @"fail";
        }
        fseek(pcm, 4*1024, SEEK_CUR);                                   //skip file header
        FILE *mp3 = fopen([outPath cStringUsingEncoding:1], "wb");  //output 输出生成的Mp3文件位置

        const int PCM_SIZE = 8192;
        const int MP3_SIZE = 8192;
        short int pcm_buffer[PCM_SIZE*2];
        unsigned char mp3_buffer[MP3_SIZE];

//        lame_t lame = lame_init();
//        lame_set_in_samplerate(lame, 8000);//8000/11025.0//44100
//        lame_set_VBR(lame, vbr_default);
//        lame_init_params(lame);


        lame_t lame = lame_init();
        lame_set_num_channels(lame, 2);//设置1为单通道,默认为2双通道
        lame_set_in_samplerate(lame, 11025.0);//11025.0
        //lame_set_VBR(lame, vbr_default);
        lame_set_brate(lame, 16);
        lame_set_mode(lame, 3);
        lame_set_quality(lame, 2);
        lame_init_params(lame);


        do {
            //size_t size = (size_t)(2 * sizeof(short int));
            //read = fread(pcm_buffer, size, PCM_SIZE, pcm);
            read = fread(pcm_buffer, 2*sizeof(short int), PCM_SIZE, pcm);
            if (read == 0)
                write = lame_encode_flush(lame, mp3_buffer, MP3_SIZE);
            else
                write = lame_encode_buffer_interleaved(lame, pcm_buffer, read, mp3_buffer, MP3_SIZE);

            fwrite(mp3_buffer, write, 1, mp3);

        } while (read != 0);

        lame_close(lame);
        fclose(mp3);
        fclose(pcm);
    }
    @catch (NSException *exception) {
        NSLog(@"%@",[exception description]);
    }
    @finally {
        NSLog(@"MP3生成成功:");
        if (isDelete) {

            NSError *error;
            [fm removeItemAtPath:sourcePath error:&error];
            if (error == nil) {
                NSLog(@"删除源文件成功");
            }
        }
        return outPath;
    }
}
注意事项:这里的几个参数配置:创建录音的时候频率为多少,转化为mp3的时候就使用多少:
录音:
//设置录音采样率(Hz) 如:AVSampleRateKey==8000/44100/96000(影响音频的质量)//11025.0
   [settingDic setValue:[NSNumber numberWithFloat:11025.0] forKey:AVSampleRateKey];
   //录音通道数  1 或 2
转化:
lame_t lame = lame_init();
        lame_set_num_channels(lame, 2);//设置1为单通道,默认为2双通道
        lame_set_in_samplerate(lame, 11025.0);//11025.0
        //lame_set_VBR(lame, vbr_default);
        lame_set_brate(lame, 16);
        lame_set_mode(lame, 3);
        lame_set_quality(lame, 2);
        lame_init_params(lame);
到此就结束了,简单的demo如下:
https://github.com/Wululu6/AudioRecordDemo.git


