5.1~5.9 监控 Linux 系统状态
监控 CPU 的命令
w 查看系统负载
[root@arslinux-01 ~]# w
20:13:49 up 1 min,  1 user,  load average: 1.26, 0.80, 0.31
USER     TTY      FROM             LOGIN@   IDLE   JCPU   PCPU WHAT
root     pts/0    192.168.194.1    20:13    5.00s  0.09s  0.01s w
1分钟内,5分钟内,15分钟内
负载值:平均时间内,有多少个活动的进程。数字越大越忙。
正在使用 CPU 或等待 CPU 都属于活动的进程,无论在排队还是正在使用都属于活动进程
uptime 查看系统负载
[root@arslinux-01 ~]# uptime
20:25:29 up 2 min,  1 user,  load average: 0.82, 0.67, 0.27
top 动态查看系统状态
可以让进程按从高到低顺序自动排列,默认按 CPU 使用率排列,同样可以显示系统负载
[root@arslinux-01 ~]# top
top - 20:28:40 up 5 min,  1 user,  load average: 0.05, 0.37, 0.23
Tasks: 142 total,   2 running, 140 sleeping,   0 stopped,   0 zombie
%Cpu(s):  0.3 us,  0.3 sy,  0.0 ni, 99.3 id,  0.0 wa,  0.0 hi,  0.0 si,  0.0 st
KiB Mem :   995896 total,   257656 free,   569336 used,   168904 buff/cache
KiB Swap:  1999868 total,  1999868 free,        0 used.   254360 avail Mem

PID USER      PR  NI    VIRT    RES    SHR S %CPU %MEM     TIME+ COMMAND
25 root      20   0       0      0      0 S  0.3  0.0   0:00.76 kworker/0:1
2947 root      20   0       0      0      0 S  0.3  0.0   0:00.05 xfsaild/sda3
1 root      20   0  125448   3896   2568 S  0.0  0.4   0:02.93 systemd
2 root      20   0       0      0      0 S  0.0  0.0   0:00.01 kthreadd
3 root      20   0       0      0      0 S  0.0  0.0   0:00.29 ksoftirqd/0
4 root      20   0       0      0      0 S  0.0  0.0   0:00.00 kworker/0:0
5 root       0 -20       0      0      0 S  0.0  0.0   0:00.00 kworker/0:0H
7 root      rt   0       0      0      0 S  0.0  0.0   0:00.00 migration/0
8 root      20   0       0      0      0 S  0.0  0.0   0:00.00 rcu_bh
9 root      20   0       0      0      0 R  0.0  0.0   0:01.32 rcu_sched
10 root       0 -20       0      0      0 S  0.0  0.0   0:00.00 lru-add-drain
11 root      rt   0       0      0      0 S  0.0  0.0   0:00.00 watchdog/0
13 root      20   0       0      0      0 S  0.0  0.0   0:00.00 kdevtmpfs
14 root       0 -20       0      0      0 S  0.0  0.0   0:00.00 netns
15 root      20   0       0      0      0 S  0.0  0.0   0:00.00 khungtaskd
CPU 使用率 = 100% - id值
RES 进程占用物理内存的大小
top 命令不仅要关注 Tasks 、%CPU 列,同样要关注下方 %CPU、%MEM、RES 列
-- 每 3 秒刷新一次
-- 按 M 键更改未按内存使用率大小排列
-- 按数字 1 可以查看所有 CPU 的使用率详情(多核)
[root@arslinux-01 ~]# top
top - 20:33:42 up 10 min,  1 user,  load average: 0.00, 0.14, 0.17
Tasks: 142 total,   1 running, 141 sleeping,   0 stopped,   0 zombie
%Cpu(s):  0.3 us,  0.7 sy,  0.0 ni, 99.0 id,  0.0 wa,  0.0 hi,  0.0 si,  0.0 st
KiB Mem :   995896 total,   255580 free,   571348 used,   168968 buff/cache
KiB Swap:  1999868 total,  1999868 free,        0 used.   252320 avail Mem

PID USER      PR  NI    VIRT    RES    SHR S %CPU %MEM     TIME+ COMMAND
7479 mysql     20   0 1302780 454812   6204 S  0.3 45.7   0:05.31 mysqld
7148 root      20   0  573920  17084   6008 S  0.0  1.7   0:00.57 tuned
5983 polkitd   20   0  612228  14172   4680 S  0.0  1.4   0:00.10 polkitd
5974 root      20   0  474244   8900   6660 S  0.0  0.9   0:00.40 NetworkManager
6000 root      20   0  301040   6480   5108 S  0.0  0.7   0:01.36 vmtoolsd
5995 root      20   0   99668   6104   4496 S  0.0  0.6   0:00.05 VGAuthService
7687 root      20   0  158864   5548   4212 S  0.0  0.6   0:00.19 sshd
7273 root      20   0  229608   4976   1232 S  0.0  0.5   0:00.25 php-fpm
7319 php-fpm   20   0  229548   4752   1008 S  0.0  0.5   0:00.00 php-fpm
7320 php-fpm   20   0  229548   4752   1008 S  0.0  0.5   0:00.00 php-fpm
7282 php-fpm   20   0  229548   4748   1008 S  0.0  0.5   0:00.00 php-fpm
7283 php-fpm   20   0  229548   4748   1008 S  0.0  0.5   0:00.00 php-fpm
7284 php-fpm   20   0  229548   4748   1008 S  0.0  0.5   0:00.00 php-fpm
7286 php-fpm   20   0  229548   4748   1008 S  0.0  0.5   0:00.00 php-fpm
7289 php-fpm   20   0  229548   4748   1008 S  0.0  0.5   0:00.00 php-fpm
7291 php-fpm   20   0  229548   4748   1008 S  0.0  0.5   0:00.00 php-fpm
按 q 退出
top -bn1静态显示所有进程情况,也是按 CPU 百分比排序
[root@arslinux-01 ~]# top -bn1
top - 20:36:02 up 12 min,  1 user,  load average: 0.00, 0.09, 0.15
Tasks: 142 total,   1 running, 141 sleeping,   0 stopped,   0 zombie
%Cpu(s):  5.9 us,  5.9 sy,  0.0 ni, 88.2 id,  0.0 wa,  0.0 hi,  0.0 si,  0.0 st
KiB Mem :   995896 total,   256044 free,   570848 used,   169004 buff/cache
KiB Swap:  1999868 total,  1999868 free,        0 used.   252804 avail Mem

PID USER      PR  NI    VIRT    RES    SHR S %CPU %MEM     TIME+ COMMAND
7745 root      20   0  161880   2164   1552 R  6.2  0.2   0:00.02 top
1 root      20   0  125448   3896   2568 S  0.0  0.4   0:02.94 systemd
2 root      20   0       0      0      0 S  0.0  0.0   0:00.01 kthreadd
3 root      20   0       0      0      0 S  0.0  0.0   0:00.36 ksoftirqd/0
5 root       0 -20       0      0      0 S  0.0  0.0   0:00.00 kworker/0:0H
7 root      rt   0       0      0      0 S  0.0  0.0   0:00.00 migration/0
8 root      20   0       0      0      0 S  0.0  0.0   0:00.00 rcu_bh
9 root      20   0       0      0      0 S  0.0  0.0   0:01.45 rcu_sched
10 root       0 -20       0      0      0 S  0.0  0.0   0:00.00 lru-add-drain
11 root      rt   0       0      0      0 S  0.0  0.0   0:00.00 watchdog/0
13 root      20   0       0      0      0 S  0.0  0.0   0:00.00 kdevtmpfs
14 root       0 -20       0      0      0 S  0.0  0.0   0:00.00 netns
15 root      20   0       0      0      0 S  0.0  0.0   0:00.00 khungtaskd
(内容过多不全显示)
-- 静态显示进程信息方便与在脚本里使用
cat /proc/cpuinfo 查看机器有几个CPU
[root@arslinux-01 ~]# cat /proc/cpuinfo
processor: 0
vendor_id: GenuineIntel
cpu family: 6
model: 78
model name: Intel(R) Core(TM) i5-6200U CPU @ 2.30GHz
stepping: 3
microcode: 0xc6
cpu MHz: 2399.999
cache size: 3072 KB
physical id: 0
siblings: 1
core id: 0
cpu cores: 1
apicid: 0
initial apicid: 0
fpu: yes
fpu_exception: yes
cpuid level: 22
wp: yes
flags: fpu vme de pse tsc msr pae mce cx8 apic sep mtrr pge mca cmov pat pse36 clflush dts mmx fxsr sse sse2 ss syscall nx pdpe1gb rdtscp lm constant_tsc arch_perfmon pebs bts nopl xtopology tsc_reliable nonstop_tsc aperfmperf eagerfpu pni pclmulqdq ssse3 fma cx16 pcid sse4_1 sse4_2 x2apic movbe popcnt tsc_deadline_timer aes xsave avx f16c rdrand hypervisor lahf_lm abm 3dnowprefetch epb ibrs ibpb stibp fsgsbase tsc_adjust bmi1 avx2 smep bmi2 invpcid rdseed adx smap xsaveopt dtherm arat pln pts hwp hwp_notify hwp_act_window hwp_epp spec_ctrl intel_stibp
bogomips: 4799.99
clflush size: 64
cache_alignment: 64
address sizes: 42 bits physical, 48 bits virtual
power management:
lscpu查看CPU的信息
[root@arslinux-01 ~]# lscpu
Architecture:          x86_64
CPU op-mode(s):        32-bit, 64-bit
Byte Order:            Little Endian
CPU(s):                1
On-line CPU(s) list:   0
Thread(s) per core:    1
Core(s) per socket:    1
座:                 1
NUMA 节点:         1
厂商 ID:           GenuineIntel
CPU 系列:          6
型号:              78
型号名称:        Intel(R) Core(TM) i5-6200U CPU @ 2.30GHz
步进:              3
CPU MHz:             2399.999
CPU max MHz:           0.0000
CPU min MHz:           0.0000
BogoMIPS:            4799.99
超管理器厂商:  VMware
虚拟化类型:     完全
L1d 缓存:          32K
L1i 缓存:          32K
L2 缓存:           256K
L3 缓存:           3072K
NUMA 节点0 CPU:    0
Flags:                 fpu vme de pse tsc msr pae mce cx8 apic sep mtrr pge mca cmov pat pse36 clflush dts mmx fxsr sse sse2 ss syscall nx pdpe1gb rdtscp lm constant_tsc arch_perfmon pebs bts nopl xtopology tsc_reliable nonstop_tsc aperfmperf eagerfpu pni pclmulqdq ssse3 fma cx16 pcid sse4_1 sse4_2 x2apic movbe popcnt tsc_deadline_timer aes xsave avx f16c rdrand hypervisor lahf_lm abm 3dnowprefetch epb ibrs ibpb stibp fsgsbase tsc_adjust bmi1 avx2 smep bmi2 invpcid rdseed adx smap xsaveopt dtherm arat pln pts hwp hwp_notify hwp_act_window hwp_epp spec_ctrl intel_stibp
监控内存的命令
free 查看内存和 swap 使用情况(默认以 kb 为单位)
[root@arslinux-01 ~]# free
total        used        free      shared  buff/cache   available
Mem:         995896      570492      256152        7864      169252      253164
Swap:       1999868           0     1999868
free -m 按 M 为单位查看系统内存相关信息
[root@arslinux-01 ~]# free -m
total        used        free      shared  buff/cache   available
Mem:            972         557         250           7         165         247
Swap:          1952           0        1952
free -h 自动以单位显示内存信息
[root@arslinux-01 ~]# free -h
total        used        free      shared  buff/cache   available
Mem:           972M        557M        250M        7.7M        165M        247M
Swap:          1.9G          0B        1.9G
free -b 以 B 为单位显示内存信息
[root@arslinux-01 ~]# free -b
total        used        free      shared  buff/cache   available
Mem:     1019797504   584146944   262340608     8052736   173309952   259309568
Swap:    2047864832           0  2047864832
只需关注 available,available = free + buff/cache未使用的部分
内存不够用时,swap 会将内存里的内容交换到磁盘分区里
buffer:从 CPU 产生,即将写入到磁盘里去的那部分数据
cached:先从磁盘里读出来,然后临时存到内存里的那部分数据
手动增加 swap
磁盘上模拟出 1G 空间
dd if=/dev/zero of=/bigfile bs=100M count=10
of 目标文件,bs 单个块大小,count 块数量
[root@arslinux-01 ~]# dd if=/dev/zero of=/bigfile bs=100M count=10
记录了10+0 的读入
记录了10+0 的写出
1048576000字节(1.0 GB)已复制,7.92899 秒,132 MB/秒
[root@arslinux-01 ~]# du -sh /bigfile
1000M/bigfile
[root@arslinux-01 ~]# mkswap /bigfile
正在设置交换空间版本 1,大小 = 1023996 KiB
无标签,UUID=0f334ed6-5c2b-49e6-a226-8afd4989123b
[root@arslinux-01 ~]# chmod 600 /bigfile
[root@arslinux-01 ~]# swapon /bigfile
[root@arslinux-01 ~]# free
total        used        free      shared  buff/cache   available
Mem:         995896      571836      167716        7896      256344      249096
Swap:       3023864           0     3023864
监控磁盘的命令
iostat 监控磁盘(需要安装 sysstat )
[root@arslinux-01 ~]# iostat
Linux 3.10.0-957.el7.x86_64 (arslinux-01) 2019年06月10日 _x86_64_(1 CPU)

avg-cpu:  %user   %nice %system %iowait  %steal   %idle
0.39    0.00    1.23    0.02    0.00   98.36

Device:            tps    kB_read/s    kB_wrtn/s    kB_read    kB_wrtn
sda               1.79        43.21       294.17     151445    1031077
sdb               0.07         2.63         0.00       9212          0
scd0              0.01         0.29         0.00       1028          0
dm-0              0.02         0.59         0.00       2072          0
iostat 1 每隔1秒查询一次
[root@arslinux-01 ~]# iostat 1
Linux 3.10.0-957.el7.x86_64 (arslinux-01) 2019年06月10日 _x86_64_(1 CPU)

avg-cpu:  %user   %nice %system %iowait  %steal   %idle
0.38    0.00    1.21    0.02    0.00   98.39

Device:            tps    kB_read/s    kB_wrtn/s    kB_read    kB_wrtn
sda               1.75        42.07       286.38     151481    1031133
sdb               0.07         2.56         0.00       9212          0
scd0              0.00         0.29         0.00       1028          0
dm-0              0.02         0.58         0.00       2072          0

avg-cpu:  %user   %nice %system %iowait  %steal   %idle
0.00    0.00    0.00    0.00    0.00  100.00

Device:            tps    kB_read/s    kB_wrtn/s    kB_read    kB_wrtn
sda               0.00         0.00         0.00          0          0
sdb               0.00         0.00         0.00          0          0
scd0              0.00         0.00         0.00          0          0
dm-0              0.00         0.00         0.00          0          0

avg-cpu:  %user   %nice %system %iowait  %steal   %idle
1.00    0.00    1.00    0.00    0.00   98.00

Device:            tps    kB_read/s    kB_wrtn/s    kB_read    kB_wrtn
sda               0.00         0.00         0.00          0          0
sdb               0.00         0.00         0.00          0          0
scd0              0.00         0.00         0.00          0          0
dm-0              0.00         0.00         0.00          0
iostat -d 只查看 device 相关信息
[root@arslinux-01 ~]# iostat -d 1
Linux 3.10.0-957.el7.x86_64 (arslinux-01) 2019年06月10日 _x86_64_(1 CPU)

Device:            tps    kB_read/s    kB_wrtn/s    kB_read    kB_wrtn
sda               1.69        40.65       276.72     151481    1031220
sdb               0.07         2.47         0.00       9212          0
scd0              0.00         0.28         0.00       1028          0
dm-0              0.02         0.56         0.00       2072          0

Device:            tps    kB_read/s    kB_wrtn/s    kB_read    kB_wrtn
sda               0.00         0.00         0.00          0          0
sdb               0.00         0.00         0.00          0          0
scd0              0.00         0.00         0.00          0          0
dm-0              0.00         0.00         0.00          0          0

Device:            tps    kB_read/s    kB_wrtn/s    kB_read    kB_wrtn
sda               0.00         0.00         0.00          0          0
sdb               0.00         0.00         0.00          0          0
scd0              0.00         0.00         0.00          0          0
dm-0              0.00         0.00         0.00          0          0
iostat -dx 1 加上 x 查看到的信息更全
[root@arslinux-01 ~]# iostat -dx 1
Linux 3.10.0-957.el7.x86_64 (arslinux-01) 2019年06月10日 _x86_64_(1 CPU)

Device:         rrqm/s   wrqm/s     r/s     w/s    rkB/s    wkB/s avgrq-sz avgqu-sz   await r_await w_await  svctm  %util
sda               0.00     0.01    0.96    0.70    39.75   270.58   375.46     0.02   11.54    0.82   26.21   1.13   0.19
sdb               0.00     0.00    0.07    0.00     2.42     0.00    70.59     0.00    0.51    0.51    0.00   0.37   0.00
scd0              0.00     0.00    0.00    0.00     0.27     0.00   114.22     0.00    1.56    1.56    0.00   1.22   0.00
dm-0              0.00     0.00    0.02    0.00     0.54     0.00    48.19     0.00    0.50    0.50    0.00   0.35
   0.00
Device:         rrqm/s   wrqm/s     r/s     w/s    rkB/s    wkB/s avgrq-sz avgqu-sz   await r_await w_await  svctm  %util
sda               0.00     0.00    0.00    0.00     0.00     0.00     0.00     0.00    0.00    0.00    0.00   0.00   0.00
sdb               0.00     0.00    0.00    0.00     0.00     0.00     0.00     0.00    0.00    0.00    0.00   0.00   0.00
scd0              0.00     0.00    0.00    0.00     0.00     0.00     0.00     0.00    0.00    0.00    0.00   0.00   0.00
dm-0              0.00     0.00    0.00    0.00     0.00     0.00     0.00     0.00    0.00    0.00    0.00   0.00
   0.00
Device:         rrqm/s   wrqm/s     r/s     w/s    rkB/s    wkB/s avgrq-sz avgqu-sz   await r_await w_await  svctm  %util
sda               0.00     0.00    0.00    0.00     0.00     0.00     0.00     0.00    0.00    0.00    0.00   0.00   0.00
sdb               0.00     0.00    0.00    0.00     0.00     0.00     0.00     0.00    0.00    0.00    0.00   0.00   0.00
scd0              0.00     0.00    0.00    0.00     0.00     0.00     0.00     0.00    0.00    0.00    0.00   0.00   0.00
dm-0              0.00     0.00    0.00    0.00     0.00     0.00     0.00     0.00    0.00    0.00    0.00   0.00   0.00
关注 %util,磁盘的使用率
iostat -d 1 2 显示 2 次
[root@arslinux-01 ~]# iostat -d  1 2
Linux 3.10.0-957.el7.x86_64 (arslinux-01) 2019年06月10日 _x86_64_(1 CPU)

Device:            tps    kB_read/s    kB_wrtn/s    kB_read    kB_wrtn
sda               1.58        38.07       259.16     151481    1031222
sdb               0.07         2.32         0.00       9212          0
scd0              0.00         0.26         0.00       1028          0
dm-0              0.02         0.52         0.00       2072          0

Device:            tps    kB_read/s    kB_wrtn/s    kB_read    kB_wrtn
sda               0.00         0.00         0.00          0          0
sdb               0.00         0.00         0.00          0          0
scd0              0.00         0.00         0.00          0          0
dm-0              0.00         0.00         0.00          0          0
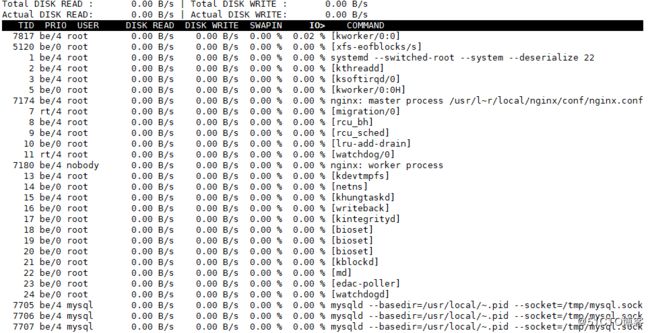
iotop 查看进程使用磁盘的信息,动态显示,按IO使用率大小排序(安装 iotop)
vmstat 综合显示 CPU、内存、磁盘的信息(用法和 iostat 类似)
[root@arslinux-01 ~]# vmstat 1
procs -----------memory---------- ---swap-- -----io---- -system-- ------cpu-----
r  b   swpd   free   buff  cache   si   so    bi    bo   in   cs us sy id wa st
2  0      0 146048    116 273320    0    0    40   237   63  148  1  1 98  0  0
0  0      0 146048    116 273320    0    0     0     0   35   79  0  1 99  0  0
0  0      0 146048    116 273320    0    0     0     0   50   90  0  0 100  0  0
1  0      0 146048    116 273320    0    0     0     0   33   73  0  0 100  0  0
0  0      0 146048    116 273320    0    0     0     0   43   78  0  1 98  1  0
^C
[root@arslinux-01 ~]# vmstat 1 3
procs -----------memory---------- ---swap-- -----io---- -system-- ------cpu-----
r  b   swpd   free   buff  cache   si   so    bi    bo   in   cs us sy id wa st
2  0      0 146196    116 273320    0    0    40   236   63  148  1  1 98  0  0
0  0      0 146164    116 273320    0    0     0     0   38   84  0  0 100  0  0
0  0      0 146164    116 273320    0    0     0     0   50   91  0  1 99  0  0
CPU ——> id
memory——>swpd 非零 或 si so 非零(si = swap in从swap进到内存,so = swap out)
bi 磁盘读,bo 磁盘写
r = run,b =block
wa =wait 等待 CPU 的百分比
关注:r、b、si、so、bi、bo、id、wa
监控网卡的命令
sar 监控网卡流量(同样由 sysstat 包安装)
[root@arslinux-01 ~]# sar -n DEV 1 3
Linux 3.10.0-957.el7.x86_64 (arslinux-01) 2019年06月10日 _x86_64_(1 CPU)

22时31分30秒     IFACE   rxpck/s   txpck/s    rxkB/s    txkB/s   rxcmp/s   txcmp/s  rxmcst/s
22时31分31秒     ens37      0.00      0.00      0.00      0.00      0.00      0.00      0.00
22时31分31秒        lo      0.00      0.00      0.00      0.00      0.00      0.00      0.00
22时31分31秒     ens33      1.01      0.00      0.06      0.00      0.00      0.00      0.00
22时31分31秒     ens38      0.00      0.00      0.00      0.00      0.00      0.00      0.00

22时31分31秒     IFACE   rxpck/s   txpck/s    rxkB/s    txkB/s   rxcmp/s   txcmp/s  rxmcst/s
22时31分32秒     ens37      0.00      0.00      0.00      0.00      0.00      0.00      0.00
22时31分32秒        lo      0.00      0.00      0.00      0.00      0.00      0.00      0.00
22时31分32秒     ens33      1.01      1.01      0.06      0.57      0.00      0.00      0.00
22时31分32秒     ens38      0.00      0.00      0.00      0.00      0.00      0.00      0.00

22时31分32秒     IFACE   rxpck/s   txpck/s    rxkB/s    txkB/s   rxcmp/s   txcmp/s  rxmcst/s
22时31分33秒     ens37      0.00      0.00      0.00      0.00      0.00      0.00      0.00
22时31分33秒        lo      0.00      0.00      0.00      0.00      0.00      0.00      0.00
22时31分33秒     ens33      1.00      1.00      0.06      0.56      0.00      0.00      0.00
22时31分33秒     ens38      0.00      0.00      0.00      0.00      0.00      0.00      0.00

平均时间:     IFACE   rxpck/s   txpck/s    rxkB/s    txkB/s   rxcmp/s   txcmp/s  rxmcst/s
平均时间:     ens37      0.00      0.00      0.00      0.00      0.00      0.00      0.00
平均时间:        lo      0.00      0.00      0.00      0.00      0.00      0.00      0.00
平均时间:     ens33      1.01      0.67      0.06      0.38      0.00      0.00      0.00
平均时间:     ens38      0.00      0.00      0.00      0.00      0.00      0.00      0.00
小常识:
bit 比特(带宽单位)
Byte 字节(速度传输单位)
8bit = 1Byte
/var/log/sa/saxx xx为日期
sar -f /var/log/sa/saxx 查看历史 sar 记录
[root@arslinux-01 ~]# sar -f /var/log/sa/sa14
Linux 3.10.0-957.el7.x86_64 (arslinux-01) 2019年05月14日 _x86_64_(1 CPU)

20时44分23秒       LINUX RESTART

20时50分01秒     CPU     %user     %nice   %system   %iowait    %steal     %idle
21时00分01秒     all      5.29      0.00      2.01      0.02      0.00     92.68
21时10分01秒     all      0.08      0.00      0.23      0.01      0.00     99.68
21时20分01秒     all      0.11      0.00      0.28      0.00      0.00     99.60
21时30分01秒     all      0.08      0.00      0.22      0.00      0.00     99.70
21时40分01秒     all      0.04      0.00      0.15      0.00      0.00     99.80
21时50分01秒     all      0.05      0.11      0.56      0.02      0.00     99.26
22时00分01秒     all      0.06      0.00      0.19      0.00      0.00     99.74
22时10分01秒     all      0.09      0.00      0.23      0.01      0.00     99.68
平均时间:     all      0.72      0.01      0.48      0.01      0.00     98.77
-- sar -n DEV -f /var/log/sa/sa14 只看具体日期的网卡流量
sar 查看 CPU
[root@arslinux-01 ~]# sar
Linux 3.10.0-957.el7.x86_64 (arslinux-01) 2019年06月10日 _x86_64_(1 CPU)

20时12分31秒       LINUX RESTART

20时23分48秒       LINUX RESTART

20时30分01秒     CPU     %user     %nice   %system   %iowait    %steal     %idle
20时40分01秒     all      0.15      0.00      0.45      0.00      0.00     99.40
20时50分01秒     all      0.08      0.00      0.28      0.00      0.00     99.63
21时00分01秒     all      0.07      0.00      0.26      0.00      0.00     99.67
21时10分01秒     all      0.07      0.00      1.13      0.05      0.00     98.75
21时20分01秒     all      0.02      0.00      0.17      0.00      0.00     99.81
21时30分01秒     all      0.08      0.00      0.27      0.01      0.00     99.65
21时40分01秒     all      1.35      0.02      0.76      0.01      0.00     97.85
21时50分01秒     all      0.08      0.00      0.26      0.00      0.00     99.66
22时00分01秒     all      0.02      0.00      0.17      0.00      0.00     99.81
22时10分01秒     all      0.02      0.00      0.17      0.00      0.00     99.81
22时20分01秒     all      0.01      0.00      0.17      0.00      0.00     99.82
22时30分01秒     all      0.04      0.00      0.20      0.00      0.00     99.76
22时40分01秒     all      0.11      0.00      0.35      0.01      0.00     99.53
平均时间:     all      0.16      0.00      0.36      0.01      0.00     99.47
sar -b 查看磁盘io
[root@arslinux-01 ~]# sar -b
Linux 3.10.0-957.el7.x86_64 (arslinux-01) 2019年06月10日 _x86_64_(1 CPU)

20时12分31秒       LINUX RESTART

20时23分48秒       LINUX RESTART

20时30分01秒       tps      rtps      wtps   bread/s   bwrtn/s
20时40分01秒      0.05      0.00      0.05      0.07      0.56
20时50分01秒      0.06      0.01      0.05      0.89      0.53
21时00分01秒      0.05      0.00      0.05      0.00      0.49
21时10分01秒      3.81      0.31      3.50     29.38   3451.05
21时20分01秒      0.05      0.00      0.05      0.12      0.46
21时30分01秒      0.07      0.01      0.06      0.40      0.81
21时40分01秒      1.57      1.04      0.54     47.96     16.79
21时50分01秒      0.05      0.00      0.05      0.00      0.51
22时00分01秒      0.06      0.00      0.06      0.01      0.74
22时10分01秒      0.16      0.11      0.06     21.74      0.63
22时20分01秒      0.03      0.00      0.03      0.00      0.33
22时30分01秒      0.09      0.01      0.08      0.55      1.00
22时40分01秒      0.13      0.04      0.09      3.18     24.33
平均时间:      0.47      0.12      0.36      8.01    267.86
sar -q 查看系统负载
[root@arslinux-01 ~]# sar -q
Linux 3.10.0-957.el7.x86_64 (arslinux-01) 2019年06月10日 _x86_64_(1 CPU)

20时12分31秒       LINUX RESTART

20时23分48秒       LINUX RESTART

20时30分01秒   runq-sz  plist-sz   ldavg-1   ldavg-5  ldavg-15   blocked
20时40分01秒         0       185      0.00      0.04      0.12         0
20时50分01秒         1       184      0.07      0.03      0.07         0
21时00分01秒         1       184      0.00      0.01      0.05         0
21时10分01秒         1       185      0.00      0.02      0.05         0
21时20分01秒         2       185      0.00      0.01      0.05         0
21时30分01秒         1       185      0.00      0.01      0.05         0
21时40分01秒         0       186      0.00      0.02      0.05         0
21时50分01秒         1       185      0.00      0.01      0.05         0
22时00分01秒         1       184      0.00      0.03      0.05         0
22时10分01秒         1       184      0.00      0.01      0.05         0
22时20分01秒         1       184      0.01      0.02      0.05         0
22时30分01秒         1       184      0.00      0.01      0.05         0
22时40分01秒         1       184      0.00      0.01      0.05         0
平均时间:         1       185      0.01      0.02      0.06         0
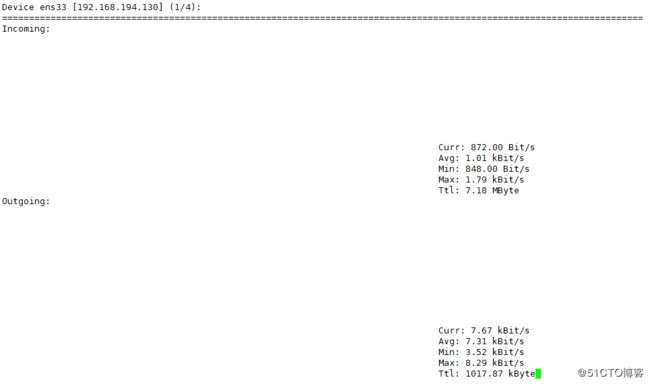
nload 查看网卡流量(安装 nload 包,先要安装 epel-release 包)
按左右方向键切换不同的网卡
ethtool 网卡名 查看网卡信息
[root@arslinux-01 ~]# ethtool ens33
Settings for ens33:
    Supported ports: [ TP ]
    Supported link modes:   10baseT/Half 10baseT/Full
                    100baseT/Half 100baseT/Full
                    1000baseT/Full
    Supported pause frame use: No
    Supports auto-negotiation: Yes
    Supported FEC modes: Not reported
    Advertised link modes:  10baseT/Half 10baseT/Full
                    100baseT/Half 100baseT/Full
                    1000baseT/Full
    Advertised pause frame use: No
    Advertised auto-negotiation: Yes
    Advertised FEC modes: Not reported
    Speed: 1000Mb/s
    Duplex: Full
    Port: Twisted Pair
    PHYAD: 0
    Transceiver: internal
    Auto-negotiation: on
    MDI-X: off (auto)
    Supports Wake-on: d
    Wake-on: d
    Current message level: 0x00000007 (7)
                    drv probe link
    Link detected: yes
mii-tool 网卡名 查看网卡是否连接
[root@arslinux-01 ~]# mii-tool ens33
ens33: negotiated 1000baseT-FD flow-control, link ok
查看进程相关的命令
ps aux 查看系统所有用户前台后台用户级别的所有进程
ps elf 同上类似
ll /proc/进程id 查看未知进程的情况(是由哪个命令起来的)
ps eLf 查看进程的线程
[root@arslinux-01 ~]# ps -eLf | grep mysql
root       7203      1   7203  0    1 20:23 ?        00:00:00 /bin/sh /usr/local/mysql/bin/mysqld_safe --datadir=/datamysql --pid-file=/data/mysql/arslinux-01.pid
mysql      7479   7203   7479  0   21 20:23 ?        00:00:04 /usr/local/mysql/bin/mysqld --basedir=/usr/local/mysql --datadir=/data/mysql --plugin-dir=/usr/local/mysql/lib/plugin --user=mysql --log-error=arslinux-01.err --pid-file=/datamysql/arslinux-01.pid --socket=/tmp/mysql.sock
mysql      7479   7203   7691  0   21 20:24 ?        00:00:00 /usr/local/mysql/bin/mysqld --basedir=/usr/local/mysql --datadir=/data/mysql --plugin-dir=/usr/local/mysql/lib/plugin --user=mysql --log-error=arslinux-01.err --pid-file=/datamysql/arslinux-01.pid --socket=/tmp/mysql.sock
mysql      7479   7203   7692  0   21 20:24 ?        00:00:00 /usr/local/mysql/bin/mysqld --basedir=/usr/local/mysql --datadir=/data/mysql --plugin-dir=/usr/local/mysql/lib/plugin --user=mysql --log-error=arslinux-01.err --pid-file=/datamysql/arslinux-01.pid --socket=/tmp/mysql.sock
mysql      7479   7203   7693  0   21 20:24 ?        00:00:00 /usr/local/mysql/bin/mysqld --basedir=/usr/local/mysql --datadir=/data/mysql --plugin-dir=/usr/local/mysql/lib/plugin --user=mysql --log-error=arslinux-01.err --pid-file=/datamysql/arslinux-01.pid --socket=/tmp/mysql.sock
mysql      7479   7203   7694  0   21 20:24 ?        00:00:00 /usr/local/mysql/bin/mysqld --basedir=/usr/local/mysql --datadir=/data/mysql --plugin-dir=/usr/local/mysql/lib/plugin --user=mysql --log-error=arslinux-01.err --pid-file=/datamysql/arslinux-01.pid --socket=/tmp/mysql.sock
mysql      7479   7203   7695  0   21 20:24 ?        00:00:00 /usr/local/mysql/bin/mysqld --basedir=/usr/local/mysql --datadir=/data/mysql --plugin-dir=/usr/local/mysql/lib/plugin --user=mysql --log-error=arslinux-01.err --pid-file=/datamysql/arslinux-01.pid --socket=/tmp/mysql.sock
mysql      7479   7203   7696  0   21 20:24 ?        00:00:00 /usr/local/mysql/bin/mysqld --basedir=/usr/local/mysql --datadir=/data/mysql --plugin-dir=/usr/local/mysql/lib/plugin --user=mysql --log-error=arslinux-01.err --pid-file=/datamysql/arslinux-01.pid --socket=/tmp/mysql.sock
mysql      7479   7203   7697  0   21 20:24 ?        00:00:00 /usr/local/mysql/bin/mysqld --basedir=/usr/local/mysql --datadir=/data/mysql --plugin-dir=/usr/local/mysql/lib/plugin --user=mysql --log-error=arslinux-01.err --pid-file=/datamysql/arslinux-01.pid --socket=/tmp/mysql.sock
mysql      7479   7203   7698  0   21 20:24 ?        00:00:00 /usr/local/mysql/bin/mysqld --basedir=/usr/local/mysql --datadir=/data/mysql --plugin-dir=/usr/local/mysql/lib/plugin --user=mysql --log-error=arslinux-01.err --pid-file=/datamysql/arslinux-01.pid --socket=/tmp/mysql.sock
mysql      7479   7203   7699  0   21 20:24 ?        00:00:00 /usr/local/mysql/bin/mysqld --basedir=/usr/local/mysql --datadir=/data/mysql --plugin-dir=/usr/local/mysql/lib/plugin --user=mysql --log-error=arslinux-01.err --pid-file=/datamysql/arslinux-01.pid --socket=/tmp/mysql.sock
mysql      7479   7203   7700  0   21 20:24 ?        00:00:00 /usr/local/mysql/bin/mysqld --basedir=/usr/local/mysql --datadir=/data/mysql --plugin-dir=/usr/local/mysql/lib/plugin --user=mysql --log-error=arslinux-01.err --pid-file=/datamysql/arslinux-01.pid --socket=/tmp/mysql.sock
mysql      7479   7203   7702  0   21 20:24 ?        00:00:00 /usr/local/mysql/bin/mysqld --basedir=/usr/local/mysql --datadir=/data/mysql --plugin-dir=/usr/local/mysql/lib/plugin --user=mysql --log-error=arslinux-01.err --pid-file=/datamysql/arslinux-01.pid --socket=/tmp/mysql.sock
mysql      7479   7203   7703  0   21 20:24 ?        00:00:01 /usr/local/mysql/bin/mysqld --basedir=/usr/local/mysql --datadir=/data/mysql --plugin-dir=/usr/local/mysql/lib/plugin --user=mysql --log-error=arslinux-01.err --pid-file=/datamysql/arslinux-01.pid --socket=/tmp/mysql.sock
mysql      7479   7203   7704  0   21 20:24 ?        00:00:00 /usr/local/mysql/bin/mysqld --basedir=/usr/local/mysql --datadir=/data/mysql --plugin-dir=/usr/local/mysql/lib/plugin --user=mysql --log-error=arslinux-01.err --pid-file=/datamysql/arslinux-01.pid --socket=/tmp/mysql.sock
mysql      7479   7203   7705  0   21 20:24 ?        00:00:00 /usr/local/mysql/bin/mysqld --basedir=/usr/local/mysql --datadir=/data/mysql --plugin-dir=/usr/local/mysql/lib/plugin --user=mysql --log-error=arslinux-01.err --pid-file=/datamysql/arslinux-01.pid --socket=/tmp/mysql.sock
mysql      7479   7203   7706  0   21 20:24 ?        00:00:00 /usr/local/mysql/bin/mysqld --basedir=/usr/local/mysql --datadir=/data/mysql --plugin-dir=/usr/local/mysql/lib/plugin --user=mysql --log-error=arslinux-01.err --pid-file=/datamysql/arslinux-01.pid --socket=/tmp/mysql.sock
mysql      7479   7203   7707  0   21 20:24 ?        00:00:00 /usr/local/mysql/bin/mysqld --basedir=/usr/local/mysql --datadir=/data/mysql --plugin-dir=/usr/local/mysql/lib/plugin --user=mysql --log-error=arslinux-01.err --pid-file=/datamysql/arslinux-01.pid --socket=/tmp/mysql.sock
mysql      7479   7203   7708  0   21 20:24 ?        00:00:00 /usr/local/mysql/bin/mysqld --basedir=/usr/local/mysql --datadir=/data/mysql --plugin-dir=/usr/local/mysql/lib/plugin --user=mysql --log-error=arslinux-01.err --pid-file=/datamysql/arslinux-01.pid --socket=/tmp/mysql.sock
mysql      7479   7203   7709  0   21 20:24 ?        00:00:00 /usr/local/mysql/bin/mysqld --basedir=/usr/local/mysql --datadir=/data/mysql --plugin-dir=/usr/local/mysql/lib/plugin --user=mysql --log-error=arslinux-01.err --pid-file=/datamysql/arslinux-01.pid --socket=/tmp/mysql.sock
mysql      7479   7203   7710  0   21 20:24 ?        00:00:00 /usr/local/mysql/bin/mysqld --basedir=/usr/local/mysql --datadir=/data/mysql --plugin-dir=/usr/local/mysql/lib/plugin --user=mysql --log-error=arslinux-01.err --pid-file=/datamysql/arslinux-01.pid --socket=/tmp/mysql.sock
mysql      7479   7203   7711  0   21 20:24 ?        00:00:00 /usr/local/mysql/bin/mysqld --basedir=/usr/local/mysql --datadir=/data/mysql --plugin-dir=/usr/local/mysql/lib/plugin --user=mysql --log-error=arslinux-01.err --pid-file=/datamysql/arslinux-01.pid --socket=/tmp/mysql.sock
root       7987   7714   7987  0    1 23:03 pts/0    00:00:00 grep --color=auto mysql
状态:
S 处于休眠状态
R 正在运行中
s 父进程(有子进程)
l 多线程
< 优先级高
N 优先级低
+ 前台的进程(不带+就是后台进程)
Z 僵尸进程
关注点:
%CPU、%MEM、RSS(进程占用的固定内存量)、STAT
扩展连接:https://www.cnblogs.com/huangmr0811/p/5570999.html
查看网络连接状况的命令
netstat 查看网络连接状况
[root@arslinux-01 ~]# netstat -lnp
Active Internet connections (only servers)
Proto Recv-Q Send-Q Local Address           Foreign Address         State       PID/Program name
tcp        0      0 0.0.0.0:38825           0.0.0.0:*               LISTEN      -
tcp        0      0 0.0.0.0:111             0.0.0.0:*               LISTEN      1/systemd
tcp        0      0 0.0.0.0:80              0.0.0.0:*               LISTEN      7174/nginx: master
tcp        0      0 0.0.0.0:20048           0.0.0.0:*               LISTEN      7177/rpc.mountd
tcp        0      0 0.0.0.0:22              0.0.0.0:*               LISTEN      7150/sshd
tcp        0      0 127.0.0.1:25            0.0.0.0:*               LISTEN      7557/master
tcp        0      0 0.0.0.0:443             0.0.0.0:*               LISTEN      7174/nginx: master
tcp        0      0 0.0.0.0:44352           0.0.0.0:*               LISTEN      7159/rpc.statd
tcp        0      0 0.0.0.0:2049            0.0.0.0:*               LISTEN      -
tcp6       0      0 :::3306                 :::*                    LISTEN      7479/mysqld
tcp6       0      0 :::38639                :::*                    LISTEN      -
tcp6       0      0 :::111                  :::*                    LISTEN      1/systemd
tcp6       0      0 :::20048                :::*                    LISTEN      7177/rpc.mountd
tcp6       0      0 :::22                   :::*                    LISTEN      7150/sshd
tcp6       0      0 ::1:25                  :::*                    LISTEN      7557/master
tcp6       0      0 :::2049                 :::*                    LISTEN      -
tcp6       0      0 :::48737                :::*                    LISTEN      7159/rpc.statd
udp        0      0 127.0.0.1:975           0.0.0.0:*                           7159/rpc.statd
udp        0      0 0.0.0.0:2049            0.0.0.0:*                           -
udp        0      0 0.0.0.0:60468           0.0.0.0:*                           7159/rpc.statd
udp        0      0 0.0.0.0:20048           0.0.0.0:*                           7177/rpc.mountd
udp        0      0 0.0.0.0:111             0.0.0.0:*                           1/systemd
udp        0      0 127.0.0.1:323           0.0.0.0:*                           6039/chronyd
udp        0      0 0.0.0.0:58247           0.0.0.0:*                           -
udp        0      0 0.0.0.0:930             0.0.0.0:*                           5894/rpcbind
udp6       0      0 :::2049                 :::*                                -
udp6       0      0 :::20048                :::*                                7177/rpc.mountd
udp6       0      0 :::111                  :::*                                1/systemd
udp6       0      0 :::48248                :::*                                7159/rpc.statd
udp6       0      0 :::36657                :::*                                -
udp6       0      0 ::1:323                 :::*                                6039/chronyd
udp6       0      0 :::930                  :::*                                5894/rpcbind
raw6       0      0 :::58                   :::*                    7           5974/NetworkManager
raw6       0      0 :::58                   :::*                    7           5974/NetworkManager
raw6       0      0 :::58                   :::*                    7           5974/NetworkManager
Active UNIX domain sockets (only servers)
Proto RefCnt Flags       Type       State         I-Node   PID/Program name     Path
unix  2      [ ACC ]     STREAM     LISTENING     41459    7557/master          public/pickup
unix  2      [ ACC ]     STREAM     LISTENING     40742    7243/gssproxy        /run/gssproxy.sock
unix  2      [ ACC ]     STREAM     LISTENING     41463    7557/master          public/cleanup
unix  2      [ ACC ]     STREAM     LISTENING     41466    7557/master          public/qmgr
unix  2      [ ACC ]     STREAM     LISTENING     41488    7557/master          public/flush
unix  2      [ ACC ]     STREAM     LISTENING     41503    7557/master          public/showq
unix  2      [ ACC ]     STREAM     LISTENING     41470    7557/master          private/tlsmgr
unix  2      [ ACC ]     STREAM     LISTENING     21315    1/systemd            /run/lvm/lvmetad.socket
unix  2      [ ACC ]     STREAM     LISTENING     41797    7479/mysqld          /tmp/mysql.sock
unix  2      [ ACC ]     STREAM     LISTENING     41473    7557/master          private/rewrite
unix  2      [ ACC ]     STREAM     LISTENING     41476    7557/master          private/bounce
unix  2      [ ACC ]     STREAM     LISTENING     41479    7557/master          private/defer
unix  2      [ ACC ]     STREAM     LISTENING     41482    7557/master          private/trace
unix  2      [ ACC ]     STREAM     LISTENING     40741    7243/gssproxy        /var/lib/gssproxy/default.sock
unix  2      [ ACC ]     STREAM     LISTENING     32898    1/systemd            /run/dbus/system_bus_socket
unix  2      [ ACC ]     STREAM     LISTENING     32901    1/systemd            /var/run/rpcbind.sock
unix  2      [ ACC ]     STREAM     LISTENING     21410    1/systemd            /run/lvm/lvmpolld.socket
unix  2      [ ACC ]     STREAM     LISTENING     41485    7557/master          private/verify
unix  2      [ ACC ]     STREAM     LISTENING     41491    7557/master          private/proxymap
unix  2      [ ACC ]     STREAM     LISTENING     41494    7557/master          private/proxywrite
unix  2      [ ACC ]     STREAM     LISTENING     41497    7557/master          private/smtp
unix  2      [ ACC ]     STREAM     LISTENING     41500    7557/master          private/relay
unix  2      [ ACC ]     STREAM     LISTENING     41506    7557/master          private/error
unix  2      [ ACC ]     STREAM     LISTENING     41509    7557/master          private/retry
unix  2      [ ACC ]     STREAM     LISTENING     41512    7557/master          private/discard
unix  2      [ ACC ]     STREAM     LISTENING     41515    7557/master          private/local
unix  2      [ ACC ]     STREAM     LISTENING     40908    7273/php-fpm: maste  /tmp/arslinux.sock
unix  2      [ ACC ]     STREAM     LISTENING     41518    7557/master          private/virtual
unix  2      [ ACC ]     STREAM     LISTENING     41521    7557/master          private/lmtp
unix  2      [ ACC ]     STREAM     LISTENING     41524    7557/master          private/anvil
unix  2      [ ACC ]     STREAM     LISTENING     40911    7273/php-fpm: maste  /tmp/php-fcgi.sock
unix  2      [ ACC ]     STREAM     LISTENING     41527    7557/master          private/scache
unix  2      [ ACC ]     SEQPACKET  LISTENING     21461    1/systemd            /run/udev/control
unix  2      [ ACC ]     STREAM     LISTENING     35295    5995/VGAuthService   /var/run/vmware/guestServicePipe
unix  2      [ ACC ]     STREAM     LISTENING     8946     1/systemd            /run/systemd/journal/stdout
unix  2      [ ACC ]     STREAM     LISTENING     21239    1/systemd            /run/systemd/private
netstat -lntp 只查看 tcp 监听的连接状态
[root@arslinux-01 ~]# netstat -lntp
Active Internet connections (only servers)
Proto Recv-Q Send-Q Local Address           Foreign Address         State       PID/Program name
tcp        0      0 0.0.0.0:38825           0.0.0.0:*               LISTEN      -
tcp        0      0 0.0.0.0:111             0.0.0.0:*               LISTEN      1/systemd
tcp        0      0 0.0.0.0:80              0.0.0.0:*               LISTEN      7174/nginx: master
tcp        0      0 0.0.0.0:20048           0.0.0.0:*               LISTEN      7177/rpc.mountd
tcp        0      0 0.0.0.0:22              0.0.0.0:*               LISTEN      7150/sshd
tcp        0      0 127.0.0.1:25            0.0.0.0:*               LISTEN      7557/master
tcp        0      0 0.0.0.0:443             0.0.0.0:*               LISTEN      7174/nginx: master
tcp        0      0 0.0.0.0:44352           0.0.0.0:*               LISTEN      7159/rpc.statd
tcp        0      0 0.0.0.0:2049            0.0.0.0:*               LISTEN      -
tcp6       0      0 :::3306                 :::*                    LISTEN      7479/mysqld
tcp6       0      0 :::38639                :::*                    LISTEN      -
tcp6       0      0 :::111                  :::*                    LISTEN      1/systemd
tcp6       0      0 :::20048                :::*                    LISTEN      7177/rpc.mountd
tcp6       0      0 :::22                   :::*                    LISTEN      7150/sshd
tcp6       0      0 ::1:25                  :::*                    LISTEN      7557/master
tcp6       0      0 :::2049                 :::*                    LISTEN      -
tcp6       0      0 :::48737                :::*                    LISTEN      7159/rpc.statd
netstat -lnup 只查看 udp 监听的连接状态
netstat -lntup 查看 tcp 和 udp 监听的连接状态
netstat -an 查看所有的网络连接,包括监听的,包括已连接的
ss -an 类似于 netstat -an,显示更快,如果 netstat -an 比较慢,可以尝试 ss -an
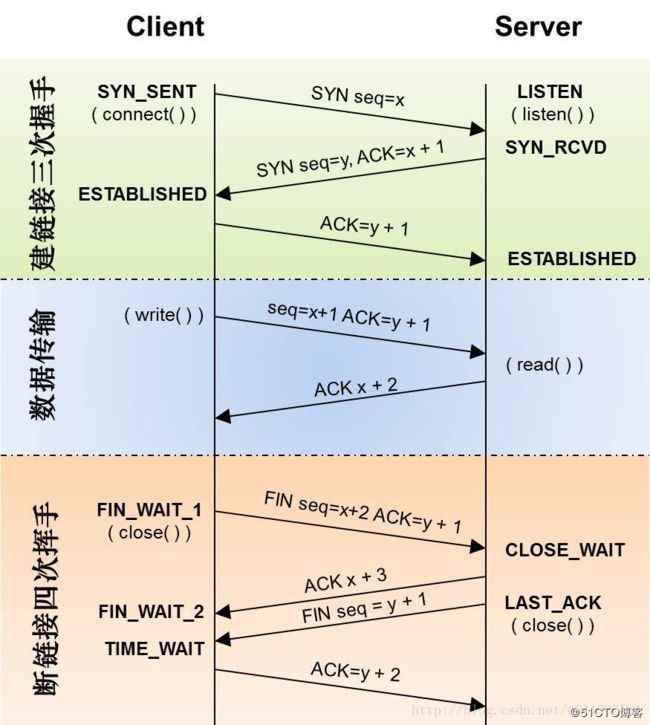
ESTABLISHED 建立连接
TIME_WAIT 要断还没断开就是
扩展连接:https://blog.csdn.net/m0_37556444/article/details/83000553
网卡流量异常,通过抓包来分析
tcpdump 抓包工具(安装 tcpdump)
-nn 数字的形式显示 ip 和 port
-i 指定端口
port 指定端口号
-c 指定抓多少包
-w 指定写入到哪个文件里去
not port 不要某个端口,多个端口可以 not port and not port
not host 不要某个 ip 的
[root@arslinux-01 ~]# tcpdump -nn -i ens33 port 80
tcpdump -r 读取 .cap 文件
可以用windows上 wireshark 分析 .cap 文件
tshark 抓包工具(需要安装 wireshark 包)和 tcpdump 用法类似
[root@arslinux-01 ~]# tshark -nn -i ens33
Running as user "root" and group "root". This could be dangerous.
Capturing on 'ens33'
1 0.000000000 192.168.194.1 -> 239.255.255.250 SSDP 216 M-SEARCH * HTTP/1.1
2 0.506531192 192.168.194.130 -> 192.168.194.1 SSH 170 Encrypted response packet len=116
3 0.555192741 192.168.194.1 -> 192.168.194.130 TCP 60 4518 > 22 [ACK] Seq=1 Ack=117 Win=2048 Len=0
4 1.000574486 192.168.194.1 -> 239.255.255.250 SSDP 216 M-SEARCH * HTTP/1.1
5 1.253766432 192.168.194.130 -> 192.168.194.1 SSH 362 Encrypted response packet len=308
6 1.295522376 192.168.194.1 -> 192.168.194.130 TCP 60 4518 > 22 [ACK] Seq=1 Ack=425 Win=2047 Len=0
7 1.797154561 192.168.194.130 -> 192.168.194.1 SSH 282 Encrypted response packet len=228
8 1.838083781 192.168.194.1 -> 192.168.194.130 TCP 60 4518 > 22 [ACK] Seq=1 Ack=653 Win=2053 Len=0
9 2.003689876 192.168.194.1 -> 239.255.255.250 SSDP 216 M-SEARCH * HTTP/1.1
10 2.506430635 192.168.194.130 -> 192.168.194.1 SSH 362 Encrypted response packet len=308
11 2.547345210 192.168.194.1 -> 192.168.194.130 TCP 60 4518 > 22 [ACK] Seq=1 Ack=961 Win=2051 Len=0
12 3.005064119 192.168.194.1 -> 239.255.255.250 SSDP 216 M-SEARCH * HTTP/1.1
1 packet dropped
12 packets captured
tshark -i 端口号 -n -t a -R http.request -T fields -e "frame.time" -e "ip.src" -e "http.host" -e "http.request.method" -e "http.request.uri"
结果和访问日志一样
5.10 监控介绍
为什么要做监控?
可以提前发现故障隐患,第一时间解决掉,把影响降低。
常见的监控软件:
cacti(专业网络设备监控软件)、nagios、zabbix、open-falcon、prometheus、grafana
zabbix 操作方便,在浏览器操作;可以自定定义监控脚本;可以方便查看趋势图形图像;可以查看历史区间内的各项指标
5.11~5.12 安装zabbix4.0
zabbix 官网:www.zabbix.com
前期准备
1、安装 zabbix 的 yum 源
[root@arslinux-01 ~]# rpm -ivh
https://repo.zabbix.com/zabbix/4.0/rhel/7/x86_64/zabbix-release-4.0-1.el7.noarch.rpm
2、查看可用的 yum 源
[root@arslinux-01 ~]# yum list|grep zabbix
zabbix-release.noarch                   4.0-1.el7                      ×××talled
iksemel.x86_64                          1.4-2.el7.centos               zabbix-non-supported
iksemel-devel.x86_64                    1.4-2.el7.centos               zabbix-non-supported
iksemel-utils.x86_64                    1.4-2.el7.centos               zabbix-non-supported
pcp-export-pcp2zabbix.x86_64            4.1.0-5.el7_6                  updates
pcp-export-zabbix-agent.x86_64          4.1.0-5.el7_6                  updates
python-pyzabbix.noarch                  0.7.3-2.el7                    epel
python2-zabbix-api-erigones.noarch      1.2.4-3.el7                    epel
python36-zabbix-api-erigones.noarch     1.2.4-3.el7                    epel
uwsgi-stats-pusher-zabbix.x86_64        2.0.17.1-2.el7                 epel
zabbix-agent.x86_64                     4.0.9-3.el7                    zabbix
zabbix-get.x86_64                       4.0.9-3.el7                    zabbix
zabbix-java-gateway.x86_64              4.0.9-3.el7                    zabbix
zabbix-proxy-mysql.x86_64               4.0.9-3.el7                    zabbix
zabbix-proxy-pgsql.x86_64               4.0.9-3.el7                    zabbix
zabbix-proxy-sqlite3.x86_64             4.0.9-3.el7                    zabbix
zabbix-sender.x86_64                    4.0.9-3.el7                    zabbix
zabbix-server-mysql.x86_64              4.0.9-3.el7                    zabbix
zabbix-server-pgsql.x86_64              4.0.9-3.el7                    zabbix
zabbix-web.noarch                       4.0.9-3.el7                    zabbix
zabbix-web-japanese.noarch              4.0.9-3.el7                    zabbix
zabbix-web-mysql.noarch                 4.0.9-3.el7                    zabbix
zabbix-web-pgsql.noarch                 4.0.9-3.el7                    zabbix
zabbix22.x86_64                         2.2.23-1.el7                   epel
zabbix22-agent.x86_64                   2.2.23-1.el7                   epel
zabbix22-dbfiles-mysql.noarch           2.2.23-1.el7                   epel
zabbix22-dbfiles-pgsql.noarch           2.2.23-1.el7                   epel
zabbix22-dbfiles-sqlite3.noarch         2.2.23-1.el7                   epel
zabbix22-proxy.noarch                   2.2.23-1.el7                   epel
zabbix22-proxy-mysql.x86_64             2.2.23-1.el7                   epel
zabbix22-proxy-pgsql.x86_64             2.2.23-1.el7                   epel
zabbix22-proxy-sqlite3.x86_64           2.2.23-1.el7                   epel
zabbix22-server.noarch                  2.2.23-1.el7                   epel
zabbix22-server-mysql.x86_64            2.2.23-1.el7                   epel
zabbix22-server-pgsql.x86_64            2.2.23-1.el7                   epel
zabbix22-web.noarch                     2.2.23-1.el7                   epel
zabbix22-web-mysql.noarch               2.2.23-1.el7                   epel
zabbix22-web-pgsql.noarch               2.2.23-1.el7                   epel
zabbix30.x86_64                         3.0.22-2.el7                   epel
zabbix30-agent.x86_64                   3.0.22-2.el7                   epel
zabbix30-dbfiles-mysql.noarch           3.0.22-2.el7                   epel
zabbix30-dbfiles-pgsql.noarch           3.0.22-2.el7                   epel
zabbix30-dbfiles-sqlite3.noarch         3.0.22-2.el7                   epel
zabbix30-proxy.noarch                   3.0.22-2.el7                   epel
zabbix30-proxy-mysql.x86_64             3.0.22-2.el7                   epel
zabbix30-proxy-pgsql.x86_64             3.0.22-2.el7                   epel
zabbix30-proxy-sqlite3.x86_64           3.0.22-2.el7                   epel
zabbix30-server.noarch                  3.0.22-2.el7                   epel
zabbix30-server-mysql.x86_64            3.0.22-2.el7                   epel
zabbix30-server-pgsql.x86_64            3.0.22-2.el7                   epel
zabbix30-web.noarch                     3.0.22-2.el7                   epel
zabbix30-web-mysql.noarch               3.0.22-2.el7                   epel
zabbix30-web-pgsql.noarch               3.0.22-2.el7                   epel
zabbix40.x86_64                         4.0.6-1.el7                    epel
zabbix40-agent.x86_64                   4.0.6-1.el7                    epel
zabbix40-dbfiles-mysql.noarch           4.0.6-1.el7                    epel
zabbix40-dbfiles-pgsql.noarch           4.0.6-1.el7                    epel
zabbix40-dbfiles-sqlite3.noarch         4.0.6-1.el7                    epel
zabbix40-proxy.noarch                   4.0.6-1.el7                    epel
zabbix40-proxy-mysql.x86_64             4.0.6-1.el7                    epel
zabbix40-proxy-pgsql.x86_64             4.0.6-1.el7                    epel
zabbix40-proxy-sqlite3.x86_64           4.0.6-1.el7                    epel
zabbix40-server.noarch                  4.0.6-1.el7                    epel
zabbix40-server-mysql.x86_64            4.0.6-1.el7                    epel
zabbix40-server-pgsql.x86_64            4.0.6-1.el7                    epel
zabbix40-web.noarch                     4.0.6-1.el7                    epel
zabbix40-web-mysql.noarch               4.0.6-1.el7                    epel
zabbix40-web-pgsql.noarch               4.0.6-1.el7                    epel
3、需要安装的包如下:
zabbix-agent、zabbix-get、zabbix-server-mysql、zabbix-web、zabbix-web-mysql
4、安装需要装的所有包
[root@arslinux-01 ~]# yum ×××tall zabbix-agent zabbix-get zabbix-server-mysql zabbix-web zabbix-web-mysql
5、查看端口
[root@arslinux-01 ~]# netstat -lntp
Active Internet connections (only servers)
Proto Recv-Q Send-Q Local Address           Foreign Address         State       PID/Program name
tcp        0      0 0.0.0.0:40647           0.0.0.0:*               LISTEN      7181/rpc.statd
tcp        0      0 0.0.0.0:111             0.0.0.0:*               LISTEN      1/systemd
tcp        0      0 0.0.0.0:80              0.0.0.0:*               LISTEN      7201/nginx: master
tcp        0      0 0.0.0.0:20048           0.0.0.0:*               LISTEN      7199/rpc.mountd
tcp        0      0 0.0.0.0:22              0.0.0.0:*               LISTEN      7173/sshd
tcp        0      0 127.0.0.1:25            0.0.0.0:*               LISTEN      7584/master
tcp        0      0 0.0.0.0:45177           0.0.0.0:*               LISTEN      -
tcp        0      0 0.0.0.0:443             0.0.0.0:*               LISTEN      7201/nginx: master
tcp        0      0 0.0.0.0:2049            0.0.0.0:*               LISTEN      -
tcp6       0      0 :::3306                 :::*                    LISTEN      7516/mysqld
tcp6       0      0 :::46092                :::*                    LISTEN      7181/rpc.statd
tcp6       0      0 :::111                  :::*                    LISTEN      1/systemd
tcp6       0      0 :::20048                :::*                    LISTEN      7199/rpc.mountd
tcp6       0      0 :::22                   :::*                    LISTEN      7173/sshd
tcp6       0      0 ::1:25                  :::*                    LISTEN      7584/master
tcp6       0      0 :::2049                 :::*                    LISTEN      -
tcp6       0      0 :::38661                :::*                    LISTEN
6、创建数据库 zabbix 并配置
[root@arslinux-01 ~]# mysql -uroot -parslinux
Warning: Using a password on the command line interface can be ×××ecure.
Welcome to the MySQL monitor.  Commands end with ; or \g.
Your MySQL connection id is 1
Server version: 5.6.43-log MySQL Community Server (GPL)

Copyright (c) 2000, 2019, Oracle and/or its affiliates. All rights reserved.

Oracle is a registered trademark of Oracle Corporation and/or its
affiliates. Other names may be trademarks of their respective
owners.

Type 'help;' or '\h' for help. Type '\c' to clear the current input statement.

mysql> create database zabbix;
Query OK, 1 row affected (0.00 sec)

mysql> grant all on zabbix.* to 'zabbix'@'127.0.0.1' identified by '123456';
Query OK, 0 rows affected (0.00 sec)

mysql> quit
Bye
7、编辑 zabbix server 配置文件
[root@arslinux-01 ~]# vim /etc/zabbix/zabbix_server.conf
DBHost=127.0.0.1
DBName=zabbix
DBPassword=123456
8、启动 zabbix-server
[root@arslinux-01 ~]# systemctl start zabbix-server
[root@arslinux-01 ~]# ps aux|grep zabbix
root       8078  0.0  0.0 112724   984 pts/0    R+   12:49   0:00 grep --color=auto zabbix
9、程序未启动,查看日志文件 /var/log/zabbix/zabbix_server.log
[root@arslinux-01 ~]# cat /var/log/zabbix/zabbix_server.log
8156:20190611:125125.104 [Z3005] query failed: [1146] Table 'zabbix.users' doesn't exist [select userid from users limit 1]
库里没有表,所以无法启动
10、安装的 RPM 包中带有 sql 文件(create.sql),将其导入数据库
[root@arslinux-01 ~]# ls /usr/share/doc/zabbix-server-mysql-4.0.9/
AUTHORS  ChangeLog  COPYING  create.sql.gz  NEWS  README
[root@arslinux-01 ~]# gzip -d !$
gzip -d /usr/share/doc/zabbix-server-mysql-4.0.9/create.sql.gz
[root@arslinux-01 ~]# ls /usr/share/doc/zabbix-server-mysql-4.0.9/
AUTHORS  ChangeLog  COPYING  create.sql  NEWS  README
[root@arslinux-01 ~]# mysql -uroot -parslinux zabbix < /usr/share/doc/zabbix-server-mysql-4.0.9/create.sql
Warning: Using a password on the command line interface can be ×××ecure.
11、启动 zabbix-server
[root@arslinux-01 ~]# systemctl start zabbix-server
[root@arslinux-01 ~]# ps aux|grep zabbix
12、zabbix-server 监听 10051 端口
[root@arslinux-01 ~]# netstat -lntp|grep zabbix
tcp        0      0 0.0.0.0:10051           0.0.0.0:*               LISTEN      7820/zabbix_server
tcp6       0      0 :::10051                :::*                    LISTEN      7820/zabbix_server
13、编辑 zabbix-agent 的配置文件
[root@arslinux-01 ~]# vim /etc/zabbix/zabbix_agentd.conf
Server=127.0.0.1 //server 去取
ServerActive=127.0.0.1 //机器量多的话,线程就太多,那么客户端上报更好
14、启动 zabbix-agent
[root@arslinux-01 ~]# systemctl start zabbix-agent
[root@arslinux-01 ~]# ps aux|grep zabbix_agent
15、安装 web ui,需要启动 httpd 服务,首先关闭 nginx 服务
[root@arslinux-01 ~]# systemctl stop nginx
[root@arslinux-01 ~]# systemctl start httpd
[root@arslinux-01 ~]# netstat -lntp|grep httpd
开始安装 web ui
1、访问 http://192.168.194.130/zabbix/setup.php,可以安装 zabbix 了
2、在下一步里,会有红色的标注 FAIL 的选项,需要修改参数
此处,我们需要找到 php 的配置文件去更改
3、更改php.ini 参数(httpd 是之前 yum 安装的) /etc/php.ini 中的 date.timezone
[root@arslinux-01 ~]# vi /etc/php.ini
date.timezone = Asia/Shanghai
4、重启 httpd
[root@arslinux-01 ~]# systemctl restart httpd
5、到浏览器中,刷新一下,可以看到,参数已经全部正常了
6、定义数据库相关信息
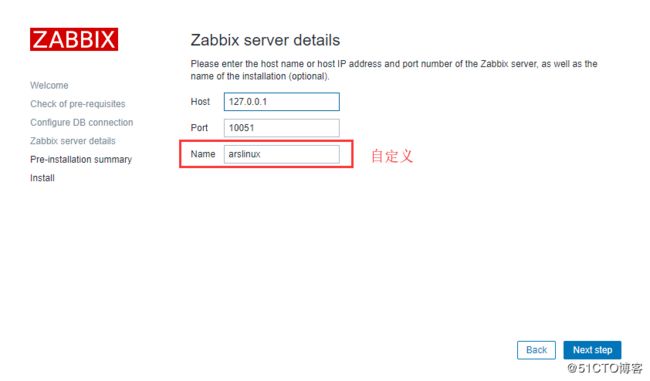
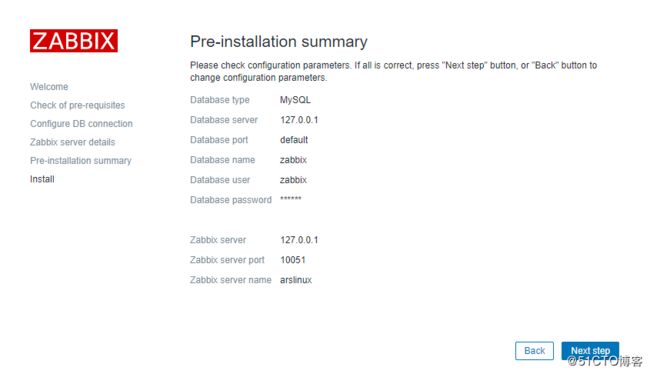
7、自定义服务器信息
根据提示,默认安装完即可
8、到登陆页面,默认初始用户名和密码是 admin 和 zabbix
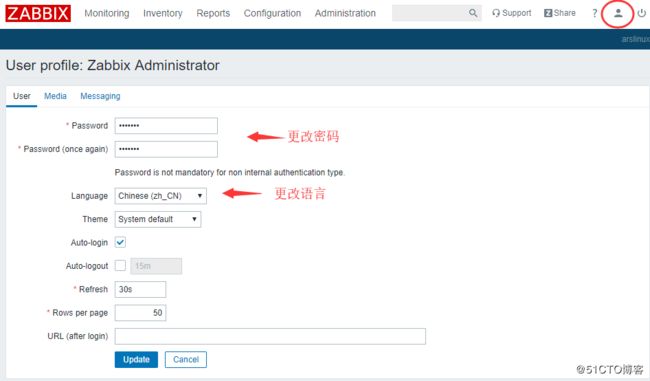
9、然后可以到个人管理中更改密码和语言
往后再访问时就在浏览器输入 ip/zabbix 即可
10、总结:
1)安装 zabbix yum 源
rpm -ivh https://repo.zabbix.com/zabbix/4.0/rhel/7/x86_64/zabbix-release-4.0-1.el7.noarch.rpm
2)yum 安装
yum ×××tall zabbix-agent zabbix-get zabbix-server-mysql zabbix-web zabbix-web-mysql
3)数据库操作
create database zabbix;
grant all on zabbix.* to 'zabbix'@'127.0.0.1' identified by '密码'
4)导入数据
/usr/share/doc/zabbix-server-mysql-4.0.3/create.sql.gz
gzid -d /usr/share/doc/zabbix-server-mysql-4.0.3/create.sql.gz
mysql -uroot -p密码 zabbix < /usr/share/doc/zabbix-server-mysql-4.0.3/create.sql.gz
5)编辑 zabbix_server.conf
vim /etc/zabbix/zabbix_server.conf #定义数据库相关的参数
systemctl start zabbix-server
systemctl enable zabbix-server
6)编辑 zabbix_agent.conf
vim /etc/zabbix/zabbix_agent.conf #定义Server 和 ServerActive=127.0.0.1
systemctl start zabbix-agent
systemctl enable zabbix-agent
7)httpd
systemctl start httpd #如果已经启动了 nginx,需要先把 nginx 关闭,然后启动 httpd;如果 nginx 不能停止,那么需要更改 nginx 监听端口为非 80 端口,比如 8080 /8000
8)web ui 配置
http://ip/zabbix 访问,解决 php 的问题 (date.timezone = Asia/Shanghai)
/etc/php.ini (httpd 是 yum 安装)
默认用户名密码:admin,zabbix
5.13 监控客户机-添加主机
1、安装 zabbix 的 yum 源
[root@arslinux-02 ~]# rpm -ivh https://repo.zabbix.com/zabbix/4.0/rhel/7/x86_64/zabbix-release-4.0-1.el7.noarch.rpm
2、yum 安装 zabbix-agent
[root@arslinux-02 ~]# yum ×××tall -y zabbix-agent
3、编辑配置文件 /etc/zabbix/zabbix_agentd.conf
[root@arslinux-02 ~]# vim /etc/zabbix/zabbix_agentd.conf
Server=192.168.194.130 //zabbix-server 的 ip
ServerActive=192.168.194.130
4、启动 zabbix-agent
[root@arslinux-02 ~]# systemctl start zabbix-agent
[root@arslinux-02 ~]# ps aux|grep zabbix
zabbix     7272  0.0  0.1  80720  1268 ?        S    21:20   0:00 /usr/sbin/zabbix_agentd -c /etc/zabbix/zabbi_agentd.conf
zabbix     7273  0.0  0.1  80720  1312 ?        S    21:20   0:00 /usr/sbin/zabbix_agentd: collector [idle 1 sec]
zabbix     7274  0.0  0.1  80720  1836 ?        S    21:20   0:00 /usr/sbin/zabbix_agentd: listener #1 [waiting for connection]
zabbix     7275  0.0  0.1  80720  1836 ?        S    21:20   0:00 /usr/sbin/zabbix_agentd: listener #2 [waiting for connection]
zabbix     7276  0.0  0.1  80720  1836 ?        S    21:20   0:00 /usr/sbin/zabbix_agentd: listener #3 [waiting for connection]
zabbix     7277  0.0  0.2  80852  2224 ?        S    21:20   0:00 /usr/sbin/zabbix_agentd: active checks #1 [idle 1 sec]
root       7279  0.0  0.0 112724   988 pts/0    R+   21:20   0:00 grep --color=auto zabbix
5、查看 zabbix-agentd 监听的端口
[root@arslinux-02 ~]# netstat -lntp|grep zabbix
tcp        0      0 0.0.0.0:10050           0.0.0.0:*               LISTEN      7272/zabbix_agentd
tcp6       0      0 :::10050                :::*                    LISTEN      7272/zabbix_agentd
zabbix-agentd 监听 10050 端口,会和 server 端的 10051 端口通信
5.14 监控客户机-管理模板
1、创建新主机
配置——主机——创建主机
主机已经添加完成
2、创建模板
配置——模板——创建模板
3、拷贝某个模板里的应用集 CPU 中的监控项到自定义的模板中
配置——模板——Template OS Linux——应用集——CPU
4、将监控项拷贝到 test 模板中去
5、同样的方法拷贝其他参数的监控项到 test 模板中
6、自动发现(Discovery)是无法使用复制来添加到自定义模板中的
我们可以将“自动发现”规则一样的模板克隆到一个新的自定义模板中
配置——模板——模板名称——全克隆(Full Clone)
添加名称和群组信息
7、进入新建的模板 ars4life ,在“连接的宏模板”中取消连接,并更新
8、根据需要删除模板中的监控项、触发器、图形
删除顺序:图形——触发器——监控项——应用集(删除空白项)
9、将模板链接到自定义创建的主机上去
配置——主机——具体主机——模板——选择链接模板——添加——更新
10、添加完成
11、查看监控项。监测——最新数据
12、命令行查看相关信息
[root@arslinux-01 ~]# zabbix_get -s 192.168.194.132 -p 10050 -k "system.cpu.load[all,avg1]"
0.100000
5.15 监控客户机-管理图形和窗口
自动发现
自动发现需要一个小时才发现一次,如果需要立刻出现,可以使用现在检查
主机——自动发现——现在检查
聚合图形
监测——聚合图形——创建聚合图形
自定义监测模块
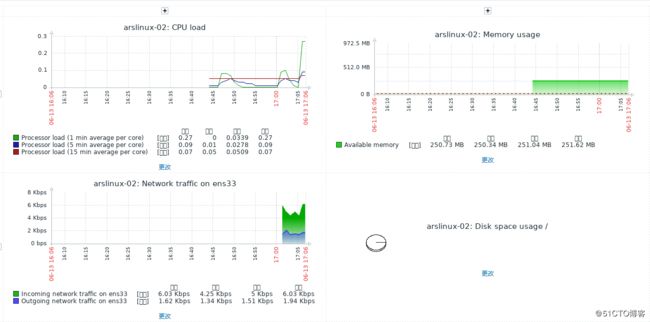
仪表板中也可以自定义新的监测模块
创建仪表盘:监测——仪表盘——创建仪表盘
效果如下图
在保存设置时出错,是由于名称不能为中文,需要改成英文,修改完后正常
![]()
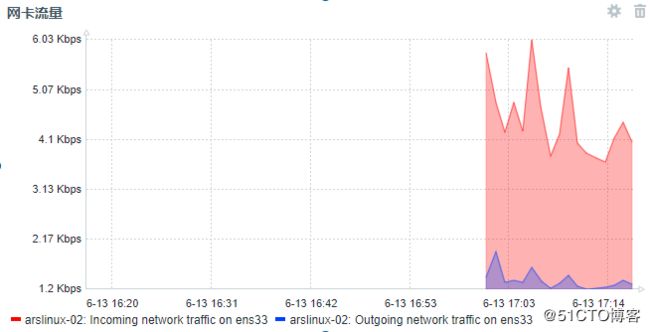
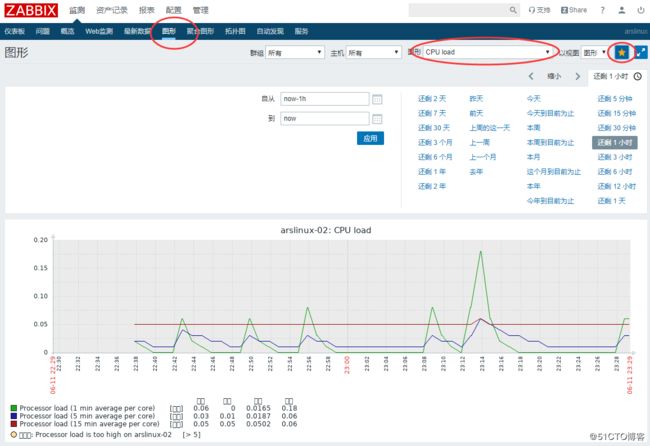
在“图形”以及“聚合图形”中,将常用的类型图标收藏,点星星变×××
在仪表板中的小构件中,可以看到收藏的项目,点进去就能查看图形
记得一定要保存设置!!
5.16 监控客户机-配置触发器
创建触发器
自定义网卡流量触发器
触发器设置:名称——严重性——表达式
表达式(条件):监控项——结果(单位为 bit)
5.17 解决中文名称不能写数据库的问题
触发器名称如果改为中文,那么在更新后,会提示错误,无法更新触发器,如下图
错误原因:数据库中文出现问题,基本都是字符集的问题
查看数据库:
mysql> show variables like 'character%';
+--------------------------+----------------------------------+
| Variable_name            | Value                            |
+--------------------------+----------------------------------+
| character_set_client     | utf8                             |
| character_set_connection | utf8                             |
| character_set_database   | latin1                           |
| character_set_filesystem | binary                           |
| character_set_results    | utf8                             |
| character_set_server     | latin1                           |
| character_set_system     | utf8                             |
| character_sets_dir       | /usr/local/mysql/share/charsets/ |
+--------------------------+----------------------------------+
8 rows in set (0.00 sec)
character_set_database,需要改为 utf8 中文
可以先去 /etc/my.cnf 中将上述参数全部改为 utf8,再导入表,就不会有这种问题了
但在已安装 zabbix 的情况下,重新安装 zabbix 就变得极不科学,有什么更好的办法呢?
修改字符集
1、将表导出
[root@arslinux-01 ~]# mysqldump -uroot -parslinux --default-character-set=utf8 zabbix > zabbix.sql
2、编辑导出的 .sql 文件
[root@arslinux-01 ~]# vim zabbix.sql
一般模式下输入 :1,$s/latin1/utf8/g,将latin1全局替换成 utf8,保存退出后再导入数据库
3、导入数据库
[root@arslinux-01 ~]# mysql -uroot -parslinux --default-character-set=utf8 zabbix < zabbix.sql
4、再进入数据库查看默认字符集:
mysql> use zabbix;
mysql> show create table items\G
ENGINE=InnoDB DEFAULT CHARSET=utf8
mysql> show create table triggers\G
ENGINE=InnoDB DEFAULT CHARSET=utf8
5、到 web 中查看名称是否能更新为中文
5.18 解决图形中文乱码
现象:如上图,乱码成方块状
原因:没有支持中文文字的字体
解决方法:替换 zabbix 默认字体为中文字体
步骤:
1、查看 zabbix 配置文件中定义的字体路径和名称
vim /usr/share/zabbix/include/defines.inc.php
ZBX_FONTPATH ——> assets/fonts
ZBX_GRAPH_FONT_NAME ——> graphfont
2、到 /usr/share/zabbix/assets/fonts 里,将 graphfont.ttf 备份
[root@arslinux-01 ~]# cd /usr/share/zabbix/assets/fonts/
[root@arslinux-01 fonts]# mv graphfont.ttf graphfont.ttf.bak
[root@arslinux-01 fonts]# ls
graphfont.ttf.bak
3、从 windows 主机里的 C:\Windows\Fonts 上传一个中文字体到虚拟机中
4、给改字体做软链接,名称为 graphfont.ttf(或者到配置文件中改配置)
[root@arslinux-01 fonts]# ln -s msyh.ttc graphfont.ttf
[root@arslinux-01 fonts]# ls
graphfont.ttf  graphfont.ttf.bak  msyh.ttc
5、web 中乱码问题已经解决
5.19~5.21 zabbix邮件告警
设置邮件推送
1、首先新注册一个域名
2、某云——产品与服务——云通信——邮件推送——立即开通
3、邮件推送控制台——邮件设置——发信域名——新建域名——配置
4、找到云解析DNS——域名解析——解析设置——添加记录(根据发信配置的信息填写,下图)
5、修改完成后,点确认修改,再点验证,状态会变为绿色“可使用-未备案”
6、新建发信地址:邮件设置——发信地址——新建发信地址——发信域名、账号(自定义)、发信类型为触发邮件——设置SMTP密码(可以用keepass生成随机字符串,也可以用mkpasswd)
创建发邮件 python 脚本:
1、编辑 mail.py 脚本
更改mail_user、mail_pass和端口号即可
[root@arslinux-01 ~]# vim mail.py
#!/usr/bin/python
#coding:utf-8

import smtplib
from email.mime.text import MIMEText
import sys

mail_user = '[email protected]'
mail_pass = 'xxxxxxxxx'

def send_mail(to_list,subject,content):
    me = "zabbix 监控告警平台"+"<"+mail_user+">"
    msg = MIMEText(content, 'plain', 'utf-8')
    msg['Subject'] = subject
    msg['From'] = me
    msg['to'] = to_list

    try:
        s = smtplib.SMTP("smtpdm.aliyun.com", 25)
        s.login(mail_user,mail_pass)
        s.sendmail(me,to_list,msg.as_string())
        s.close()
        return True
    except Exception,e:
        print str(e)
        return False

if __name__ == "__main__":
    send_mail(sys.argv[1], sys.argv[2], sys.argv[3])
2、修改 mail.py 权限为755
[root@arslinux-01 ~]# chmod 755 mail.py
3、使用命令发一个测试给个人邮箱来测试
[root@arslinux-01 ~]# ./mail.py [email protected] "测试邮件" "看看能否发送成功"
4、进入邮箱查看是否搜到邮件
5、成功!
设置zabbix_server配置文件
1、在 /etc/zabbix/zabbix_server.conf 找到报警脚本路径 AlertScriptsPath=/usr/lib/zabbix/alertscripts
2、cd 到 /usr/lib/zabbix/alertscripts
3、把 mail.py 脚本挪到这个目录下来
[root@arslinux-01 alertscripts]# mv /root/mail.py .
4、发邮件时是 zabbix 用户执行的,而不是root用户,确定 mail.py 是755权限
设置zabbixWEB UI
1、设置报警媒介
管理——报警媒介类型——创建媒体类型
名称:baojing
类型:脚本
脚本名称:mail.py(zabbix 会到 zabbix_server 去找 AlertScriptsPath )
添加脚本参数:{ALERT.SENDTO}、{ALERT.SUBJECT}、{ALERT.MESSAGE}
选项保持默认即可,点添加完成
2、设置接收邮件地址
1)管理——用户——Admin(或者新创建用户)
2)Admin——报警媒介——添加
类型:baojing
收件人:邮箱地址
可以添加多个,记得点更新,检查一下报警媒介是否添加成功
3)权限检查是否所有机器都有读写权限
如果没有读写权限,可以更改 “用户类型” 为 “超级管理员”
3、配置动作
1)配置——动作——创建动作
2)“操作”标签
操作——新的
发送到用户:Admin(根据实际情况填写用户)
仅送到:baojing
条件:事件已确认等于非确认,添加
添加
3)“恢复操作”标签,同上
测试报警
1、配置——主机——触发器
2、模拟故障:更改一个触发器,将“网卡入口流量”触发值改为 <=10000000
3、监测——问题——查看切换为问题——选择主机名——应用
4、也可以查看邮箱,有邮件告警
5、将触发器告警值恢复为默认,会有恢复操作的邮件通知
5.22/5.23 zabbix监控Nginx
编写监控脚本
1、arslinux-02上安装 nginx 服务
2、配置 Nginx 状态信息,增加一段内容
[root@arslinux-02 ~]# vim /etc/nginx/nginx.conf
location /nginx_status
{
stub_status on;
access_log   off;
allow 127.0.0.1;
deny all;
}
如果 include /etc/nginx/default.d/*.conf 之后后没有看到内容,那么可能是被单独定义到了 /etc/nginx/default.d/default.conf 中去,可以将 location /nginx_status 一段内容写到 default.conf 中去,方法同上
3、测试:
[root@arslinux-02 ~]# curl 127.0.0.1/nginx_status
Active connections: 1
server accepts handled requests
2 2 2
Reading: 0 Writing: 1 Waiting: 0
[root@arslinux-02 ~]# curl 127.0.0.1/nginx_status
Active connections: 1
server accepts handled requests
3 3 3
Reading: 0 Writing: 1 Waiting: 0
[root@arslinux-02 ~]# curl 127.0.0.1/nginx_status
Active connections: 1
server accepts handled requests
4 4 4
Reading: 0 Writing: 1 Waiting: 0
4、说明:
字段 含义
Active Connections 当前活动连接数,其中也包括了等待状态的连接
accepts 接收到的连接数
handled 已经处理完的连接数,该数字一般和accepts一致,如果不一致那么说明Nginx出错了
requests 总共处理的请求数,一个连接可以有多个请求,所以该值比accpets要大
Reading 正在读取请求头信息的连接数
Writing 正在发送响应报文的连接数
Waiting 处于闲置状态,等待客户端发送请求的连接数
5、编写监控脚本
[root@arslinux-02 ~]# vim /usr/local/sbin/ngx_status.sh
#!/bin/bash
url="http://127.0.0.1/nginx_status"
curl=/usr/bin/curl
# 检测nginx进程是否存在
function ping {
    /sbin/pidof nginx | wc -l
}
# 检测nginx性能
function active {
$curl $url 2>/dev/null| grep 'Active' | awk '{print $NF}'
}
function reading {
$curl $url 2>/dev/null| grep 'Reading' | awk '{print $2}'
}
function writing {
    $curl $url 2>/dev/null| grep 'Writing' | awk '{print $4}'
}
function waiting {
    $curl $url 2>/dev/null| grep 'Waiting' | awk '{print $6}'
}
function accepts {
    $curl $url 2>/dev/null| awk NR==3 | awk '{print $1}'
}
function handled {
    $curl $url 2>/dev/null| awk NR==3 | awk '{print $2}'
}
function requests {
    $curl $url 2>/dev/null| awk NR==3 | awk '{print $3}'
}
$1
6、更改脚本权限
[root@arslinux-02 ~]# chmod 755 /usr/local/sbin/ngx_status.sh
7、执行脚本,如果数值不为 0,那么 nginx 就在运行
[root@arslinux-02 ~]# /usr/local/sbin/ngx_status.sh ping
1
编辑 zabbix_agent.conf
1、在 UserParameter= 下增加一行
UserParameter=nginx.status[*],/usr/local/sbin/ngx_status.sh $1
用来定义自定义的监控脚本,多个脚本定义多行
2、指定 key 和 shell 脚本的路径名称
nginx.status[*] 就是 key,[*] 表示脚本带有参数
3、重启服务
[root@arslinux-02 ~]# systemctl restart zabbix-agent
4、在 zabbix-server 上测试
[root@arslinux-01 ~]# zabbix_get -s 192.168.194.132 -k 'nginx.status[accepts]'
6
[root@arslinux-01 ~]# zabbix_get -s 192.168.194.132 -k 'nginx.status[ping]'
1
nginx 只要是启动状态,必然有数值
添加进 web 界面
1、虚拟机安装 git
[root@arslinux-02 ~]# yum ×××tall -y git
2、将内容全部 clone 到 虚拟机上
[root@arslinux-02 ~]# git clone https://github.com/aminglinux/linux2019.git
3、将模板载到 windows 端
[root@arslinux-02 ~]# cd zabbix_nginx_template
[root@arslinux-02 zabbix_nginx_template]# sz zbx_export_templates.xml
4、web 上:删除重名模板 Template App NGINX
5、配置——模板——导入——导入文件(选择文件,选 zbx_export_templates.xml 文件)
链接模板
1、配置——主机——主机名称——模板——链接指示器(选择Template App NGINX)——添加——更新
2、监控项、图形里已经出现了 Nginx 相关的监控
错误解决:
1、无效的参数 "/source": UTF-8中无效的字节排序 。
导入的模板不可以直接复制源码,重命名记事本文件
5.24 zabbix监控Tomcat
监控流程:
1、安装zabbix_java_gateway
2、配置zabbix_java_gateway配置文件和zabbix_server配置文件,指定监听端口,启动进程数
3、编辑Tomcat配置文件,开启JMX
4、添加host,指定JMX interface
5、链接TOMCAT模板
操作步骤:
1、在 zabbix-server 上安装 zabbix-java-gateway
[root@arslinux-01 ~]# yum ×××tall -y zabbix-java-gateway
2、编辑 zabbix_java_gateway.conf
[root@arslinux-01 ~]# vim /etc/zabbix/zabbix_java_gateway.conf
LISTEN_PORT=10052 //不打开也是默认 10052 端口
START_POLLERS=5 //进程数
3、编辑 /etc/zabbix/zabbix_server.conf
[root@arslinux-01 ~]# vim /etc/zabbix/zabbix_server.conf
JavaGateway=127.0.0.1 //JavaGateway 所安装的主机 ip,我们这里是本机
JavaGatewayPort=10052 //java 的 port
StartJavaPollers=5
4、启动 zabbix-java-gateway
[root@arslinux-01 ~]# systemctl start zabbix-java-gateway
5、重启 zabbix-server 服务
[root@arslinux-01 ~]# systemctl restart zabbix-server
6、查看进程和端口
[root@arslinux-01 ~]# ps aux|grep gateway
zabbix     8023  1.0  3.6 2267640 36624 ?       Sl   20:28   0:00 java -server -Dlogback.configurationFile=/etc/zabbix/zabbix_java_gateway_logback.xml -classpath lib:lib/android-json-4.3_r3.1.jar:lib/logback-classic-0.9.27.jar:lib/logback-core-0.9.27.jar:lib/slf4j-api-1.6.1.jar:bin/zabbix-java-gateway-4.0.9.jar -Dzabbix.pidFile=/var/run/zabbix/zabbix_java.pid -Dzabbix.listenPort=10052 -Dzabbix.startPollers=5 -Dsun.rmi.transport.tcp.responseTimeout=3000 com.zabbix.gateway.JavaGateway
root       8108  0.0  0.0 112728   988 pts/0    S+   20:29   0:00 grep --color=auto gateway
[root@arslinux-01 ~]# netstat -lntp
Active Internet connections (only servers)
Proto Recv-Q Send-Q Local Address           Foreign Address         State       PID/Program name
tcp        0      0 0.0.0.0:111             0.0.0.0:*               LISTEN      1/systemd
tcp        0      0 0.0.0.0:20048           0.0.0.0:*               LISTEN      7223/rpc.mountd
tcp        0      0 0.0.0.0:22              0.0.0.0:*               LISTEN      7156/sshd
tcp        0      0 0.0.0.0:36919           0.0.0.0:*               LISTEN      7171/rpc.statd
tcp        0      0 127.0.0.1:25            0.0.0.0:*               LISTEN      7572/master
tcp        0      0 0.0.0.0:43225           0.0.0.0:*               LISTEN      -
tcp        0      0 0.0.0.0:2049            0.0.0.0:*               LISTEN      -
tcp        0      0 0.0.0.0:10050           0.0.0.0:*               LISTEN      7196/zabbix_agentd
tcp        0      0 0.0.0.0:10051           0.0.0.0:*               LISTEN      8049/zabbix_server
tcp6       0      0 :::41833                :::*                    LISTEN      -
tcp6       0      0 :::3306                 :::*                    LISTEN      7479/mysqld
tcp6       0      0 :::111                  :::*                    LISTEN      1/systemd
tcp6       0      0 :::80                   :::*                    LISTEN      7155/httpd
tcp6       0      0 :::20048                :::*                    LISTEN      7223/rpc.mountd
tcp6       0      0 :::22                   :::*                    LISTEN      7156/sshd
tcp6       0      0 ::1:25                  :::*                    LISTEN      7572/master
tcp6       0      0 :::2049                 :::*                    LISTEN      -
tcp6       0      0 :::10050                :::*                    LISTEN      7196/zabbix_agentd
tcp6       0      0 :::10051                :::*                    LISTEN      8049/zabbix_server
tcp6       0      0 :::43939                :::*                    LISTEN      7171/rpc.statd
tcp6       0      0 :::10052                :::*                    LISTEN      8023/java
7、开启 JMX
1)编辑配置文件 /usr/local/tomcat/bin/catalina.sh
在 #!/bin/sh 下增加一段
export CATALINA_OPTS="$CATALINA_OPTS -Dcom.sun.management.jmxremote
-Djava.rmi.server.hostname=192.168.194.130
-Dcom.sun.management.jmxremote.port=9999
-Dcom.sun.management.jmxremote.ssl=false
-Dcom.sun.management.jmxremote.authenticate=false"
2)重启 tomcat
[root@arslinux-01 ~]# /usr/local/tomcat/bin/shutdown.sh
[root@arslinux-01 ~]# /usr/local/tomcat/bin/startup.sh
3)查看 9999 端口是否启动
[root@arslinux-01 ~]# netstat -lntp |grep 9999
tcp6       0      0 :::9999                 :::*                    LISTEN      8328/java
8、zabbix web 端添加新 host
1)创建新主机,配置——主机——创建主机
2)更改主机配置:主机名称——群组——移除agent代理程序接口——添加JMX接口——127.0.0.1,端口 9999
3)链接模板:模板——Template App Apache Tomcat JMX——添加——添加
4)监测——最新数据——主机切换为arslinux-01_tomcat已经出数据了
5.25 zabbix监控MySQL
1、授权用户
[root@arslinux-01 ~]# mysql -uroot -parslinux
mysql> grant usage,process,replication client on*.* to 'mon'@'localhost' identified by '12345678';
Query OK, 0 rows affected (0.05 sec)
2、查看 /etc/zabbix/zabbix_agentd.d/userparameter_mysql.conf 中 HOME 的位置
HOME=/var/lib/zabbix
3、创建目录 /var/lib/zabbix
[root@arslinux-01 ~]# mkdir /var/lib/zabbix
4、在目录下创建隐藏文件 .my.cnf,添加两段内容
[root@arslinux-01 ~]# vim /var/lib/zabbix/.my.cnf
[mysql]
host=localhost
user=mon
password='12345678'
socket=/tmp/mysql.sock

[mysqladmin]
host=localhost
user=mon
password='12345678'
socket=/tmp/mysql.sock
5、重启 zabbix-agent 服务(如果没改 zabbix 配置文件无需重启)
[root@arslinux-01 ~]# systemctl restart zabbix-agent
6、测试
[root@arslinux-01 ~]# zabbix_get -s 127.0.0.1 -p 10050 -k mysql.ping
sh: mysqladmin: 未找到命令
0
7、mysqladmin 的位置
[root@arslinux-01 ~]# which mysqladmin
/usr/local/mysql/bin/mysqladmin
由于 PATH 的原因,可以给 mysqladmin 做个软连接到 /usr/bin/ 下
8、做软链接
[root@arslinux-01 ~]# ln -s /usr/local/mysql/bin/mysqladmin /usr/bin/
9、再次测试
[root@arslinux-01 ~]# zabbix_get -s 127.0.0.1 -p 10050 -k mysql.ping
1
10、测试下 mysql.version、mysql.size
[root@arslinux-01 ~]# zabbix_get -s 127.0.0.1 -p 10050 -k mysql.version
sh: mysql: 未找到命令
[root@arslinux-01 ~]# zabbix_get -s 127.0.0.1 -p 10050 -k mysql.size
bash: mysql: 未找到命令
11、通方法给 mysql 做软链接
[root@arslinux-01 ~]# which mysql
/usr/local/mysql/bin/mysql
[root@arslinux-01 ~]# ln -s /usr/local/mysql/bin/mysql /usr/bin/
[root@arslinux-01 ~]# zabbix_get -s 127.0.0.1 -p 10050 -k mysql.version
mysql  Ver 14.14 Distrib 5.6.43, for linux-glibc2.12 (x86_64) using  EditLine wrapper
[root@arslinux-01 ~]# zabbix_get -s 127.0.0.1 -p 10050 -k mysql.size
10240
11、添加主机和模板
1)配置——主机——创建主机——主机名称——群组——端口
2)模板——Template DB MySQL——添加
3)监测——最新数据——主机切换为 arslinux-01_mysql ,过段时间会出现新数据
4)主机可用性也显示 ZBX 可用
课堂笔记
1、监控重要性
2、主流监控:zabbix、open-falcon、Prometheus、grafana
链路监控:apm、pinport
3、学习监控需要把握的几点:监控项目如何配置、自定义监控如何配置、如何成图、如何告警
