一、属性传值
从前向后
假设A为第一个视图控制器,B为第二个视图控制器
在A中导入B的.h文件
场景:A向B传值
第一步:在B的.h中定义一个content属性
@interface SecondViewController : UIViewController

@property(nonatomic,copy)NSString *contents;

@end
第二步:在点击A中的按钮的方法里面给B的content属性赋值
-(void)buttonAction:(UIButton *)button
{
    NSLog(@"进入第二页");

    SecondViewController *secondVC =

    [[SecondViewController alloc] init];

    secondVC.contents = self.label.text;

    [self.navigationController pushViewController:secondVC animated:YES];

    [secondVC release];
}
第三步:在B中使用content的属性给相应的控件赋值
@implementation SecondViewController
- (void)viewDidLoad {
    [super viewDidLoad];
    self.view.backgroundColor = [UIColor whiteColor];
    self.navigationItem.title = self.contents;
}
二、代理传值
代理传值使用在两个界面传值的时候,从后向前传值。
假设A为第一个视图控制器,B为第二个视图控制器
场景:B向A传值
第一步:首先在B的.h文件中声明协议和协议方法
第二步:在B的.h中声明一个协议属性,这里要注意用assign或weak修饰,
weak和assign是一种“非拥有关系”的指针,通过这两种修饰符修饰的指针变量,都不会改变被引用对象的引用计数。但是在一个对象被释放后,weak会自动将指针指向nil,而assign则不会。所以,似乎用weak更安全些。
@property (nonatomic,assign)id <协议名>delegate;
#pragma mark 这里是B的.h

#import

@protocol CustomTabBarDelegate

//把btn的tag传出去的方法
-(void)selectedIndexWithTag:(NSInteger)tag;

@end

@interface CustomTabBarView : UIView

//声明一个协议属性delegate
@property (nonatomic,assign)id delegate;

@end
第三步:在B即将POP回前一个界面的时候,在pop方法的上一行使用协议方法传递数据
[self.delegate 协议方法名称:(参数,也就是要传回的数据)
#pragma mark 这里是B的.m
//    判断在指定的代理类中是否实现了该协议方法
//    确保执行时无此方法时不崩溃
    if([self.delegate respondsToSelector:@selector(selectedIndexWithTag:)])
    {
       //执行代理方法
        [self.delegate selectedIndexWithTag:(sender.tag - 1000)];
    }
    else
    {
        NSLog(@"selectIndexWithTag该方法没有实现");
    }
第四步:在A的.m中,在push到B界面的push方法之前,B对象的初始化之后,指定A对象为B对象的代理
(B对象).delegate = self;
此时会有黄色警告,没有遵守协议
#pragma mark A的.m中
//指定代理,B就是customView
    customView.delegate = self;
第五步:在A的延展或者A的.h文件中导入协议<协议名称>
#pragma mark A的.m的延展里 , A就是RootTabBarController
//导入协议
@interface RootTabBarController ()

@end
第六步:在A的.m中实现协议方法,取得参数中的值,呈现在当前界面上
#pragma mark A的.m

//实现代理方法,这里就可以使用从B传来的值了
- (void)selectedIndexWithTag:(NSInteger)tag
{
    self.selectedIndex = tag;
}
三、block传值
这里就不具体讲block是怎么回事了,这是OC的基础内容。
block就是一块代码片段,类似于函数但是block可以作为参数进行传递
第一步:
在B的.h中重定义一个block,用这个重定义的block类型声明一个类的属性
这里要注意用copy修饰block属性
#pragma mark B的.h

#import

//block传值
//重命名一个有参无返回值的block类型
typedef void(^passValue)(NSInteger tag);

@interface CustomTabBarView : UIView

 //用这个block类型定义一个属性
@property (nonatomic,copy)passValue passValueTag;


@end
第二步:
在B的.m的返回方法中调用block的方法
#pragma mark B的.m的返回方法中

nbsp;//调用block方法
   self.passValueTag(sender.tag - 1000);
第三步:
在A的.m中创建B的实例的地方,为B的block属性赋值,也就是说,写好这个block中的内容,类似于给B的某一个属性赋初值
//设置block内容
   customView.passValueTag = ^(NSInteger tag)
   {
       self.selectedIndex = tag;
   };
这里只有三步,比代理的方法简单了不少
下面是实现效果
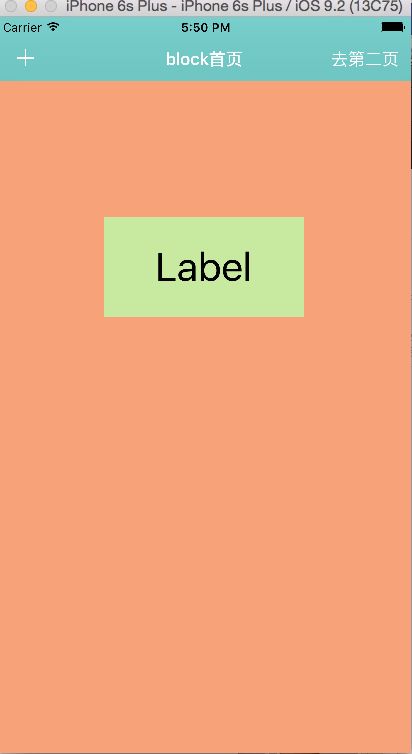
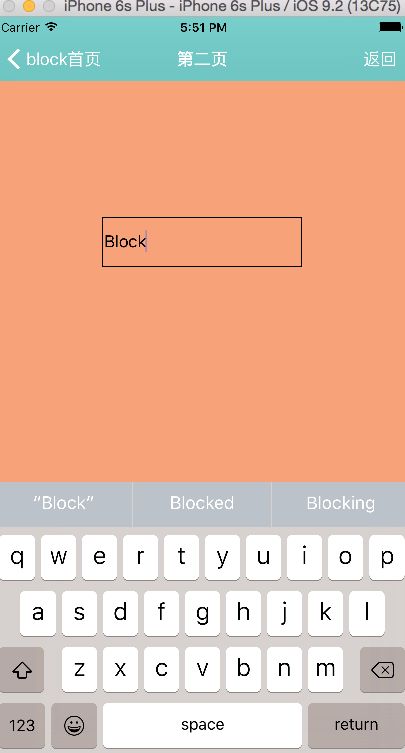
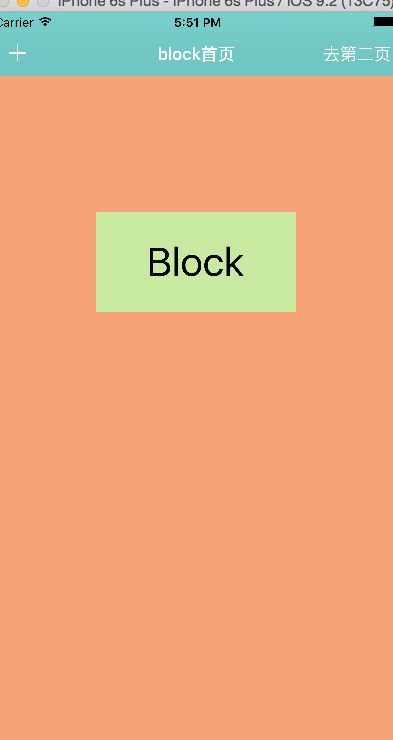
第一页有个Label,在第二页的输入框输入文字,就可以显示在第一页的label上,实现了从后向前的传值
没有引用局部变量的block内存存储在全局区
没有引用局部变量的block内存存储在全局区
引用了局部变量的block内存存储在栈区
当对block进行copy操作的时候blcok的内存在堆区
block的循环引用问题
当block是self的一个属性的时候
self.circleBlock = ^() { my_self.navigationItem.title = @"asd"; };
会导致self的引用计数+1,最终导致循环引用
在arc下使用__weak修饰变量防止循环引用
在非arc下使用__block修饰变量防止循环引用
四、单例传值
单例传值基本思路是创建一个SingleTon类,里面定义一个要传的值的属性,再声明一个share类方法,在类方法中用static定义类的实例变量,让它只初始化一次。
这样凡是导入这个SingleTon类的文件都可以通过share方法声明一个实例变量,从变量中拿到它的属性,这个属性是地址唯一的,也就是说,大家拿到的都一样,一处变化,任何位置拿到的这个值都变化。
创建SingleTon类
SingleTon.h
#import

@interface SingleTon : NSObject
//传值的具体属性
@property (nonatomic,retain)NSString *passValue;

//一般单例是类方法来创建
+(SingleTon*)sharedSingleTon;

@end
SingleTon.m
#import "SingleTon.h"

@implementation SingleTon

+(SingleTon *)sharedSingleTon
{
    //static 只赋值一次
    static SingleTon *singleTon = nil;

    //线程锁,保证同时只有一个线程访问
    @synchronized(self) {
        if (!singleTon) {
            singleTon = [[SingleTon alloc]init];
        }
    }
    return singleTon;
}

@end
//GCD方法创建单例

+(XMPPTools *)sharedXMPPTool
{
    static XMPPTools *xmppTools = nil;

    //GCD方式创建单例
    static dispatch_once_t onceToker;
    _dispatch_once(&onceToker, ^{
        xmppTools = [[XMPPTools alloc]init];
    });
    return xmppTools;
}
这次把代码贴全点
AppDelegate.h
#import "AppDelegate.h"
#import "RootViewController.h"
#import "SecondViewController.h"

@interface AppDelegate ()

@end

@implementation AppDelegate
- (BOOL)application:(UIApplication *)application didFinishLaunchingWithOptions:(NSDictionary *)launchOptions {
    self.window = [[UIWindow alloc] initWithFrame:[[UIScreen mainScreen] bounds]];
    // Override point for customization after application launch.
    self.window.backgroundColor = [UIColor whiteColor];
    [self.window makeKeyAndVisible];

    RootViewController *rootVC = [[RootViewController alloc]init];
    //创建导航控制器
    UINavigationController *naviagtionC = [[UINavigationController alloc]initWithRootViewController:rootVC];

    self.window.rootViewController = naviagtionC;

    return YES;
}
用的时候在两个ViewController文件中导入SingleTon.h
RootViewController.m
#import "RootViewController.h"
#import "SingleTon.h"
#import "SecondViewController.h"

@interface RootViewController ()

@property (nonatomic,retain)UITextField* myTextField;

@end

@implementation RootViewController

- (void)viewDidLoad {
    [super viewDidLoad];

    self.navigationItem.title = @"第一页";


    //添加UItextField
    _myTextField = [[UITextField alloc]initWithFrame:CGRectMake((414-200)/2, 200, 200, 40)];
    _myTextField.borderStyle = UITextBorderStyleLine;
    _myTextField.placeholder = @"input";

    //添加按钮
    UIButton *myBtn = [UIButton buttonWithType:UIButtonTypeSystem];
    myBtn.frame = CGRectMake((414-100)/2, 300, 100, 100);
    [myBtn setTitle:@"确定" forState:UIControlStateNormal];
    myBtn.layer.cornerRadius = 50;
    myBtn.layer.masksToBounds = YES;
    myBtn.backgroundColor =  [UIColor colorWithRed:200/255.0 green:233/255.0 blue:160/255.0 alpha:1];
    //添加按钮方法
    [myBtn addTarget:self action:@selector(jumpToSecondVC:) forControlEvents:UIControlEventTouchUpInside];

    [self.view addSubview:myBtn];

    [self.view addSubview:_myTextField];

}
//重复调用的方法,再返回时用单例的值给标题
-(void)viewWillAppear:(BOOL)animated
{
    SingleTon *singleTon = [SingleTon sharedSingleTon];
    if (singleTon.passValue.length) {
        self.navigationItem.title = singleTon.passValue;
    }

}

-(void)jumpToSecondVC:(UIButton*)sender
{
    NSLog(@"tap btn");
    SingleTon *mySingleTon = [SingleTon sharedSingleTon];
    //把输入框的值给单例的属性
    mySingleTon.passValue = _myTextField.text;
    SecondViewController *secondVC = [[SecondViewController alloc]init];
    [self.navigationController pushViewController:secondVC animated:YES];
}
SecondViewController.m
#import "SecondViewController.h"
#import "SingleTon.h"

@interface SecondViewController ()

@property (nonatomic,retain)UITextView *myTextView;//
@property (nonatomic,retain)UITextField *testTextField;

@end

@implementation SecondViewController

- (void)viewDidLoad {
    [super viewDidLoad];

    self.navigationItem.title = @"第二页";

    SingleTon *mySingleTon = [SingleTon sharedSingleTon];
    self.navigationItem.title = mySingleTon.passValue;


    _testTextField = [[UITextField alloc]initWithFrame:CGRectMake((414-200)/2, 300, 200, 40)];

    [self.view addSubview:_testTextField];
    _testTextField.placeholder = @"input";

    mySingleTon.passValue = _testTextField.text;

}
//view即将消失时,也就是返回前,赋值给单例
 -(void)viewWillDisappear:(BOOL)animated
{

    SingleTon *mySingleTon = [SingleTon sharedSingleTon];
    mySingleTon.passValue = _myTextField.text;

}


