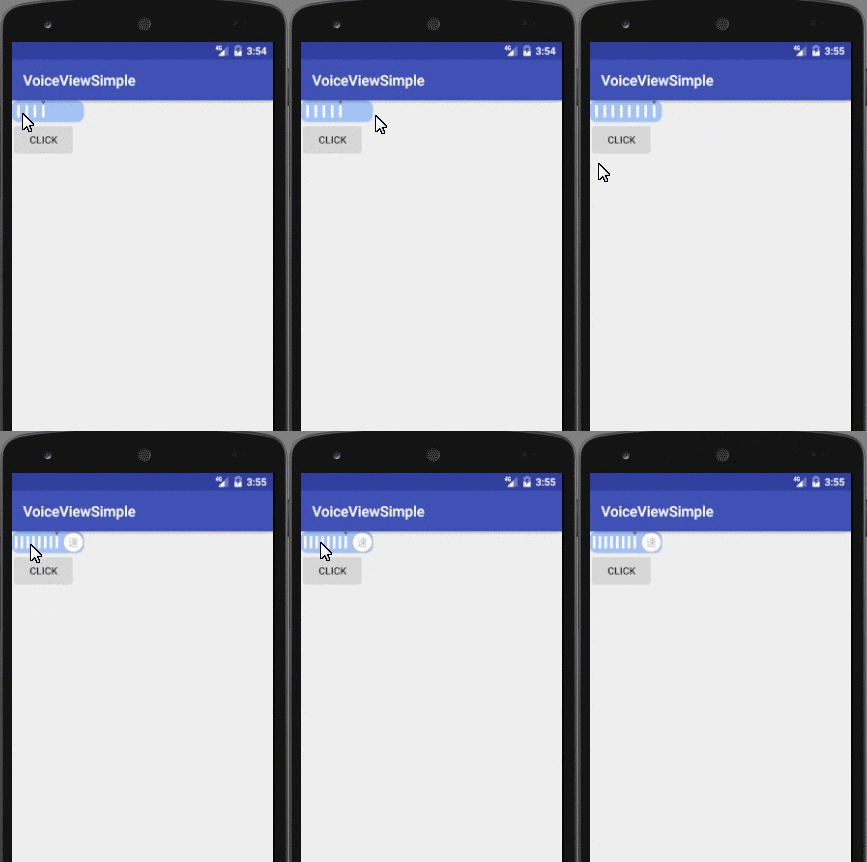
记得以前有一个需求
做一个播放界面,左边的是需要这种效果可以随着拖动调节音量,然后点击速图标还可以收缩伸展开这个音量栏,尼玛当初的我做的那个累啊,整整弄了一个星期,大概写了3,4个组合控件有3000多行代码以及用了各种切图,勉强弄好后还有点Bug,还依稀记得我们技术总监最后看我的眼神~~~,当然现在翻过头来看这种需求也不是那么特别难了,前段时间正好没事把它撸了出来。
我们看下怎么实现的。
public class VoiceView extends View
首先定义VoiceView
    private void initView() {
        //音量大小默认为1
        mSpeedLength = 5;
        //矩形弧度minimum
        mXRound = 30;
        mYRound = 30;

        //每个item需要的宽度
        mVoiceItemWidth = 10;
        mVoiceItemHeight = 20;
        mMinimumVoiceHeight = mVoiceItemHeight+mVoiceItemHeight*1/3;
        mPointBitmap = Bitmap.createBitmap(BitmapFactory.decodeResource(getResources(), R.mipmap.point));

        //初始化音量控件初始狂宽高大小
        mMinWidth=100;
        mMinHeight=30;

        mPointWidth = mVoiceItemWidth*2;
        mCurrVolum = 4;

        //右侧图片宽高
    }
我在创建控件的时候定义一个init方法进行一些初始化,这里有初始速度,矩形弧度,每个音量块的宽度以及每个音量块的高度,音量指示器图片等,这里我把指示器的宽度设置为音量块宽度的二倍。
好我们主要看一下draw方法里面怎么实现的。主要的逻辑都在这里
 protected void onDraw(Canvas canvas) {
        super.onDraw(canvas);
        int count=0;
        mMeasuredWidth = getMeasuredWidth();
        mMeasuredHeight = getMeasuredHeight();
            Paint backgroundPaint = new Paint();
            backgroundPaint.setColor(Color.parseColor("#a4c2f4"));
            canvas.drawRoundRect(0, 0, mMeasuredWidth, mMeasuredHeight, mXRound, mYRound, backgroundPaint);
            //音量栏所需要的上下左右宽距离
            if(mRightImageBitmap!=null){
                mRightBitmapWidthAndHeight=mMeasuredHeight;
                //mVoiceItemMarginLeft = (mMeasuredWidth - mMeasuredHeight - (mVoiceItemWidth * mSpeedLength))/(mSpeedLength+1);
                RectF rectF = new RectF();
                rectF.set(mMeasuredWidth-mRightBitmapWidthAndHeight,0,mMeasuredWidth,mRightBitmapWidthAndHeight);
                canvas.drawBitmap(mRightImageBitmap,null,rectF,null);
                Log.e("wwww","isnull");
            }else{
                mRightBitmapWidthAndHeight=0;
                //mVoiceItemMarginLeft=(mMeasuredWidth - (mVoiceItemWidth * mSpeedLength))/(mSpeedLength+1);
                Log.e("wwww","isnullNO");
            }
            mVoiceItemMarginLeft = (mMeasuredWidth - mRightBitmapWidthAndHeight - (mVoiceItemWidth * mSpeedLength))/(mSpeedLength+1);
            int voiceLeft;
            int voiceRight;
            backgroundPaint.setColor(Color.WHITE);
            //设置初始的7个音量调节位置和大小   上下都是不变的变得是左右位置
            for (int i = 0; i < mCurrVolum; i++) {
                voiceLeft = (i + 1) * mVoiceItemMarginLeft + i * mVoiceItemWidth;
                voiceRight = (i + 1) * mVoiceItemMarginLeft + (i +1)* mVoiceItemWidth ;
                canvas.drawRect(voiceLeft, mVoiceItemHeight, voiceRight, mMeasuredHeight - mVoiceItemHeight, backgroundPaint);
                //绘制point
                if(i==(mCurrVolum-1)){
                    int pointLeft = voiceLeft - (mPointWidth-mVoiceItemWidth) / 2;
                    RectF rectF = new RectF();
                    rectF.set(pointLeft,0,pointLeft+mPointWidth,mPointWidth);
                    canvas.drawBitmap(mPointBitmap,null,rectF,null);
                    Log.e("TAG","mCurrVolum:"+mCurrVolum);
                }

            }

             backgroundPaint.setColor(Color.parseColor("#a4c2f4"));
            for (int i = mCurrVolum; i < mSpeedLength; i++) {
                //定义每个Item音量的宽度
                voiceLeft = (i + 1) * mVoiceItemMarginLeft + i * mVoiceItemWidth;
                voiceRight = (i + 1) * mVoiceItemMarginLeft + i * mVoiceItemWidth + mVoiceItemWidth;
                canvas.drawRect(voiceLeft, mVoiceItemHeight, voiceRight, mMeasuredHeight - mVoiceItemHeight, backgroundPaint);
            }

    }
由于这个控件实现的比较单一所以实现细节直接写里面了没有抽出来,
首先绘制矩形,然后我们判断右边的bitmap是否为null,因为这是提供的一个开放方法这个图片是由我们设置进去的如果是null,那么mRightBitmapWidthAndHeight设置为0,否则我们把它的宽和高都设置为整个控件的高。
ok右边的图片绘制完后,正式开始撸我们的音量啦~一开始我默认设置音量len=7我们分别绘制7个音块
            for (int i = 0; i < mCurrVolum; i++) {
                voiceLeft = (i + 1) * mVoiceItemMarginLeft + i * mVoiceItemWidth;
                voiceRight = (i + 1) * mVoiceItemMarginLeft + (i +1)* mVoiceItemWidth ;
                canvas.drawRect(voiceLeft, mVoiceItemHeight, voiceRight, mMeasuredHeight - mVoiceItemHeight, backgroundPaint);
            }
每个音块的左边距离等我们设置的marginleft+音块的宽度
然后开始绘制指示器point
                //绘制point
                if(i==(mCurrVolum-1)){
                    int pointLeft = voiceLeft - (mPointWidth-mVoiceItemWidth) / 2;
                    RectF rectF = new RectF();
                    rectF.set(pointLeft,0,pointLeft+mPointWidth,mPointWidth);
                    canvas.drawBitmap(mPointBitmap,null,rectF,null);
                    Log.e("TAG","mCurrVolum:"+mCurrVolum);
                }
这里我们把指示器默认绘制在第四档的位置,这里需要注意下,由于指示器的宽度是音块宽度的二倍所以指示器的
左侧距离=第四个音块的左侧距离-(指示器宽度-音块宽度)/2
好了这里我们指示器和音块全部绘制完毕了
if(i==(mCurrVolum-1))
这里为啥要去-1呢你想啊我们绘制音块的时候是从0开始的,假如
mCurrVolum值是4当然要在index=3处绘制这个时候音块长度为4
但是这个控件不能是静态的啊,我们要滑动控制它啊,我们重写一下
onTouchEvent方法
    @Override
    public boolean onTouchEvent(MotionEvent event) {

        switch (event.getAction()) {

            case MotionEvent.ACTION_DOWN:
                return true;

            case ACTION_MOVE:
                getScrollLength(event);
                invalidate();
                return true;
            case MotionEvent.ACTION_UP:
                getScrollLength(event);
                invalidate();
                return true;

        }
        return super.onTouchEvent(event);
    }
可以看到代码并不复杂,在滑动和停止滑动时候都调用了getscrolllenth()这个方法是个什么鬼我们贴上代码看看
    private void getScrollLength(MotionEvent event) {
        int eventX= (int) (event.getX()+0.5f);
/*
        if(eventX>0&&eventY>0&&eventXmSpeedLength){
                mCurrVolum=mSpeedLength;
            }
            Log.e("TAG","volum:"+mCurrVolum);
            if(mOnSpeedClickListener!=null){
                mOnSpeedClickListener.onSpeedChange(mCurrVolum);
            }
    }
这里采用的方案1是当我们触摸到每个音块最右边的时候,这个音块显示或者消失,而方案2是触摸到音块左边的时候显示消失,这个根据个人习惯选择了。
我们用控件宽度-最右侧图标的宽度-音块的左边距/音量长度就可以得到每个音块+左边距长度
我们根据这个值和我们手指滑动的距离跟新我们的音量大小,拿我们滑动的当前位置eventX/刚才计算的边距 =当前音量位置然后把结果赋值给我们mCurrVolum重新绘制一下,音量就更新好啦。
最终我们实现的效果如下
3000多行代码撸出来的效果现在200行左右就全部搞定省时省力,哈
这个控件虽然不是很复杂但是还是有应用场景的的,贴上git地址:
老铁们随手给个Star支持下我这小小的进步哈 ~
https://github.com/boboyuwu/voice-view

