前言
Redux作为通用的状态管理器,可以搭配任意界面框架。所以并搭配react使用的话就要借助redux官方提供的React绑定库react-redux,以高效灵活的在react中使用redux。下面我们一起看看是react-redux如何灵活高效的
redux 概述
在开始之间还是大概提一下redux的内容,以免脱节。比较早的时候也解读了下redux的源码实现,可以参考一下
Redux 是 JavaScript 状态容器,旨在提供可预测化的状态管理。
其包括action、store、reducer等三部分:
在理解各部分作用之前,我们可以通过一个更新数据的例子来捋下思路:
- 要更新数据,肯定有个数据库来存储和维护数据。即数据层。
- 具体如何更新,需要有负责执行的部分,即逻辑处理层。
- 具体何时更新哪个字段、何时更新,同样需要分发层来控制。
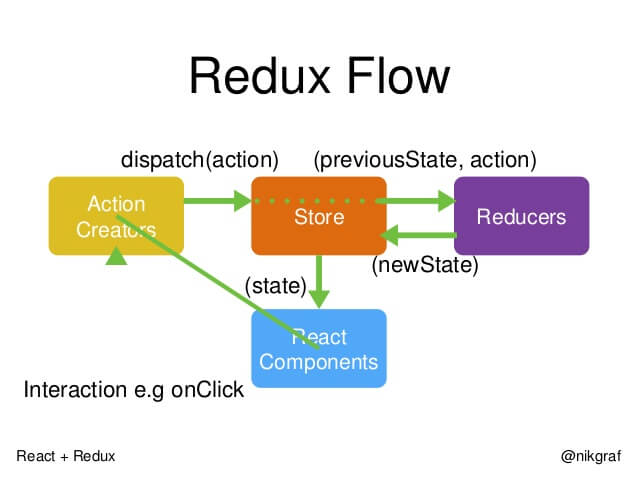
根据上面的例子我们再对比下redux的流程图(图片来自阮一峰大佬):

可以对照着来理解不同部分的作用。
action
就如上面所说负责更新字段和更新时机。 用户接触到的是view(即用户界面),对应的更新信息通过acton传递给reducer。
function addTodo(text) {
  return {
    // 更新类型及具体内容
    type: ADD_TODO,
    text
  }
}
reducer
负责更新数据的具体逻辑。
即根据当前state及action携带的信息合成新的数据。
function todoApp(state = initialState, action) {
  switch (action.type) {
    case SET_VISIBILITY_FILTER:
      return Object.assign({}, state, {
        visibilityFilter: action.filter
      })
    // 不同更新类型的处理逻辑不同
    case ADD_TODO:
      return Object.assign({}, state, {
        todos: [
          ...state.todos,
          {
            text: action.text,
            completed: false
          }
        ]
      })
    default:
      return state
  }
}
store
store就是负责维护和管理数据。
此外还有dispatch,subscrible等api来完成更新事件的分发。
例如:
import { createStore } from 'redux'
import todoApp from './reducers'
let store = createStore(todoApp)
import {
  addTodo} from './actions'
// 注册监听事件
const unsubscribe = store.subscribe(() => console.log(store.getState()))
// 发起一系列 action
store.dispatch(addTodo('Learn about actions'))
// 停止监听
unsubscribe()
到这里,我们应该就大概明白redux如何更新管理数据的了。
- 通过store.subscribe来监听状态更新,这是响应变化的重要一步。
- 然后通过stroe.getState()获取相应数据
- 具体更新通过action和reducer来实现了。
那么对照react-redux的实例官方demo,来结合React的时候,会发现redux使用有些不同之处。
不同之处
大概可以有下面这三点:
- 组件没有显示调用store.subscrible()
- state也不是通过Store.getState()来获取。
- 多了Provider和connect方法
可以猜测,上述差异是React-redux帮我们封装了绑定监听等过程,避免需要每个应用都重复相同的操作。使得React组件的数据源只关注props和state。
下面带着这些问题深入了解React-redux.
react-redux
本质上 react-redux也是react高阶组件HOC的一种实现。其基于 容器组件和展示组件相分离 的开发思想来实现的。
其核心是通过两部分来实现:
1、Provider
2、container通过connect来解除手动调用store.subscrible
provider 的实现
provider用法如下,绑定之后,再经过connect处理,就可以在组件中通过props访问对应信息了。
import React from 'react'
import { render } from 'react-dom'
import { Provider } from 'react-redux'
import { createStore } from 'redux'
import todoApp from './reducers'
import App from './components/App'

let store = createStore(todoApp)
render(
  // 绑定store


  ,
  document.getElementById('root')
)
在看源码之前,我们先自行猜测一下。
前面也提到了Provider是React组件。
那么为了让子组件都能方便的访问到store,store这个属性会如何传递呢。props?context?
核心实现
import { Component, Children } from 'react'
export default class Provider extends Component {
  // 声明context 以被子组件获取。
  getChildContext() {
    return { store: this.store }
  }

  constructor(props, context) {
    super(props, context)
    // 挂载store到Provider
    this.store = props.store
  }

  render() {
    // 判断是否只有一个child,是则返回该child节点,否则抛错
    return Children.only(this.props.children)
  }
}
Provider将store传递给子组件,具体如何和组件绑定就是conect做的事情了。
connect
connect连接组件和store,该操作并不修改原组件而是返回一个新的增强了关联store的组件。
根据这个描述,这显然就是个React高阶组件(HOC)吗。先看一下使用:
connect([mapStateToProps], [mapDispatchToProps], [mergeProps], [options])接收四个参数,具体每个参数的作用详细可以参考http://cn.redux.js.org/docs/react-redux/api.html
- [mapStateToProps(state, [ownProps]): stateProps] (Function): 如果定义该参数,组件将会监听 Redux store 的变化。任何时候,只要 Redux store 发生改变,mapStateToProps 函数就会被调用。该回调函数必须返回一个纯对象,这个对象会与组件的 props 合并。
- mapDispatchToProps(dispatch, [ownProps]): dispatchProps: 如果传递的是一个对象,那么每个定义在该对象的函数都将被当作 Redux action creator,对象所定义的方法名将作为属性名;每个方法将返回一个新的函数,函数中dispatch方法会将 action creator 的返回值作为参数执行。这些属性会被合并到组件的 props 中。
- [mergeProps(stateProps, dispatchProps, ownProps): props] (Function): 如果指定了这个参数,mapStateToProps() 与 mapDispatchToProps() 的执行结果和组件自身的 props 将传入到这个回调函数中。该回调函数返回的对象将作为 props 传递到被包装的组件中。
- [options] (Object) 如果指定这个参数,可以定制 connector 的行为
- [pure = true] (Boolean): 如果为 true,connector 将执行 shouldComponentUpdate 并且浅对比 mergeProps 的结果,避免不必要的更新,默认true
- [withRef = false] (Boolean): 如果为 true,connector 会保存一个对被被包含的组件实例的引用,该引用通过 getWrappedInstance() 方法获得。默认false
结合下面的例子能更清晰知道作用是什么。
import { connect } from 'react-redux'
import { toggleTodo } from '../actions'
import TodoList from '../components/TodoList'
import { VisibilityFilters } from '../actions'

const getVisibleTodos = (todos, filter) => {
  switch (filter) {
    case VisibilityFilters.SHOW_ALL:
      return todos
    case VisibilityFilters.SHOW_COMPLETED:
      return todos.filter(t => t.completed)
    case VisibilityFilters.SHOW_ACTIVE:
      return todos.filter(t => !t.completed)
    default:
      throw new Error('Unknown filter: ' + filter)
  }
}
// 将store中的state作为props传递给被包裹组件
// mapStateToProps对应当前组件所需要的props,不过这个props显然是要从store中抽取的,不是所有store都需要,所以只会取state.todos
const mapStateToProps = state => ({
  todos: getVisibleTodos(state.todos, state.visibilityFilter)
})
// 将action 与被包裹组件相绑定。
// 其实就是将action中的方法赋值到Props上,以便在组件中调用toggleTodo方法
const mapDispatchToProps = dispatch => ({
  toggleTodo: id => dispatch(toggleTodo(id))
})
// 被包裹组件就对应TodoList
export default connect(
  mapStateToProps,
  mapDispatchToProps
)(TodoList)
具体实现
connect实现比较复杂一点,返回的是个高阶函数我们可以先看该函数实现了什么。
connect函数
首先该方法接受相关参数,进行参数的判断和兼容处理(不指定使用默认)。
并返回一个 wrapWithConnect 方法来装饰传入的容器组件。
// 每个参数的默认实现
const defaultMapStateToProps = state => ({}) // eslint-disable-line no-unused-vars
const defaultMapDispatchToProps = dispatch => ({ dispatch })
const defaultMergeProps = (stateProps, dispatchProps, parentProps) => ({
  ...parentProps,
  ...stateProps,
  ...dispatchProps
})

export default function connect(mapStateToProps, mapDispatchToProps, mergeProps, options = {}) {
  // 需要store中的state才会去监听
  const shouldSubscribe = Boolean(mapStateToProps)
  // 更新state 方法的兼容,无mapStateToProps则使用默认
  const mapState = mapStateToProps || defaultMapStateToProps

  let mapDispatch
  // action creater是否为 函数
  if (typeof mapDispatchToProps === 'function') {
    // 函数直接赋值
    mapDispatch = mapDispatchToProps
  } else if (!mapDispatchToProps) {
    // 不存在,则使用默认方法
    mapDispatch = defaultMapDispatchToProps
  } else {
    // 否则 将action Creater 包装起来
    mapDispatch = wrapActionCreators(mapDispatchToProps)
  }

  const finalMergeProps = mergeProps || defaultMergeProps
  const { pure = true, withRef = false } = options
  const checkMergedEquals = pure && finalMergeProps !== defaultMergeProps
function wrapWithConnect(WrappedComponent) {
    const connectDisplayName = `Connect(${getDisplayName(WrappedComponent)})`
     class Connect extends Component {/****/}
    // ****
    return hoistStatics(Connect, WrappedComponent)
    }
wrapWithConnect 函数 返回内容
wrapWithConnect 函数接受一个组件(connect这就是个HOC。返回一个connect组件
// ****省略*****
// hoistStatics的作用:常用语高阶组件中,将被包裹元素的静态方法,“同步”到容器元素中。
// 也就是 connect中那些WrappedComponent属性的mix
return hoistStatics(Connect, WrappedComponent)
这里,就是HOC常见的增加功能的实现了。 也就是增强与redux的关联,让使用者只需要关注props,而非每次都要自己手动绑定。
connect组件生命周期
既然connect存在生命周期,那就顺着生命周期看看
构造函数,就是获取store中的state。
this.store 即Provider中挂载的Store
// 构造函数,获取store中的state
      constructor(props, context) {
        super(props, context)
        this.version = version
        // props或者context中,这是provider中挂载的store
        this.store = props.store || context.store

        //  获取state
        const storeState = this.store.getState()
        // 初始化state
        this.state = { storeState }
        this.clearCache()
      }
shouldComponentUpdate
shouldComponentUpdate这里会根据options里面的参数来看是否 pure 选择不同的更新策略
shouldComponentUpdate() {
        return !pure || this.haveOwnPropsChanged || this.hasStoreStateChanged
      }
componentDidMount
componentDidMount 根据前面的shouldSubscribe标识(mapStateToProps是否为true)决定是否增加监听事件
componentDidMount() {
       this.trySubscribe()
     }
trySubscribe() {
       // 存在监听必要 并且没有注册过监听事件
       if (shouldSubscribe && !this.unsubscribe) {
         // 业务组件中没有使用的subscribe 在这里实现,这也是HOC的用法之一,公共方法的抽离
         // 注册完成之后,this.unsubscribe为对一个unsubscribe回调
         this.unsubscribe = this.store.subscribe(this.handleChange.bind(this))
         this.handleChange()
       }
     }
componentWillReceiveProps
componentWillReceiveProps 判断是否更新 ,对于pure 组件 这里就涉及到了shallowEqual。
通过shallowEqual的实现,我们可以得到Immtable的重要性
componentWillReceiveProps(nextProps) {
        if (!pure || !shallowEqual(nextProps, this.props)) {
          this.haveOwnPropsChanged = true
        }
      }
shallowEqual浅比较的实现
由此可以看到Immutable的重要性。对于引用类型的数据,只是比较了引用地址是否相同。
对于嵌套引用数据类型,只比较key的长度和value引用地址,并没有进一步深入比较。导致嵌套结构并不适用。
export default function shallowEqual(objA, objB) {
  // 引用地址是否相同
 if (objA === objB) {
   return true
 }

 const keysA = Object.keys(objA)
 const keysB = Object.keys(objB)
 // key长度是否相同
 if (keysA.length !== keysB.length) {
   return false
 }
 // 循环比较,vakue思否相同,对于嵌套引用类型,这种比较是不能满足预期的。
 const hasOwn = Object.prototype.hasOwnProperty
 for (let i = 0; i < keysA.length; i++) {
   if (!hasOwn.call(objB, keysA[i]) ||
       objA[keysA[i]] !== objB[keysA[i]]) {
     return false
   }
 }

 return true
}
render
再下面是render,对于是否更新进行判断,即是否更新传递给子组件的props
render的关注点在于 传递给WrappedComponent的props如何获得。
// this.mergedProps 的计算
if (withRef) {
         this.renderedElement = createElement(WrappedComponent, {
           ...this.mergedProps,
           ref: 'wrappedInstance'
         })
       } else {
         this.renderedElement = createElement(WrappedComponent,
           this.mergedProps
         )
       }
计算this.mergedProps 最终传递下去的props是经过mapStateToProps,mapDispatchToProps计算之后,最后再由mergeProps计算之后的state。
// 简化代码
this.mergedProps = nextMergedProps = computeMergedProps(this.stateProps, this.dispatchProps, this.props)

  /**
     * 获得最终props 即经过参数中的
     * @param {*} stateProps 经过mapStateToProps之后的结果
     * @param {*} dispatchProps mapDispatchToProps之后的结果
     * @param {*} parentProps 此处即为connect组件的props this.props
     * @returns
     */
    function computeMergedProps(stateProps, dispatchProps, parentProps) {
      // finalMergeProps 即为参数中的mergeProps 或者 defaultMergeProps。 将前两参数计算结果再进行处理。
      const mergedProps = finalMergeProps(stateProps, dispatchProps, parentProps)
      if (process.env.NODE_ENV !== 'production') {
        checkStateShape(mergedProps, 'mergeProps')
      }
      return mergedProps
    }
到这里connect的作用也体现出来了:
- 根据参数决定监数据的变化
- 将store和action作为warpered的props传入,一共组件使用store中的state和action
- 对于部分操作进行缓存优化,提升执行效率
此时再回过头去看上面的例子应该更清晰了。
结束语
参考文章
http://cn.redux.js.org/docs/react-redux/api.html
到这里就结束了react-redux的源码解析,更多是自己的学习笔记吧。
使用一定程度之后再回头看,可能对自己的理解更有帮助。
另外阅读源码不是要盲目去读,而是在应用之后带着问题去读。
这样会更清晰如何去优化如何去提升。因为水平有限肯定有错漏指出,欢迎指出。