HAProxy的四层与七层的区别及透传IP实战案例
作者:尹正杰
版权声明:原创作品,谢绝转载!否则将追究法律责任。
一.HAProxy在四层的工作原理
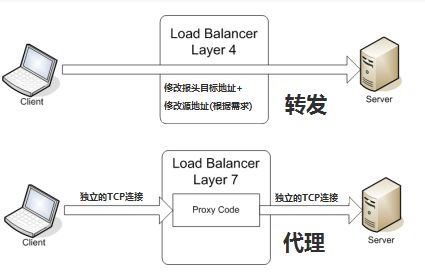
  在四层负载设备中,把client发送的报文目标地址(原来是负载均衡设备的IP地址),根据均衡设备设置的选择web服务器的规则选择对应的web服务器IP地址,这样client就可以直接跟此服务器建立TCP连接并发送数据。

  我们其实可以把haproxy在四层的工作流程分为两个阶段:
    第一阶段:
       client发送http请求报文到haproxy,haproxy由于工作在第四层,因此通过拆包可以查看到TCP/IP包头信息,haproxy根据定义的规则将client请求的目标地址修改为后端的web服务器的IP地址,与此同时还将源地址修改为haproxy的IP地址并转发给后端的web服务器。
    第二阶段:
       后端的web服务器将响应的结果封装成响应报文发送给haproxy服务器后,haproxy再将报文的源地址修改为haproxy的IP地址,目标地址修改为client的IP地址并转发给client。
二.HAProxy在七层的工作原理
  七层负载均衡服务器起了一个代理服务器的作用,服务器建立一次TCP连接要三次握手,而client要访问webserver要先与七层负载设备进行三次握手后建立TCP连接,把要访问的报文信息发送给七层负载均衡;然后七层负载均衡再根据设置的均衡规则选择特定的webserver,然后通过三次握手与此台webserver建立TCP连接,然后webserver把需要的数据发送给七层负载均衡设备,负载均衡设备再把数据发送给client;所以,七层负载均衡设备起到了代理服务器的作用。

  我们其实可以把haproxy在七层的工作流程分为四个阶段:
    第一阶段:
      client发送http请求报文到haproxy,haproxy接收到client的http请求报文后,会查看client的请求报文,根据http请求报文的信息在结合haproxy自身定义的规则判断出client要访问后端的web服务器;
    第二阶段:
      haproxy根据client的请求报文判断要访问的后端的web服务器后,会代替客户端的重新发起http请求报文到后端的web服务器;
    第三阶段:
      后端的web服务器接收到haproxy的http请求报文后,如果访问的资源存在且权限允许的话会将haproxy请求的资源封装成响应报文并发送给haproxy服务器;
    第四阶段:
      haproxy接收到web服务器的响应报文后,haproxy将后端web服务器返回的结果封装成响应报文并发送给client。
三.HAProxy的四层与七层的区别
  如上图所示,HAProxy的四层与七层的主要区别就在于是否重新发起了http请求,如果重新发来http请求则说明工作在第七层,若没有重新发起http请求则说明haproxy工作在第四次。

  这也就是为什么HAProxy在反向代理MySQL,Redis,RDP等服务时需要特别指定mode为TCP模式的主要原因,因为工作在七层会重新发起http请求,而重新发起的http请求MySQL,Redis,RDP等服务压根就不认识,因为这些服务都有着自己默认的协议。
四.七层(基于http)负载实现IP透传案例
1>.nginx服务器端配置
[[email protected] ~]# cat /yinzhengjie/softwares/nginx/conf/nginx.conf              #编辑nginx的主配置文件
worker_processes  4;
worker_cpu_affinity 00000001 00000010 00000100 00001000;

events {
   worker_connections  100000;
   use epoll;
   accept_mutex on;
   multi_accept on;
}

http {
     include       mime.types;

     default_type  text/html;

     server_tokens off;

     charset utf-8;

     log_format my_access_json '{"@timestamp":"$time_iso8601",'
                               '"host":"$server_addr",'
                               '"clientip":"$remote_addr",'
                               '"size":$body_bytes_sent,'
                               '"responsetime":$request_time,'
                               '"upstreamtime":"$upstream_response_time",'
                               '"upstreamhost":"$upstream_addr",'
                               '"http_host":"$host",'
                               '"uri":"$uri",'
                               '"domain":"$host",'
                               '"xff":"$http_x_forwarded_for",'
                               '"referer":"$http_referer",'
                               '"tcp_xff":"$proxy_protocol_addr",'
                               '"http_user_agent":"$http_user_agent",'
                               '"status":"$status"}';

    access_log logs/access_json.log my_access_json;

    ssl_certificate /yinzhengjie/softwares/nginx/certs/www.yinzhengjie.org.cn.crt;
    ssl_certificate_key /yinzhengjie/softwares/nginx/certs/www.yinzhengjie.org.cn.key;
    ssl_session_cache shared:sslcache:20m;
    ssl_session_timeout 10m;

    include /yinzhengjie/softwares/nginx/conf.d/*.conf;
}
[[email protected] ~]#
[[email protected] ~]# nginx -t
nginx: the configuration file /yinzhengjie/softwares/nginx/conf/nginx.conf syntax is ok
nginx: configuration file /yinzhengjie/softwares/nginx/conf/nginx.conf test is successful
[[email protected] ~]#
[[email protected] ~]#
[[email protected] ~]# cat /yinzhengjie/softwares/nginx/conf.d/node101_yinzhengjie_org.cn.conf       #编辑nginx的子配置文件
server {
    listen 80;
    listen 443 ssl;
    server_name node101.yinzhengjie.org.cn;

    access_log /yinzhengjie/softwares/nginx/logs/node101_yinzhengjie_org_cn_access.log my_access_json;
    error_log /yinzhengjie/softwares/nginx/logs/node101_yinzhengjie_org_cn_error.log;

    location / {
       root /yinzhengjie/data/web/nginx;
       index index.html;
    }

    location = /favicon.ico {
       root /yinzhengjie/data/web/nginx/images/jd;
    }

    location ~ \.php$ {
        #"$document_root"会调用root目录,若不写root指令对应的目录路径,则"$document_root"所对应的值为空.
        #root /yinzhengjie/data/web/php;
        #指定PHP服务器地址
        fastcgi_pass 172.30.1.106:9000;
        fastcgi_index index.php;
        #fastcgi_param SCRIPT_FILENAME $document_root$fastcgi_script_name;
        #如果"SCRIPT_FILENAME"后面是绝对路径则可以省略上面的"root /data/nginx/php;"
        fastcgi_param SCRIPT_FILENAME /yinzhengjie/data/web/php$fastcgi_script_name;
        #千万别忘记添加改行,若不添加"include fastcgi_params;"尽管上面配置的都正确,nginx也无法将fastcgi程序的处理结果返回给浏览器,返回给浏览器的只能是一个零字节的文件。
        include fastcgi_params;
    }
}
[[email protected] ~]#
[[email protected] ~]# nginx -t
nginx: the configuration file /yinzhengjie/softwares/nginx/conf/nginx.conf syntax is ok
nginx: configuration file /yinzhengjie/softwares/nginx/conf/nginx.conf test is successful
[[email protected] ~]#
[[email protected] ~]# ss -ntl
State      Recv-Q Send-Q                                         Local Address:Port                                                        Peer Address:Port
LISTEN     0      128                                                        *:22                                                                     *:*
LISTEN     0      128                                                       :::22                                                                    :::*
[[email protected] ~]#
[[email protected] ~]# nginx           #启动nginx服务
[[email protected] ~]#
[[email protected] ~]# ss -ntl
State      Recv-Q Send-Q                                         Local Address:Port                                                        Peer Address:Port
LISTEN     0      128                                                        *:80                                                                     *:*
LISTEN     0      128                                                        *:22                                                                     *:*
LISTEN     0      128                                                        *:443                                                                    *:*
LISTEN     0      128                                                       :::22                                                                    :::*
[[email protected] ~]#
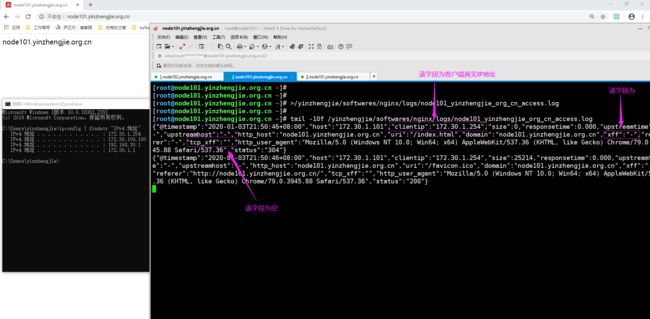
2>.使用浏览器直接访问nginx服务器地址("http://node101.yinzhengjie.org.cn/")
[[email protected] ~]# >/yinzhengjie/softwares/nginx/logs/node101_yinzhengjie_org_cn_access.log          #为了便于观测,我将之前日志清空。
[[email protected] ~]#
[[email protected] ~]# tail -10f /yinzhengjie/softwares/nginx/logs/node101_yinzhengjie_org_cn_access.log     #观察访问日志
{"@timestamp":"2020-01-03T21:50:46+08:00","host":"172.30.1.101","clientip":"172.30.1.254","size":0,"responsetime":0.000,"upstreamtime":"
-","upstreamhost":"-","http_host":"node101.yinzhengjie.org.cn","uri":"/index.html","domain":"node101.yinzhengjie.org.cn","xff":"-","refe
rer":"-","tcp_xff":"","http_user_agent":"Mozilla/5.0 (Windows NT 10.0; Win64; x64) AppleWebKit/537.36 (KHTML, like Gecko) Chrome/79.0.39
45.88 Safari/537.36","status":"304"}
{"@timestamp":"2020-01-03T21:50:46+08:00","host":"172.30.1.101","clientip":"172.30.1.254","size":25214,"responsetime":0.000,"upstreamtim
e":"-","upstreamhost":"-","http_host":"node101.yinzhengjie.org.cn","uri":"/favicon.ico","domain":"node101.yinzhengjie.org.cn","xff":"-",
"referer":"http://node101.yinzhengjie.org.cn/","tcp_xff":"","http_user_agent":"Mozilla/5.0 (Windows NT 10.0; Win64; x64) AppleWebKit/537
.36 (KHTML, like Gecko) Chrome/79.0.3945.88 Safari/537.36","status":"200"}
3>.编辑haproxy服务器的配置文件
[[email protected] ~]# cat /etc/haproxy/haproxy.cfg               #使用haproxy配置反向代理nginx
global
maxconn 100000
chroot /yinzhengjie/softwares/haproxy
#如果需要使用动态调度算法需要将socket功能打开
stats socket /yinzhengjie/softwares/haproxy/haproxy.sock mode 600 level admin
user haproxy
group haproxy
daemon
nbproc 2
cpu-map 1 0
cpu-map 2 1
nbthread 2
pidfile /yinzhengjie/softwares/haproxy/haproxy.pid
log 127.0.0.1 local5 info

defaults
option http-keep-alive
option  forwardfor
option redispatch
option abortonclose
maxconn 100000
mode http
timeout connect 300000ms
timeout client  300000ms
timeout server  300000ms

listen stats
 mode http
 bind 0.0.0.0:9999
 stats enable
 log global
 stats uri     /haproxy-status
 stats auth    haadmin:q1w2e3r4ys

listen WEB_PORT_80
    bind 172.30.1.102:80
    mode http
    server web01 172.30.1.101:80 check inter 3000 fall 3 rise 5
[[email protected] ~]#
[[email protected] ~]#
[[email protected] ~]# systemctl restart haproxy                #别忘记重启haproxy使配置生效。
[[email protected] ~]#
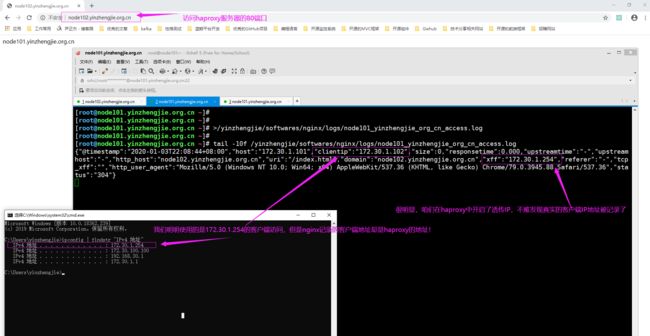
4>.使用浏览器直接访问haproxy服务器地址("http://node102.yinzhengjie.org.cn/")
[[email protected] ~]# >/yinzhengjie/softwares/nginx/logs/node101_yinzhengjie_org_cn_access.log
[[email protected] ~]#
[[email protected] ~]# tail -10f /yinzhengjie/softwares/nginx/logs/node101_yinzhengjie_org_cn_access.log
{"@timestamp":"2020-01-03T22:08:44+08:00","host":"172.30.1.101","clientip":"172.30.1.102","size":0,"responsetime":0.000,"upstreamtime":"-","upstream
host":"-","http_host":"node102.yinzhengjie.org.cn","uri":"/index.html","domain":"node102.yinzhengjie.org.cn","xff":"172.30.1.254","referer":"-","tcp
_xff":"","http_user_agent":"Mozilla/5.0 (Windows NT 10.0; Win64; x64) AppleWebKit/537.36 (KHTML, like Gecko) Chrome/79.0.3945.88 Safari/537.36","sta
tus":"304"}
五.四层负载实现IP透传案例
1>.修改nginx的主配置文件(标红色的参数必须的配置)
[[email protected] ~]# cat /yinzhengjie/softwares/nginx/conf/nginx.conf
worker_processes  4;
worker_cpu_affinity 00000001 00000010 00000100 00001000;

events {
   worker_connections  100000;
   use epoll;
   accept_mutex on;
   multi_accept on;
}

http {
     include       mime.types;

     default_type  text/html;

     server_tokens off;

     charset utf-8;

     log_format my_access_json '{"@timestamp":"$time_iso8601",'
                               '"host":"$server_addr",'
                               '"clientip":"$remote_addr",'
                               '"size":$body_bytes_sent,'
                               '"responsetime":$request_time,'
                               '"upstreamtime":"$upstream_response_time",'
                               '"upstreamhost":"$upstream_addr",'
                               '"http_host":"$host",'
                               '"uri":"$uri",'
                               '"domain":"$host",'
                               '"xff":"$http_x_forwarded_for",'
                               '"referer":"$http_referer",'
                               '"tcp_xff":"$proxy_protocol_addr",'
                               '"http_user_agent":"$http_user_agent",'
                               '"status":"$status"}';

    access_log logs/access_json.log my_access_json;

    ssl_certificate /yinzhengjie/softwares/nginx/certs/www.yinzhengjie.org.cn.crt;
    ssl_certificate_key /yinzhengjie/softwares/nginx/certs/www.yinzhengjie.org.cn.key;
    ssl_session_cache shared:sslcache:20m;
    ssl_session_timeout 10m;

    include /yinzhengjie/softwares/nginx/conf.d/*.conf;
}
[[email protected] ~]#
[[email protected] ~]#
[[email protected] ~]# nginx -t
nginx: the configuration file /yinzhengjie/softwares/nginx/conf/nginx.conf syntax is ok
nginx: configuration file /yinzhengjie/softwares/nginx/conf/nginx.conf test is successful
[[email protected] ~]#
2>.修改nginx的子配置文件(标红色的参数必须的配置)
[[email protected] ~]# cat /yinzhengjie/softwares/nginx/conf.d/node101_yinzhengjie_org.cn.conf
server {
    listen 80 proxy_protocol;
    listen 443 ssl;
    server_name node101.yinzhengjie.org.cn;

    access_log /yinzhengjie/softwares/nginx/logs/node101_yinzhengjie_org_cn_access.log my_access_json;
    error_log /yinzhengjie/softwares/nginx/logs/node101_yinzhengjie_org_cn_error.log;

    location / {
       root /yinzhengjie/data/web/nginx;
       index index.html;
    }

    location = /favicon.ico {
       root /yinzhengjie/data/web/nginx/images/jd;
    }
}
[[email protected] ~]#
[[email protected] ~]# nginx -t
nginx: the configuration file /yinzhengjie/softwares/nginx/conf/nginx.conf syntax is ok
nginx: configuration file /yinzhengjie/softwares/nginx/conf/nginx.conf test is successful
[[email protected] ~]#
3>.重新加载nginx的配置文件
[[email protected] ~]# ps -ef | grep nginx | grep -v grep
root      2825     1  0 21:43 ?        00:00:00 nginx: master process nginx
nginx     2984  2825  0 22:24 ?        00:00:00 nginx: worker process
nginx     2985  2825  0 22:24 ?        00:00:00 nginx: worker process
nginx     2986  2825  0 22:24 ?        00:00:00 nginx: worker process
nginx     2987  2825  0 22:24 ?        00:00:00 nginx: worker process
[[email protected] ~]#
[[email protected] ~]# nginx -s reload
[[email protected] ~]#
[[email protected] ~]# ps -ef | grep nginx | grep -v grep
root      2825     1  0 21:43 ?        00:00:00 nginx: master process nginx
nginx     3025  2825  7 22:26 ?        00:00:00 nginx: worker process
nginx     3026  2825  7 22:26 ?        00:00:00 nginx: worker process
nginx     3027  2825 10 22:26 ?        00:00:00 nginx: worker process
nginx     3028  2825 11 22:26 ?        00:00:00 nginx: worker process
[[email protected] ~]#
[[email protected] ~]#
4>.编辑haproxy的配置文件(标红色的参数必须的配置)
[[email protected] ~]# cat /etc/haproxy/haproxy.cfg
global
maxconn 100000
chroot /yinzhengjie/softwares/haproxy
#如果需要使用动态调度算法需要将socket功能打开
stats socket /yinzhengjie/softwares/haproxy/haproxy.sock mode 600 level admin
user haproxy
group haproxy
daemon
nbproc 2
cpu-map 1 0
cpu-map 2 1
nbthread 2
pidfile /yinzhengjie/softwares/haproxy/haproxy.pid
log 127.0.0.1 local5 info

defaults
option http-keep-alive
option  forwardfor
option redispatch
option abortonclose
maxconn 100000
mode http
timeout connect 300000ms
timeout client  300000ms
timeout server  300000ms

listen stats
 mode http
 bind 0.0.0.0:9999
 stats enable
 log global
 stats uri     /haproxy-status
 stats auth    haadmin:q1w2e3r4ys

listen WEB_PORT_80
    bind 172.30.1.102:80
    mode tcp
    server web01 172.30.1.101:80  send-proxy check inter 3000 fall 3 rise 5
[[email protected] ~]#
[[email protected] ~]# systemctl restart haproxy        #别忘记重启haproxy使配置生效。
[[email protected] ~]#
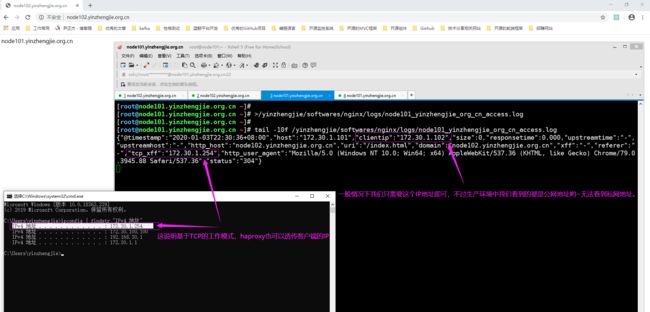
5>.使用浏览器直接访问haproxy服务器地址("http://node102.yinzhengjie.org.cn/")
[[email protected] ~]#
[[email protected] ~]# >/yinzhengjie/softwares/nginx/logs/node101_yinzhengjie_org_cn_access.log
[[email protected] ~]#
[[email protected] ~]# tail -10f /yinzhengjie/softwares/nginx/logs/node101_yinzhengjie_org_cn_access.log
{"@timestamp":"2020-01-03T22:30:36+08:00","host":"172.30.1.101","clientip":"172.30.1.102","size":0,"responsetime":0.000,"upstreamtime":"-",
"upstreamhost":"-","http_host":"node102.yinzhengjie.org.cn","uri":"/index.html","domain":"node102.yinzhengjie.org.cn","xff":"-","referer":"
-","tcp_xff":"172.30.1.254","http_user_agent":"Mozilla/5.0 (Windows NT 10.0; Win64; x64) AppleWebKit/537.36 (KHTML, like Gecko) Chrome/79.0
.3945.88 Safari/537.36","status":"304"}


