shiro安全框架是目前为止作为登录注册最常用的框架,因为它十分的强大简单,提供了认证、授权、加密和会话管理等功能 。
shiro能做什么?
认证:验证用户的身份
授权:对用户执行访问控制:判断用户是否被允许做某事
会话管理:在任何环境下使用 Session API,即使没有 Web 或EJB 容器。
加密:以更简洁易用的方式使用加密功能,保护或隐藏数据防止被偷窥
Realms:聚集一个或多个用户安全数据的数据源
单点登录(SSO)功能。
为没有关联到登录的用户启用 "Remember Me“ 服务
Shiro 的四大核心部分
Authentication(身份验证):简称为“登录”,即证明用户是谁。
Authorization(授权):访问控制的过程,即决定是否有权限去访问受保护的资源。
Session Management(会话管理):管理用户特定的会话,即使在非 Web 或 EJB 应用程序。
Cryptography(加密):通过使用加密算法保持数据安全
shiro的三个核心组件:
Subject :正与系统进行交互的人,或某一个第三方服务。所有 Subject 实例都被绑定到(且这是必须的)一个SecurityManager 上。
SecurityManager:Shiro 架构的心脏,用来协调内部各安全组件,管理内部组件实例,并通过它来提供安全管理的各种服务。当 Shiro 与一个 Subject 进行交互时,实质上是幕后的 SecurityManager 处理所有繁重的 Subject 安全操作。
Realms :本质上是一个特定安全的 DAO。当配置 Shiro 时,必须指定至少一个 Realm 用来进行身份验证和/或授权。Shiro 提供了多种可用的 Realms 来获取安全相关的数据。如关系数据库(JDBC),INI 及属性文件等。可以定义自己 Realm 实现来代表自定义的数据源。
shiro整合SSM框架:
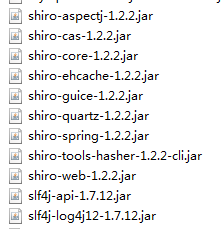
1.加入 jar 包:以下jar包自行百度下载
2.配置 web.xml 文件
在web.xml中加入以下代码—shiro过滤器。
        shiroFilter
        org.springframework.web.filter.DelegatingFilterProxy

            targetFilterLifecycle
            true


        shiroFilter
        /*
3.在 Spring 的配置文件中配置 Shiro
Springmvc配置文件中:
Spring配置文件中导入shiro配置文件:
新建applicationContext-shiro.xml
                /shiro-logout = logout
                /shiro-* = anon
                /user.jsp = roles[user]
                /admin.jsp = roles[admin]
                /** = authc
导入ehcache-shiro.xml配置文件:
到这一步,配置文件都基本准备好了,接下来要写Realm方法了,新建shiro包,在包下新建MyRealm.java文件继承AuthorizingRealm
package shiro;

import org.apache.shiro.authc.AuthenticationException;
import org.apache.shiro.authc.AuthenticationInfo;
import org.apache.shiro.authc.AuthenticationToken;
import org.apache.shiro.authc.SimpleAuthenticationInfo;
import org.apache.shiro.authc.credential.HashedCredentialsMatcher;
import org.apache.shiro.authz.AuthorizationInfo;
import org.apache.shiro.authz.SimpleAuthorizationInfo;
import org.apache.shiro.crypto.hash.Md5Hash;
import org.apache.shiro.crypto.hash.SimpleHash;
import org.apache.shiro.realm.AuthorizingRealm;
import org.apache.shiro.subject.PrincipalCollection;
import org.apache.shiro.util.ByteSource;
import org.springframework.beans.factory.annotation.Autowired;

import bean.user;
import dao.userdao;

public class MyRealm extends AuthorizingRealm {
    @Autowired
    private userdao userdao;
    String pass;

    /**
     * 授权:
     *
     */
    @Override
    protected AuthorizationInfo doGetAuthorizationInfo(PrincipalCollection principalCollection) {
        SimpleAuthorizationInfo info = new SimpleAuthorizationInfo();
        Object principal = principalCollection.getPrimaryPrincipal();//获取登录的用户名
        if("admin".equals(principal)){               //两个if根据判断赋予登录用户权限
            info.addRole("admin");
        }
        if("user".equals(principal)){
            info.addRole("list");
        }

        info.addRole("user");

        return info;
    }

    /*
     * 用户验证
     *
     */
    @Override
    protected AuthenticationInfo doGetAuthenticationInfo(AuthenticationToken token) throws AuthenticationException {
        //1. token 中获取登录的 username! 注意不需要获取password.
        Object principal = token.getPrincipal();

        //2. 利用 username 查询数据库得到用户的信息.
        user user=userdao.findbyname((String) principal);
        if(user!=null){
            pass=user.getPass();
        }
        String credentials = pass;
        //3.设置盐值 ,(加密的调料,让加密出来的东西更具安全性,一般是通过数据库查询出来的。 简单的说,就是把密码根据特定的东西而进行动态加密,如果别人不知道你的盐值,就解不出你的密码)
        String source = "abcdefg";
        ByteSource credentialsSalt = new Md5Hash(source);


        //当前 Realm 的name
        String realmName = getName();
        //返回值实例化
        SimpleAuthenticationInfo info =
                new SimpleAuthenticationInfo(principal, credentials,
                        credentialsSalt, realmName);

        return info;
    }

    //init-method 配置.
    public void setCredentialMatcher(){
        HashedCredentialsMatcher  credentialsMatcher = new HashedCredentialsMatcher();
        credentialsMatcher.setHashAlgorithmName("MD5");//MD5算法加密
        credentialsMatcher.setHashIterations(1024);//1024次循环加密
        setCredentialsMatcher(credentialsMatcher);
    }


    //用来测试的算出密码password盐值加密后的结果,下面方法用于新增用户添加到数据库操作的,我这里就直接用main获得,直接数据库添加了,省时间
    public static void main(String[] args) {
        String saltSource = "abcdef";
        String hashAlgorithmName = "MD5";
        String credentials = "passwor";
        Object salt = new Md5Hash(saltSource);
        int hashIterations = 1024;
        Object result = new SimpleHash(hashAlgorithmName, credentials, salt, hashIterations);
        System.out.println(result);
    }

}
好了,接下来我们写一个简单的action来通过shiro登录验证。
//登录认证
    @RequestMapping("/shiro-login")
    public String login(@RequestParam("username") String username,
            @RequestParam("password") String password){
        Subject subject = SecurityUtils.getSubject();
        UsernamePasswordToken token = new UsernamePasswordToken(username, password);
        try {
            //执行认证操作.
            subject.login(token);
        }catch (AuthenticationException ae) {
            System.out.println("登陆失败: " + ae.getMessage());
            return "/index";
        }

        return "/shiro-success";
    }
//温馨提示:记得在注册中密码存入数据库前也记得加密哦,提供一个utils方法
//进行shiro加密,返回加密后的结果
public static String md5(String pass){
String saltSource = "blog";
String hashAlgorithmName = "MD5";
Object salt = new Md5Hash(saltSource);
int hashIterations = 1024;
Object result = new SimpleHash(hashAlgorithmName, pass, salt, hashIterations);
String password = result.toString();
return password;
}
好了,shiro登录验证到这里完了,这个简单的实例也应该能让大家初步了解了