ResponderChain对象交互方式本质
响应者链简介
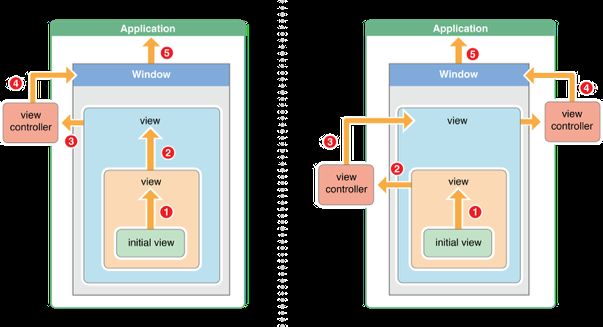
Responder Chain也就是响应链,响应者链是由多个响应者对象连接起来的链条。在iOS中响应者链的关系可以用下图表示:
响应者链的事件传递过程:
1>如果当前view是控制器的view,那么控制器就是上一个响应者,事件就传递给控制器;如果当前view不是控制器的view,那么父视图就是当前view的上一个响应者,事件就传递给它的父视图
2>在视图层次结构的最顶级视图,如果也不能处理收到的事件或消息,则其将事件或消息传递给window对象进行处理
3>如果window对象也不处理,则其将事件或消息传递给UIApplication对象
4>如果UIApplication也不能处理该事件或消息,则将其丢弃
交互本质
通过对UIResponder添加分类,实现事件沿响应链条传递。(事件传递的方向与ResponderChain是保持一致的,如果未达到需要响应的对象,可抛弃事件继续向上进行传递)
DEMO
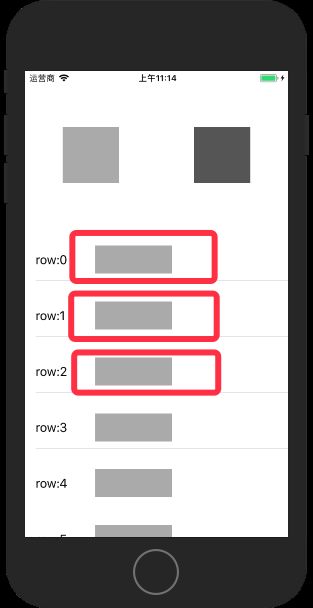
如图所示,如果我们对Cell中的灰色按钮点击以实现控制器中弹出alert,一般的做法是点击Cell按钮后,通过代理或者block回调至控制器,但两者的缺点是:
代理:代码较多
block:代码较为分散
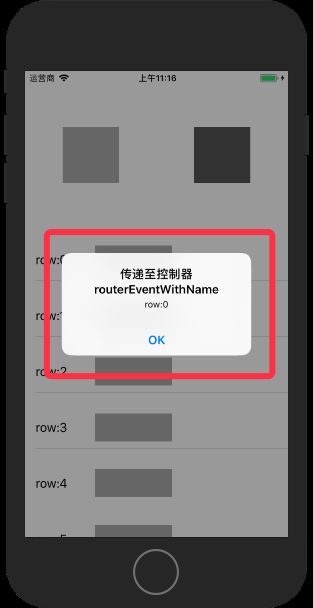
通过ResponderChain对象交互,因为Cell属于控制器的子view,当点击Cell上的按钮时,事件会传递至控制器,我们在控制器中拦截对应的事件名称,调用控制器的方法实现alert弹出,而且如果有多个subView,事件也可以进行统一的管理。
「Talk is cheap. Show me the code」
为UIResponder category
@interface UIResponder (Router)

/**
 为响应链添加配对的方法,以实现事件沿响应链传递

 @param eventName 事件名称
 @param userInfo 传递的参数
 */
- (void)routerEventWithName:(NSString *)eventName userInfo:(NSDictionary *)userInfo;

@end
@implementation UIResponder (Router)

- (void)routerEventWithName:(NSString *)eventName userInfo:(NSDictionary *)userInfo{
    [[self nextResponder] routerEventWithName:eventName userInfo:userInfo];
}

@end
Cell代码
#import "ResponderTestTableViewCell.h"
#import "UIResponder+Router.h"
#import "ResponderChainName.h"

@implementation ResponderTestTableViewCell{
    UILabel     *_testLabel;
}

- (instancetype)initWithStyle:(UITableViewCellStyle)style reuseIdentifier:(NSString *)reuseIdentifier{
    if (self = [super initWithStyle:style reuseIdentifier:reuseIdentifier]) {
        [self initUI];
    }
    return self;
}

- (void)initUI{
    // cell中可点击按钮
    UIButton *testBtn = [UIButton buttonWithType:UIButtonTypeCustom];
    [testBtn setFrame:CGRectMake(100, 30, 110, 40)];
    [testBtn setBackgroundColor:[UIColor lightGrayColor]];
    [testBtn addTarget:self action:@selector(testBtnClick) forControlEvents:UIControlEventTouchUpInside];
    [self.contentView addSubview:testBtn];

    _testLabel = [[UILabel alloc] initWithFrame:CGRectMake(15, 0, 100, 100)];
    [_testLabel setFont:[UIFont systemFontOfSize:18]];
    [self.contentView addSubview:_testLabel];
}

- (void)configureTextWithIndexRow:(NSInteger)row{
    [_testLabel setText:[NSString stringWithFormat:@"row:%zd", row]];
}

- (void)testBtnClick{
    // 接收到点击事件时,将事件往上层传递
    [self.nextResponder routerEventWithName:kTestCellBtnClickedEvent userInfo:@{kUserInfoObject : _testLabel.text}];
}

@end
由于弹出alert的事件是发生在控制器中的,cell里不做处理,只是将事件名称和参数向外传递
控制器相关代码
- (void)routerEventWithName:(NSString *)eventName userInfo:(NSDictionary *)userInfo{
    [[EventProxy shareInstance] handleEvent:eventName userInfo:userInfo];

}
当传递至控制器时,进行事件的拦截,此处用了EventProxy类来进行事件的统一处理
EventProxy是将根据外部传入的事件名以及方法参数,找到对应target和对应的方法,通过NSInvocation的方式进行调用。
EventProxy相关实现
@implementation EventProxy

+ (EventProxy *)shareInstance{
    static EventProxy *shareInstance = nil;
    static dispatch_once_t oncePredicate;
    dispatch_once(&oncePredicate, ^{
        shareInstance = [[EventProxy alloc] init];
    });
    return shareInstance;
}

- (void)handleEvent:(NSString *)eventName userInfo:(NSDictionary *)userInfo{
    NSInvocation *invocation = [self.eventStrategy objectForKey:eventName];
    if (invocation) {
        if (invocation.methodSignature.numberOfArguments > 2) {
            [invocation setArgument:&userInfo atIndex:2];
        }
        [invocation invoke];
    }
}

- (NSInvocation *)createInvocationWithTarget:(id)target selector:(SEL)action{
    if (!target) {
        return nil;
    }
    NSMethodSignature *methodSignature = [(NSObject *)target methodSignatureForSelector:action];
    NSInvocation *invocation = [NSInvocation invocationWithMethodSignature:methodSignature];
    invocation.selector = action;
    invocation.target = target;
    return invocation;
}

- (NSMutableDictionary *)eventStrategy{
    if (_eventStrategy == nil) {
        _eventStrategy = @{}.mutableCopy;
    }
    return _eventStrategy;
}

// 重写set方法是为了在设置其他target的时候,添加对应的事件

- (void)setMainVc:(ViewController *)mainVc{
    _mainVc = mainVc;
    if (![self.eventStrategy objectForKey:kTestCellBtnClickedEvent]) {
        [self.eventStrategy setObject:[self createInvocationWithTarget:self.mainVc selector:NSSelectorFromString(@"testCellBtnClicked:")] forKey:kTestCellBtnClickedEvent];
    }
}

- (void)setTestAVc:(TestAViewController *)testAVc{
    _testAVc = testAVc;
    if (![self.eventStrategy objectForKey:kTestABtnClickedEvent]) {
        [self.eventStrategy setObject:[self createInvocationWithTarget:self.testAVc selector:NSSelectorFromString(@"hasPushedTestAViewController")] forKey:kTestABtnClickedEvent];
    }
}

@end
控制器中弹出TestA控制器并调用kTestABtnClickedEvent对应事件实际开发中是用不到的,此处只为了演示不在同一响应链上的事件是怎样传递的。
- (void)testABtnClicked{
    TestAViewController *testAVc = [[TestAViewController alloc] init];
    [self presentViewController:testAVc animated:YES completion:nil];
    [EventProxy shareInstance].testAVc = testAVc;
    [testAVc routerEventWithName:kTestABtnClickedEvent userInfo:nil];
}
小结
在我看来,响应链传递事件这种做法最适合的场景是位于同一view上的多个子view的事件传递,对于不同target的事件传递,并不是那样契合,EventProxy类我的实现方式也不是很Elegant,在此只为抛砖引玉,希望有好想法的小伙伴可以私聊或者评论。


