介绍
ansible是新出现的自动化运维工具,基于Python开发,集合了众多运维工具(puppet、cfengine、chef、func、fabric)的优点,实现了批量系统配置、批量程序部署、批量运行命令等功能。
无客户端。

我们要学一些Ansible的安装和一些基本概念,然后我们会开始研究一些真正有意思的东西 – playbook,配置管理,部署以及语法编排.我们将会学习如何使用/usr/bin/ansible执行ad-hoc并行命令,我们还会学习ansible的核心有什么样的模块可供使用.当然以后你也可以写你自己的模块.
部署
1 dns resolve
环境
ansible服务器:192.168.122.166
ansible客户机:(192.168.122.33; 192.168.122.61; 192.168.122.173)
ansible服务器
域名解析
[ansible-server]#vim /etc/hosts
192.168.122.166 ansible
192.168.122.33 1
192.168.122.61 2
192.168.122.173 3
ansible客户机
无需配置 准备IP yum源
2install ansible
ansible服务器
安装epel源 :yum install -y epel-release
wget -O /etc/yum.repos.d/epel.repo http://mirrors.aliyun.com/repo/epel-7.repo
wget -O /etc/yum.repos.d/CentOS-Base.repo http://mirrors.aliyun.com/repo/Centos-7.repo
安装ansible:
yum install -y ansible
rpm -ql ansible 列出所有文件
rpm -qc ansible 查看配置文件
ansible --help 查看ansible帮助
ansible-doc -l 看所有模块(A10,华为,docker,EC2,aws等等广大厂商设备)
ansible-doc -s yum 看yum模块,了解其功能
3ssh-key(可选)
免密码ssh-key的方式
ssh-keygen
ssh-copy-id 客户机IP
4.ansible基础
vim /etc/ansible/hosts
192.168.122.33
192.168.122.61
192.168.122.173
2测试
ansible   localhost   -m ping
 -m 指定模块。什么功能
ping只是其中一个模块。还有shell,yum等等
3.简洁输出
ansible host1(这里可以是组名也可以是客户机的主机名) -m ping -o
去掉(yes/no)的询问
vim /etc/ssh/ssh_config
StrictHostKeyChecking no
1 增加主机组
vim /etc/ansible/hosts
[web]
192.168.122.33
192.168.122.61
192.168.122.173
测试 :ansible web -m ping -o
2 增加用户名 密码
vim /etc/ansible/hosts
[web]
{主机名] ansible_ssh_user='root' ansible_ssh_pass='666666'
3 增加端口
例:
请将host1的sshd程序端口修改为2222
vim /etc/ssh/sshd_config
Port 2222
4变量
vim /etc/ansible/hosts

[webserver]
host[1:4]
[webserver:vars]
ansible_ssh_user='root'
ansible_ssh_pass='666666'
常用变量

5子分组
讲不同的分组进行组合
# vim /etc/ansible/hosts
[apache]
host[1:2]
[nginx]
host[3:4]
[webserver:children]
apache
nginx
[webserver:vars]
ansible_ssh_user='root'
ansible_ssh_pass='666666'
6自定义主机列表
vim /etc/ansible/hosts

[dockers]
host1
host2
[dockers:vars]
ansible_ssh_user='root'
ansible_ssh_pass='666666'
注意您的计算机密码
简介:临时的,在ansible中是指需要快速执行的单条命令,并且不需要保存的命令。对于复杂的命令则为 playbook。
1shell 模块
帮助:ansible-doc shell
ansible webserver -m shell -a 'hostname' -o 获取主机名
ansible webserver -m shell -a 'hostname' -o -f 2 -f 2 指定线程数
ansible host2 -m shell -a 'yum -y install httpd' -o 部署apache
ansible host3 -m shell -a 'uptime' -o 查询系统负载
2copy模块
ansible webserver -m copy -a 'src=/etc/hosts(源) dest=/tmp/2.txt(目标) owner=root(属主) group属组=bin mode=777'

ansible webserver -m copy -a 'src=/etc/hosts dest=/tmp/2.txt owner=root group=bin mode=777(权限) backup=yes'
3用户模块
创建用户
ansible webserver -m user -a 'name=qianfeng state=present'
删除用户
ansible webserver -m user -a 'name=qianfeng state=absent'
修改密码
1生成密码
echo '777777' | openssl passwd -1 -stdin
2修改密码
ansible webserver -m user -a 'name=qianfeng password="$1$XVzsJMDr$5wI4oUaQ.emxap6s.N272."'
修改shell
ansible webserver -m user -a 'name=qianfeng shell=/sbin/noglogin append=yes'
4软件包模块
name= #所安装的包的名称
state= # present --->安装, latest --->安装新的, absent ---> 卸载 软件。
update_cache #强制更新yum的缓存 conf_file #指定远程yum安装时所依赖的配置文件 (安装本地已有的包)。
disable_pgp_check #是否禁止GPG checking,只用于 present or latest 。
disablerepo #临时禁止使用yum库。 只用于安装或更新时。 enablerepo #临时使用的yum库。只 用于安装或更新时。
ansible host1 -m yum -a 'name="*" state=latest' (*=软件名)
例:安装apache
ansible host2 -m yum -a 'name="httpd" state=latest'
5服务模块
ansible host2 -m service -a 'name=httpd state=started' 启动
ansible host2 -m service -a 'name=httpd state=started enabled=yes' 开机启动
ansible host2 -m service -a 'name=httpd state=stopped' 停止
ansible host2 -m service -a 'name=httpd state=restarted' 重启
ansible host2 -m service -a 'name=httpd state=started enabled=no' 开机禁止启动
6文件模块
该模块主要用于设置文件的属性,比如创建文件、创建链接文件、删除文件等。 下面是一些常见的命令:
force
需要在两种情况下强制创建软链接,一种是源文件不存在,但之后会建立的情况下;另一种是目 标软链接已存在,需要先取消之前的软链,然后创建新的软链,有两个选项:yes|no
group
定义文件/ 目录的属组。后面可以加上 mode :定义文件/目录的权限
owner #定义文件/目录的属主。后面必须跟上 path :定义文件/目录的路径
recurse #递归设置文件的属性,只对目录有效,后面跟上 src :被链接的 源文件路径,只应用于 state=link 的情况
dest #被链接到的路径,只应用于 state=link 的情况
state #状态,有以下选项:
directory :如果目录不存在,就创建目录
file :即使文件不存在,也不会被创建
link :创建软链接
hard :创建硬链接
touch :如果文件不存在,则会创建一个新的文件,如果文件或目录已存在,则更新其 后修改时间
absent :删除目录、文件或者取消链接文件
ansible host1 -m file -a 'path=/tmp/88.txt mode=777 state=touch' 创建文件
ansible host1 -m file -a 'path=/tmp/99 mode=777 state=directory' 创建目录
7收集模块
ansible host3 -m setup 查询所有信息
7.YAML-YAML Ain’t Markup Language-非标记语言
语法
列表
fruits:
      - Apple
      - Orange
      - Strawberry
      - Mango
字典
martin:
name: Martin D'vloper
job: Developer
skill: Elite
示例1
需求:通过YAML编写一个简单的剧本,完成web的部署,配置,启动的全过程。
ansible服务器
ansible all -m yum -a 'name=httpd state=removed' -o 清理一下环境
yum install -y httpd 准备配置文件
mkdir apache
cd apache
cp -rf /etc/httpd/conf/httpd.conf .
grep '^Listen' httpd.conf    Listen 8080  修改配置,用作推送
vim apache.yaml

----
- hosts: host2
  tasks:
  - name: install apache packages
    yum: name=httpd state=present
  - name: copy apache conf
    copy: src=./httpd.conf dest=/etc/httpd/conf/httpd.conf
  - name: ensure apache is running
    service: name=httpd state=started enabled=yes
测试
ansible-playbook apache.yaml --syntax-check 检验语法
ansible-playbook apache.yaml --list-tasks 列出任务
ansible-playbook apache.yaml --list-hosts 列出主机
ansible-playbook apache.yaml 执行
访问 :主页
如果配置文件发生变化。Listen 9000
ansible-playbook apache.yaml 再次执行,命令成功,但配置未生效,所以要增加处理程序。设置触发器
vim apache.yaml
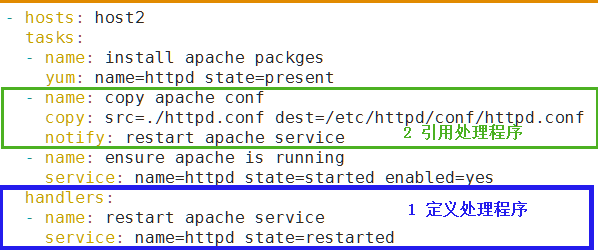
如果配置文件再发生变化。 Listen 9080
ansible-playbook apache.yaml 再次执行,配置生效,触发成功
8.Role-角色扮演
简介
roles则是在ansible中,playbooks的目录组织结构。
而模块化之后,成为roles的组织结构,易读,代码可重用,层次清晰。
目标
通过role远程部署nginx并配置
1.目录结构
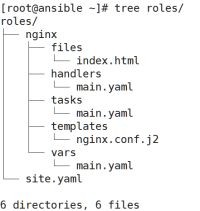
准备目录结构
mkdir roles/nginx/{files,handlers,tasks,templates,vars} -p
touch roles/site.yaml roles/nginx/{handlers,tasks,vars}/main.yaml
echo 1234 > roles/nginx/files/index.html
yum install -y nginx && cp /etc/nginx/nginx.conf roles/nginx/templates/nginx.conf.j2
2.编写任务
vim roles/nginx/tasks/main.yaml
---
- name: install nginx packge
  yum: name={{ item }} state=latest
  with_items:
  - epel-release
  - nginx

- name: copy index.html
  copy: src=index.html dest=/usr/share/nginx/html/index.html

- name: copy nginx.conf template
  template: src=nginx.conf.j2 dest=/etc/nginx/nginx.conf
  notify: restart nginx

- name: make sure nginx service running
  service: name=nginx state=started enabled=yes
3.准备配置文件
vim roles/nginx/templates/nginx.conf.j2
worker_processes {{ ansible_processor_cores }}; 调用内部已知变量
worker_connections {{ worker_connections }}; 自定义变量
44.编写变量
vim roles/nginx/vars/main.yaml
worker_connections: 10240
5.编写处理程序
vim roles/nginx/handlers/main.yaml
---
- name: restart nginx
  service: name=nginx state=restarted
6.编写剧本
vim roles/site.yaml
- hosts: host4
  roles:
  - nginx
7.实施
ansible-playbook site.yaml --syntax-check 测试
ansible-playbook site.yaml 实施剧本