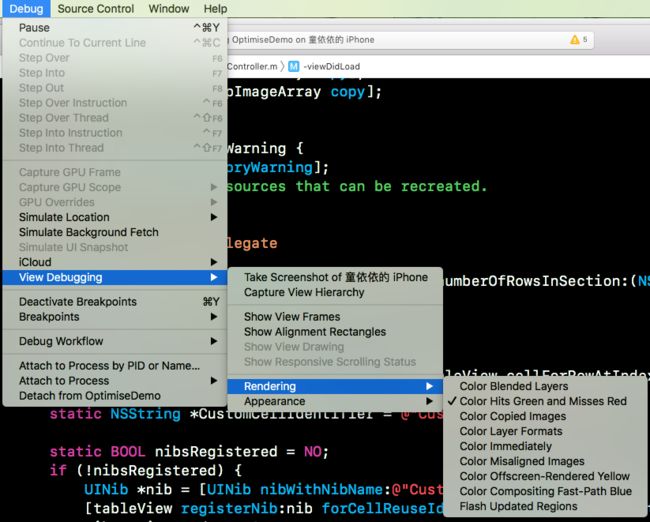
Color Blended layers
标示混合的图层会为红色,不透明的图层为绿色,通常我们希望绿色的区域越多越好。
Color Hits Green and Misses Red
假如我们设置viewlayer的shouldRasterize为YES,那些成功被缓存的layer会标注为绿色,反之为红色。
Color offscreen-rendered yellow
(offscreen-render)标示哪些layer需要做离屏渲染,黄色的区域就是离屏渲染的地方。
1、Color Blended layers像素混合
现象: UILabel、UIImageView通过设置Cell的背景颜色(默认为nil,也不能设置背景色为clearColor )+ maskTobunds = YES 两者都具备可以消除像素混合,UIButton我怎么试都不能,始终显示红色。
    cell.name.backgroundColor = [UIColor whiteColor];
//    cell.name.layer.masksToBounds = YES;


    cell.sign.backgroundColor = [UIColor whiteColor];
    cell.sign.layer.masksToBounds = YES;

//    cell.place.backgroundColor = [UIColor whiteColor];
    cell.place.layer.masksToBounds = YES;


    cell.imageView1.backgroundColor = [UIColor redColor];
    cell.imageView1.layer.masksToBounds = YES;


    cell.imageView2.backgroundColor = [UIColor clearColor];
    cell.imageView2.layer.masksToBounds = YES;

    [cell.btn setBackgroundColor:[UIColor whiteColor]];
    cell.btn.layer.masksToBounds = YES;
    cell.btn.opaque = YES;

2、Color offscreen-rendered yellow
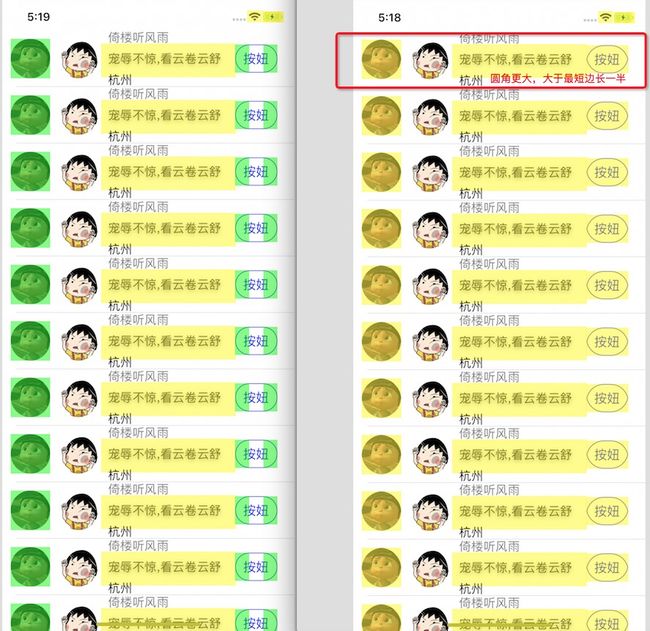
shouldRasterize(光栅化)、阴影(需要设置透明度shadowOpacity,单纯的设置layer.opacity 不会)、圆角 都会造成离屏渲染,但iOS 9.0 而UIImageView里png图片设置圆角(不能设置imageView背景色或者为clearColor)不会触发离屏渲染了。
     // 圆角 (当圆角大于t控件最短边的一半会变成黄色,小于等于最短边的一半则为绿色)
    cell.btn.layer.cornerRadius = 25;
    //    cell.btn.layer.cornerRadius = 20;
    cell.btn.layer.masksToBounds = YES;

    // 图片在设置圆角下 背景色对离屏渲染的影响
    cell.imageView1.backgroundColor = [UIColor whiteColor];
    cell.imageView1.layer.cornerRadius = 30;
    cell.imageView2.backgroundColor = [UIColor clearColor];


    //阴影(需要设置透明度shadowOpacity,单纯的设置layer.opacity也不会)
    cell.name.layer.opacity = 0.5;

    cell.sign.layer.shadowOffset = CGSizeMake(0, 2);
    cell.sign.layer.shadowOpacity = 0.5;

    cell.place.layer.shadowOffset = CGSizeMake(0, 2);
为什么是圆角的离屏渲染显示绿色的不是黄色的,我也不清楚,测试中我发现将圆角变大,大于控件最短边长的一半就会变成黄色。(绿色可能表示有缓存可用?)
3、Color Hits Green and Misses Red
//阴影性能优化
    cell.sign.layer.shadowPath = [UIBezierPath  bezierPathWithRect:cell.sign.bounds].CGPath;
//
//使用光栅化进行优化
    cell.layer.shouldRasterize = YES;
    cell.layer.rasterizationScale = [UIScreen mainScreen].scale;
对阴影可以设置shadowPath来解决,圆角可以通过:使用CAShapeLayer和UIBezierPath设置圆角
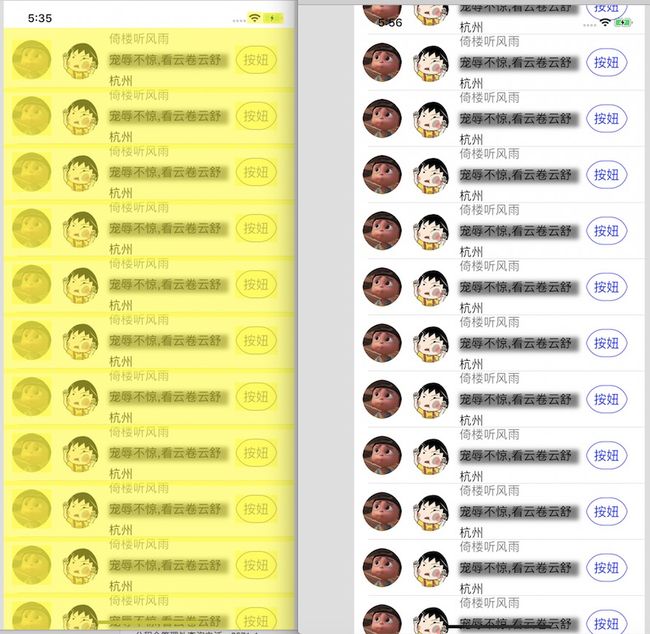
也可以用光栅化解决,虽然被Rasterize的图层也会引起离屏渲染,如下图所示,整个cell都被标示为黄色。
layer设置shouldRasterize=YES之后,会把被光栅化的图层保存成位图并缓存起来,其中圆角或者阴影之类的效果也是直接保存到位图当中,当需要渲染到屏幕上的时候只需要到缓存中去取对应的位图进行显示就行了,加快了整个渲染过程。可以通过勾选instruments core animation中的Color Hits Green and Misses Red选项来查看图层是否被缓存了,如果图层显示为绿色则表示已经被缓存起来了,也就是这个缓冲区的内容被复用了,不用在去重新创建缓冲区,反之则是用红色标示。如下图可以看到设置shouldRasterize之后,cell都被标示为绿色了,如果滑动过程中发现都是红色的证明就有问题了。
(全屏为绿色的截屏后没有颜色了,自己想象一下第二张图片都是绿色的吧,手机放在那还会绿色红色 的闪动)
适用于内容基本不变的图层
- 假如图层的内容经常变化,比如cell里面有涉及到动画之类的,那么缓存的内容就无效了,GPU需要重新创建缓存区,导致离屏渲染,这又涉及到OpenGL的上下文环境切换,反而降低性能。
- 不要过度使用
缓存区的大小被设置为屏幕大小的2.5倍,假如过分使用同样会导致大量的离屏渲染。 - 如果缓存的内容超过100ms没有被使用则会被回收。
demo源码:
#import

@interface CustomCell : UITableViewCell

@property (strong, nonatomic)  UILabel *name;
@property (strong, nonatomic)  UILabel *sign;
@property (strong, nonatomic)  UILabel *place;
@property (strong, nonatomic)  UIImageView *imageView2;
@property (strong, nonatomic)  UIImageView *imageView1;
@property (strong, nonatomic)  UIButton *btn;

@end

#import "CustomCell.h"

@implementation CustomCell

- (instancetype)initWithStyle:(UITableViewCellStyle)style reuseIdentifier:(NSString *)reuseIdentifier {
    self = [super initWithStyle:style reuseIdentifier:reuseIdentifier];
    if (self) {
        [self.contentView addSubview:self.imageView1];
        [self.contentView addSubview:self.imageView2];
        [self.contentView addSubview:self.name];
        [self.contentView addSubview:self.sign];
        [self.contentView addSubview:self.place];
        [self.contentView addSubview:self.btn];

    }
    return self;
}

-(UIImageView *)imageView1 {
    if (!_imageView1) {
        _imageView1 = [[UIImageView alloc] initWithFrame:CGRectMake(12, 12, 56, 56)];
        _imageView1.layer.cornerRadius = 28;
        _imageView1.layer.masksToBounds = YES;
        _imageView1.image = [UIImage imageNamed:@"1"];
    }
    return _imageView1;
}

-(UIImageView *)imageView2 {
    if (!_imageView2) {
        _imageView2 = [[UIImageView alloc] initWithFrame:CGRectMake(80, 12, 56, 56)];
        _imageView2.layer.cornerRadius = 28;
        _imageView2.layer.masksToBounds = YES;
        _imageView2.image = [UIImage imageNamed:@"2"];
    }
    return _imageView2;
}
- (UILabel *)name {
    if (!_name) {
        _name = [[UILabel alloc] initWithFrame:CGRectMake(150, 0, 100, 20)];
        _name.text = @"倚楼听风雨";
    }
    return _name;
}
- (UILabel *)sign {
    if (!_sign) {
        _sign = [[UILabel alloc] initWithFrame:CGRectMake(150, 30, 170, 20)];
        _sign.text = @"宠辱不惊,看云卷云舒";
    }
    return _sign;
}
- (UILabel *)place {
    if (!_place) {
        _place = [[UILabel alloc] initWithFrame:CGRectMake(150, 60, 100, 20)];
        _place.text = @"杭州";
    }
    return _place;
}
- (UIButton *)btn {
    if (!_btn) {
        _btn = [UIButton buttonWithType:UIButtonTypeCustom];
        _btn.frame = CGRectMake(330, 20, 60, 40);
        [_btn setTitleColor:[UIColor blueColor] forState:UIControlStateNormal];
        [_btn setTitle:@"按妞" forState:UIControlStateNormal];
        _btn.layer.borderWidth = 1.0;
        _btn.layer.borderColor = [UIColor blueColor].CGColor;
    }
    return _btn;
}
@end
#import "ViewController.h"
#import "CustomCell.h"

@interface ViewController ()

@property (strong, nonatomic) UITableView *tableView;

@end

@implementation ViewController

- (void)viewDidLoad {
    [super viewDidLoad];
    [self.view addSubview:self.tableView];
    // Do any additional setup after loading the view, typically from a nib.
}

- (void)didReceiveMemoryWarning {
    [super didReceiveMemoryWarning];
    // Dispose of any resources that can be recreated.
}

#pragma mark -- Table Delegate

- (NSInteger)tableView:(UITableView *)tableView numberOfRowsInSection:(NSInteger)section {
    return 100;
}

- (UITableViewCell *)tableView:(UITableView *)tableView cellForRowAtIndexPath:(NSIndexPath *)indexPath {
    static NSString *CustomCellIdentifier = @"CustomCellIdentifier";
    CustomCell *cell = [tableView dequeueReusableCellWithIdentifier:CustomCellIdentifier];
    if (cell == nil) {
        cell = [[CustomCell alloc]
                initWithStyle:UITableViewCellStyleDefault
                reuseIdentifier:CustomCellIdentifier];
    }
    return cell;
}

- (CGFloat)tableView:(UITableView *)tableView heightForRowAtIndexPath:(NSIndexPath *)indexPath
{
    return 80.0;
}

- (UITableView *)tableView {
    if (!_tableView) {
        _tableView = [[UITableView alloc] initWithFrame:self.view.bounds];
        _tableView.delegate =self;
        _tableView.dataSource = self;
    }
    return _tableView;
}
@end
参考:iOS app性能优化的那些事(二)