在我们NDK开发中,可能会遇到需要通过cmake生成一个可执行程序,在app运行的过程中,调用该可执行程序用于做一些底层操作,尽管我们做的更多的可能是通过java直接调用JNI接口的方式来调用底层c/c++接口
开发环境
操作系统:macOS 10.14.3
ndk版本:android-ndk-r19
示例
这里以opengl es来作为参考示例,编写一个可以在android平台用于测试音频的可执行程序
build.gradle
首先我们需要在build.gradle文件中,与编译动态库或者静态库类似的做法,指定abiFilters与path参数,其中abiFilters指定编译的目标平台,path指定cmake文件路径,参考代码如下:
android {
    compileSdkVersion 27
    defaultConfig {
        applicationId "com.eggsy.opensles"
        minSdkVersion 16
        targetSdkVersion 27
        versionCode 1
        versionName "1.0"
        testInstrumentationRunner "android.support.test.runner.AndroidJUnitRunner"

        externalNativeBuild {
            cmake {
                cppFlags ""
                abiFilters 'armeabi-v7a', 'arm64-v8a' , 'x86', 'x86_64'
            }
        }
    }
    buildTypes {
        release {
            minifyEnabled false
            proguardFiles getDefaultProguardFile('proguard-android-optimize.txt'), 'proguard-rules.pro'
        }
    }
    externalNativeBuild {
        cmake {
            path "CMakeLists.txt"
        }
    }
}
可能会有人有疑问,为什么abiFilters中armeabi、mips、mips64等平台呢,因为当前ndk版本是r19,从NDK r17版本开始,已经去掉了armeabi、mips、mips64的ABI支持,所以我们不需要在abiFilters中使用以上配置。
CMakeLists.txt
上面我们定义了abiFilter,并指定了cmake文件的文件名,下面我们看下CMakeLists.txt是怎么写的
# 指定当前cmake支持的最低版本
cmake_minimum_required(VERSION 3.4.1)
# 指定输出的目录结构,这里我们指定到当前CMakeLists.txt同级目录的/src/main/assets/目录下,
# 根据abiFilter中指定的编译平台在细分子目录
set(EXECUTABLE_OUTPUT_PATH      "${CMAKE_CURRENT_SOURCE_DIR}/src/main/assets/${ANDROID_ABI}")
# 指定编译的目标可执行程序名称与编译的文件,其中testopensl是输出的可执行程序名称,src/main/cpp/opensltest.cpp是
# 编译到可执行程序中的文件,可指定多个
add_executable(testopensl src/main/cpp/opensltest.cpp)
# 添加目标编译目录
#target_include_directories (testopensl PUBLIC ${CMAKE_CURRENT_SOURCE_DIR})

# 从ANDROID_NDK变量表示的目录下,找到SLES/OpenSLES.h路径,存储在SL_INCLUDE_DIR变量中备用
find_path(SL_INCLUDE_DIR SLES/OpenSLES.h
        HINTS ${ANDROID_NDK})

# 从上面find_path中找到的SL_INCLUDE_DIR路径的./../lib目录中,找到libOpenSLES.so动态库,存储在SL_LIBRARY变量
# 中备用
find_library(SL_LIBRARY libOpenSLES.so
        HINTS ${SL_INCLUDE_DIR}/../lib)

# 指定编译器编译时寻找头文件的目录
include_directories(
        ${CMAKE_SOURCE_DIR}/src/main/cpp   #此处忽略
        ${CMAKE_SOURCE_DIR}/libs/include   #此处忽略
        ${SL_INCLUDE_DIR}                  #把头文件路径添加进来
)

# 链接目标程序与库
target_link_libraries(
        testopensl
        ${SL_LIBRARY}     #把opensl库文件添加进来
)
生成目标文件
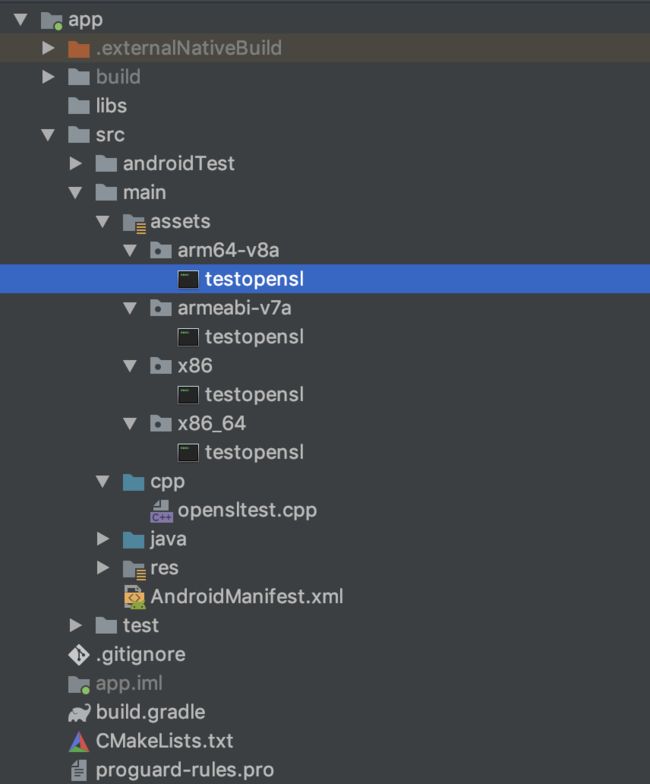
通过android studio中Make Project,会在我们CMakeLists.txt中指定的EXECUTABLE_OUTPUT_PATH路径下生成对应的可执行程序,生成结果如下:
这样,我们就生成了testopensl可执行程序
验证
我们将这个可执行程序通过adb shell拷贝到手机上,并且chmod +x testopensl增加可执行权限后,就可以在android系统终端执行程序查看结果了,或者在android代码中通过Runtime.getRuntime().exec()的几个方法,来执行可执行程序,这里我就不做过多解释。
参考opensltest.cpp文件
#include
#include
#include
#include
#include
#include
#include
#include
#include
#include

extern "C"

#define sample_size (44100 * 2 *2)

// 引擎接口
SLObjectItf engineObject = NULL;
SLEngineItf engineEngine = NULL;

//混音器
SLObjectItf outputMixObject = NULL;
SLEnvironmentalReverbItf outputMixEnvironmentalReverb = NULL;
SLEnvironmentalReverbSettings reverbSettings = SL_I3DL2_ENVIRONMENT_PRESET_STONECORRIDOR;

//pcm
SLObjectItf pcmPlayerObject = NULL;
SLPlayItf pcmPlayerPlay = NULL;
SLVolumeItf pcmPlayerVolume = NULL;

//缓冲器队列接口
SLAndroidSimpleBufferQueueItf pcmBufferQueue;

uint8_t *out_buffer;

FILE *pcmFile;
void *buffer;

unsigned long get_file_size(const char *path) {
    unsigned long filesize = -1;
    struct stat statbuff;
    if (stat(path, &statbuff) < 0) {
        return filesize;
    } else {
        filesize = statbuff.st_size;
    }
    return filesize;
}

void create_engine() {
    SLresult result;//返回结果
    result = slCreateEngine(&engineObject, 0, NULL, 0, NULL, NULL);//第一步创建引擎
    result = (*engineObject)->Realize(engineObject, SL_BOOLEAN_FALSE);//实现(Realize)engineObject接口对象
    result = (*engineObject)->GetInterface(engineObject, SL_IID_ENGINE,
                                           &engineEngine);//通过engineObject的GetInterface方法初始化engineEngine
}

void get_pcm_data(void **pcm) {
    while (!feof(pcmFile)) {
        fread(out_buffer, 44100 * 2 * 2, 1, pcmFile);
        if (out_buffer == NULL) {
            printf("%s", "read end \n");
            break;
        } else {
            printf("%s", "reading \n");
        }
        *pcm = out_buffer;
        break;
    }
}

void pcm_buffer_callBack(SLAndroidSimpleBufferQueueItf bf, void *context) {
    get_pcm_data(&buffer);
    if (NULL != buffer) {
        SLresult result;
        result = (*pcmBufferQueue)->Enqueue(pcmBufferQueue, buffer, 44100 * 2 * 2);
    }
}

void init() {
    out_buffer = (uint8_t *) malloc(44100 * 2 * 2);
    SLresult result;
    //混音器
    SLObjectItf outputMixObject = NULL;//用SLObjectItf创建混音器接口对象
    SLEnvironmentalReverbItf outputMixEnvironmentalReverb = NULL;////创建具体的混音器对象实例

    //第一步,创建引擎
    create_engine();

    //第二步,创建混音器
    const SLInterfaceID mids[1] = {SL_IID_ENVIRONMENTALREVERB};
    const SLboolean mreq[1] = {SL_BOOLEAN_FALSE};
    result = (*engineEngine)->CreateOutputMix(engineEngine, &outputMixObject, 1, mids, mreq);
    (void) result;
    result = (*outputMixObject)->Realize(outputMixObject, SL_BOOLEAN_FALSE);
    (void) result;
    result = (*outputMixObject)->GetInterface(outputMixObject, SL_IID_ENVIRONMENTALREVERB,
                                              &outputMixEnvironmentalReverb);
    if (SL_RESULT_SUCCESS == result) {
        result = (*outputMixEnvironmentalReverb)->SetEnvironmentalReverbProperties(
                outputMixEnvironmentalReverb, &reverbSettings);
        (void) result;
    }
    SLDataLocator_OutputMix outputMix = {SL_DATALOCATOR_OUTPUTMIX, outputMixObject};
    SLDataSink audioSnk = {&outputMix, NULL};


    // 第三步,配置PCM格式信息
    SLDataLocator_AndroidSimpleBufferQueue android_queue = {SL_DATALOCATOR_ANDROIDSIMPLEBUFFERQUEUE,
                                                            2};
    SLDataFormat_PCM pcm = {
            SL_DATAFORMAT_PCM,//播放pcm格式的数据
            2,//2个声道(立体声)
            SL_SAMPLINGRATE_44_1,//44100hz的频率
            SL_PCMSAMPLEFORMAT_FIXED_16,//位数 16位
            SL_PCMSAMPLEFORMAT_FIXED_16,//和位数一致就行
            SL_SPEAKER_FRONT_LEFT | SL_SPEAKER_FRONT_RIGHT,//立体声(前左前右)
            SL_BYTEORDER_LITTLEENDIAN//结束标志
    };
    SLDataSource slDataSource = {&android_queue, &pcm};


    const SLInterfaceID ids[3] = {SL_IID_BUFFERQUEUE, SL_IID_EFFECTSEND, SL_IID_VOLUME};
    const SLboolean req[3] = {SL_BOOLEAN_TRUE, SL_BOOLEAN_TRUE, SL_BOOLEAN_TRUE};

    result = (*engineEngine)->CreateAudioPlayer(engineEngine, &pcmPlayerObject, &slDataSource,
                                                &audioSnk, 3, ids, req);
    //初始化播放器
    (*pcmPlayerObject)->Realize(pcmPlayerObject, SL_BOOLEAN_FALSE);

//    得到接口后调用  获取Player接口
    (*pcmPlayerObject)->GetInterface(pcmPlayerObject, SL_IID_PLAY, &pcmPlayerPlay);

//    注册回调缓冲区 获取缓冲队列接口
    (*pcmPlayerObject)->GetInterface(pcmPlayerObject, SL_IID_BUFFERQUEUE, &pcmBufferQueue);
    //缓冲接口回调
    (*pcmBufferQueue)->RegisterCallback(pcmBufferQueue, pcm_buffer_callBack, NULL);
//    获取音量接口
    (*pcmPlayerObject)->GetInterface(pcmPlayerObject, SL_IID_VOLUME, &pcmPlayerVolume);

//    获取播放状态接口
    (*pcmPlayerPlay)->SetPlayState(pcmPlayerPlay, SL_PLAYSTATE_PLAYING);
}

void play_audio(char *filename) {
    printf("input pcm file path %s \n", filename);
    pcmFile = fopen(filename, "r");
    if (pcmFile == NULL) {
        printf("%s", "fopen file error \n");
        return;
    }

    init();

//  主动调用回调函数开始工作
    pcm_buffer_callBack(pcmBufferQueue, NULL);
}

void release() {

    if (pcmPlayerObject != NULL) {
        (*pcmPlayerObject)->Destroy(pcmPlayerObject);
        pcmPlayerObject = NULL;
        pcmPlayerPlay = NULL;
        pcmPlayerVolume = NULL;
        pcmBufferQueue = NULL;
        pcmFile = NULL;
        buffer = NULL;
        out_buffer = NULL;
    }

    // destroy output mix object, and invalidate all associated interfaces
    if (outputMixObject != NULL) {
        (*outputMixObject)->Destroy(outputMixObject);
        outputMixObject = NULL;
        outputMixEnvironmentalReverb = NULL;
    }

    // destroy engine object, and invalidate all associated interfaces
    if (engineObject != NULL) {
        (*engineObject)->Destroy(engineObject);
        engineObject = NULL;
        engineEngine = NULL;
    }

}

int main(int argc, char *argv[]) {
    int count;
    char *pcm_path;
    long file_size;
    int sleep_seconds;
    char *cmd;
    char *vol;
    int volume = -1;
    SLmillibel current_volume = -1;
    if (argc < 2) {
        printf("please input pcm file path \n");
    } else if (argc == 2) {
        cmd = argv[1];
        printf("cmd : %s \n", cmd);
        if (memcmp(cmd, "vol", strlen("vol")) == 0) {
            init();
            if (pcmPlayerVolume != NULL) {
                (*pcmPlayerVolume)->GetVolumeLevel(pcmPlayerVolume, ¤t_volume);
            }
            release();
            printf("current volume %d\n", current_volume);
        } else {
            printf("begin play pcm data \n");
            printf("pcm data size %d sample size %d\n", file_size, sample_size);
            pcm_path = argv[1];
            play_audio(pcm_path);
            file_size = get_file_size(pcm_path);
            if (file_size > 0) {
                if (file_size % sample_size == 0) {
                    sleep_seconds = (file_size % sample_size);
                } else {
                    sleep_seconds = ((int) file_size / sample_size + 1);
                }
                sleep(sleep_seconds);
            }
            release();
            printf("end play pcm data \n");
        }
    } else if (argc == 3) {
        cmd = argv[1];
        vol = argv[2];
        if (memcmp(cmd, "vol", strlen("vol")) == 0) {
            init();
            // 音量设置
            printf("begin set volume \n");
            volume = atoi(vol);
            if (volume >= 0 && pcmPlayerVolume != NULL) {
                printf("set volume %d\n", volume);
                (*pcmPlayerVolume)->SetVolumeLevel(pcmPlayerVolume, volume);
            }
            release();
            printf("end set volume \n");
        }
    }
    return 0;
}
最后找一段pcm文件,来进行播放测试吧,注意是需要44.1khz的pcm16音频数据就可以进行播放啦!!!
总结
以上就是android studio上用cmake生成可执行程序的一些步骤,由于是测试方法,testopensl.cpp并没有做成很通用的播放,不过作为一个示例工程,也是够用了~
