本文翻译自Geometric Android Animations using the Canvas,不过很多与技术无关的段落没有翻译,只保留了技术部分。
1 创建圆形动画
首先需要画一些同心圆,并添加动画将同心圆的半径逐渐增加,即从同心圆中心向四周扩散的动画。
需要定义一些属性包括:同心圆间隔、圆线颜色、圆线宽度:
其次,需要定义一个layout布局和自定义View:
import android.content.Context
import android.graphics.Canvas
import android.graphics.Paint
import android.graphics.Paint.ANTI_ALIAS_FLAG
import android.graphics.PointF
import android.util.AttributeSet
import android.view.View

class WavesView
@JvmOverloads
constructor(context: Context,
            attrs: AttributeSet? = null,
            defStyleAttr: Int = R.attr.wavesViewStyle
) : View(context, attrs, defStyleAttr) {

    private val wavePaint: Paint
    private val waveGap: Float

    private var maxRadius = 0f
    private var center = PointF(0f, 0f)
    private var initialRadius = 0f

    init {
        val attrs = context.obtainStyledAttributes(attrs, R.styleable.WavesView, defStyleAttr, 0)

        //init paint with custom attrs
        wavePaint = Paint(ANTI_ALIAS_FLAG).apply {
            color = attrs.getColor(R.styleable.WavesView_waveColor, 0)
            strokeWidth = attrs.getDimension(R.styleable.WavesView_waveStrokeWidth, 0f)
            style = Paint.Style.STROKE
        }

        waveGap = attrs.getDimension(R.styleable.WavesView_waveGap, 50f)
        attrs.recycle()
    }

    override fun onSizeChanged(w: Int, h: Int, oldw: Int, oldh: Int) {
        //set the center of all circles to be center of the view
        center.set(w / 2f, h / 2f)
        maxRadius = Math.hypot(center.x.toDouble(), center.y.toDouble()).toFloat()
        initialRadius = w / waveGap
    }

    override fun onDraw(canvas: Canvas) {
        super.onDraw(canvas)

        //draw circles separated by a space the size of waveGap
        var currentRadius = initialRadius
        while (currentRadius < maxRadius) {
            canvas.drawCircle(center.x, center.y, currentRadius, wavePaint)
            currentRadius += waveGap
        }
    }
}
在自定义的View中,我们做了:
- 根据自定义属性初始化画笔属性
- 定义最小圆和最大圆半径
- 定义开始画圆的位置
- 从最小半径到最大半径画同心圆,圆间隔是waveGap。
    private var waveAnimator: ValueAnimator? = null
    private var waveRadiusOffset = 0f
        set(value) {
            field = value
            postInvalidateOnAnimation()
        }

    override fun onAttachedToWindow() {
        super.onAttachedToWindow()
        waveAnimator = ValueAnimator.ofFloat(0f, waveGap).apply {
            addUpdateListener {
                waveRadiusOffset = it.animatedValue as Float
            }
            duration = 1500L
            repeatMode = ValueAnimator.RESTART
            repeatCount = ValueAnimator.INFINITE
            interpolator = LinearInterpolator()
            start()
        }
    }

    override fun onDetachedFromWindow() {
        waveAnimator?.cancel()
        super.onDetachedFromWindow()
    }

    override fun onDraw(canvas: Canvas) {
        super.onDraw(canvas)

        //draw circles separated by a space the size of waveGap
        var currentRadius = initialRadius + waveRadiusOffset
        while (currentRadius < maxRadius) {
            canvas.drawCircle(center.x, center.y, currentRadius, wavePaint)
            currentRadius += waveGap
        }
    }
。
2 不仅仅是圆形
圆形其实也很美,但是有时候动画需要特定的形状,这里我来画出一个十角星的形状。
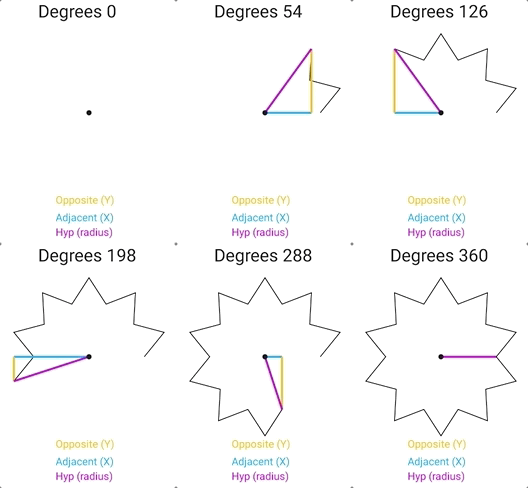
我们利用三角函数(还记得sohcahtoa吗?)来绘制十角星。需要温习高中知识的话可以看下这个文献:https://en.wikipedia.org/wiki/Trigonometry#Mnemonics
绘制星星的边的动图:。
首先要计算出每个点的位置,需要每个点的弧度(或者角度)和到圆形的长度这两个变量才能计算出其位置。由于圆的整个弧度是,那么每个点的弧度就是当前点的索引除以:
    private val wavePath = Path()

    override fun onDraw(canvas: Canvas) {
        super.onDraw(canvas)

        //draw circles separated by a space the size of waveGap
        val path = createStarPath(width/2f, wavePath)
        canvas.drawPath(path, wavePaint)
    }

    private fun createStarPath(
            radius: Float,
            path: Path = Path(),
            points: Int = 20
    ): Path {
        path.reset()
        val pointDelta = 0.7f // difference between the "far" and "close" points from the center
        val angleInRadians = 2.0 * Math.PI / points // essentially 360/20 or 18 degrees, angle each line should be drawn
        val startAngleInRadians = 0.0 //starting to draw star at 0 degrees

        //move pointer to 0 degrees relative to the center of the screen
        path.moveTo(
                center.x + (radius * pointDelta * Math.cos(startAngleInRadians)).toFloat(),
                center.y + (radius * pointDelta * Math.sin(startAngleInRadians)).toFloat()
        )

        //create a line between all the points in the star
        for (i in 1 until points) {
            val hypotenuse = if (i % 2 == 0) {
                //by reducing the distance from the circle every other points, we create the "dip" in the star
                pointDelta * radius
            } else {
                radius
            }

            val nextPointX = center.x + (hypotenuse * Math.cos(startAngleInRadians - angleInRadians * i)).toFloat()
            val nextPointY = center.y + (hypotenuse * Math.sin(startAngleInRadians - angleInRadians * i)).toFloat()
            path.lineTo(nextPointX, nextPointY)
        }

        path.close()
        return path
    }
onDraw方法也要更改下:
override fun onDraw(canvas: Canvas) {
    super.onDraw(canvas)

    //draw circles separated by a space the size of waveGap
    var currentRadius = initialRadius + waveRadiusOffset
    while (currentRadius < maxRadius) {
        val path = createStarPath(currentRadius, wavePath)
        canvas.drawPath(path, wavePaint)
        currentRadius += waveGap
    }
}
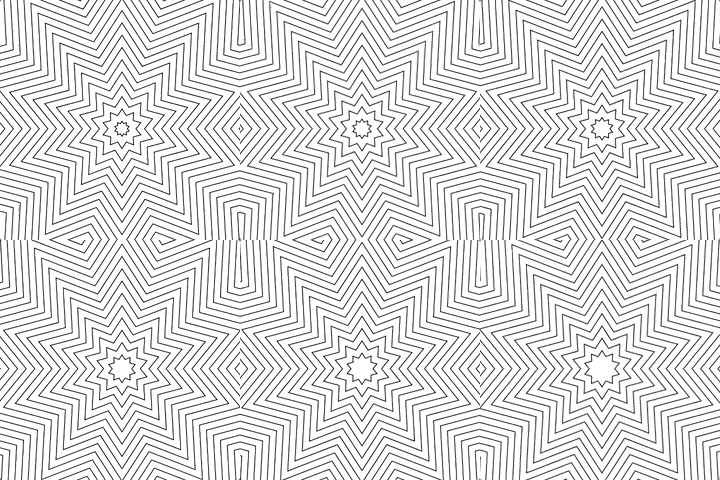
。
3 渐变色
加点渐变色总是很酷的,我们的渐变色是通过绘制画笔加到波纹上的而不是加到背景上的。为了加强落到渐变色上的波纹,我们使用PorterDuff.Mode.SRC_IN模式,关于更多模式可以参考Android矢量图(二)--VectorDrawable所有属性全解析,这篇文章对PorterDuff的十八种模式进行了比较详细的分析解释。下面的代码定义一个渐变色的画笔:
import android.graphics.PorterDuff
import android.graphics.PorterDuffXfermode

private val gradientPaint = Paint(Paint.ANTI_ALIAS_FLAG).apply {
    // Highlight only the areas already touched on the canvas
    xfermode = PorterDuffXfermode(PorterDuff.Mode.SRC_IN)
}
我们用一个alpha数组作为画笔的shader的参数来实现渐变功能:
import android.graphics.Color
import android.graphics.RadialGradient
import android.graphics.Shader

// gradient colors
private val green = Color.GREEN
// solid green in the center, transparent green at the edges
private val gradientColors =
    intArrayOf(green, modifyAlpha(green, 0.10f),
                      modifyAlpha(green, 0.05f))
override fun onSizeChanged(w: Int, h: Int, oldw: Int, oldh: Int) {
    ...

    //Create gradient after getting sizing information
    gradientPaint.shader = RadialGradient(
            center.x, center.y, maxRadius,
            gradientColors, null, Shader.TileMode.CLAMP
    )
}
override fun onDraw(canvas: Canvas) {
    ...
    canvas.drawPaint(gradientPaint)
}
最后我们需要给自定义的View加上layerType的属性,默认的layerType是0,需要改成1(software)或者2(hardware),否则渐变色不会有效果:
。
4 移动
我们可以通过移动画笔的shader的局部矩阵来实现渐变色的移动。
private val gradientMatrix = Matrix()

private fun updateGradient(x: Float, y: Float) {
    gradientMatrix.setTranslate(x - center.x, y - center.y)
    gradientPaint.shader.setLocalMatrix(gradientMatrix)
    postInvalidateOnAnimation()
}
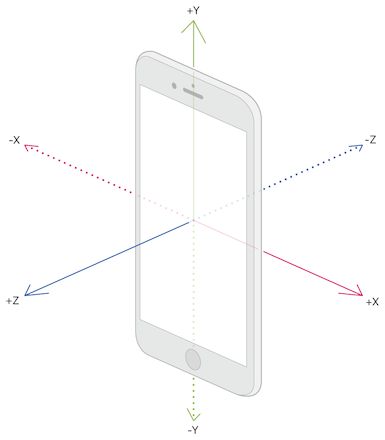
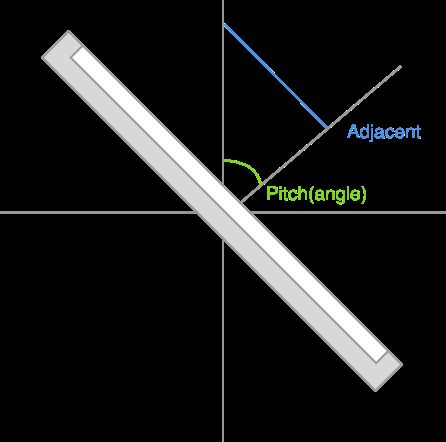
现在我们利用加速度和磁感应器来获取手机的方向,以决定移动画笔shader矩阵的具体的值。关于感应器的更多的知识:sensors_position。WaveTiltSensor这个类用来获取手机设备的方向角度并做相应的逻辑处理。
import android.content.Context
import android.hardware.Sensor
import android.hardware.SensorEvent
import android.hardware.SensorEventListener
import android.hardware.SensorManager

interface TiltListener {

    fun onTilt(pitchRollRad: Pair)
}

interface TiltSensor {

    fun addListener(tiltListener: TiltListener)

    fun register()

    fun unregister()
}

class WaveTiltSensor(context: Context) : SensorEventListener, TiltSensor {

    private val sensorManager: SensorManager
    private val accSensor: Sensor
    private val magneticSensor: Sensor
    private var listeners = mutableListOf()

    init {
        sensorManager = context.getSystemService(Context.SENSOR_SERVICE) as SensorManager
        accSensor = sensorManager.getDefaultSensor(Sensor.TYPE_ACCELEROMETER)
        magneticSensor = sensorManager.getDefaultSensor(Sensor.TYPE_MAGNETIC_FIELD)
    }


    override fun onAccuracyChanged(sensor: Sensor, accuracy: Int) {
        // Do nothing here
    }

    override fun onSensorChanged(event: SensorEvent) {
        // TODO: Get orientation angles and notify listeners
    }

    override fun addListener(tiltListener: TiltListener) {
        listeners.add(tiltListener)
    }

    override fun register() {
        sensorManager.registerListener(this, accSensor, SensorManager.SENSOR_DELAY_UI)
        sensorManager.registerListener(this, magneticSensor, SensorManager.SENSOR_DELAY_UI)
    }

    override fun unregister() {
        listeners.clear()
        sensorManager.unregisterListener(this, accSensor)
        sensorManager.unregisterListener(this, magneticSensor)
    }
}
主要的逻辑是放在onSensorChanged方法里:
class WaveTiltSensor(context: Context) : SensorEventListener, TiltSensor {

    private val rotationMatrix = FloatArray(9)
    private val accelerometerValues = FloatArray(3)
    private val magneticValues = FloatArray(3)
    private val orientationAngles = FloatArray(3)

    override fun onSensorChanged(event: SensorEvent) {
        if (event.sensor.type == Sensor.TYPE_ACCELEROMETER) {
            System.arraycopy(event.values, 0, accelerometerValues, 0, accelerometerValues.size)
        } else if (event.sensor.type == Sensor.TYPE_MAGNETIC_FIELD) {
            System.arraycopy(event.values, 0, magneticValues, 0, magneticValues.size)
        }

        SensorManager.getRotationMatrix(rotationMatrix, null, accelerometerValues, magneticValues)
        SensorManager.getOrientation(rotationMatrix, orientationAngles)

        val pitchInRad = orientationAngles[1].toDouble()
        val rollInRad = orientationAngles[2].toDouble()

        val pair = Pair(pitchInRad, rollInRad)
        listeners.forEach {
            it.onTilt(pair)
        }
    }
}
   val tiltSensor = WaveTiltSensor(context)

   override fun onTilt(pitchRollRad: Pair) {
        val pitchRad = pitchRollRad.first
        val rollRad = pitchRollRad.second

        // Use half view height/width to calculate offset instead of full view/device measurement
        val maxYOffset = center.y.toDouble()
        val maxXOffset = center.x.toDouble()

        val yOffset = (Math.sin(pitchRad) * maxYOffset)
        val xOffset = (Math.sin(rollRad) * maxXOffset)

        updateGradient(xOffset.toFloat() + center.x, yOffset.toFloat() + center.y)
    }

    override fun onAttachedToWindow() {
        tiltSensor.addListener(this)
        tiltSensor.register()
    }

    override fun onDetachedFromWindow() {
        tiltSensor.unregister()
    }
5 总结
下面是可以运行的demo源码的git地址,希望本篇文章能让你觉得使用三角函数和陀螺仪制作动画更简单!
alexio/Android-AnimatedWaveView


