参考 http://blog.csdn.net/haozhoupan/article/details/49814631
首先声明的是图片我是上传到服务器的Tomcat中,并保存路径在数据库中
第1步 安装插件
1.1 安装cordovaCamera
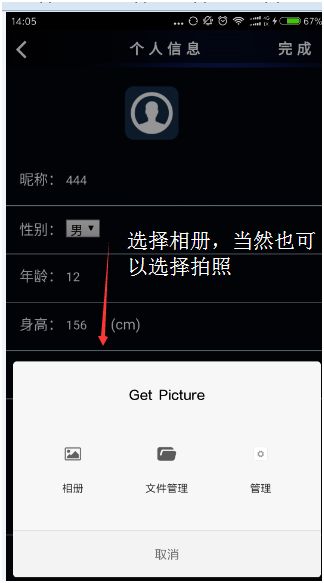
这个插件是用来拍照,或者说是打开手机上面的照相机功能的
DOS进入项目
Ionic plugin add cordova-plugin-camera
1.2 安装cordovaFileTransfer
这个插件是上传文件用的 ionic plugin add cordova-plugin-file-transfer
第2步.编写页面代码


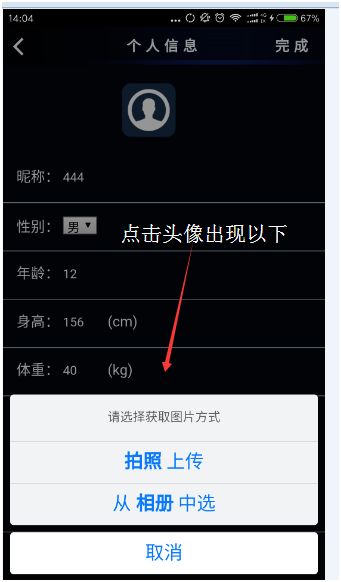
其中: addPhoto()是链接JS中写的图片上传方法
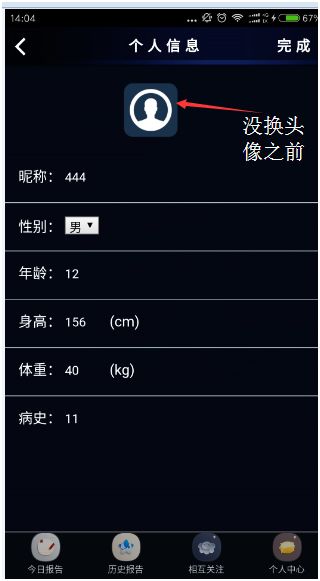
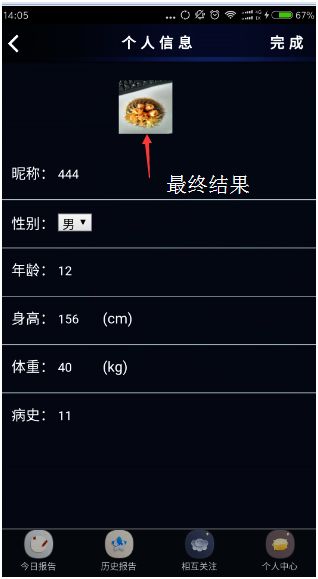
Img中的ng-if是判断用户是否修改了头像,若从没修改过就给一个默认的头像,头像修改过就显示修改后的图片
第3步JS代码
3.1 在.controller中注入相关服务
$ionicActionSheet, $cordovaCamera, $cordovaFileTransfer
3.2 编写下面JS代码
  // 添加图片
    $scope.addPhoto = function () {
      $ionicActionSheet.show({
        /* cancelOnStateChange: true,
         cssClass: 'action_s',*/
        titleText: "请选择获取图片方式",
        buttons: [{
          text: '拍照 上传'
        }, {
          text: '从 相册 中选'
        }],
        cancelText: '取消',
        cancel: function () {
          return true;
        },
        buttonClicked: function (index) {
          switch (index) {
            case 0:
              $scope.takePhoto();
              break;
            case 1:
              $scope.pickImage();
              break;
            default:
              break;
          }
          return true;
        }
      });
    };
    //拍照
    $scope.takePhoto = function () {
      var options = {
        quality: 100,
        destinationType: Camera.DestinationType.FILE_URI,//Choose the format of the return value.
        sourceType: Camera.PictureSourceType.CAMERA,//资源类型:CAMERA打开系统照相机;PHOTOLIBRARY打开系统图库
        targetWidth: 150,//头像宽度
        targetHeight: 150//头像高度
      };
      $cordovaCamera.getPicture(options)
        .then(function (imageURI) {
          //Success
          $scope.imageSrc = imageURI;
          //$scope.uploadPhoto();
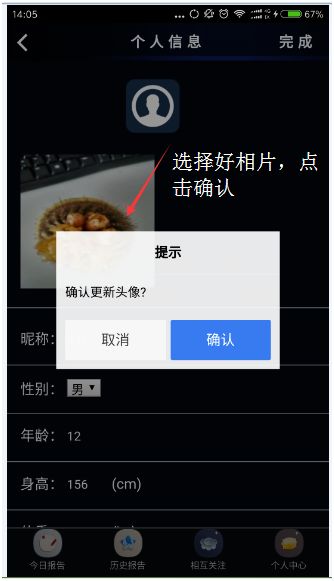
          var confirmPopup = $ionicPopup.confirm({
            title: '提示',
            template: '确认更新头像?',
            okText: '确认',
            cancelText: '取消'
          });
          confirmPopup.then(function (res) {
            $scope.uploadPhoto();//调用上传功能
          })
        }, function (err) {
          // Error
        });
    };
//选择照片
    $scope.pickImage = function () {
      var options = {
        maximumImagesCount: 1,
        quality: 100,
        destinationType: Camera.DestinationType.FILE_URI,//Choose the format of the return value.
        sourceType: Camera.PictureSourceType.SAVEDPHOTOALBUM,//资源类型:CAMERA打开系统照相机;PHOTOLIBRARY打开系统图库
        targetWidth: 150,//头像宽度
        targetHeight: 150//头像高度
      };

      $cordovaCamera.getPicture(options)
        .then(function (imageURI) {
          //Success
          $scope.imageSrc = imageURI;
          // $scope.imageSrc= imageURI.substring(0,imageURI.lastIndexOf("?"));//获取手机上的图片可能后面出现?时间戳
          // $scope.uploadPhoto();
          var confirmPopup = $ionicPopup.confirm({
            title: '提示',
            template: '确认更新头像?',
            okText: '确认',
            cancelText: '取消'
          });
          confirmPopup.then(function (res) {
            $scope.uploadPhoto();//调用上传
          })
        }, function (err) {
          // Error
        });
    };


    $scope.uploadPhoto = function () {
      // var requestParams = "?callback=JSON_CALLBACK";
      var options = new FileUploadOptions();
      var server = encodeURI('注意这写的是你的后台请求地址');
      var fileURL = $scope.imageSrc;
      alert("1 fileURL= "+fileURL);
      var params = {
        fileKey: "file",//相当于form表单项的name属性
        fileName: fileURL.substr(fileURL.lastIndexOf('/') + 1),
        mimeType: "image/jpeg",
        chunkedMode : true,
        id:$scope.user.id
      };
      options.params = params;
      //alert("2 options.fileKey = " +options.params.fileKey+" 3fileName= "+options.params.fileName);
      $cordovaFileTransfer.upload(server, fileURL, options)
        .then(function (result) {
          // Success!
          //alert("Code = " + result.responseCode + "Response = " + result.response+ "Sent = " + result.bytesSent);
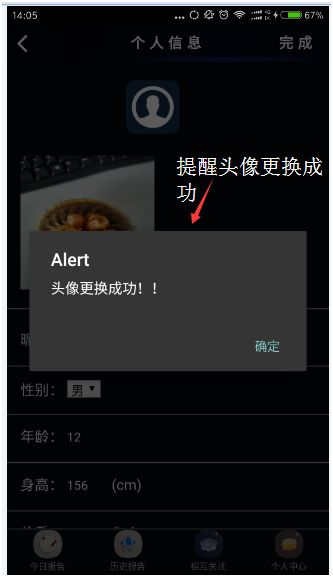
         alert("头像更换成功!!");
        }, function (err) {
          // Error
          alert("An error has occurred: Code = " + error.code + "upload error source " + error.source + "upload error target " + error.target);
        }, function (progress) {
          // constant progress updates
        });

    };
第4步 编写后台代码
在此以springMVC中的controller作为后台
@ResponseBody
    @RequestMapping(value = "saveFile", method = { RequestMethod.GET, RequestMethod.POST })
    public void saveFile(@RequestParam("file") MultipartFile[] mFiles,String fileName,String id) throws MalformedURLException {

        String targetDirectory = "D:\\apache-tomcat-8.0.9\\webapps\\hy\\image"; //保存在服务器上的tomcat中路径
        System.err.println("filename= "+fileName+" 用户id= "+id);//得到参数文件名和用户id

          if(mFiles.length==0|| mFiles==null){
              return  ;
          }else{
              if(fileName.contains("?")){
                 fileName = fileName.substring(0, fileName.indexOf("?"));
              }
              for(MultipartFile mFile : mFiles){
                    //String fileName = mFile.getOriginalFilename();//重名图片的覆盖问题
                    File targetFile = new File(targetDirectory, fileName);
                    if (!targetFile.exists()) {
                        targetFile.mkdirs();
                    }

                    try {
                        mFile.transferTo(targetFile);
                        UserCenterDTO user = new UserCenterDTO();
                        String path = targetFile.getPath();
                        user.setImage(fileName);
                        user.setUid(id);
                        int a= userService.updateImage(user);
                    } catch (IllegalStateException isEx) {
                        isEx.printStackTrace();
                    } catch (IOException ioEx) {
                        ioEx.printStackTrace();
                    }
                 }
         }

    }
但是这样会报MultipartResolver错误,所以在上面代码之上加上以下代码:
@Bean
        public MultipartResolver multipartResolver() {
            CommonsMultipartResolver resolver = new CommonsMultipartResolver();
            resolver.setMaxUploadSize(10000000);
            return resolver;
        }
