一、debug模块
参考
npm debug模块
开始学nodejs —— 调试篇
debug模块详解
一般在nodejs需要进行调试的时候,可以使用console.log()方法来将调试信息输出到控制台,当发布到生产环境的时候,需要将这些调试信息都注释掉,为了方便切换而不需要改动程序代码,可以使用nodejs的debug模块
首先安装一下npm install debug
var debug = require('debug')('myapp:main');
debug('现在的时间是 %s' , new Date());
如果是开发环境,只需要设置环境变量set debug=myapp:*就可以输出调试信息。如果需要关闭调试信息,则设置set debug=null
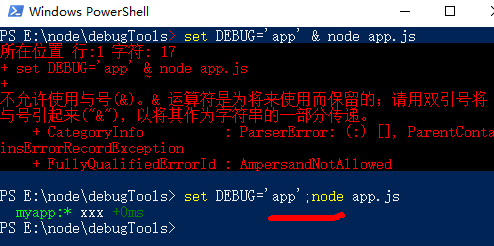
1.注意Windows下,CMD和PowerShell的区别:
但是,PowerShell的DEBUG参数并没有传进去。查看debug模块的源码,在node.js的load方法中console一下:
/**
 * Load `namespaces`.
 *
 * @return {String} returns the previously persisted debug modes
 * @api private
 */

function load() {
    console.log("process.env.DEBUG:",process.env.DEBUG);
  return process.env.DEBUG;
}
发现PowerShell这个参数,居然是undefined
2.避开了PowerShell的坑,用CMD还是不行,查看源代码中的debug.js发现:
/**
 * Returns true if the given mode name is enabled, false otherwise.
 *
 * @param {String} name
 * @return {Boolean}
 * @api public
 */

function enabled(name) {

  if (name[name.length - 1] === '*') {
    return true;
  }
  var i, len;
  for (i = 0, len = exports.skips.length; i < len; i++) {
    if (exports.skips[i].test(name)) {
      return false;
    }
  }
  for (i = 0, len = exports.names.length; i < len; i++) {
     console.log("enabled name:",name,"exports.names[i]",exports.names[i]);
     //enabled name: myapp:main exports.names[i] /^'myapp:main'$/
    //if (exports.names[i].test(name)) {
    if (exports.names[i].test('\''+name+'\'')) {
      return true;
    }
  }
  return false;
}
注意看,正则匹配那里没有通过,原因是生成的正则两侧有单引号,但是传进来的name,也就是namespace没有单引号,所以匹配不上去。我改成if (exports.names[i].test('\''+name+'\'')) {就可以使用了。所以源码有问题???再仔细看看自己的cmd命令,原来是自己多打了单引号:E:\node\debugTools>set DEBUG='myapp:main' & node app.js。改为E:\node\debugTools>set DEBUG=myapp:main & node app.js即可。
3.给几个例子:
01.js
/**
 * debug基础例子
 */
var debug = require('debug')('app');

// 运行 DEBUG=app node 01.js
// 输出:app hello +0ms
debug('hello');
02.js
/**
 * debug例子:命名空间
 */
var debug = require('debug');
var appDebug = debug('app');
var apiDebug = debug('api');

console.log("appDebug eanbled",appDebug.enabled);
console.log("apiDebug eanbled",apiDebug.enabled);
// 分别运行下面几行命令看下效果
//
//     DEBUG=app node 02.js
//     DEBUG=api node 02.js
//     DEBUG=app,api node 02.js
//     DEBUG=a* node 02.js
//
appDebug('hello');
apiDebug('hello');
03.js
/**
 * debug例子:排查命名空间
 */
var debug = require('debug');
var listDebug = debug('app:list');
var profileDebug = debug('app:profile');
var loginDebug = debug('account:login');

// 分别运行下面几行命令看下效果
//
//     DEBUG=* node 03.js
//     DEBUG=*,-account* node 03.js
//
listDebug('hello');
profileDebug('hello');
loginDebug('hello');
04.js
/**
 * debug:自定义格式化
 */
var createDebug = require('debug')

createDebug.formatters.h = function(v) {
  return v.toUpperCase();
};

var debug = createDebug('foo');

// 运行 DEBUG=foo node 04.js
// 输出 foo My name is CHYINGP +0ms
debug('My name is %h', 'chying');
二、在chrome中调试
参考 3分钟干货学会使用node-inspector调试NodeJS代码
先安装:npm install -g node-inspector
然后打开命令行,输入node-inspector,会提示visit http://127.0.0.1:8080/?port=5858 to start debug
然后打开另一个命令行,输入node --debug-brk test.js,再去chrome中打开http://127.0.0.1:8080/?port=5858即可
三、在vscode中调试
参考vscode 调试node.js
1.这里以express应用为例,参考Node.js Express Helloworld,使用命令行npm start,然后访问localhost:3000确认可以正常访问。
2.命令行中使用code .,使用vscode打开express应用
注:在当前项目下创建ExpressApp.bat,输入“code .”即可,下次直接此文件直接使用VSCode打开Nodejs项目
@echo off
code.
选择完成之后,在项目的根目录中会生成一个.vscode的目录,这个目录中存放了各种各样的VScode编辑器的配置。现在这个目录中就包含了一个文件名为lanuch.json的配置文件,配置文件的内容如下:
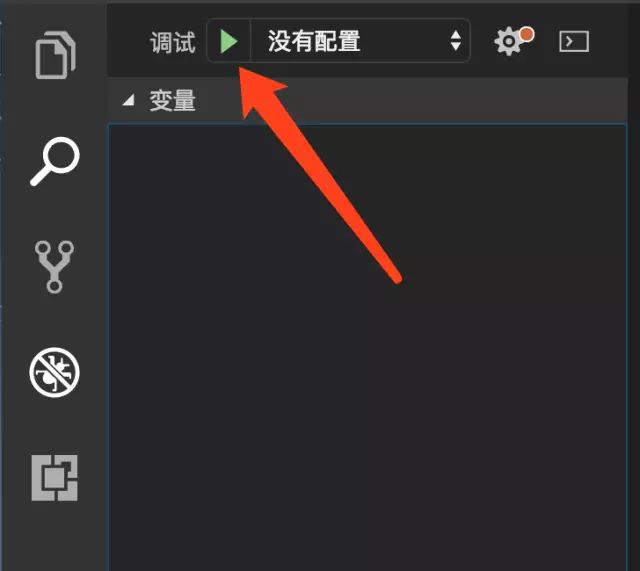
其中最重要的配置项就是“Program”字段,这个字段定义了整个应用的入口,开启调试器的时候会从这个入口启动应用。我们发现当前这个字段已经有值了,不要慌,那是因为VScode在初始化这个配置文件的时候,会查看package.json中是否有包含了键名为start的scripts,如果有的话,就会把start配置的内容作为“program”字段的值。点击开始调试按钮(绿色三角形),就可以开始调试了。
四、supervisor / nodemon + Browsersync
如果你有 PHP 开发经验,会习惯在修改 PHP 脚本后直接刷新浏览器以观察结果,而你在开发 Node.js 实现的 HTTP 应用时会发现,无论你修改了代码的哪一部份,都必须终止Node.js 再重新运行才会奏效。这是因为 Node.js 只有在第一次引用到某部份时才会去解析脚本文件,以后都会直接访问内存,避免重复载入,而 PHP 则总是重新读取并解析脚本(如果没有专门的优化配置)。Node.js的这种设计虽然有利于提高性能,却不利于开发调试,因为我们在开发过程中总是希望修改后立即看到效果,而不是每次都要终止进程并重启。supervisor 或者nodemon ,可以帮助你实现这个功能,它会监视你对代码的改动,并自动重启 Node.js。
supervisor修改代码时可以自动重启服务器但不更新浏览器。Browsersync能让浏览器实时、快速响应您的文件更改(html、js、css、sass、less等)并自动刷新页面。
五、ts-node
参考使用ts-node和vsc来调试TypeScript代码
我之前写过一篇用vsc+gulp来自动编译ts并重启程序的文章,不过后来发现这样做的工作比较多而且有很多不足,比如
- 运行或者调试需要等待编译完成,项目大了之后编译这一步还是需要一定的时间的
- 难以调试测试代码,一般来说项目采用ts,测试代码也应该采用ts去编写,而采用编译+sourcemap的方式就很难调试测试代码
可以看出这些不足都来自于一个根本原因,运行之前需要编译。后来我就发现了一个很强大的工具ts-node,来看下ts-node的简介:
TypeScript execution environment and REPL for node.
简单的说就是它提供了TypeScript的运行环境,让我们免去了麻烦的编译这一步骤。
# Locally in your project
npm install -D ts-node
npm install -D typescript

# Or globally (not recommended)
npm install -g ts-node
npm install -g typescript
官网提示还要本地安装typescript,我没装,果然报错:
Error: Cannot find module 'typescript'
    at Function.Module._resolveFilename (module.js:469:15)
    at Function.Module._load (module.js:417:25)
    at Module.require (module.js:497:17)
    at require (internal/module.js:20:19)
    at Object.register (E:\node\ts-node-starter\node_modules\ts-node\src\index.ts:227:26)
    at Object. (E:\node\ts-node-starter\node_modules
\ts-node\register\index.js:1:16)    at Module._compile (module.js:570:32)
    at Object.Module._extensions..js (module.js:579:10)    at Module.load (module.js:487:32)
    at tryModuleLoad (module.js:446:12)
Waiting for the debugger to disconnect...
修改项目的launch.json文件,添加一个新的启动方式
{
  "name": "Current TS File",
  "type": "node",
  "request": "launch",
  "args": [
    "${workspaceRoot}/src/index.ts" // 入口文件
  ],
  "runtimeArgs": [
    "--nolazy",
    "-r",
    "ts-node/register"
  ],
  "sourceMaps": true,
  "cwd": "${workspaceRoot}",
  "protocol": "inspector",
  "console": "integratedTerminal",
  "internalConsoleOptions": "neverOpen"
}
这下可以愉快地调试Ts了。具体配置参见作者ts-debug-example,下载之后npm install一下就能运行。


