Talk is cheap,show me the code , 书上得来终觉浅,绝知此事要躬行。在自己真正实现的过程中,会遇到很多莫名其妙的问题,而正是在解决这些问题的过程中,你会发现自己之前思维的盲点。
引子
看完《微服务设计》后,算是补上了自己在服务化这块的理论知识,在业界,一般有两种微服务的实践方法:基于dubbo的微服务架构、基于Spring Cloud的微服务架构。从概念上来讲,Dubbo和Spring Cloud并不能放在一起对比,因为Dubbo仅仅是一个RPC框架,实现Java程序的远程调用,实施服务化的中间件则需要自己开发;而Spring Cloud则是实施微服务的一系列套件,包括:服务注册与发现、断路器、服务状态监控、配置管理、智能路由、一次性令牌、全局锁、分布式会话管理、集群状态管理等。
在有赞,我们基于Dubbo实施服务化,刚开始是基于ZooKeeper进行服务注册与发现,现在已经转成使用Etcd。我这次学习Spring Cloud,则是想成体系得学习下微服务架构的实现,也许能够对基于Dubbo实施微服务架构有所借鉴。
Spring Cloud下有很多工程:
- Spring Cloud Config:依靠git仓库实现的中心化配置管理。配置资源可以映射到Spring的不同开发环境中,但是也可以使用在非Spring应用中。
- Spring Cloud Netflix:不同的Netflix OSS组件的集合:Eureka、Hystrix、Zuul、Archaius等。
- Spring Cloud Bus:事件总线,利用分布式消息将多个服务连接起来。非常适合在集群中传播状态的改变事件(例如:配置变更事件)
- Spring Cloud Consul:服务发现和配置管理,由Hashicorp团队开发。
我决定先从Spring Cloud Netflix看起,它提供了如下的功能特性:
- 服务发现:Eureka-server实例作为服务提供者,可以注册到服务注册中心,Eureka客户端可以通过Spring管理的bean发现实例;
- 服务发现:嵌套式的Eureka服务可以通过声明式的Java配置文件创建;
- 断路器:利用注解,可以创建一个简单的Hystrix客户端;
- 断路器:通过Java配置文件可以创建内嵌的Hystrix控制面板;
- 声明式REST客户端:使用Feign可以创建声明式、模板化的HTTP客户端;
- 客户端负载均衡器:Ribbon
- 路由器和过滤器:Zuul可以在微服务架构中提供路由功能、身份验证、服务迁移、金丝雀发布等功能。
本文计划利用Eureka实现一个简答的服务注册于发现的例子,需要创建三个角色:服务注册中心、服务提供者、服务消费者。
实践
1. 服务注册中心
在IDEA中创建一个Spring Cloud工程,引入Eureka-Server包,pom文件整体如下:
    4.0.0

    org.example.springcloud
    service-register
    1.0-SNAPSHOT


        org.springframework.boot
        spring-boot-starter-parent
        1.5.1.RELEASE


        UTF-8
        1.8


                org.springframework.boot
                spring-boot-maven-plugin


            org.springframework.cloud
            spring-cloud-starter-eureka-server


            org.springframework.boot
            spring-boot-starter-test
            test


                org.springframework.cloud
                spring-cloud-dependencies
                Camden.SR5
                pom
                import
在src/main/java包下创建一个名为hello的包,然后创建EurekaServiceRegisterApplication类,并用@EnableEurekaServer和@SpringBootApplication两个注解修饰,后者是Spring Boot应用都需要用的,这里不作过多解释;@EnableEurekaServer注解的作用是触发Spring Boot的自动配置机制,由于我们之前在pom文件中导入了eureka-server,spring boot会在容器中创建对应的bean。EurekaServiceRegisterApplication的代码如下:
package hello;

import org.springframework.boot.SpringApplication;
import org.springframework.boot.autoconfigure.SpringBootApplication;
import org.springframework.cloud.netflix.eureka.server.EnableEurekaServer;

/**
 * Created by IntelliJ IDEA.
 * User: duqi
 * Date: 2017/3/2
 * Time: 20:02
 */

@EnableEurekaServer //通过@EnableEurekaServer启动一个服务注册中心给其他应用使用
@SpringBootApplication
public class EurekaServiceRegisterApplication {

    public static void main(String[] args) {
        SpringApplication.run(EurekaServiceRegisterApplication.class, args);
    }
}
在application.properties中还需要增加如下配置,才能创建一个真正可以使用的服务注册中心。
#注册服务的端口号
server.port=8761

#是否需要注册到注册中心,因为该项目本身作为服务注册中心,所以为false
eureka.client.register-with-eureka=false
#是否需要从注册中心获取服务列表,原因同上,为false
eureka.client.fetch-registry=false
#注册服务器的地址:服务提供者和服务消费者都要依赖这个地址
eureka.client.service-url.defaultZone=http://localhost:${server.port}/eureka

logging.level.com.netflix.eureka=OFF
logging.level.com.netflix.discovery=OFF
启动注册服务,并访问:http://localhost:8761,就可以看到如下界面。
2. 服务提供者
创建一个Spring Boot工程,代表服务提供者,该服务提供者会暴露一个加法服务,接受客户端传来的加数和被加数,并返回两者的和。
工程的pom文件内容如下:
    4.0.0

    org.example.springcloud
    service-client
    1.0-SNAPSHOT


        org.springframework.boot
        spring-boot-starter-parent
        1.5.1.RELEASE


        UTF-8
        1.8


                org.springframework.boot
                spring-boot-maven-plugin


            org.springframework.cloud
            spring-cloud-starter-eureka


            org.springframework.boot
            spring-boot-starter-test
            test


            org.springframework.cloud
            spring-cloud-starter-eureka-server
            test


                org.springframework.cloud
                spring-cloud-dependencies
                Camden.SR5
                pom
                import
其中的关键在于spring-cloud-starter-eureka这个Jar包,其中包含了eureka的客户端实现。
在src/main/java/hello下创建工程的主类EurekaServerProducerApplication,使用@EnableDiscoveryClient注解修饰,该注解在服务启动的时候,可以触发服务注册的过程,向配置文件中指定的服务注册中心(Eureka-Server)的地址注册自己提供的服务。EurekaServerProducerApplication的源码如下:
package hello;

import org.springframework.boot.SpringApplication;
import org.springframework.boot.autoconfigure.SpringBootApplication;
import org.springframework.cloud.client.discovery.EnableDiscoveryClient;

/**
 * Created by IntelliJ IDEA.
 * User: duqi
 * Date: 2017/3/2
 * Time: 20:34
 */
@EnableDiscoveryClient
@SpringBootApplication
public class EurekaServerProducerApplication {

    public static void main(String[] args) {
        SpringApplication.run(EurekaServerProducerApplication.class, args);
    }

}
配置文件的内容如下:
#服务提供者的名字
spring.application.name=compute-service

#服务提供者的端口号
server.port=8888

#服务注册中心的地址
eureka.client.serviceUrl.defaultZone=http://localhost:8761/eureka/
服务提供者的基本框架搭好后,需要实现服务的具体内容,在ServiceInstanceRestController类中实现,它的具体代码如下:
package hello;


import org.slf4j.Logger;
import org.slf4j.LoggerFactory;
import org.springframework.beans.factory.annotation.Autowired;
import org.springframework.cloud.client.ServiceInstance;
import org.springframework.cloud.client.discovery.DiscoveryClient;
import org.springframework.web.bind.annotation.GetMapping;
import org.springframework.web.bind.annotation.RequestParam;
import org.springframework.web.bind.annotation.RestController;

/**
 * Created by IntelliJ IDEA.
 * User: duqi
 * Date: 2017/3/2
 * Time: 20:36
 */
@RestController
public class ServiceInstanceRestController {

    private static final Logger logger = LoggerFactory.getLogger(ServiceInstanceRestController.class);

    @Autowired
    private DiscoveryClient discoveryClient; //服务发现客户端

    @GetMapping(value = "/add")
    public Integer add(@RequestParam Integer a, @RequestParam Integer b) {
        ServiceInstance instance = discoveryClient.getLocalServiceInstance();
        Integer r = a + b;
        logger.info("/add, host:" + instance.getHost() + ", service_id:" + instance.getServiceId() + ", result:" + r);
        return r;
    }
}
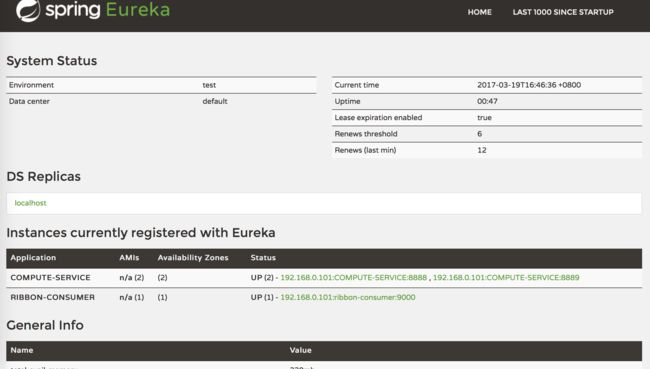
先启动服务注册中心的工程,然后再启动服务提供者,在访问:localhost:8761,如下图所示,服务提供者已经注册到服务注册中心啦。
在Spring Cloud Netflix中,使用Ribbon实现客户端负载均衡,使用Feign实现声明式HTTP客户端调用——即写得像本地函数调用一样。
3. 服务消费者-Ribbon
创建一个Spring boot工程,引入ribbon和eureka,pom文件内容如下:
    4.0.0

    org.example.springcloud
    serviceconsumer
    1.0-SNAPSHOT


        org.springframework.boot
        spring-boot-starter-parent
        1.5.1.RELEASE


        UTF-8
        1.8


                org.springframework.boot
                spring-boot-maven-plugin


            org.springframework.cloud
            spring-cloud-starter-ribbon


            org.springframework.cloud
            spring-cloud-starter-eureka


            org.springframework.boot
            spring-boot-starter-web


            org.springframework.boot
            spring-boot-starter-test
            test


                org.springframework.cloud
                spring-cloud-dependencies
                Camden.SR5
                pom
                import
创建EurekaConsumerApplication类,定义REST客户端实例,代码如下:
package hello;

import org.springframework.boot.SpringApplication;
import org.springframework.boot.autoconfigure.SpringBootApplication;
import org.springframework.cloud.client.discovery.EnableDiscoveryClient;
import org.springframework.cloud.client.loadbalancer.LoadBalanced;
import org.springframework.context.annotation.Bean;
import org.springframework.web.client.RestTemplate;

/**
 * Created by IntelliJ IDEA.
 * User: duqi
 * Date: 2017/3/2
 * Time: 22:55
 */
@EnableDiscoveryClient //开启服务发现的能力
@SpringBootApplication
public class EurekaConsumerApplication {

    @Bean //定义REST客户端,RestTemplate实例
    @LoadBalanced //开启负债均衡的能力
    RestTemplate restTemplate() {
        return new RestTemplate();
    }

    public static void main(String[] args) {
        SpringApplication.run(EurekaConsumerApplication.class, args);
    }
}
application.properties中定义了服务注册中心的地址、消费者服务的端口号、消费者服务的名称这些内容:
#应用名称
spring.application.name=ribbon-consumer

#端口号
server.port=9000

#注册中心的地址
eureka.client.serviceUrl.defaultZone=http://localhost:8761/eureka/
消费者服务的入口为:ConsumerController,我们通过这个实例进行测试。消费者服务启动过程中,会从服务注册中心中拉最新的服务列表,当浏览器触发对应的请求,就会根据COMPUTE-SERVICE查找服务提供者的IP和端口号,然后发起调用。
package hello;

import org.springframework.beans.factory.annotation.Autowired;
import org.springframework.web.bind.annotation.GetMapping;
import org.springframework.web.bind.annotation.RestController;
import org.springframework.web.client.RestTemplate;

/**
 * Created by IntelliJ IDEA.
 * User: duqi
 * Date: 2017/3/2
 * Time: 22:58
 */
@RestController
public class ConsumerController {

    @Autowired
    private RestTemplate restTemplate;

    @GetMapping(value = "/add")
    public String add() {
        return restTemplate.getForEntity("http://COMPUTE-SERVICE/add?a=10&b=20", String.class).getBody();
    }
}
首先启动服务注册中心,第二分别启动两个服务提供者(IP相同、端口不同即可),然后启动服务消费者。
在浏览器里访问localhost:9000/add两次,可以看到请求有时候会在8888端口的服务,有时候会到8889的服务。具体背后选择的原理,还有待后续研究。
4. 服务消费者-Feign
上一节中,使用类似restTemplate.getForEntity("http://COMPUTE-SERVICE/add?a=10&b=20", String.class).getBody()这样的语句进行服务间调用并非不可以,只是我们在服务化的过程中,希望跨服务调用能够看起来像本地调用,这也是我理解的Feign的使用场景。
创建一个spring boot工程,该工程的pom文件与上一节的类似,只是把ribbon的依赖换为feign的即可,代码如下:
    4.0.0

    org.example.springcloud
    serviceconsumer
    1.0-SNAPSHOT


        org.springframework.boot
        spring-boot-starter-parent
        1.5.1.RELEASE


        UTF-8
        1.8


                org.springframework.boot
                spring-boot-maven-plugin


            org.springframework.cloud
            spring-cloud-starter-feign


            org.springframework.cloud
            spring-cloud-starter-eureka


            org.springframework.boot
            spring-boot-starter-web


            org.springframework.boot
            spring-boot-starter-test
            test


                org.springframework.cloud
                spring-cloud-dependencies
                Camden.SR5
                pom
                import
首先创建应用程序启动类:EurekaConsumerApplication,代码如下:
package hello;

import org.springframework.boot.SpringApplication;
import org.springframework.boot.autoconfigure.SpringBootApplication;
import org.springframework.cloud.client.discovery.EnableDiscoveryClient;
import org.springframework.cloud.netflix.feign.EnableFeignClients;


/**
 * Created by IntelliJ IDEA.
 * User: duqi
 * Date: 2017/3/19
 * Time: 16:59
 */
@EnableDiscoveryClient //用于启动服务发现功能
@EnableFeignClients //用于启动Fegin功能
@SpringBootApplication
public class EurekaConsumerApplication {

    public static void main(String[] args) {
        SpringApplication.run(EurekaConsumerApplication.class);
    }
}
然后定义远程调用的接口,在hello包下创建depend包,然后创建ComputeClient接口,使用@FeignClient("COMPUTE-SERVICE")注解修饰,COMPUTE-SERVICE就是服务提供者的名称,然后定义要使用的服务,代码如下:
package hello.depend;

import org.springframework.cloud.netflix.feign.FeignClient;
import org.springframework.web.bind.annotation.RequestMapping;
import org.springframework.web.bind.annotation.RequestMethod;
import org.springframework.web.bind.annotation.RequestParam;

/**
 * Created by IntelliJ IDEA.
 * User: duqi
 * Date: 2017/3/19
 * Time: 17:02
 */
@FeignClient("COMPUTE-SERVICE")
public interface ComputeClient {

    @RequestMapping(method = RequestMethod.GET, value = "/add")
    Integer add(@RequestParam(value = "a") Integer a, @RequestParam(value = "b") Integer b);
}
在ConsumerController中,像引入普通的spring bean一样引入ComputeClient对象,其他的和Ribbon的类似。
package hello;

import org.springframework.beans.factory.annotation.Autowired;
import org.springframework.web.bind.annotation.RequestMapping;
import org.springframework.web.bind.annotation.RequestMethod;
import org.springframework.web.bind.annotation.RestController;

import hello.depend.ComputeClient;

/**
 * Created by IntelliJ IDEA.
 * User: duqi
 * Date: 2017/3/19
 * Time: 17:06
 */
@RestController
public class ConsumerController {

    @Autowired
    private ComputeClient computeClient;

    @RequestMapping(value = "/add", method = RequestMethod.GET)
    public Integer add() {
        return computeClient.add(10, 20);
    }
}
application.properties的内容如下:
#应用名称
spring.application.name=fegin-consumer

#端口号
server.port=9000

#注册中心的地址
eureka.client.serviceUrl.defaultZone=http://localhost:8761/eureka/
启动fegin消费者,访问localhost:9000/add,也可以看到服务提供者已经收到了消费者发来的请求。
源码下载
- 服务注册中心(Eureka服务端)
- 服务提供者(Eureka客户端)
- 服务消费者-Ribbon(Eureka客户端)
- 服务消费者-Feign(Eureka客户端)
参考资料
- Spring Cloud构建微服务架构(一)服务注册与发现
- Spring Cloud实现服务注册于发现
- spring-cloud-netflix官网
- spring cloud 官网
- 使用Spring Cloud Feign作为HTTP客户端调用远程HTTP服务
本号专注于后端技术、JVM问题排查和优化、Java面试题、个人成长和自我管理等主题,为读者提供一线开发者的工作和成长经验,期待你能在这里有所收获。


