转载请标明出处:
http://blog.csdn.net/lmj623565791/article/details/46858663;
本文出自:【张鸿洋的博客】
一、概述
在自定义ViewGroup中,很多效果都包含用户手指去拖动其内部的某个View(eg:侧滑菜单等),针对具体的需要去写好onInterceptTouchEvent和onTouchEvent这两个方法是一件很不容易的事,需要自己去处理:多手指的处理、加速度检测等等。
好在官方在v4的支持包中提供了ViewDragHelper这样一个类来帮助我们方便的编写自定义ViewGroup。简单看一下它的注释:
ViewDragHelper is a utility class for writing custom ViewGroups. It offers a number
of useful operations and state tracking for allowing a user to drag and reposition
views within their parent ViewGroup.
本篇博客将重点介绍ViewDragHelper的使用,并且最终去实现一个类似DrawerLayout的一个自定义的ViewGroup。(ps:官方的DrawerLayout就是用此类实现)
二、入门小示例
首先我们通过一个简单的例子来看看其快捷的用法,分为以下几个步骤:
创建实例
触摸相关的方法的调用
ViewDragHelper.Callback实例的编写
(一) 自定义ViewGroup
packagecom.zhy.learn.view;importandroid.content.Context;importandroid.support.v4.widget.ViewDragHelper;importandroid.util.AttributeSet;importandroid.view.MotionEvent;importandroid.view.View;importandroid.widget.LinearLayout;/**
* Created by zhy on 15/6/3.
*/publicclassVDHLayoutextendsLinearLayout{privateViewDragHelper mDragger;publicVDHLayout(Context context, AttributeSet attrs) {super(context, attrs); mDragger = ViewDragHelper.create(this,1.0f,newViewDragHelper.Callback() {@OverridepublicbooleantryCaptureView(View child,intpointerId) {returntrue; }@OverridepublicintclampViewPositionHorizontal(View child,intleft,intdx) {returnleft; }@OverridepublicintclampViewPositionVertical(View child,inttop,intdy) {returntop; } }); }@OverridepublicbooleanonInterceptTouchEvent(MotionEvent event) {returnmDragger.shouldInterceptTouchEvent(event); }@OverridepublicbooleanonTouchEvent(MotionEvent event) { mDragger.processTouchEvent(event);returntrue; }}
1
2
3
4
5
6
7
8
9
10
11
12
13
14
15
16
17
18
19
20
21
22
23
24
25
26
27
28
29
30
31
32
33
34
35
36
37
38
39
40
41
42
43
44
45
46
47
48
49
50
51
52
53
54
1
2
3
4
5
6
7
8
9
10
11
12
13
14
15
16
17
18
19
20
21
22
23
24
25
26
27
28
29
30
31
32
33
34
35
36
37
38
39
40
41
42
43
44
45
46
47
48
49
50
51
52
53
54
可以看到,上面整个自定义ViewGroup的代码非常简洁,遵循上述3个步骤:
1、创建实例
mDragger = ViewDragHelper.create(this,1.0f,newViewDragHelper.Callback() { });
1
2
3
1
2
3
创建实例需要3个参数,第一个就是当前的ViewGroup,第二个sensitivity,主要用于设置touchSlop:
helper.mTouchSlop = (int) (helper.mTouchSlop * (1/ sensitivity));
1
1
可见传入越大,mTouchSlop的值就会越小。第三个参数就是Callback,在用户的触摸过程中会回调相关方法,后面会细说。
2、触摸相关方法
@OverridepublicbooleanonInterceptTouchEvent(MotionEventevent) {returnmDragger.shouldInterceptTouchEvent(event); } @OverridepublicbooleanonTouchEvent(MotionEventevent) { mDragger.processTouchEvent(event);returntrue; }
1
2
3
4
5
6
7
8
9
10
11
12
1
2
3
4
5
6
7
8
9
10
11
12
onInterceptTouchEvent中通过使用mDragger.shouldInterceptTouchEvent(event)来决定我们是否应该拦截当前的事件。onTouchEvent中通过mDragger.processTouchEvent(event)处理事件。
3、实现ViewDragHelper.CallCack相关方法
newViewDragHelper.Callback() {@OverridepublicbooleantryCaptureView(View child,intpointerId) {returntrue; }@OverridepublicintclampViewPositionHorizontal(View child,intleft,intdx) {returnleft; }@OverridepublicintclampViewPositionVertical(View child,inttop,intdy) {returntop; } }
1
2
3
4
5
6
7
8
9
10
11
12
13
14
15
16
17
18
19
20
1
2
3
4
5
6
7
8
9
10
11
12
13
14
15
16
17
18
19
20
ViewDragHelper中拦截和处理事件时,需要会回调CallBack中的很多方法来决定一些事,比如:哪些子View可以移动、对个移动的View的边界的控制等等。
上面复写的3个方法:
tryCaptureView如何返回ture则表示可以捕获该view,你可以根据传入的第一个view参数决定哪些可以捕获
clampViewPositionHorizontal,clampViewPositionVertical可以在该方法中对child移动的边界进行控制,left , top 分别为即将移动到的位置,比如横向的情况下,我希望只在ViewGroup的内部移动,即:最小>=paddingleft,最大<=ViewGroup.getWidth()-paddingright-child.getWidth。就可以按照如下代码编写:
@OverridepublicintclampViewPositionHorizontal(View child,intleft,intdx) {finalintleftBound = getPaddingLeft();finalintrightBound = getWidth() - mDragView.getWidth() - leftBound;finalintnewLeft = Math.min(Math.max(left, leftBound), rightBound);returnnewLeft; }
1
2
3
4
5
6
7
8
9
10
1
2
3
4
5
6
7
8
9
10
经过上述3个步骤,我们就完成了一个简单的自定义ViewGroup,可以自由的拖动子View。
简单看一下布局文件
(二) 布局文件
1
2
3
4
5
6
7
8
9
10
11
12
13
14
15
16
17
18
19
20
21
22
23
24
25
26
27
28
29
30
31
32
33
34
35
36
1
2
3
4
5
6
7
8
9
10
11
12
13
14
15
16
17
18
19
20
21
22
23
24
25
26
27
28
29
30
31
32
33
34
35
36
我们的自定义ViewGroup中有三个TextView。
当前效果:
可以看到短短数行代码就可以玩起来了~~~
有了直观的认识以后,我们还需要对ViewDragHelper.CallBack里面的方法做下深入的理解。首先我们需要考虑的是:我们的ViewDragHelper不仅仅说只能够去让子View去跟随我们手指移动,我们继续往下学习其他的功能。
三、功能展示
ViewDragHelper还能做以下的一些操作:
边界检测、加速度检测(eg:DrawerLayout边界触发拉出)
回调Drag Release(eg:DrawerLayout部分,手指抬起,自动展开/收缩)
移动到某个指定的位置(eg:点击Button,展开/关闭Drawerlayout)
那么我们接下来对我们最基本的例子进行改造,包含上述的几个操作。
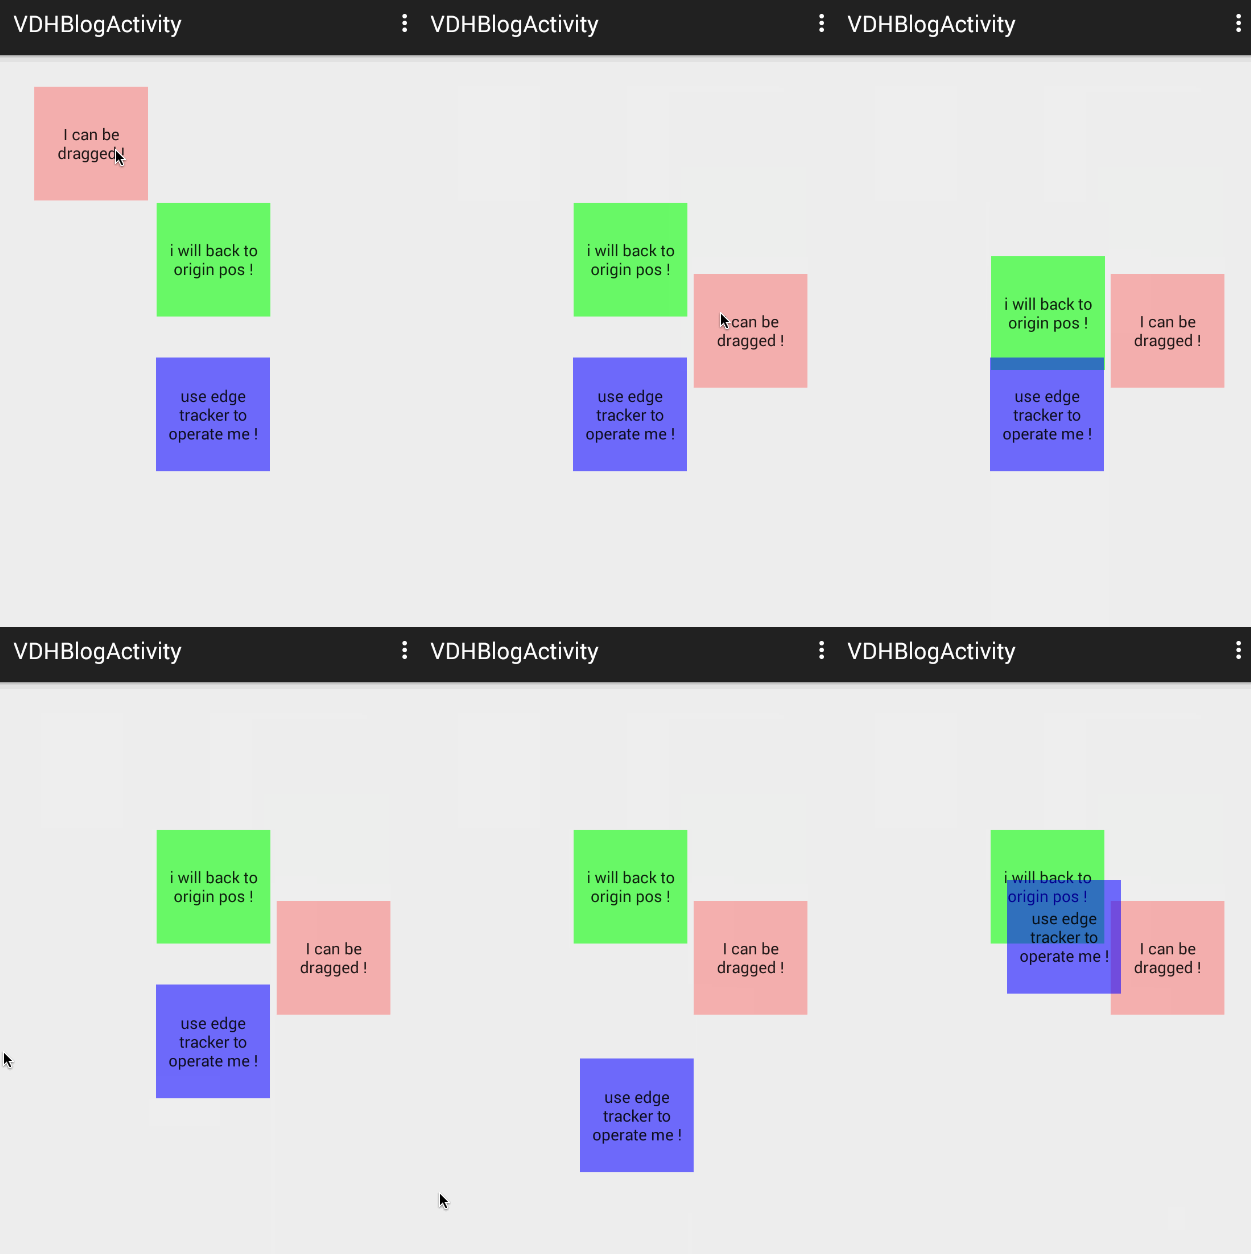
首先看一下我们修改后的效果:
简单的为每个子View添加了不同的操作:
第一个View,就是演示简单的移动
第二个View,演示除了移动后,松手自动返回到原本的位置。(注意你拖动的越快,返回的越快)
第三个View,边界移动时对View进行捕获。
好了,看完效果图,来看下代码的修改:
修改后的代码
packagecom.zhy.learn.view;importandroid.content.Context;importandroid.graphics.Point;importandroid.support.v4.widget.ViewDragHelper;importandroid.util.AttributeSet;importandroid.view.MotionEvent;importandroid.view.View;importandroid.widget.LinearLayout;/**
* Created by zhy on 15/6/3.
*/publicclassVDHLayoutextendsLinearLayout{privateViewDragHelper mDragger;privateView mDragView;privateView mAutoBackView;privateView mEdgeTrackerView;privatePoint mAutoBackOriginPos =newPoint();publicVDHLayout(Context context, AttributeSet attrs) {super(context, attrs); mDragger = ViewDragHelper.create(this,1.0f,newViewDragHelper.Callback() {@OverridepublicbooleantryCaptureView(View child,intpointerId) {//mEdgeTrackerView禁止直接移动returnchild == mDragView || child == mAutoBackView; }@OverridepublicintclampViewPositionHorizontal(View child,intleft,intdx) {returnleft; }@OverridepublicintclampViewPositionVertical(View child,inttop,intdy) {returntop; }//手指释放的时候回调@OverridepublicvoidonViewReleased(View releasedChild,floatxvel,floatyvel) {//mAutoBackView手指释放时可以自动回去if(releasedChild == mAutoBackView) { mDragger.settleCapturedViewAt(mAutoBackOriginPos.x, mAutoBackOriginPos.y); invalidate(); } }//在边界拖动时回调@OverridepublicvoidonEdgeDragStarted(intedgeFlags,intpointerId) { mDragger.captureChildView(mEdgeTrackerView, pointerId); } }); mDragger.setEdgeTrackingEnabled(ViewDragHelper.EDGE_LEFT); }@OverridepublicbooleanonInterceptTouchEvent(MotionEvent event) {returnmDragger.shouldInterceptTouchEvent(event); }@OverridepublicbooleanonTouchEvent(MotionEvent event) { mDragger.processTouchEvent(event);returntrue; }@OverridepublicvoidcomputeScroll() {if(mDragger.continueSettling(true)) { invalidate(); } }@OverrideprotectedvoidonLayout(booleanchanged,intl,intt,intr,intb) {super.onLayout(changed, l, t, r, b); mAutoBackOriginPos.x = mAutoBackView.getLeft(); mAutoBackOriginPos.y = mAutoBackView.getTop(); }@OverrideprotectedvoidonFinishInflate() {super.onFinishInflate(); mDragView = getChildAt(0); mAutoBackView = getChildAt(1); mEdgeTrackerView = getChildAt(2); }}
1
2
3
4
5
6
7
8
9
10
11
12
13
14
15
16
17
18
19
20
21
22
23
24
25
26
27
28
29
30
31
32
33
34
35
36
37
38
39
40
41
42
43
44
45
46
47
48
49
50
51
52
53
54
55
56
57
58
59
60
61
62
63
64
65
66
67
68
69
70
71
72
73
74
75
76
77
78
79
80
81
82
83
84
85
86
87
88
89
90
91
92
93
94
95
96
97
98
99
100
101
102
103
104
105
106
107
108
109
110
111
112
113
布局文件我们仅仅是换了下文本和背景色就不重复贴了。
第一个View基本没做任何修改。
第二个View,我们在onLayout之后保存了最开启的位置信息,最主要还是重写了Callback中的onViewReleased,我们在onViewReleased中判断如果是mAutoBackView则调用settleCapturedViewAt回到初始的位置。大家可以看到紧随其后的代码是invalidate();因为其内部使用的是mScroller.startScroll,所以别忘了需要invalidate()以及结合computeScroll方法一起。
第三个View,我们在onEdgeDragStarted回调方法中,主动通过captureChildView对其进行捕获,该方法可以绕过tryCaptureView,所以我们的tryCaptureView虽然并为返回true,但却不影响。注意如果需要使用边界检测需要添加上mDragger.setEdgeTrackingEnabled(ViewDragHelper.EDGE_LEFT);。
到此,我们已经介绍了Callback中常用的回调方法了,当然还有一些方法没有介绍,接下来我们修改下我们的布局文件,我们把我们的TextView全部加上clickable=true,意思就是子View可以消耗事件。再次运行,你会发现本来可以拖动的View不动了,(如果有拿Button测试的兄弟应该已经发现这个问题了,我希望你看到这了,而不是已经提问了,哈~)。
原因是什么呢?主要是因为,如果子View不消耗事件,那么整个手势(DOWN-MOVE*-UP)都是直接进入onTouchEvent,在onTouchEvent的DOWN的时候就确定了captureView。如果消耗事件,那么就会先走onInterceptTouchEvent方法,判断是否可以捕获,而在判断的过程中会去判断另外两个回调的方法:getViewHorizontalDragRange和getViewVerticalDragRange,只有这两个方法返回大于0的值才能正常的捕获。
所以,如果你用Button测试,或者给TextView添加了clickable = true ,都记得重写下面这两个方法:
@OverridepublicintgetViewHorizontalDragRange(View child){returngetMeasuredWidth()-child.getMeasuredWidth();}@OverridepublicintgetViewVerticalDragRange(View child){returngetMeasuredHeight()-child.getMeasuredHeight();}
1
2
3
4
5
6
7
8
9
10
11
1
2
3
4
5
6
7
8
9
10
11
方法的返回值应当是该childView横向或者纵向的移动的范围,当前如果只需要一个方向移动,可以只复写一个。
到此,我们列一下所有的Callback方法,看看还有哪些没用过的:
onViewDragStateChanged
当ViewDragHelper状态发生变化时回调(IDLE,DRAGGING,SETTING[自动滚动时])
onViewPositionChanged
当captureview的位置发生改变时回调
onViewCaptured
当captureview被捕获时回调
onViewReleased 已用
onEdgeTouched
当触摸到边界时回调。
onEdgeLock
true的时候会锁住当前的边界,false则unLock。
onEdgeDragStarted 已用
getOrderedChildIndex
改变同一个坐标(x,y)去寻找captureView位置的方法。(具体在:findTopChildUnder方法中)
getViewHorizontalDragRange 已用
getViewVerticalDragRange 已用
tryCaptureView 已用
clampViewPositionHorizontal 已用
clampViewPositionVertical 已用
ok,至此所有的回调方法都有了一定的认识。
总结下,方法的大致的回调顺序:
shouldInterceptTouchEvent:
DOWN:
getOrderedChildIndex(findTopChildUnder)
->onEdgeTouched
MOVE:
getOrderedChildIndex(findTopChildUnder)
->getViewHorizontalDragRange &
getViewVerticalDragRange(checkTouchSlop)(MOVE中可能不止一次)
->clampViewPositionHorizontal&
clampViewPositionVertical
->onEdgeDragStarted
->tryCaptureView
->onViewCaptured
->onViewDragStateChanged
processTouchEvent:
DOWN:
getOrderedChildIndex(findTopChildUnder)
->tryCaptureView
->onViewCaptured
->onViewDragStateChanged
->onEdgeTouched
MOVE:
->STATE==DRAGGING:dragTo
->STATE!=DRAGGING:
onEdgeDragStarted
->getOrderedChildIndex(findTopChildUnder)
->getViewHorizontalDragRange&
getViewVerticalDragRange(checkTouchSlop)
->tryCaptureView
->onViewCaptured
->onViewDragStateChanged
1
2
3
4
5
6
7
8
9
10
11
12
13
14
15
16
17
18
19
20
21
22
23
24
25
26
27
28
29
30
31
32
33
34
35
36
1
2
3
4
5
6
7
8
9
10
11
12
13
14
15
16
17
18
19
20
21
22
23
24
25
26
27
28
29
30
31
32
33
34
35
36
ok,上述是正常情况下大致的流程,当然整个过程可能会存在很多判断不成立的情况。
从上面也可以解释,我们在之前TextView(clickable=false)的情况下,没有编写getViewHorizontalDragRange方法时,是可以移动的。因为直接进入processTouchEvent的DOWN,然后就onViewCaptured、onViewDragStateChanged(进入DRAGGING状态),接下来MOVE就直接dragTo了。
而当子View消耗事件的时候,就需要走shouldInterceptTouchEvent,MOVE的时候经过一系列的判断(getViewHorizontalDragRange,clampViewPositionVertical等),才能够去tryCaptureView。
ok,到此ViewDragHelper的入门用法我们就介绍结束了,下一篇,我们将使用ViewDragHelper去自己实现一个DrawerLayout。
有兴趣的也可以根据本文,以及DrawerLayout的源码去实现了~
参考链接
http://flavienlaurent.com/blog/2013/08/28/each-navigation-drawer-hides-a-viewdraghelper/
http://blog.denevell.org/android-viewdraghelper-example-tutorial.html
~~have a nice day ~~
源码点击下载

