转载请注明文章出处LooperJing!
Android的消息机制我觉得是每一个弄Android开发的人都要弄懂得问题,也有很多人对它进行研究,Android的消息机制的重要性不强调,但是觉得自己对Android的消息机制了解不深刻,所以决定深入源码,写下三篇博客以记之。因为Message全局池和ThreadLocal对Android的消息机制理解很重要,附上前两篇的博客地址。
Android源码解析Handler系列第(一)篇 --- Message全局池
Android源码解析Handler系列第(二)篇 --- ThreadLocal详解
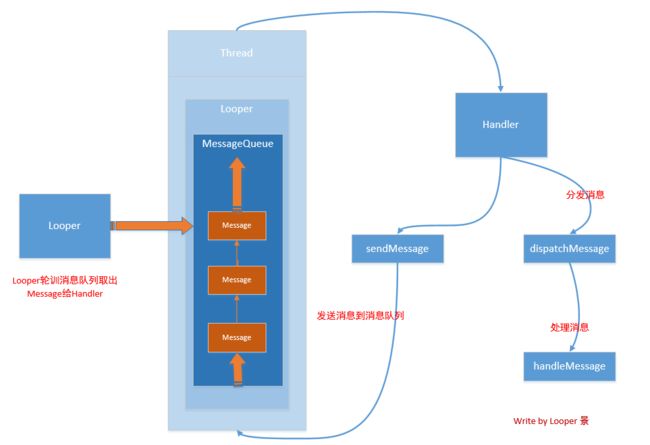
先来一张图感受一下,下面这张图基本说明了Android的消息机制的工作流程。
不看别的,主要涉及的类有Thread,Looper,MessageQueue,Handler,其实还有一个ThreadLocal,这些类都是整套消息机制中很关键的类,下面我们正式分析这套机制是怎么运行的。
要分析这套机制是怎么运行的,要首先从应用程序的入口说起,Android应用程序的入口是ActivityThread类的main方法。下面是main方法中的相关代码。
 public static void main(String[] args) {


        Process.setArgV0("");

        //创建UI线程所需要的Looper,Looper有何用,后面再说
        Looper.prepareMainLooper();

        //这里最终启动应用程序
        ActivityThread thread = new ActivityThread();
        thread.attach(false);

        if (sMainThreadHandler == null) {
            sMainThreadHandler = thread.getHandler();
        }

        if (false) {
            Looper.myLooper().setMessageLogging(new
                    LogPrinter(Log.DEBUG, "ActivityThread"));
        }
        //执行消息循环
        Looper.loop();

        throw new RuntimeException("Main thread loop unexpectedly exited");
    }
注意到,入口函数的最后一行代码是Looper调用了静态方法Looper. loop(),而这个loop是死循环,按照正常的理解,在主线程中执行死循环,那么就不能做其他任务了,比如按钮事件的触发,动画的播放等。但是反过来想一想,如果这不是死循环,那么最后一行代码执行完,应用程序不就跑完了嘛。并且这行代码也只能放在main的最后一句,如果放在前面,后面的程序就没有办法进行了。
好滴, Looper.loop()是执行消息循环,去这里看个究竟。
/**
   * Run the message queue in this thread. Be sure to call
   * {@link #quit()} to end the loop.
   */
  public static void loop() {
      final Looper me = myLooper();
      if (me == null) {
          throw new RuntimeException("No Looper; Looper.prepare() wasn't called on this thread.");
      }
      final MessageQueue queue = me.mQueue;

      // Make sure the identity of this thread is that of the local process,
      // and keep track of what that identity token actually is.
      Binder.clearCallingIdentity();
      final long ident = Binder.clearCallingIdentity();

      for (;;) {
          Message msg = queue.next(); // might block
          if (msg == null) {
              // No message indicates that the message queue is quitting.
              return;
          }

          // This must be in a local variable, in case a UI event sets the logger
          Printer logging = me.mLogging;
          if (logging != null) {
              logging.println(">>>>> Dispatching to " + msg.target + " " +
                      msg.callback + ": " + msg.what);
          }

          msg.target.dispatchMessage(msg);

          if (logging != null) {
              logging.println("<<<<< Finished to " + msg.target + " " + msg.callback);
          }

          // Make sure that during the course of dispatching the
          // identity of the thread wasn't corrupted.
          final long newIdent = Binder.clearCallingIdentity();
          if (ident != newIdent) {
              Log.wtf(TAG, "Thread identity changed from 0x"
                      + Long.toHexString(ident) + " to 0x"
                      + Long.toHexString(newIdent) + " while dispatching to "
                      + msg.target.getClass().getName() + " "
                      + msg.callback + " what=" + msg.what);
          }

          msg.recycleUnchecked();
      }
  }
代码比较长,但是真的比较容易理解的,第一句执行final Looper me = myLooper()获取一个Looper对象,怎么获取的呢?在myLooper中涉及到了ThreadLocal,对ThreadLocal不了解的,看我的第二篇博客。
  /**
     * Return the Looper object associated with the current thread.  Returns
     * null if the calling thread is not associated with a Looper.
     */
    public static @Nullable Looper myLooper() {
        return sThreadLocal.get();
    }
如果sThreadLocal.get()返回了NULl,那么程序就会 throw new RuntimeException("No Looper; Looper.prepare() wasn't called on this thread."); ,尼玛,如果主线程在这都抛了异常,那还玩毛线,所以必然有sThreadLocal.set()。回到刚才,在执行消息循环Looper.loop之前,有一句关键的代码, Looper.prepareMainLooper(),这句话可以创建UI线程所需要的Looper,跟踪进去。
 public static void prepareMainLooper() {
        //代码在下面
        prepare(false);
        synchronized (Looper.class) {
            if (sMainLooper != null) {
                throw new IllegalStateException("The main Looper has already been prepared.");
            }
          //从sThreadLocal中获取Looper,系统默认给我们创建了sMainLooper
            sMainLooper = myLooper();
        }
    }
  private static void prepare(boolean quitAllowed) {
        if (sThreadLocal.get() != null) {
            throw new RuntimeException("Only one Looper may be created per thread");
        }
        sThreadLocal.set(new Looper(quitAllowed));
    }
在sThreadLocal.get() 为NULL的情况下,直接以饿汉式的方式new了一个Looper, 调用sThreadLocal的set方法,这一步,通过sThreadLocal,其实是将Looper与当前线程(UI线程)做了关联, 也就是说上面创建的Looper对象me只能被主线程所访问,其他线程访问不了!!!,这就是ThreadLocal的厉害之处。Looper我们称之是消息循环器,就是不断的把消息从消息队列中取出来,看一个创建Looper干了什么。
private Looper(boolean quitAllowed) {
        mQueue = new MessageQueue(quitAllowed);
        mThread = Thread.currentThread();
    }
主要是初始化了一个消息队列,原来消息队列是Looper里面的成员,记住了!!!,还保留了当前线程,有了mThread,我们就可以知道这个Looper是哪一个线程的Looper。Looper的成员非常少,就几个,看下面。
    // sThreadLocal.get() will return null unless you've called prepare().
     static final ThreadLocal sThreadLocal = new ThreadLocal();

     private static Looper sMainLooper;  // guarded by Looper.class

     final MessageQueue mQueue;

     final Thread mThread;
OK,在ActivityThread中的Looper.loop()这个死循环启动之前,需要执行 Looper.prepareMainLooper(),这个方法执行以后,我们知道发生了以下几件事情。
- 1、以饿汉式的方式创建了主线程的Looper对象
- 2、用sThreadLocal将主线程与这个Looper对象关联起来
- 3、sThreadLocal.get一个Looper对象,赋值给sMainLooper。
继续看Looper.loop()里面,第二句关键代码是final MessageQueue queue = me.mQueue;即获取Looper中的消息队列,之后是一个死循环,对消息队列里面的消息进行遍历,在这里我们先留一个问题 消息是怎么存到消息队列里面去的?
 for (;;) {
            Message msg = queue.next(); // might block
            if (msg == null) {
                // No message indicates that the message queue is quitting.
                return;
            }

            msg.target.dispatchMessage(msg);

            msg.recycleUnchecked();
        }
在这个死循环中遍历,通过queue.next()取出消息。
  Message next() {

        for (;;) {

            //这句代码水比较深,先跳过
            nativePollOnce(ptr, nextPollTimeoutMillis);

            synchronized (this) {
                // Try to retrieve the next message.  Return if found.
                final long now = SystemClock.uptimeMillis();
                Message prevMsg = null;
                Message msg = mMessages;
                if (msg != null && msg.target == null) {
                    // Stalled by a barrier.  Find the next asynchronous message in the queue.
                    do {
                        prevMsg = msg;
                        msg = msg.next;
                    } while (msg != null && !msg.isAsynchronous());
                }
                if (msg != null) {
                    if (now < msg.when) {
                        // Next message is not ready.  Set a timeout to wake up when it is ready.
                        nextPollTimeoutMillis = (int) Math.min(msg.when - now, Integer.MAX_VALUE);
                    } else {
                        // Got a message.
                        mBlocked = false;
                        if (prevMsg != null) {
                            prevMsg.next = msg.next;
                        } else {
                            mMessages = msg.next;
                        }
                        msg.next = null;
                        if (DEBUG) Log.v(TAG, "Returning message: " + msg);
                        msg.markInUse();
                        return msg;
                    }
                } else {
                    // No more messages.
                    nextPollTimeoutMillis = -1;
                }

            }
        }
    }
在同步synchronized中,这一大段代码也就是写消息何时出队列的事情。
if (now < msg.when) {
         // Next message is not ready.  Set a timeout to wake up when it is ready.
            nextPollTimeoutMillis = (int) Math.min(msg.when - now, Integer.MAX_VALUE);
        }
nextPollTimeoutMillis表示消息出队列的时间,如果现在的时间now比Message要执行的时间msg.when要小,就减去现在的时间,计算一个新的时间给nextPollTimeoutMillis。如果消息的执行时间已经到了,那么就取出这个消息返回并调用msg.markInUse(),把消息的状态赋值为使用之中。
OK,在上面那个for循环中,消息是取到之后,就要进行消息的分发了,消息的分发也是有一套顺序的。调用 msg.target.dispatchMessage(msg),进行消息的分发,不知道target是什么的(是Handler对象,标识这个消息被谁处理),去看我的第一篇博客。
    /**
     * Handle system messages here.
     */
    public void dispatchMessage(Message msg) {
        if (msg.callback != null) {
            handleCallback(msg);
        } else {
            if (mCallback != null) {
                if (mCallback.handleMessage(msg)) {
                    return;
                }
            }
            handleMessage(msg);
        }
    }
这里具体可以看我第一篇博客中****Message的处理顺序****章节,可以知道Message是怎么进行分发的,从消息的分发可以看到,如果没有Runnable的类型的消息callback以及没有Callback类型的回调mCallback,那么就会回调Handler的handleMessge。
   private Handler  handler=new Handler(){
        @Override
        public void handleMessage(Message msg) {
           dosomething();
        }
    };
上面试我们常常写的代码,走到这,相信你已经知道我们常写的那个套路是怎么来的了。在Looper.looper中还有最后一句代码 msg.recycleUnchecked();这个就不用讲了,主要做消息的回收操作,这里消息会进入消息的全局池中。
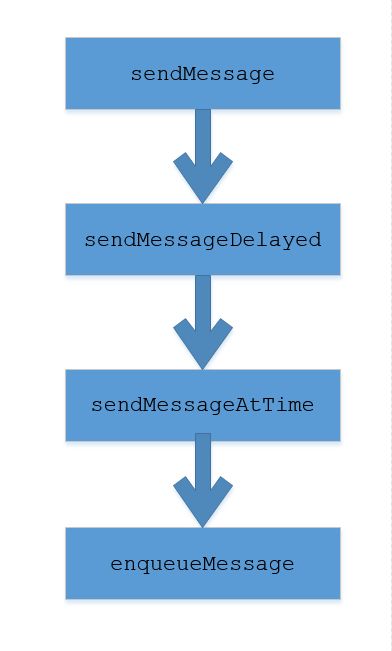
上面留下了一个问题****消息是怎么存到消息队列里面去的?****现在来分析分析,这个从我们发送消息(handler.sendMessage())来入手,经过查看源码,sendMessage中会掉一系列方法,最终走到enqueueMessage中。如下图。
对于enqueueMessage中代码就不分析了,现在我们知道消息是怎么进入消息队列的,又是怎么被Looper给取走,交给Handler去处理的了,整个消息机制基本就弄清楚了。其实,严格来说,消息可以分为系统消息和我们自定义的消息,自定义的消息就是发送一个Message,然后在handlerMessage中进行处理,那么系统的消息呢,比如四大组件的生命周期回掉是系统消息,跨进程通信也是系统消息,应用程序退出还是一个系统消息。这些消息在哪里?谁来处理呢?在ActivityThread中有一个成员final H mH = new H();这个mH就是来处理系统消息的。
 private class H extends Handler {
        public static final int LAUNCH_ACTIVITY         = 100;
        //...
        public static final int ENTER_ANIMATION_COMPLETE = 149;

        String codeToString(int code) {
            if (DEBUG_MESSAGES) {
                switch (code) {
                    case LAUNCH_ACTIVITY: return "LAUNCH_ACTIVITY";
                      //...
                    case ENTER_ANIMATION_COMPLETE: return "ENTER_ANIMATION_COMPLETE";
                }
            }
            return Integer.toString(code);
        }
        public void handleMessage(Message msg) {
            if (DEBUG_MESSAGES) Slog.v(TAG, ">>> handling: " + codeToString(msg.what));
            switch (msg.what) {
                  //...
                case LAUNCH_ACTIVITY: {
                    Trace.traceBegin(Trace.TRACE_TAG_ACTIVITY_MANAGER, "activityStart");
                    final ActivityClientRecord r = (ActivityClientRecord) msg.obj;

                    r.packageInfo = getPackageInfoNoCheck(
                            r.activityInfo.applicationInfo, r.compatInfo);
                    handleLaunchActivity(r, null);
                    Trace.traceEnd(Trace.TRACE_TAG_ACTIVITY_MANAGER);
                } break;

                case PAUSE_ACTIVITY:
                    Trace.traceBegin(Trace.TRACE_TAG_ACTIVITY_MANAGER, "activityPause");
                    handlePauseActivity((IBinder)msg.obj, false, (msg.arg1&1) != 0, msg.arg2,
                            (msg.arg1&2) != 0);
                    maybeSnapshot();
                    Trace.traceEnd(Trace.TRACE_TAG_ACTIVITY_MANAGER);
                    break;
                case PAUSE_ACTIVITY_FINISHING:
                    Trace.traceBegin(Trace.TRACE_TAG_ACTIVITY_MANAGER, "activityPause");
                    handlePauseActivity((IBinder)msg.obj, true, (msg.arg1&1) != 0, msg.arg2,
                            (msg.arg1&1) != 0);
                    Trace.traceEnd(Trace.TRACE_TAG_ACTIVITY_MANAGER);
                    break;

                case HIDE_WINDOW:
                    Trace.traceBegin(Trace.TRACE_TAG_ACTIVITY_MANAGER, "activityHideWindow");
                    handleWindowVisibility((IBinder)msg.obj, false);
                    Trace.traceEnd(Trace.TRACE_TAG_ACTIVITY_MANAGER);
                    break;
                case RESUME_ACTIVITY:
                    Trace.traceBegin(Trace.TRACE_TAG_ACTIVITY_MANAGER, "activityResume");
                    handleResumeActivity((IBinder) msg.obj, true, msg.arg1 != 0, true);
                    Trace.traceEnd(Trace.TRACE_TAG_ACTIVITY_MANAGER);
                    break;

                case DESTROY_ACTIVITY:
                    Trace.traceBegin(Trace.TRACE_TAG_ACTIVITY_MANAGER, "activityDestroy");
                    handleDestroyActivity((IBinder)msg.obj, msg.arg1 != 0,
                            msg.arg2, false);
                    Trace.traceEnd(Trace.TRACE_TAG_ACTIVITY_MANAGER);
                    break;
                case CREATE_SERVICE:
                    Trace.traceBegin(Trace.TRACE_TAG_ACTIVITY_MANAGER, "serviceCreate");
                    handleCreateService((CreateServiceData)msg.obj);
                    Trace.traceEnd(Trace.TRACE_TAG_ACTIVITY_MANAGER);
                    break;
                case BIND_SERVICE:
                    Trace.traceBegin(Trace.TRACE_TAG_ACTIVITY_MANAGER, "serviceBind");
                    handleBindService((BindServiceData)msg.obj);
                    Trace.traceEnd(Trace.TRACE_TAG_ACTIVITY_MANAGER);
                    break;
                case UNBIND_SERVICE:
                    Trace.traceBegin(Trace.TRACE_TAG_ACTIVITY_MANAGER, "serviceUnbind");
                    handleUnbindService((BindServiceData)msg.obj);
                    Trace.traceEnd(Trace.TRACE_TAG_ACTIVITY_MANAGER);
                    break;
                case SERVICE_ARGS:
                    Trace.traceBegin(Trace.TRACE_TAG_ACTIVITY_MANAGER, "serviceStart");
                    handleServiceArgs((ServiceArgsData)msg.obj);
                    Trace.traceEnd(Trace.TRACE_TAG_ACTIVITY_MANAGER);
                    break;
                case STOP_SERVICE:
                    Trace.traceBegin(Trace.TRACE_TAG_ACTIVITY_MANAGER, "serviceStop");
                    handleStopService((IBinder)msg.obj);
                    maybeSnapshot();
                    Trace.traceEnd(Trace.TRACE_TAG_ACTIVITY_MANAGER);
                    break;

                case SUICIDE:
                    Process.killProcess(Process.myPid());
                    break;
              //...
            }
            if (DEBUG_MESSAGES) Slog.v(TAG, "<<< done: " + codeToString(msg.what));
        }
    }
看到了吧,如果要退出应用程序,需要发送一个SUICIDE消息,绑定服务需要发送一个BIND_SERVICE消息等等。
最后总结一个Android消息机制涉及到的类以及类的重要方法,在整个机制中它们扮演着不同的角色也承担着各自的不同责任。
Thread
负责业务逻辑的实施。
线程中的操作是由各自的业务逻辑所决定的,视具体情况进行。Handler
负责发送消息和处理消息。
通常的做法是在主线程中建立Handler并利用它在子线程中向主线程发送消息,在主线程接收到消息后会对其进行处理MessageQueue
负责保存消息。
Handler发出的消息均会被保存到消息队列MessageQueue中,系统会根据Message距离触发时间的长短决定该消息在队列中位置。在队列中的消息会依次出队得到相应的处理。Looper
负责轮询消息队列。
Looper使用其loop()方法一直轮询消息队列,并在消息出队时将其派发至对应的Handler.ThreadLocal
将线程和Looper相关联
Please accept mybest wishes for your happiness and success
参考资料:http://blog.csdn.net/lfdfhl/article/details/53332936

