本项目git: https://github.com/razerdp/ZoomViewActivity
【上篇】一起撸个微信图片浏览的BaseActivity吧(上)——初步思考与基础结构
因为在朋友圈项目讲解过该过渡动画实现的原理,因此这里不再详述,如果想了解原理,请点击一起撸个朋友圈吧 - 图片浏览(中)【图片浏览器】
【Step 1】缩放比例
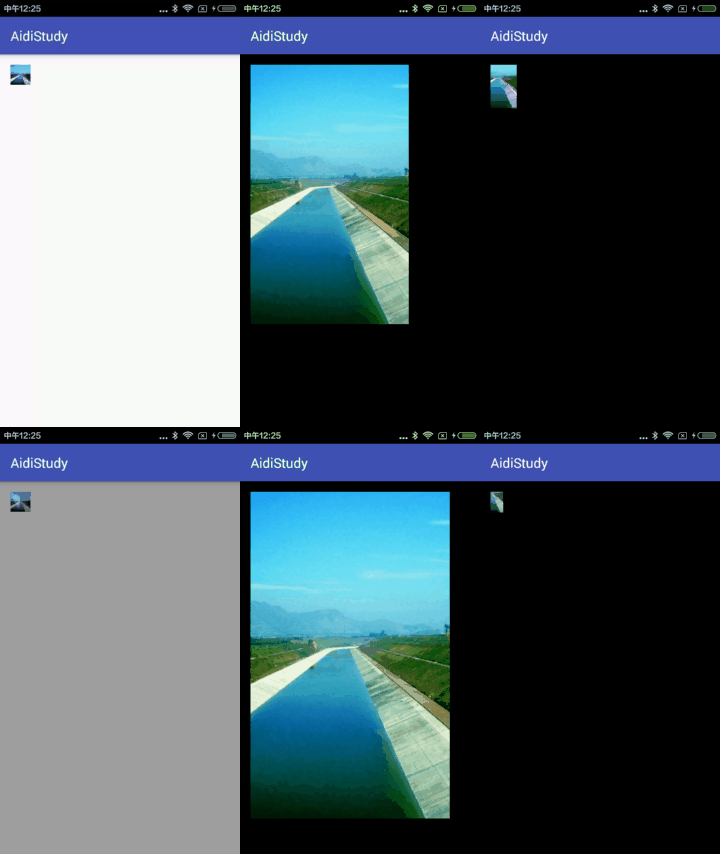
在本项目中,跟原来的方案有所不同的是关于放大比率的计算。原来的项目里采用的是官方的代码,官方的代码是只有一个比例的,因此需要对图片的比例有一个事先的了解,否则无法做到比较自然的缩放过渡,往往会出现宽或者高只有一边可以回归到原来的大小的情况。
比如下面这种情况(请忽略aidlstudy..这个项目是昨天研究aidl时忽然来感的):
因此我们的比例计算不使用官方的,而是我们自行计算宽高比例。
private float[] calculateRatios(Rect startBounds, Rect finalBounds) {
        //startBounds:点击的View的绘制区域(小图)
        //finalBounds:最终展示的View的绘制区域(大图)
        float[] result = new float[2];
        float widthRatio = startBounds.width() * 1.0f / finalBounds.width() * 1.0f;
        float heightRatio = startBounds.height() * 1.0f / finalBounds.height() * 1.0f;
        result[0] = widthRatio;
        result[1] = heightRatio;
        return result;
    }
这样我们的宽和高都有自己的缩放比例,才能完美的回归到小图的大小。
【Step 2】最终大图的绘制区域
前文我们说过,在onPreDrawListener里面实现大图的属性获取,但在此之前,我们需要对前一个Activity传过来的数据进行校验,今儿判断是否需要动画效果。
在上一篇文章我们说过,打开Activity的方法需要使用固定的规则,在上一篇文章我们定义了这么一个静态方法:
 public static void startWithScaleElementActivity(Activity from,
                                                     @Nullable String picUrl,
                                                     @Nullable Rect fromRect,
                                                     Class clazz) {
        Intent intent = new Intent(from, clazz);
        intent.putExtra("url", picUrl);
        intent.putExtra("fromRect", fromRect);
        from.startActivity(intent);
        //禁用过渡动画
        from.overridePendingTransition(0, 0);
    }
传过来的数据很简单,一个是小图的绘制区域,一个是图片的地址,假如这两者任一为空,就没有必要做动画展示了,或者说甚至不需要打开这个Activity了,当然,这个容错如何处理我们都可以设计,并不是说一定要怎样。
因此,在onCreate和setContentView里面,我们进行数据的校验和View的初始化:
    protected V targetScaleAnimaedImageView;
    private String picUrl;
    private boolean needAnima;
    private AnimatorSet currentAnimator;
    private Point globalOffset;

    private Rect startRect;
    private Rect endRect;

    @Override protected void onCreate(@Nullable Bundle savedInstanceState) {
        super.onCreate(savedInstanceState);
        initData();
    }

    @Override public void setContentView(@LayoutRes int layoutResID) {
        super.setContentView(layoutResID);
        initImageView();
    }
其中initData()和initImageView()如下
 private void initData() {
        picUrl = getIntent().getStringExtra("url");
        startRect = getIntent().getParcelableExtra("fromRect");
        needAnima = startRect != null && !TextUtils.isEmpty(picUrl);
        if (needAnima) {
            endRect = new Rect();
            globalOffset = new Point();
        }
    }

    private void initImageView() {
        targetScaleAnimaedImageView = getAnimaedImageView();
        needAnima = (needAnima && targetScaleAnimaedImageView != null);
        if (needAnima) {
            targetScaleAnimaedImageView.getViewTreeObserver().addOnPreDrawListener(new ViewTreeObserver.OnPreDrawListener() {
                @Override public boolean onPreDraw() {
                    //此时目标已经有了宽高信息
                    targetScaleAnimaedImageView.getGlobalVisibleRect(endRect, globalOffset);
                    playEnterAnima();
                    targetScaleAnimaedImageView.getViewTreeObserver().removeOnPreDrawListener(this);
                    return true;
                }
            });
            //这里实现点击退出,暂时测试用,实际上可以暴露给子类来决定退出时机
            targetScaleAnimaedImageView.setOnClickListener(new View.OnClickListener() {
                @Override public void onClick(View v) {
                    playExitAnima();
                }
            });
        }
    }
在onPreDrawListener里面,获取了最终展示的区域之后,就可以开始播放动画了,动画的播放跟朋友圈项目基本一致,就不再详细描述了。
private void playEnterAnima() {
        if (currentAnimator != null) {
            currentAnimator.cancel();
        }
        onLoadingPicture(imageViewTarget, picUrl);

        startRect.offset(-globalOffset.x, -globalOffset.y);
        endRect.offset(-globalOffset.x, -globalOffset.y);

        float[] ratios = calculateRatios(startRect, endRect);

        targetScaleAnimaedImageView.setPivotX(0.5f);
        targetScaleAnimaedImageView.setPivotY(0.5f);
        final AnimatorSet enter = new AnimatorSet();
        enter.play(ObjectAnimator.ofFloat(targetScaleAnimaedImageView, View.X, startRect.left, endRect.left))
             .with(ObjectAnimator.ofFloat(targetScaleAnimaedImageView, View.Y, startRect.top, endRect.top))
             .with(ObjectAnimator.ofFloat(targetScaleAnimaedImageView, View.SCALE_X, ratios[0], 1f))
             .with(ObjectAnimator.ofFloat(targetScaleAnimaedImageView, View.SCALE_Y, ratios[1], 1f));

        enter.setDuration(400);
        enter.setInterpolator(new DecelerateInterpolator());
        enter.addListener(new Animator.AnimatorListener() {
            @Override
            public void onAnimationStart(Animator animation) {
                currentAnimator = enter;
            }

            @Override
            public void onAnimationEnd(Animator animation) {
                currentAnimator = null;
            }

            @Override
            public void onAnimationCancel(Animator animation) {
                currentAnimator = null;
            }

            @Override
            public void onAnimationRepeat(Animator animation) {

            }
        });
        enter.start();
    }
退出动画也一样
  private void playExitAnima() {
        if (currentAnimator != null) {
            currentAnimator.cancel();
        }

        float[] ratios = calculateRatios(startRect, endRect);

        Log.i("startRect", "exit after offset:  >>>   " + startRect.toString());
        Log.d("endtRect", "exit after offset:  >>>   " + endRect.toString());

        targetScaleAnimaedImageView.setPivotX(0.5f);
        targetScaleAnimaedImageView.setPivotY(0.5f);
        final AnimatorSet exit = new AnimatorSet();

        exit.play(ObjectAnimator.ofFloat(targetScaleAnimaedImageView, View.X, startRect.left))
            .with(ObjectAnimator.ofFloat(targetScaleAnimaedImageView, View.Y, startRect.top))
            .with(ObjectAnimator.ofFloat(targetScaleAnimaedImageView, View.SCALE_X, ratios[0]))
            .with(ObjectAnimator.ofFloat(targetScaleAnimaedImageView, View.SCALE_Y, ratios[1]));

        exit.setDuration(400);
        exit.setInterpolator(new DecelerateInterpolator());
        exit.addListener(new Animator.AnimatorListener() {
            @Override
            public void onAnimationStart(Animator animation) {
                currentAnimator = exit;
            }

            @Override
            public void onAnimationEnd(Animator animation) {
                currentAnimator = null;
                finish();
            }

            @Override
            public void onAnimationCancel(Animator animation) {
                currentAnimator = null;
            }

            @Override
            public void onAnimationRepeat(Animator animation) {

            }
        });
        exit.start();
    }
此时我们得到如下的效果图:
初步的动画雏形是有了,但似乎有些什么地方不太对。。。。orz
细心的看,不难发现,我们的图片并没有回归到小图的大小,所以我们要在这里进行一下问题的修复。
【Step 3】图片回归的问题修复
从上面的代码,我们不难看到,我们一直都是针对View来做动画的,而我们的ImageView实际上是填充整个屏幕的,但图片却未必。当然,也可以使用scaleType,但强行缩放的话这明显不符合我们的要求,所以我们还是得从View入手。
给ImageView加上背景色,我们来看看放大后和缩小后的View的位置和大小。
图片放大之后:
图片缩小后:
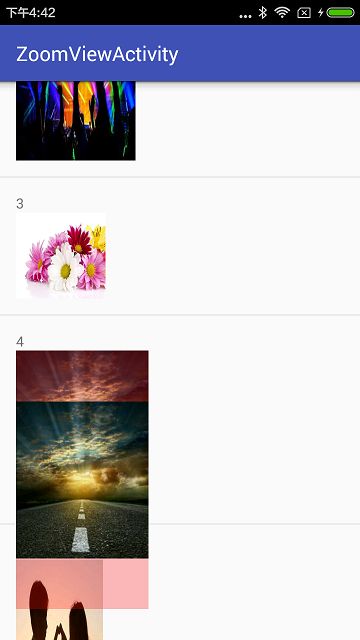
为了效果更明显,我将Activity颜色设置为半透明并且给ImageView设置了半透明。
从图中我们不难看出,对于ImageView来说,我们的比例是正好对上的,也就是算法其实是没有问题,但问题在于ImageView的图片并非填充整个ImageView,因此即使ImageView能够正确缩放,但对于图片来说,并不能实现位置的对正。
因此我们的解决方案很简单,就是要拿到ImageView的Bitmap的绘制区域。
对于BitMap的绘制区域,系统的API并没有直接的方法,因此我们需要自己手动计算,于是我们就需要这两个对象:
- Drawable的bounds(即图片的边界)
- ImageMatrix,即图片的矩阵
对于(Image)Matrix,我们都知道它是一个3x3的矩阵,表现在一维数组上就是float[9],各部分的信息大致可以理解如下:
(x方向)[缩放,错切,位移]
(y方向)[错切,缩放,位移]
(z方向)[透视,透视,透视]【事实上,对于第三行这里并没有一个很好的解释,至今也不太清楚,如果您有相关资料,望告知】
不管如何,从上面的简图我们知道,对于图片来说,它的位置信息和缩放信息处于这个float[]的0\2\3\5中
当然,我们并不需要记下这些位置,因为Matrix里面就有这些位置的静态变量。
有了这两个东东,我们接下来的逻辑就很简单了:
- 通过Drawable的bounds拿到Bitmap在ImageView里面的rect
- 通过ImageMatrix拿到Bitmap在ImageView里面的四个角的位置
因此我们建立一个类来维护这个数据:
public class ImageRect {
    private RectF rect;

    public ImageRect(ImageView imageview) {
        rect = new RectF();
        if (imageview != null) {
            //得到drawable的边界
            Rect drawableRect = imageview.getDrawable().getBounds();
            //得到图片的矩阵
            Matrix imgMatrix = imageview.getImageMatrix();
            float[] matrixValues = new float[9];
            imgMatrix.getValues(matrixValues);
            //图片的左边界(相对于imageview)
            rect.left = matrixValues[Matrix.MTRANS_X];
            //图片的顶边界(相对于imageview)
            rect.top = matrixValues[Matrix.MTRANS_Y];
            //图片的右边界(相对于imageview),计算方法:左边界+图片宽*X方向的缩放
            rect.right = rect.left + drawableRect.width() * matrixValues[Matrix.MSCALE_X];
            //图片的右边界(相对于imageview),计算方法:上边界+图片高*Y方向的缩放
            rect.bottom = rect.top + drawableRect.height() * matrixValues[Matrix.MSCALE_Y];
        }
    }

    public RectF getImageRect() {
        return rect;
    }
}
这样最后拿到的rect就是我们图片在imageview里面的绘制区域(包含位置)。
在图片加载完毕后,我们只需要对最终绘制区域进行更新就可以了,因为本项目使用的是Glide,因此直接使用Glide的target:
  private SimpleTarget imageViewTarget = new SimpleTarget() {
        @Override public void onResourceReady(GlideDrawable resource, GlideAnimation glideAnimation) {
            if (resource instanceof GlideBitmapDrawable) {
                targetScaleAnimaedImageView.setImageBitmap(((GlideBitmapDrawable) resource).getBitmap());
                ImageRect imageRect = new ImageRect(targetScaleAnimaedImageView);
                RectF rect = imageRect.getImageRect();
                //因为endRect会在退出动画时进行计算,因此这里需要将endRect由view的rect转换为图片的rect才能保证按照图片的大小来缩放而非view的大小
                endRect.set((int) rect.left, (int) rect.top, (int) rect.right, (int) rect.bottom);

                Log.d("imgrect", rect.toShortString());
            }
        }
    };
【Step 4】缩小后位移的校正
当我们以为这样校正之后就可以顺利达到我们的目的,结果还是too young....其实我们只完成了一半,不多说,直接上预览图:
哎,哥,这跟我们的设想不对啊。。。。。
从图中我们看到,图片的缩放已经是正确的,但是。。。。但是这位置不太对啊哥- -
为了解决这个问题,我们不妨回到退出动画的代码
  exit.play(ObjectAnimator.ofFloat(targetScaleAnimaedImageView, View.X, startRect.left))
            .with(ObjectAnimator.ofFloat(targetScaleAnimaedImageView, View.Y, startRect.top))
            .with(ObjectAnimator.ofFloat(targetScaleAnimaedImageView, View.SCALE_X, ratios[0]))
            .with(ObjectAnimator.ofFloat(targetScaleAnimaedImageView, View.SCALE_Y, ratios[1]));
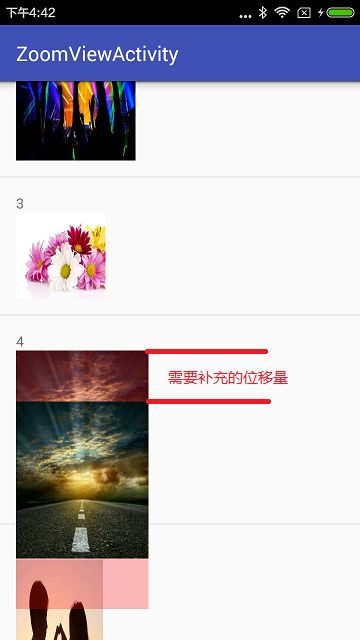
在退出动画里,我们可以看到核心的几个参数:x,y的位移和缩放,在上面的代码中,我们已经解决了缩放问题,但是并没有解决位移问题,可以看到,我们目前依然是View的位移,但缩放是图片的缩放。
所以我们需要进行位置的校准。
从图中我们知道,在缩放之后,我们需要将缩小的View上移一部分。解析如下:
那么这个解析要怎么计算呢?其实很简单,还记得我们已经得到了图片相对于imageview的绘制区域么,我们只需要将它的位置乘以计算好的缩放比例就可以了。
因此我们的退出动画补充以下几行:
 private void playExitAnima() {
        if (currentAnimator != null) {
            currentAnimator.cancel();
        }

        float[] ratios = calculateRatios(startRect, endRect);

        //垂直方向的位移
        int deltaHeight = (int) (endRect.top * ratios[1]);
        //水平方向的位移
        int deltaWidth = (int) (endRect.left * ratios[0]);
        targetScaleAnimaedImageView.setPivotX(0.5f);
        targetScaleAnimaedImageView.setPivotY(0.5f);
        final AnimatorSet exit = new AnimatorSet();

        //位移补充
        exit.play(ObjectAnimator.ofFloat(targetScaleAnimaedImageView, View.X, startRect.left - deltaWidth))
            .with(ObjectAnimator.ofFloat(targetScaleAnimaedImageView, View.Y, startRect.top - deltaHeight))
            .with(ObjectAnimator.ofFloat(targetScaleAnimaedImageView, View.SCALE_X, ratios[0]))
            .with(ObjectAnimator.ofFloat(targetScaleAnimaedImageView, View.SCALE_Y, ratios[1]));

      。。。动画的监听播放等,保持一致,此处不展示了
    }
在修正了所有数据之后,我们就得到了最终的效果图:
可以看到,我们的图片跟原来的小图对的十分准确,至于ImageView....把背景色去掉后,谁知道呢←_←
至此,我们的项目就基本完成了,当然,还可以进一步优化和拓展,这个以后有空再补坑吧。
最后,如果您需要完整的源码,请到本项目所处的git浏览,如果可以的话,求个star如何


