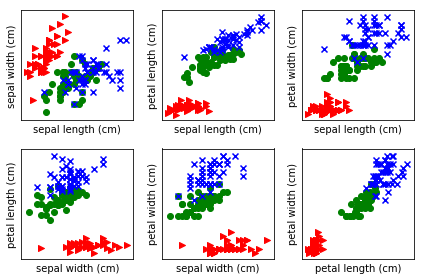
Iris Data 背景
Iris Data是三种Iris(鸢尾花)的四种形态学记录数据集,并且是现代最早的统计分类数据记录之一。
数据集中记录的三种Iris(鸢尾花)的学名和四种Iris(鸢尾花)罗列如下
学名:
- Setosa
- Versicolor
- Virginica
形态学特征:
- Sepal length (萼片长度)
- Sepal width (萼片宽度)
- Petal length (花瓣长度)
- Petal width(花瓣宽度)
学习任务
对Iris Data数据集中的四种形态学统计数据建模,来用于对分类未知子类的鸢尾花。
数据可视化
人类对环境的各种刺激的感知敏感度是不一样,相较于单纯的文字与数据,图像和视频给人的感官刺激会更加强烈,所以将数据可视化是观察数据的一种非常好的手段。
from matplotlib import pyplot as plt

# We load the data with load_iris from sklearn
from sklearn.datasets import load_iris

# load_iris returns an object with several fields
data = load_iris()
features = data.data
feature_names = data.feature_names
target = data.target
target_names = data.target_names

fig,axes = plt.subplots(2, 3)
pairs = [(0, 1), (0, 2), (0, 3), (1, 2), (1, 3), (2, 3)]

# Set up 3 different pairs of (color, marker)
color_markers = [
        ('r', '>'),
        ('g', 'o'),
        ('b', 'x'),
        ]
for i, (p0, p1) in enumerate(pairs):
    ax = axes.flat[i]

    for t in range(3):
        # Use a different color/marker for each class `t`
        c,marker = color_markers[t]
        ax.scatter(features[target == t, p0], features[
                    target == t, p1], marker=marker, c=c)
    ax.set_xlabel(feature_names[p0])
    ax.set_ylabel(feature_names[p1])
    ax.set_xticks([])
    ax.set_yticks([])
fig.tight_layout()
fig.savefig('figure1.png')
将数据集可视化后,仔细观察生成的散点图,我们会发现右下图中,Setosa与另外两种Iris(鸢尾花)在Petal length (花瓣长度)上差异显著,可通过阈值比较,将Setosa从数据中单独分离开来,而且代码运行所得也验证了我们的想法,接下来的任务就是如何分离Versicolor和Virginica。
labels = target_names[target]

# The petal length is the feature at position 2
plength = features[:, 2]

# Build an array of booleans:
is_setosa = (labels == 'setosa')

# This is the important step:
max_setosa =plength[is_setosa].max()
min_non_setosa = plength[~is_setosa].min()
print('Maximum of setosa: {0}.'.format(max_setosa))

print('Minimum of others: {0}.'.format(min_non_setosa))
Maximum of setosa: 1.9.
Minimum of others: 3.0.
继续采用阈值比较的策略,寄希望于能够在四种形态学特征中找出尽可能差异明显的形态学特征,可将Versicolor和Virginica分离开来,但由于我们没法一下子从图像中找出对应的特征,只能通过代码进行循环计算,并定义is_virginica_test函数根据找到的特征与阈值对新的数据进行判别。
# Initialize best_acc to impossibly low value
best_acc = -1.0
for fi in range(features.shape[1]):
    # We are going to test all possible thresholds
    thresh = features[:,fi]
    for t in thresh:

        # Get the vector for feature `fi`
        feature_i = features[:, fi]
        # apply threshold `t`
        pred = (feature_i > t)
        acc = (pred == is_virginica).mean()
        rev_acc = (pred == ~is_virginica).mean()
        if rev_acc > acc:
            reverse = True
            acc = rev_acc
        else:
            reverse = False

        if acc > best_acc:
            best_acc = acc
            best_fi = fi
            best_t = t
            best_reverse = reverse

print(best_fi, best_t, best_reverse, best_acc)
3 1.6 False 0.94
运行结果表明特征取Petal width(花瓣宽度),阈值:1.6具有最好的分类效果
交叉验证(cross-validation)
建立的阈值比较分类的模型的准确率居然高达94%,结果非常之理想,但不要高兴的太早,是否有点过于理想了,你想啊,94%是将所有数据囊括后计算得出的,我们建立模型的目的是为了用于预测新数据,就是说真94%是没有进行过验证的,只是基于现有的数据所得。
这就要引出交叉验证(cross-validation)这个概念了,简单理解就是将数据集分为两部分:Training data与Testing data两部分,其中Training data 用于模型建设,Testing data则用于模型验证,Testing data的验证准确率更偏向于实际情况。就以Iris Data为例,进行交叉验证,每次只取一个数据作为Testing data,剩余部分为Training data.
correct = 0.0

for ei in range(len(features)):
    # select all but the one at position `ei`:
    training = np.ones(len(features), bool)
    training[ei] = False
    testing = ~training
    model = fit_model(features[training], is_virginica[training])
    predictions = predict(model, features[testing])
    correct += np.sum(predictions == is_virginica[testing])
acc = correct/float(len(features))
print('Accuracy: {0:.1%}'.format(acc))
Accuracy: 87.0%
相比最初的准确率:94%,交叉验证后的准确率小了7个百分点,结果也相当不错,而且更符合实际

