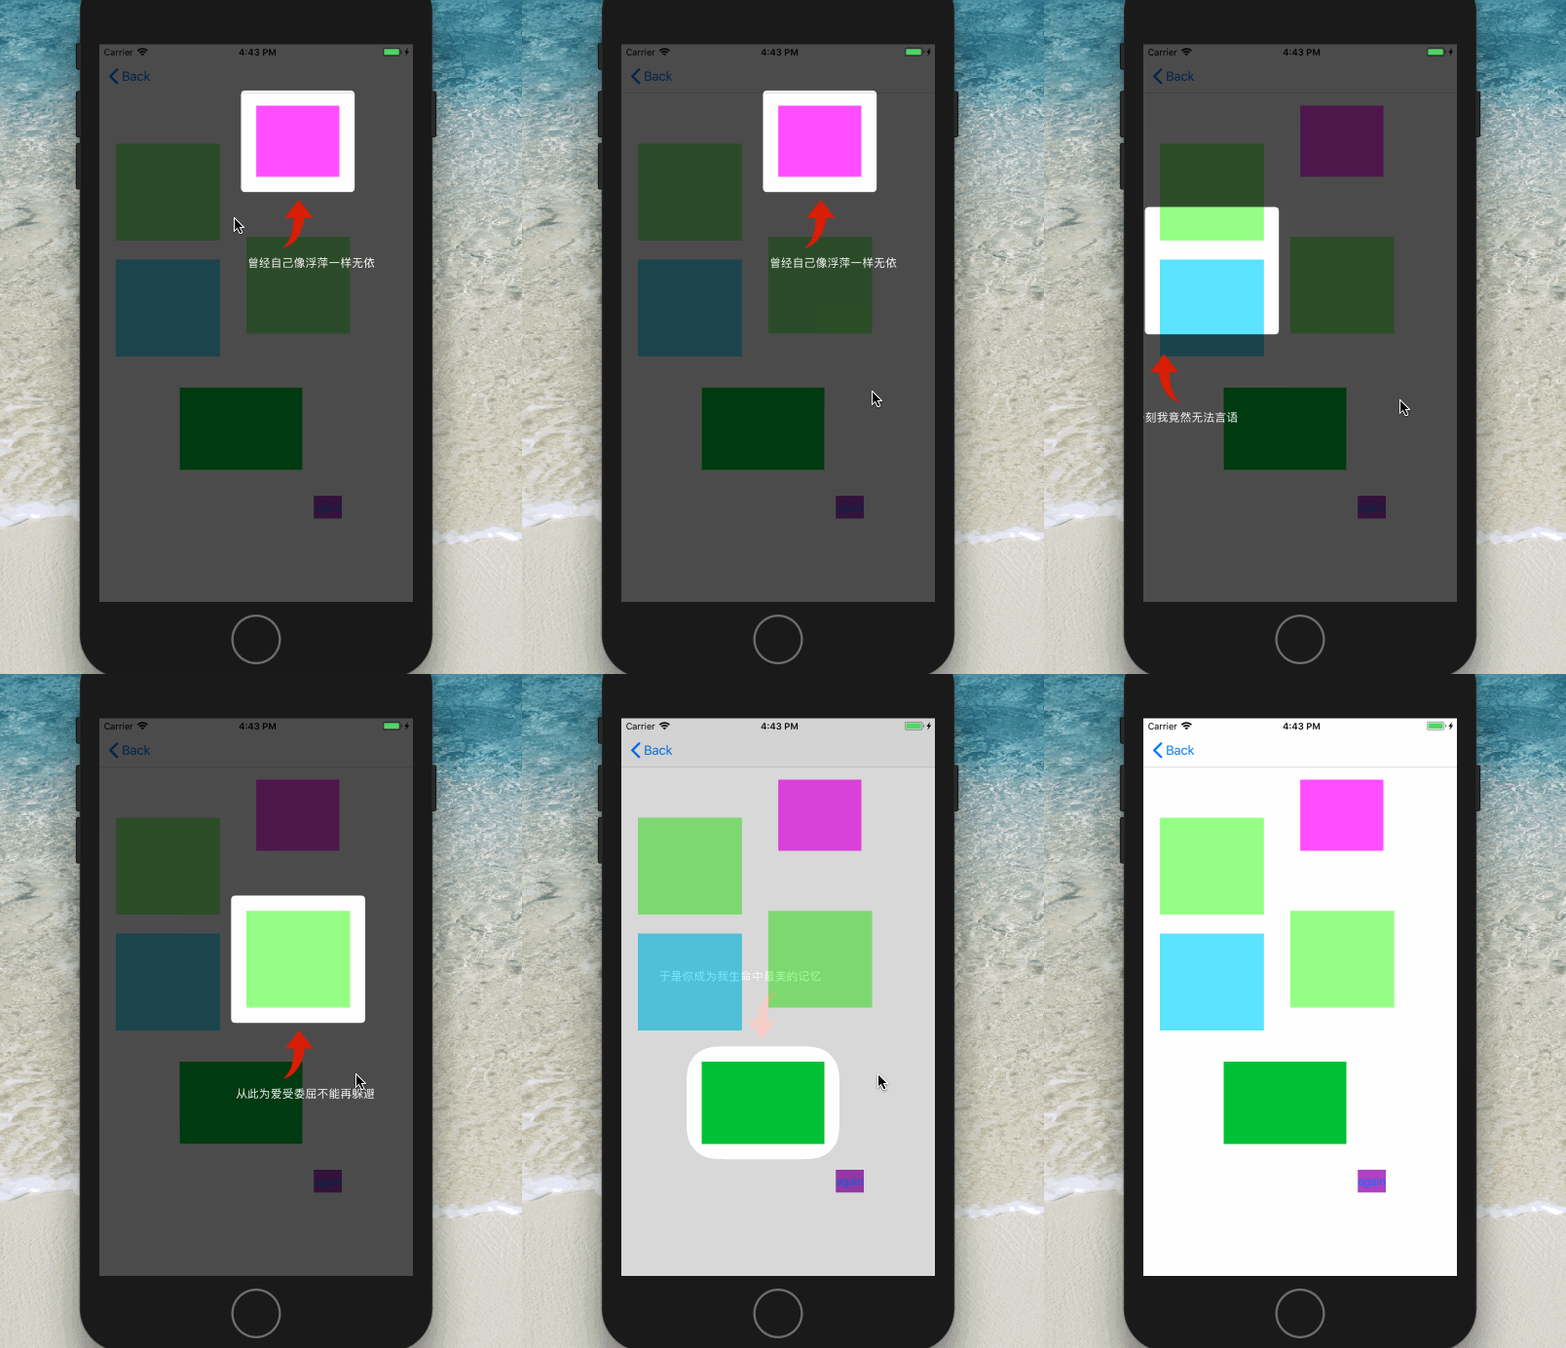
本文开始之前,我们看下界面效果:
我们看下本文涉及到的知识点:
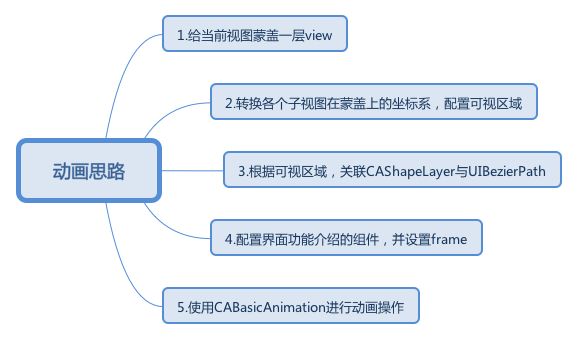
动画思路:
1.CAShapeLayer的概念与应用
CAShapeLayer继承自CALayer,因此,可使用CALayer的所有属性。但是,CAShapeLayer需要和贝塞尔曲线配合使用才有意义。
CAShapeLayer与UIBezierPath的关系
1.CAShapeLayer中shape代表形状的意思,所以需要形状才能生效。
2.贝塞尔曲线可以创建基于矢量的路径,而UIBezierPath类是对CGPathRef的封装。
3.贝塞尔曲线给CAShapeLayer提供路径,CAShapeLayer在提供的路径中进行渲染。路径会闭环,所以绘制出了Shape。
4.用于CAShapeLayer的贝塞尔曲线作为path,其path是一个首尾相接的闭环的曲线,即使该贝塞尔曲线不是一个闭环的曲线。
大概步骤:
1.UI配置
由于UI比较简单,就用故事面板拖拽了5个view,
把5个view关联到一个数组里。
@property(nonatomic,strong)IBOutletCollection(UIView) NSArray * viewsArray;
2.遮罩图层的设置
2.1 获得可见视图的frame,根据需要在原视图上进行扩大。
坐标系的转化
 // 代码含义:拿到view.superview中的view.frame相对于self的位置
    CGRect visualRect = [self convertRect:view.frame toView:view.superview];
拿到在遮罩图层的坐标系,并且扩大frame。
- (CGRect)obtainVisualFrame
{
    if (self.currentIndex>=_count) {
        return CGRectZero;
    }

    UIView * view = [self.dataSource guideMaskView:self viewForItemAtIndex:self.currentIndex]; //拿到视图上对应的view
#warning 转换坐标系 重点
    // 代码含义:拿到view.superview中的view.frame相对于self的位置
    CGRect visualRect = [self convertRect:view.frame toView:view.superview];
    UIEdgeInsets edgeInsets = UIEdgeInsetsMake(-20, -20, -20, -20);
    if (self.delegate &&[self.delegate respondsToSelector:@selector(guideMaskView:insetsForItemAtIndex:)]) {
        [self.delegate guideMaskView:self insetsForItemAtIndex:self.currentIndex];
    }
    visualRect.origin.x += edgeInsets.left;
    visualRect.origin.y += edgeInsets.right;
    visualRect.size.width -=(edgeInsets.left+edgeInsets.right);
    visualRect.size.height -= (edgeInsets.bottom + edgeInsets.top);

    return visualRect; // x减小,y减小 宽高分别变大

}
遮罩图层的配置,主要在于UIBezierPath和CAShapeLayer的关联。
-(void)showMask
{
    CGPathRef fromPath = self.maskLayer.path; //一个不可变的图形路径
    self.maskLayer.frame = self.bounds;
    self.maskLayer.fillColor = [UIColor blackColor].CGColor;
    CGFloat maskCornerRadius = 5;
    if (self.delegate && [self.delegate respondsToSelector:@selector(guideMaskView:cornerRadiusForItemAtIndex:)]) {
        maskCornerRadius = [self.delegate guideMaskView:self cornerRadiusForItemAtIndex:self.currentIndex]; // 获得圆角
    }

    UIBezierPath * visualPath = [UIBezierPath bezierPathWithRoundedRect:[self obtainVisualFrame] cornerRadius:maskCornerRadius];
    /// 获取终点路径
    UIBezierPath *toPath = [UIBezierPath bezierPathWithRect:self.bounds];

    [toPath appendPath:visualPath];// 添加路径

    /// 遮罩的路径
    // 设置CAShapeLayer与UIBezierPath关联

    self.maskLayer.path = toPath.CGPath; // 设置遮罩路径 重点代码
    self.maskLayer.fillRule = kCAFillRuleEvenOdd; // 空心矩形框
#pragma mark - 设置遮罩部分
    self.layer.mask = self.maskLayer;// 设置遮罩给当前视图的view

    /// 开始移动动画
    CABasicAnimation *anim = [CABasicAnimation animationWithKeyPath:@"path"];
    anim.duration  = 0.3;
    anim.fromValue = (__bridge id _Nullable)(fromPath);
    anim.toValue   = (__bridge id _Nullable)(toPath.CGPath);
    [self.maskLayer addAnimation:anim forKey:NULL];

}
3.介绍view的配置
我们这里需要根据子视图Viewd的frame,配置指示view的位置,也就是箭头和文字描述的位置
#pragma mark - 配置items的frame
-(void)configureItemsFrame
{
   // 文字颜色
    if (self.dataSource && [self.dataSource respondsToSelector:@selector(guideView:colorForDescriptionAtIndex:)]) {
        self.textLabel.textColor = [self.dataSource guideView:self colorForDescriptionAtIndex:self.currentIndex];
    }
    // 文字的大小
    if (self.dataSource && [self.dataSource respondsToSelector:@selector(guideView:fontForDescriptionLabelAtIndex:)]) {
        self.textLabel.font = [self.dataSource guideView:self fontForDescriptionLabelAtIndex:self.currentIndex];
    }
    // 描述文字
    NSString * des = [self.dataSource guideView:self descriptionLabelForItemAtIndex:self.currentIndex];
    self.textLabel.text = des;

    CGFloat desInsetsX = 50;

    // 文字与左右边框的距离
    if (self.delegate && [self.delegate respondsToSelector:@selector(guideMaskView:insetsForItemAtIndex:)]) {
        desInsetsX = [self.delegate guideMaskView:self horizontalSpaceForDescriptionLabelAtIndex:self.currentIndex];
    }


    CGFloat space = 10;
    if(self.delegate && [self.delegate respondsToSelector:@selector(guideMaskView:spaceForSubViewsAtIndex:)])
    {
        space = [self.delegate guideMaskView:self spaceForSubViewsAtIndex:self.currentIndex];
    }
    // 设置文字与箭头的位置
    CGRect textRect,arrowRect;
    CGSize imgSize = self.arrowView.image.size;
    CGFloat maxWidth = self.bounds.size.width - desInsetsX*2 ; //最大宽度为屏幕尺寸 - 2个边框
    /*
     typedef NS_OPTIONS(NSInteger, NSStringDrawingOptions) {

     NSStringDrawingUsesLineFragmentOrigin = 1 << 0,
     // 整个文本将以每行组成的矩形为单位计算整个文本的尺寸
     // The specified origin is the line fragment origin, not the base line origin

     NSStringDrawingUsesFontLeading = 1 << 1,
     // 使用字体的行间距来计算文本占用的范围,即每一行的底部到下一行的底部的距离计算
     // Uses the font leading for calculating line heights

     NSStringDrawingUsesDeviceMetrics = 1 << 3,
     // 将文字以图像符号计算文本占用范围,而不是以字符计算。也即是以每一个字体所占用的空间来计算文本范围
     // Uses image glyph bounds instead of typographic bounds

     NSStringDrawingTruncatesLastVisibleLine
     // 当文本不能适合的放进指定的边界之内,则自动在最后一行添加省略符号。如果NSStringDrawingUsesLineFragmentOrigin没有设置,则该选项不生效
     // Truncates and adds the ellipsis character to the last visible line if the text doesn't fit into the bounds specified. Ignored if NSStringDrawingUsesLineFragmentOrigin is not also set.

     }
     */
    CGSize textSize = [des boundingRectWithSize:CGSizeMake(maxWidth, CGFLOAT_MAX) options:NSStringDrawingUsesLineFragmentOrigin|NSStringDrawingUsesFontLeading attributes:@{NSFontAttributeName:self.textLabel.font} context:NULL].size;
    CGAffineTransform transform = CGAffineTransformIdentity;// 对设置进行还原
    // 获取items 的方位
    // 需要设置对应方向缩放
    cyGuideMaskItemRegion itemRegion = [self obtainVisualRegion];
    switch (itemRegion) {
        case cyGuideMaskItemRegionLeftTop:
        {
            // 左上
            transform = CGAffineTransformMakeScale(-1, 1);
            arrowRect =  CGRectMake(CGRectGetMidX([self obtainVisualFrame]) -imgSize.width*2, CGRectGetMaxY([self obtainVisualFrame]) + space, imgSize.width, imgSize.height);
            CGFloat x;
            if (textSize.width< CGRectGetWidth([self obtainVisualFrame])) {
                x = CGRectGetMidX(arrowRect) - textSize.width*0.5;
            }else
            {
                x = desInsetsX;
            }
            textRect = CGRectMake(x, CGRectGetMaxY(arrowRect) + space, textSize.width, textSize.height); // 左上的尺寸

        }
            break;
        case cyGuideMaskItemRegionRightTop:
        {

            /// 右上
            arrowRect = CGRectMake(CGRectGetMidX([self obtainVisualFrame]) - imgSize.width * 0.5,
                                   CGRectGetMaxY([self obtainVisualFrame]) + space,
                                   imgSize.width,
                                   imgSize.height);

            CGFloat x = 0;

            if (textSize.width < CGRectGetWidth([self obtainVisualFrame]))
            {
                x = CGRectGetMinX(arrowRect) - textSize.width * 0.5;
            }
            else
            {
                x = desInsetsX + maxWidth - textSize.width;
            }

            textRect = CGRectMake(x, CGRectGetMaxY(arrowRect) + space, textSize.width, textSize.height);
        }
            break;
        case cyGuideMaskItemRegionLeftBottom:
        {

            /// 左下
            transform = CGAffineTransformMakeScale(-1, -1);
            arrowRect = CGRectMake(CGRectGetMidX([self obtainVisualFrame]) - imgSize.width * 0.5,
                                   CGRectGetMinY([self obtainVisualFrame]) - space - imgSize.height,
                                   imgSize.width,
                                   imgSize.height);

            CGFloat x = 0;

            if (textSize.width < CGRectGetWidth([self obtainVisualFrame]))
            {
                x = CGRectGetMaxX(arrowRect) - textSize.width * 0.5;
            }
            else
            {
                x = desInsetsX;
            }

            textRect = CGRectMake(x, CGRectGetMinY(arrowRect) - space - textSize.height, textSize.width, textSize.height);

        }
            break;
        case cyGuideMaskItemRegionRightBottom:
        {

            /// 右下
            transform = CGAffineTransformMakeScale(1, -1);
            arrowRect = CGRectMake(CGRectGetMidX([self obtainVisualFrame]) - imgSize.width * 0.5,
                                   CGRectGetMinY([self obtainVisualFrame]) - space - imgSize.height,
                                   imgSize.width,
                                   imgSize.height);

            CGFloat x = 0;

            if (textSize.width < CGRectGetWidth([self obtainVisualFrame]))
            {
                x = CGRectGetMinX(arrowRect) - textSize.width * 0.5;
            }
            else
            {
                x = desInsetsX + maxWidth - textSize.width;
            }

            textRect = CGRectMake(x, CGRectGetMinY(arrowRect) - space - textSize.height, textSize.width, textSize.height);

        }
            break;

    }
    [UIView animateWithDuration:0.3 animations:^{
        self.arrowView.transform = transform;
        self.arrowView.frame = arrowRect;
        self.textLabel.frame = textRect;
    }];

}
至于如何如何拿到可见区域的方位,见demo里的具体代码。
4.显示和关闭遮罩动画,通过更改透明度的动画来控制显示或关闭。
显示遮罩
-(void)show
{
    if (self.dataSource) {
        _count = [self.dataSource numbersOfItemsInGuideMaskView:self]; //拿到item的总数
    }
    /// 如果当前没有可以显示的 item 的数量
    if (_count < 1)  return;
    // 把透明度由0 - 1
    [[UIApplication sharedApplication].keyWindow addSubview:self]; // 把自身添加到keyWindow上去
        self.alpha = 0;
    [UIView animateWithDuration:1 animations:^{
        self.alpha = 1;
    }];
    self.currentIndex = 0;
}
关闭遮罩
-(void)hide
{
// 隐藏操作
    [UIView animateWithDuration:.3f animations:^{
        self.alpha = 0;
    } completion:^(BOOL finished) {
        [self removeFromSuperview]; // 移除自身视图
    }];
}
以上简单整理了此demo的主要代码。
app程序功能介绍动画git地址


