总览
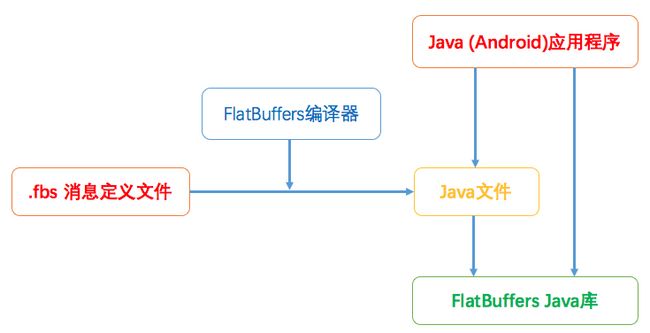
先来看一下 FlatBuffers 项目已经为我们提供了什么,而我们在将 FlatBuffers 用到我们的项目中时又需要做什么的整体流程。如下图:
在使用 FlatBuffers 时,我们需要以特殊的格式定义我们的结构化数据,保存为 .fbs 文件。FlatBuffers 项目为我们提供了编译器,可用于将 .fbs 文件编译为Java文件,C++文件等,以用于我们的项目。FlatBuffers 编译器在我们的开发机,比如Ubuntu,Mac上运行。这些源代码文件是基于 FlatBuffers 提供的Java库生成的,同时我们也需要利用这个Java库的一些接口来序列化或解析数据。
我们将 FlatBuffers 编译器生成的Java文件及 FlatBuffers 的Java库导入我们的项目,就可以用 FlatBuffers 来对我们的结构化数据执行序列化和反序列化了。尽管每次手动执行 FlatBuffers 编译器生成Java文件非常麻烦,但不像 Protocol Buffers 那样,当前还没有Google官方提供的gradle插件可用。不过,我们这边开发了一个简单的 FlatBuffers gradle插件,后面会简单介绍一下,欢迎大家使用。
接下来我们更详细地看一下上面流程中的各个部分。
下载、编译 FlatBuffers 编译器
我们可以在如下位置:
https://github.com/google/flatbuffers/releases
获取官方发布的打包好的版本。针对Windows平台有编译好的可执行安装文件,对其它平台还是打包的源文件。我们也可以指向clone repo的代码,进行手动编译。这里我们从GitHub上clone代码并手动编译编译器:
$ git clone https://github.com/google/flatbuffers.git
Cloning into 'flatbuffers'...
remote: Counting objects: 7340, done.
remote: Compressing objects: 100% (46/46), done.
remote: Total 7340 (delta 16), reused 0 (delta 0), pack-reused 7290
Receiving objects: 100% (7340/7340), 3.64 MiB | 115.00 KiB/s, done.
Resolving deltas: 100% (4692/4692), done.
Checking connectivity... done.
下载代码之后,我们需要用cmake工具来为flatbuffers生成Makefile文件并编译:
$ cd flatbuffers/
$ cmake CMakeLists.txt
-- The C compiler identification is AppleClang 7.3.0.7030031
-- The CXX compiler identification is AppleClang 7.3.0.7030031
-- Check for working C compiler: /Applications/Xcode.app/Contents/Developer/Toolchains/XcodeDefault.xctoolchain/usr/bin/cc
-- Check for working C compiler: /Applications/Xcode.app/Contents/Developer/Toolchains/XcodeDefault.xctoolchain/usr/bin/cc -- works
-- Detecting C compiler ABI info
-- Detecting C compiler ABI info - done
-- Detecting C compile features
-- Detecting C compile features - done
-- Check for working CXX compiler: /Applications/Xcode.app/Contents/Developer/Toolchains/XcodeDefault.xctoolchain/usr/bin/c++
-- Check for working CXX compiler: /Applications/Xcode.app/Contents/Developer/Toolchains/XcodeDefault.xctoolchain/usr/bin/c++ -- works
-- Detecting CXX compiler ABI info
-- Detecting CXX compiler ABI info - done
-- Detecting CXX compile features
-- Detecting CXX compile features - done
-- Configuring done
-- Generating done
-- Build files have been written to: /Users/netease/Projects/OpenSource/flatbuffers
$ make && make install
安装之后执行如下命令以确认已经装好:
$ flatc --version
flatc version 1.4.0 (Dec  7 2016)
flatc没有为我们提供 --help 选项,不过加了错误的参数时这个工具会为我们展示详细的用法:
$ flatc --help
flatc: unknown commandline argument: --help
usage: flatc [OPTION]... FILE... [-- FILE...]
  --binary     -b Generate wire format binaries for any data definitions.
  --json       -t Generate text output for any data definitions.
  --cpp        -c Generate C++ headers for tables/structs.
  --go         -g Generate Go files for tables/structs.
  --java       -j Generate Java classes for tables/structs.
  --js         -s Generate JavaScript code for tables/structs.
  --csharp     -n Generate C# classes for tables/structs.
  --python     -p Generate Python files for tables/structs.
  --php           Generate PHP files for tables/structs.
  -o PATH            Prefix PATH to all generated files.
  -I PATH            Search for includes in the specified path.
  -M                 Print make rules for generated files.
  --version          Print the version number of flatc and exit.
  --strict-json      Strict JSON: field names must be / will be quoted,
                     no trailing commas in tables/vectors.
  --allow-non-utf8   Pass non-UTF-8 input through parser and emit nonstandard
                     \x escapes in JSON. (Default is to raise parse error on
                     non-UTF-8 input.)
  --defaults-json    Output fields whose value is the default when
                     writing JSON
  --unknown-json     Allow fields in JSON that are not defined in the
                     schema. These fields will be discared when generating
                     binaries.
  --no-prefix        Don't prefix enum values with the enum type in C++.
  --scoped-enums     Use C++11 style scoped and strongly typed enums.
                     also implies --no-prefix.
  --gen-includes     (deprecated), this is the default behavior.
                     If the original behavior is required (no include
                     statements) use --no-includes.
  --no-includes      Don't generate include statements for included
                     schemas the generated file depends on (C++).
  --gen-mutable      Generate accessors that can mutate buffers in-place.
  --gen-onefile      Generate single output file for C#.
  --gen-name-strings Generate type name functions for C++.
  --escape-proto-ids Disable appending '_' in namespaces names.
  --gen-object-api   Generate an additional object-based API.
  --cpp-ptr-type T   Set object API pointer type (default std::unique_ptr)
  --raw-binary       Allow binaries without file_indentifier to be read.
                     This may crash flatc given a mismatched schema.
  --proto            Input is a .proto, translate to .fbs.
  --schema           Serialize schemas instead of JSON (use with -b)
  --conform FILE     Specify a schema the following schemas should be
                     an evolution of. Gives errors if not.
  --conform-includes Include path for the schema given with --conform
    PATH
FILEs may be schemas, or JSON files (conforming to preceding schema)
FILEs after the -- must be binary flatbuffer format files.
Output files are named using the base file name of the input,
and written to the current directory or the path given by -o.
example: flatc -c -b schema1.fbs schema2.fbs data.json
创建 .fbs 文件
flatc支持将为 Protocol Buffers 编写的 .proto 文件转换为 .fbs 文件,如:
$ ls
addressbook.proto
$ flatc --proto addressbook.proto
$ ls -l
total 16
-rw-r--r--  1 netease  staff  431 12  7 17:21 addressbook.fbs
-rw-r--r--@ 1 netease  staff  486 12  1 15:18 addressbook.proto
Protocol Buffers 消息文件中的一些写法,FlatBuffers 编译器还不能很好的支持,如option java_package,option java_outer_classname,和嵌套类。这里我们基于 FlatBuffers 编译器转换的 .proto 文件来获得我们的 .fbs 文件:
// Generated from addressbook.proto

namespace com.example.tutorial;

enum PhoneType : int {
  MOBILE = 0,
  HOME = 1,
  WORK = 2,
}

namespace com.example.tutorial;

table Person {
  name:string (required);
  id:int;
  email:string;
  phone:[com.example.tutorial._Person.PhoneNumber];
}

namespace com.example.tutorial._Person;

table PhoneNumber {
  number:string (required);
  type:int;
}

namespace com.example.tutorial;

table AddressBook {
  person:[com.example.tutorial.Person];
}

root_type AddressBook;
可以参考 官方的文档 来了解 .fbs 文件的详细的写法。
编译 .fbs 文件
可以通过如下命令编译 .fbs 文件:
$ flatc --java -o out addressbook.fbs
--java用于指定编译的目标编程语言。-o 参数则用于指定输出文件的路径,如过没有提供则将当前目录用作输出目录。FlatBuffers 编译器按照为不同的数据结构声明的namespace生成目录结构。对于上面的例子,会生成如下的这些文件:
$ find out
p.p1 {margin: 0.0px 0.0px 0.0px 0.0px; font: 11.0px Menlo}span.s1 {font-variant-ligatures: no-common-ligatures}

$ find out/
out/
out//com
out//com/example
out//com/example/tutorial
out//com/example/tutorial/_Person
out//com/example/tutorial/_Person/PhoneNumber.java
out//com/example/tutorial/AddressBook.java
out//com/example/tutorial/Person.java
out//com/example/tutorial/PhoneType.java
在Android项目中使用 FlatBuffers
我们将前面由 .fbs 文件生成的Java文件拷贝到我们的项目中。我们前面提到的,FlatBuffers 的Java库比较薄,当前并没有发不到jcenter这样的maven仓库中,因而我们需要将这部分代码也拷贝到我们的额项目中。FlatBuffers 的Java库在其repo仓库的 java 目录下。引入这些文件之后,我们的代码结构如下:
添加访问 FlatBuffers 的类:
package com.netease.volleydemo;

import com.example.tutorial.AddressBook;
import com.example.tutorial.Person;
import com.example.tutorial._Person.PhoneNumber;
import com.google.flatbuffers.FlatBufferBuilder;

import java.nio.ByteBuffer;

/**
 * Created by hanpfei0306 on 16-12-5.
 */

public class AddressBookFlatBuffers {
    public static byte[] encodeTest(String[] names) {
        FlatBufferBuilder builder = new FlatBufferBuilder(0);

        int[] personOffsets = new int[names.length];

        for (int i = 0; i < names.length; ++ i) {
            int name = builder.createString(names[i]);
            int email = builder.createString("zhangsan@gmail.com");

            int number1 = builder.createString("0157-23443276");
            int type1 = 1;
            int phoneNumber1 = PhoneNumber.createPhoneNumber(builder, number1, type1);

            int number2 = builder.createString("136183667387");
            int type2 = 0;
            int phoneNumber2 = PhoneNumber.createPhoneNumber(builder, number2, type2);

            int[] phoneNubers = new int[2];
            phoneNubers[0] = phoneNumber1;
            phoneNubers[1] = phoneNumber2;

            int phoneNumbersPos = Person.createPhoneVector(builder, phoneNubers);

            int person = Person.createPerson(builder, name, 13958235, email, phoneNumbersPos);

            personOffsets[i] = person;
        }
        int persons = AddressBook.createPersonVector(builder, personOffsets);

        AddressBook.startAddressBook(builder);
        AddressBook.addPerson(builder, persons);
        int eab = AddressBook.endAddressBook(builder);
        builder.finish(eab);
        byte[] data = builder.sizedByteArray();
        return data;
    }

    public static byte[] encodeTest(String[] names, int times) {
        for (int i = 0; i < times - 1; ++ i) {
            encodeTest(names);
        }
        return encodeTest(names);
    }

    public static AddressBook decodeTest(byte[] data) {
        AddressBook addressBook = null;
        ByteBuffer byteBuffer = ByteBuffer.wrap(data);
        addressBook = AddressBook.getRootAsAddressBook(byteBuffer);
        return addressBook;
    }

    public static AddressBook decodeTest(byte[] data, int times) {
        AddressBook addressBook = null;
        for (int i = 0; i < times; ++ i) {
            addressBook = decodeTest(data);
        }
        return addressBook;
    }
}
使用 flatbuf-gradle-plugin
我们有开发一个 FlatBuffers 的gradle插件,以方便开发,项目位置。这个插件的设计有参考Google的protobuf-gradle-plugin,功能与用法也与protobuf-gradle-plugin类似。在这个项目中,我们也有为 FlatBuffers 的Java库创建一个module。
编译并发布flatbuf-gradle-plugin
从github上下载代码:
$ git clone https://github.com/hanpfei/flatbuffers.git
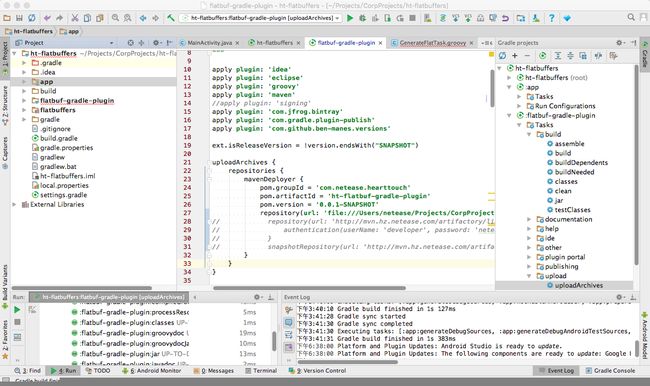
然后将代码导入Android Studio,将看到如下的代码结构:
app 模块是一个demo程序,flatbuf-gradle-plugin 模块是 FlatBuffers 的gradle插件,而flatbuffers模块则是 FlatBuffers 的Java库。
为了使用 flatbuf-gradle-plugin,可以将插件发布到本地文件系统。这可以通过修改flatbuf-gradle-plugin/build.gradle来完成,修改 uploadArchives task 的 repository 指向本地文件系统,如:
uploadArchives {
    repositories {
        mavenDeployer {
            pom.groupId = 'com.netease.hearttouch'
            pom.artifactId = 'ht-flatbuf-gradle-plugin'
            pom.version = '0.0.1-SNAPSHOT'
            repository(url: 'file:///Users/netease/Projects/CorpProjects/ht-flatbuffers/app/plugin')
        }
    }
}
执行uploadArchives task,编译并发布flatbuf-gradle-plugin到本地文件系统。
应用flatbuf-gradle-plugin
修改应用程序的 build.gradle 以应用flatbuf-gradle-plugin。
- 为buildscript添加对
flatbuf-gradle-plugin的依赖:
buildscript {
    //目前先发布在本地,后面会通过maven进行引用
    repositories {
        maven {
            url "file:///Users/netease/Projects/CorpProjects/ht-flatbuffers/app/plugin"
        }
        jcenter()
        mavenCentral()
    }
    dependencies {
        classpath 'com.netease.hearttouch:ht-flatbuf-gradle-plugin:0.0.1-SNAPSHOT'
    }
}
- 在
apply plugin: 'com.android.application'后面应用flatbuf的plugin:
apply plugin: 'com.android.application'
apply plugin: 'com.netease.flatbuf'
- 添加flatbuf块,对flatbuf-gradle-plugin的执行做配置:
flatbuf {
    flatc {
        path = '/usr/local/bin/flatc'
    }

    generateFlatTasks {
        all().each { task ->
            task.builtins {
                remove java
            }
            task.builtins {
                java { }
            }
        }
    }
}
flatc块用于配置 FlatBuffers 编译器,这里我们指定用我们之前手动编译的编译器。
task.builtins的块必不可少,这个块用于指定我们要为那些编程语言生成代码,这里我们为Java生成代码。
- 指定 .fbs 文件的路径
    sourceSets {
        main {
            flat {
                srcDir 'src/main/flat'
            }
        }
    }
我们将 FlatBuffers 的IDL文件放在src/main/flat目录下。
这样我们就不用再那么麻烦每次手动执行flatc了。
FlatBuffers、Protobuf及JSON对比测试
FlatBuffers相对于Protobuf的表现又如何呢?这里我们用数据说话,对比一下FlatBuffers格式、JSON格式与Protobuf的表现。测试同样用fastjson作为JSON的编码解码工具。
测试用的数据结构所有的数据结构,Protobuf相关的测试代码,及JSON的测试代码同 在Android中使用Protocol Buffers 一文所述,FlatBuffers的测试代码如上面看到的 AddressBookFlatBuffers。
通过如下的这段代码来执行测试:
    private class ProtoTestTask extends AsyncTask {
        private static final int BUFFER_LEN = 8192;

        private void compress(InputStream is, OutputStream os)
                throws Exception {

            GZIPOutputStream gos = new GZIPOutputStream(os);

            int count;
            byte data[] = new byte[BUFFER_LEN];
            while ((count = is.read(data, 0, BUFFER_LEN)) != -1) {
                gos.write(data, 0, count);
            }

            gos.finish();
            gos.close();
        }

        private int getCompressedDataLength(byte[] data) {
            ByteArrayInputStream bais =new ByteArrayInputStream(data);
            ByteArrayOutputStream baos = new ByteArrayOutputStream();

            try {
                compress(bais, baos);
            } catch (Exception e) {
            }

            return baos.toByteArray().length;
        }

        private void dumpDataLengthInfo(byte[] protobufData, String jsonData, byte[] flatbufData) {
            int compressedProtobufLength = getCompressedDataLength(protobufData);
            int compressedJSONLength = getCompressedDataLength(jsonData.getBytes());
            int compressedFlatbufLength = getCompressedDataLength(flatbufData);
            Log.i(TAG, String.format("%-120s", "Data length"));
            Log.i(TAG, String.format("%-20s%-20s%-20s%-20s%-20s%-20s", "Protobuf", "Protobuf (GZIP)",
                    "JSON", "JSON (GZIP)", "Flatbuf", "Flatbuf (GZIP)"));
            Log.i(TAG, String.format("%-20s%-20s%-20s%-20s%-20s%-20s",
                    String.valueOf(protobufData.length), compressedProtobufLength,
                    String.valueOf(jsonData.getBytes().length), compressedJSONLength,
                    String.valueOf(flatbufData.length), compressedFlatbufLength));
        }

        private void doEncodeTest(String[] names, int times) {
            long startTime = System.nanoTime();
            byte[] protobufData = AddressBookProtobuf.encodeTest(names, times);
            long protobufTime = System.nanoTime();
            protobufTime = protobufTime - startTime;

            startTime = System.nanoTime();
            String jsonData = AddressBookJson.encodeTest(names, times);
            long jsonTime = System.nanoTime();
            jsonTime = jsonTime - startTime;

            startTime = System.nanoTime();
            byte[] flatbufData = AddressBookFlatBuffers.encodeTest(names, times);
            long flatbufTime = System.nanoTime();
            flatbufTime = flatbufTime - startTime;

            dumpDataLengthInfo(protobufData, jsonData, flatbufData);

            Log.i(TAG, String.format("%-20s%-20s%-20s%-20s", "Encode Times", String.valueOf(times),
                    "Names Length", String.valueOf(names.length)));

            Log.i(TAG, String.format("%-20s%-20s%-20s%-20s%-20s%-20s",
                    "ProtobufTime", String.valueOf(protobufTime),
                    "JsonTime", String.valueOf(jsonTime),
                    "FlatbufTime", String.valueOf(flatbufTime)));
        }

        private void doEncodeTest10(int times) {
            doEncodeTest(TestUtils.sTestNames10, times);
        }

        private void doEncodeTest50(int times) {
            doEncodeTest(TestUtils.sTestNames50, times);
        }

        private void doEncodeTest100(int times) {
            doEncodeTest(TestUtils.sTestNames100, times);
        }

        private void doEncodeTest(int times) {
            doEncodeTest10(times);
            doEncodeTest50(times);
            doEncodeTest100(times);
        }

        private void doDecodeTest(String[] names, int times) {
            byte[] protobufBytes = AddressBookProtobuf.encodeTest(names);
            ByteArrayInputStream bais = new ByteArrayInputStream(protobufBytes);
            long startTime = System.nanoTime();
            AddressBookProtobuf.decodeTest(bais, times);
            long protobufTime = System.nanoTime();
            protobufTime = protobufTime - startTime;

            String jsonStr = AddressBookJson.encodeTest(names);
            startTime = System.nanoTime();
            AddressBookJson.decodeTest(jsonStr, times);
            long jsonTime = System.nanoTime();
            jsonTime = jsonTime - startTime;

            byte[] flatbufData = AddressBookFlatBuffers.encodeTest(names);
            startTime = System.nanoTime();
            AddressBookFlatBuffers.decodeTest(flatbufData, times);
            long flatbufTime = System.nanoTime();
            flatbufTime = flatbufTime - startTime;

            Log.i(TAG, String.format("%-20s%-20s%-20s%-20s", "Decode Times", String.valueOf(times),
                    "Names Length", String.valueOf(names.length)));
            Log.i(TAG, String.format("%-20s%-20s%-20s%-20s%-20s%-20s",
                    "ProtobufTime", String.valueOf(protobufTime),
                    "JsonTime", String.valueOf(jsonTime),
                    "FlatbufTime", String.valueOf(flatbufTime)));
        }

        private void doDecodeTest10(int times) {
            doDecodeTest(TestUtils.sTestNames10, times);
        }

        private void doDecodeTest50(int times) {
            doDecodeTest(TestUtils.sTestNames50, times);
        }

        private void doDecodeTest100(int times) {
            doDecodeTest(TestUtils.sTestNames100, times);
        }

        private void doDecodeTest(int times) {
            doDecodeTest10(times);
            doDecodeTest50(times);
            doDecodeTest100(times);
        }

        @Override
        protected Void doInBackground(Void... params) {
            TestUtils.initTest();
            doEncodeTest(5000);

            doDecodeTest(5000);
            return null;
        }

        @Override
        protected void onPostExecute(Void aVoid) {
            super.onPostExecute(aVoid);
        }
    }
这里我们执行3组编码测试及3组解码测试。对于编码测试,第一组的单个数据中包含10个Person,第二组的包含50个,第三组的包含100个,然后对每个数据分别执行5000次的编码操作。
对于解码测试,三组中单个数据同样包含10个Person、50个及100个,然后对每个数据分别执行5000次的解码码操作。
在Galaxy Nexus的Android 4.4.4 CM平台上执行上述测试,最终得到如下结果:
编码后数据长度对比 (Bytes)
| Person个数 | Protobuf | Protobuf(GZIP) |JSON | JSON(GZIP)|Flatbuf | Flatbuf(GZIP) |
| --------------|:--------------:|-------------------- --:|-----------:|------------------:|--------:|-------------------:|
|10 |860 |288 |1703 |343 |1532 |513 |
|50 |4300 |986 |8463 |1048 |7452 |1814 |
|100 |8600 |1841 |16913 |1918 |14852 |3416 |
相同的数据,经过编码,在压缩前JSON的数据最长,FlatBuffers的数据长度与JSON的短大概10 %,而Protobuf的数据长度则大概只有JSON的一半。而在用GZIP压缩后,Protobuf的数据长度与JSON的接近,FlatBuffers的数据长度则接近两者的两倍。
编码性能对比 (S)
| Person个数 | Protobuf | JSON | FlatBuffers |
|---|---|---|---|
| 10 | 6.000 | 8.952 | 12.464 |
| 50 | 26.847 | 45.782 | 56.752 |
| 100 | 50.602 | 73.688 | 108.426 |
编码性能Protobuf相对于JSON有较大幅度的提高,而FlatBuffers则有较大幅度的降低。
解码性能对比 (S)
| Person个数 | Protobuf | JSON | FlatBuffers |
|---|---|---|---|
| 10 | 0.255 | 10.766 | 0.014 |
| 50 | 0.245 | 51.134 | 0.014 |
| 100 | 0.323 | 101.070 | 0.006 |
解码性能方面,Protobuf相对于JSON,有着惊人的提升。Protobuf的解码时间几乎不随着数据长度的增长而有太大的增长,而JSON则随着数据长度的增加,解码所需要的时间也越来越长。而FlatBuffers则由于无需解码,在性能方面相对于前两者更有着非常大的提升。
FlatBuffers 编码原理
FlatBuffers的Java库只提供了如下的4个类:
./com/google/flatbuffers/Constants.java
./com/google/flatbuffers/FlatBufferBuilder.java
./com/google/flatbuffers/Struct.java
./com/google/flatbuffers/Table.java
Constants 类定义FlatBuffers中可用的基本原始数据类型的长度:
public class Constants {
    // Java doesn't seem to have these.
    /** The number of bytes in an `byte`. */
    static final int SIZEOF_BYTE = 1;
    /** The number of bytes in a `short`. */
    static final int SIZEOF_SHORT = 2;
    /** The number of bytes in an `int`. */
    static final int SIZEOF_INT = 4;
    /** The number of bytes in an `float`. */
    static final int SIZEOF_FLOAT = 4;
    /** The number of bytes in an `long`. */
    static final int SIZEOF_LONG = 8;
    /** The number of bytes in an `double`. */
    static final int SIZEOF_DOUBLE = 8;
    /** The number of bytes in a file identifier. */
    static final int FILE_IDENTIFIER_LENGTH = 4;
}
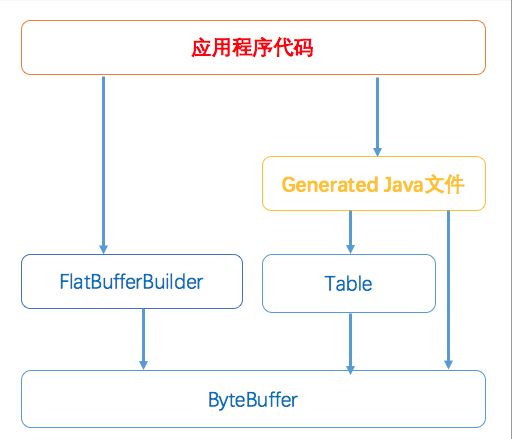
FlatBufferBuilder 用于FlatBuffers编码,它会将我们的结构化数据序列化为字节数组。我们借助于 FlatBufferBuilder 在 ByteBuffer 中放置基本数据类型的数据、数组、字符串及对象。ByteBuffer 用于处理字节序,在序列化时,它将数据按适当的字节序进行序列化,在发序列化时,它将多个字节转换为适当的数据类型。在 .fbs 文件中定义的 table 和 struct,为它们生成的Java 类会继承 Table 和 Struct。
在反序列化时,输入的ByteBuffer数据被当作字节数组,Table提供了针对字节数组的操作,生成的Java类负责对这些数据进行解释。对于FlatBuffers编码的数据,无需进行解码,只需进行解释。在编译 .fbs 文件时,每个字段在这段数据中的位置将被确定。每个字段的类型及长度将被硬编码进生成的Java类。
Struct 类的代码也比较简洁:
package com.google.flatbuffers;

import java.nio.ByteBuffer;

/// @cond FLATBUFFERS_INTERNAL

/**
 * All structs in the generated code derive from this class, and add their own accessors.
 */
public class Struct {
  /** Used to hold the position of the `bb` buffer. */
  protected int bb_pos;
  /** The underlying ByteBuffer to hold the data of the Struct. */
  protected ByteBuffer bb;
}
整体的结构如下图:
在序列化结构化数据时,我们首先需要创建一个 FlatBufferBuilder ,在这个对象的创建过程中会分配或从调用者那里获取 ByteBuffer,序列化的数据将保存在这个 ByteBuffer中:
   /**
    * Start with a buffer of size `initial_size`, then grow as required.
    *
    * @param initial_size The initial size of the internal buffer to use.
    */
    public FlatBufferBuilder(int initial_size) {
        if (initial_size <= 0) initial_size = 1;
        space = initial_size;
        bb = newByteBuffer(initial_size);
    }

   /**
    * Start with a buffer of 1KiB, then grow as required.
    */
    public FlatBufferBuilder() {
        this(1024);
    }

    /**
     * Alternative constructor allowing reuse of {@link ByteBuffer}s.  The builder
     * can still grow the buffer as necessary.  User classes should make sure
     * to call {@link #dataBuffer()} to obtain the resulting encoded message.
     *
     * @param existing_bb The byte buffer to reuse.
     */
    public FlatBufferBuilder(ByteBuffer existing_bb) {
        init(existing_bb);
    }

    /**
     * Alternative initializer that allows reusing this object on an existing
     * `ByteBuffer`. This method resets the builder's internal state, but keeps
     * objects that have been allocated for temporary storage.
     *
     * @param existing_bb The byte buffer to reuse.
     * @return Returns `this`.
     */
    public FlatBufferBuilder init(ByteBuffer existing_bb){
        bb = existing_bb;
        bb.clear();
        bb.order(ByteOrder.LITTLE_ENDIAN);
        minalign = 1;
        space = bb.capacity();
        vtable_in_use = 0;
        nested = false;
        finished = false;
        object_start = 0;
        num_vtables = 0;
        vector_num_elems = 0;
        return this;
    }

    static ByteBuffer newByteBuffer(int capacity) {
        ByteBuffer newbb = ByteBuffer.allocate(capacity);
        newbb.order(ByteOrder.LITTLE_ENDIAN);
        return newbb;
    }
下面我们更详细地分析基本数据类型数据、数组及对象的序列化过程。ByteBuffer 为小尾端的。
FlatBuffers编码基本数据类型
FlatBuffer 的基本数据类型主要包括如下这些:
Boolean
Byte
Short
Int
Long
Float
Double
FlatBufferBuilder 提供了三组方法用于操作这些数据:
    public void putBoolean(boolean x);
    public void putByte   (byte    x);
    public void putShort  (short   x);
    public void putInt    (int     x);
    public void putLong   (long    x);
    public void putFloat  (float   x);
    public void putDouble (double  x);

    public void addBoolean(boolean x);
    public void addByte   (byte    x);
    public void addShort  (short   x);
    public void addInt    (int     x);
    public void addLong   (long    x);
    public void addFloat  (float   x);
    public void addDouble (double  x);

    public void addBoolean(int o, boolean x, boolean d);
    public void addByte(int o, byte x, int d);
    public void addShort(int o, short x, int d);
    public void addInt    (int o, int     x, int     d);
    public void addLong   (int o, long    x, long    d);
    public void addFloat  (int o, float   x, double  d);
    public void addDouble (int o, double  x, double  d);
putXXX 那一组,直接地将一个数据放入 ByteBuffer 中,它们的实现基本如下面这样:
    public void putBoolean(boolean x) {
        bb.put(space -= Constants.SIZEOF_BYTE, (byte) (x ? 1 : 0));
    }

    public void putByte(byte x) {
        bb.put(space -= Constants.SIZEOF_BYTE, x);
    }

    public void putShort(short x) {
        bb.putShort(space -= Constants.SIZEOF_SHORT, x);
    }
Boolean值会被先转为byte类型再放入 ByteBuffer。另外一点值得注意的是,数据是从 ByteBuffer 的结尾处开始放置的,space用于记录最近放入的数据的位置及剩余的空间。
addXXX(XXX x) 那一组在放入数据之前会先做对齐处理,并在需要时扩展 ByteBuffer 的容量:
    static ByteBuffer growByteBuffer(ByteBuffer bb) {
        int old_buf_size = bb.capacity();
        if ((old_buf_size & 0xC0000000) != 0)  // Ensure we don't grow beyond what fits in an int.
            throw new AssertionError("FlatBuffers: cannot grow buffer beyond 2 gigabytes.");
        int new_buf_size = old_buf_size << 1;
        bb.position(0);
        ByteBuffer nbb = newByteBuffer(new_buf_size);
        nbb.position(new_buf_size - old_buf_size);
        nbb.put(bb);
        return nbb;
    }

   public void pad(int byte_size) {
       for (int i = 0; i < byte_size; i++) bb.put(--space, (byte) 0);
   }

    public void prep(int size, int additional_bytes) {
        // Track the biggest thing we've ever aligned to.
        if (size > minalign) minalign = size;
        // Find the amount of alignment needed such that `size` is properly
        // aligned after `additional_bytes`
        int align_size = ((~(bb.capacity() - space + additional_bytes)) + 1) & (size - 1);
        // Reallocate the buffer if needed.
        while (space < align_size + size + additional_bytes) {
            int old_buf_size = bb.capacity();
            bb = growByteBuffer(bb);
            space += bb.capacity() - old_buf_size;
        }
        pad(align_size);
    }

    public void addBoolean(boolean x) {
        prep(Constants.SIZEOF_BYTE, 0);
        putBoolean(x);
    }

    public void addInt(int x) {
        prep(Constants.SIZEOF_INT, 0);
        putInt(x);
    }
对齐是数据存放的起始位置相对于ByteBuffer的结束位置的对齐,additional bytes被认为是不需要对齐的,且在必要的时候会在ByteBuffer可用空间的结尾处填充值为0的字节。在扩展 ByteBuffer 的空间时,老的ByteBuffer被放在新ByteBuffer的结尾处。
addXXX(int o, XXX x, YYY y) 这一组方法在放入数据之后,会将 vtable 中对应位置的值更新为最近放入的数据的offset。
    public void addShort(int o, short x, int d) {
        if (force_defaults || x != d) {
            addShort(x);
            slot(o);
        }
    }

    public void slot(int voffset) {
        vtable[voffset] = offset();
    }
后面我们在分析编码对象时再来详细地了解vtable。
基本上,在我们的应用程序代码中不要直接调用这些方法,它们主要在构造对象时用于存储对象的基本数据类型字段。
FlatBuffers编码数组
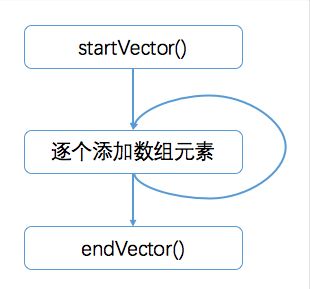
编码数组的过程如下:
先执行 startVector(),这个方法会记录数组的长度,处理元素的对齐,准备足够的空间,并设置nested,用于指示记录的开始。
然后逐个添加元素。
最后 执行 endVector(),将nested复位,并记录数组的长度。
    public void startVector(int elem_size, int num_elems, int alignment) {
        notNested();
        vector_num_elems = num_elems;
        prep(SIZEOF_INT, elem_size * num_elems);
        prep(alignment, elem_size * num_elems); // Just in case alignment > int.
        nested = true;
    }

    public int endVector() {
        if (!nested)
            throw new AssertionError("FlatBuffers: endVector called without startVector");
        nested = false;
        putInt(vector_num_elems);
        return offset();
    }
我们前面的AddressBook例子中有如下这样的生成代码:
  public static int createPersonVector(FlatBufferBuilder builder, int[] data) {
    builder.startVector(4, data.length, 4);
    for (int i = data.length - 1; i >= 0; i--) builder.addOffset(data[i]);
    return builder.endVector();
  }
编码后的数组将有如下的内存分布:
其中的Vector Length为4字节的int型值。
FlatBuffers编码字符串
FlatBufferBuilder 创建字符串的过程如下:
    public int createString(CharSequence s) {
        int length = s.length();
        int estimatedDstCapacity = (int) (length * encoder.maxBytesPerChar());
        if (dst == null || dst.capacity() < estimatedDstCapacity) {
            dst = ByteBuffer.allocate(Math.max(128, estimatedDstCapacity));
        }

        dst.clear();

        CharBuffer src = s instanceof CharBuffer ? (CharBuffer) s :
            CharBuffer.wrap(s);
        CoderResult result = encoder.encode(src, dst, true);
        if (result.isError()) {
            try {
                result.throwException();
            } catch (CharacterCodingException x) {
                throw new Error(x);
            }
        }

        dst.flip();
        return createString(dst);
    }

    public int createString(ByteBuffer s) {
        int length = s.remaining();
        addByte((byte)0);
        startVector(1, length, 1);
        bb.position(space -= length);
        bb.put(s);
        return endVector();
    }

    public int createByteVector(byte[] arr) {
        int length = arr.length;
        startVector(1, length, 1);
        bb.position(space -= length);
        bb.put(arr);
        return endVector();
    }
编码字符串的过程如下:
- 对字符串进行编码,比如 UTF-8 ,编码后的数据保存在另一个 ByteBuffer 中。
- 在可用空间的结尾处添加值为 0 的byte。
- 将第 1 步中创建的 ByteBuffer 作为一个字节数组添加到 FlatBufferBuilder 的 ByteBuffer 中。这里不是逐个元素,也就是字节,添加,而是将 ByteBuffer 整体一次性添加,以保证字符串中各个字节的相对顺序不会被颠倒过来,这一点与我们前面在AddressBook 中看到的稍有区别。
编码后的字符串将有如下的内存分布:
FlatBuffers编码对象
对象的编码与数组的编码有点类似。编码对象的过程为:
- 先执行 startObject(),创建 vtable并初始化,记录对象的字段个数及对象数据的起始位置,并设置nested,指示对象编码的开始。
- 然后为对象逐个添加每个字段的值。
- 最后执行 endObject() 结束对象的编码。
    public void startObject(int numfields) {
        notNested();
        if (vtable == null || vtable.length < numfields) vtable = new int[numfields];
        vtable_in_use = numfields;
        Arrays.fill(vtable, 0, vtable_in_use, 0);
        nested = true;
        object_start = offset();
    }

    public int endObject() {
        if (vtable == null || !nested)
            throw new AssertionError("FlatBuffers: endObject called without startObject");
        addInt(0);
        int vtableloc = offset();
        // Write out the current vtable.
        for (int i = vtable_in_use - 1; i >= 0 ; i--) {
            // Offset relative to the start of the table.
            short off = (short)(vtable[i] != 0 ? vtableloc - vtable[i] : 0);
            addShort(off);
        }

        final int standard_fields = 2; // The fields below:
        addShort((short)(vtableloc - object_start));
        addShort((short)((vtable_in_use + standard_fields) * SIZEOF_SHORT));

        // Search for an existing vtable that matches the current one.
        int existing_vtable = 0;
        outer_loop:
        for (int i = 0; i < num_vtables; i++) {
            int vt1 = bb.capacity() - vtables[i];
            int vt2 = space;
            short len = bb.getShort(vt1);
            if (len == bb.getShort(vt2)) {
                for (int j = SIZEOF_SHORT; j < len; j += SIZEOF_SHORT) {
                    if (bb.getShort(vt1 + j) != bb.getShort(vt2 + j)) {
                        continue outer_loop;
                    }
                }
                existing_vtable = vtables[i];
                break outer_loop;
            }
        }

        if (existing_vtable != 0) {
            // Found a match:
            // Remove the current vtable.
            space = bb.capacity() - vtableloc;
            // Point table to existing vtable.
            bb.putInt(space, existing_vtable - vtableloc);
        } else {
            // No match:
            // Add the location of the current vtable to the list of vtables.
            if (num_vtables == vtables.length) vtables = Arrays.copyOf(vtables, num_vtables * 2);
            vtables[num_vtables++] = offset();
            // Point table to current vtable.
            bb.putInt(bb.capacity() - vtableloc, offset() - vtableloc);
        }

        nested = false;
        return vtableloc;
    }
结束对象编码的过程比较有意思:
- 在可用空间的结尾处添加值为 0 的int。
- 记录下当前的offset值 vtableloc,也就是 ByteBuffer中已经保存的数据的长度。
- 编码vtable。vtable用于记录对象每个字段的存储位置,在为对象添加字段时会被更新。在这里会用 vtableloc - vtable[i],找到每个对象的保存位置相对于对象起始位置的偏移,并将这个偏移量保存到ByteBuffer中。
- 记录对象所有字段的总长度,包含对象开始初值为0的int数据。
- 记录元数据的长度。这包括vtable的长度,记录 对象所有字段的总长度 的short型值,以及这个长度本身所消耗的存储空间。
- 查找是否有一个vtable与正在创建的这个一致。
- 找到了匹配的vtable,则清除创建的元数据。第 1 步中放0的那个位置的值,被更新为找到的vtable相对于对象的数据起始位置的偏移。
- 没有找到匹配的vtable。记下vtable的位置,第 1 步中放0的那个位置的值,被更新为新创建的vtable相对于对象的数据起始位置的偏移。
就像C++中的vtable,这里的vtable也是针对类创建的,而不是对象。
编码后的对象有如下的内存分布:
图中值为0的那个位置的值实际不是0,它指向vtable,图中是指向在创建对象时创建的vtable,但它也可以相同类已经存在的vtable。
结束编码
编码数据之后,需要执行 FlatBufferBuilder 的 finish() 结束编码:
    public int offset() {
        return bb.capacity() - space;
    }

    public void addOffset(int off) {
        prep(SIZEOF_INT, 0);  // Ensure alignment is already done.
        assert off <= offset();
        off = offset() - off + SIZEOF_INT;
        putInt(off);
    }

    public void finish(int root_table) {
        prep(minalign, SIZEOF_INT);
        addOffset(root_table);
        bb.position(space);
        finished = true;
    }

    public void finish(int root_table, String file_identifier) {
        prep(minalign, SIZEOF_INT + FILE_IDENTIFIER_LENGTH);
        if (file_identifier.length() != FILE_IDENTIFIER_LENGTH)
            throw new AssertionError("FlatBuffers: file identifier must be length " +
                                     FILE_IDENTIFIER_LENGTH);
        for (int i = FILE_IDENTIFIER_LENGTH - 1; i >= 0; i--) {
            addByte((byte)file_identifier.charAt(i));
        }
        finish(root_table);
    }
这个方法主要是记录根对象的位置。给 finish() 传入的的根对象的位置是相对于ByteBuffer结尾处的偏移,但是在 addOffset() 中,这个偏移会被转换为相对于整个数据块开始处的偏移。计算off值时,最后加的SIZEOF_INT是要给后面放入的off留出空间。
整个编码后的数据有如下的内存分布:
FlatBuffers 解码原理
这里我们通过一个生成的比较简单的类 PhoneNumber 来了解FlatBuffers的解码。
    public static PhoneNumber getRootAsPhoneNumber(ByteBuffer _bb) {
        return getRootAsPhoneNumber(_bb, new PhoneNumber());
    }

    public static PhoneNumber getRootAsPhoneNumber(ByteBuffer _bb, PhoneNumber obj) {
        _bb.order(ByteOrder.LITTLE_ENDIAN);
        return (obj.__assign(_bb.getInt(_bb.position()) + _bb.position(), _bb));
    }

    public void __init(int _i, ByteBuffer _bb) {
        bb_pos = _i;
        bb = _bb;
    }

    public PhoneNumber __assign(int _i, ByteBuffer _bb) {
        __init(_i, _bb);
        return this;
    }
创建对象的时候,会初始化 bb 为保存有对象数据的ByteBuffer,bb_pos 为对象数据在ByteBuffer中的偏移。在 getRootAsPhoneNumber() 中会从 ByteBuffer的position处获取根对象的偏移,并加上position,以计算出对象在ByteBuffer中的位置。
通过生成的PhoneNumber类中的number()、type()两个方法来看, FlatBuffers 中是怎么访问成员的:
    public String number() {
        int o = __offset(4);
        return o != 0 ? __string(o + bb_pos) : null;
    }

    public int type() {
        int o = __offset(6);
        return o != 0 ? bb.getInt(o + bb_pos) : 0;
    }
过程大体为:
- 获得对应字段在对象中的偏移位置。
- 根据字段的偏移位置及对象的原点位置计算出对象的位置。
- 通过ByteBuffer等提供的一些方法得到字段的值。
计算字段相对于对象原点位置的偏移的方法 __offset(4) 在com.google.flatbuffers.Table中定义:
  protected int __offset(int vtable_offset) {
    int vtable = bb_pos - bb.getInt(bb_pos);
    return vtable_offset < bb.getShort(vtable) ? bb.getShort(vtable + vtable_offset) : 0;
  }
在这个方法中,先是根据对象的原点处保存的vtable的偏移得到vtable的位置,然后在从vtable中获取对象字段相对于对象原点位置的偏移。
得到字符串字段的过程如下:
  protected String __string(int offset) {
    CharsetDecoder decoder = UTF8_DECODER.get();
    decoder.reset();

    offset += bb.getInt(offset);
    ByteBuffer src = bb.duplicate().order(ByteOrder.LITTLE_ENDIAN);
    int length = src.getInt(offset);
    src.position(offset + SIZEOF_INT);
    src.limit(offset + SIZEOF_INT + length);

    int required = (int)((float)length * decoder.maxCharsPerByte());
    CharBuffer dst = CHAR_BUFFER.get();
    if (dst == null || dst.capacity() < required) {
      dst = CharBuffer.allocate(required);
      CHAR_BUFFER.set(dst);
    }

    dst.clear();

    try {
      CoderResult cr = decoder.decode(src, dst, true);
      if (!cr.isUnderflow()) {
        cr.throwException();
      }
    } catch (CharacterCodingException x) {
      throw new Error(x);
    }

    return dst.flip().toString();
  }
了解了前面字符串编码的过程之后,相信也不难了解这里解码字符串的过程,这里完全是那个过程的相反过程。
如我们所见,FlatBuffers编码后的数据其实无需解码,只要通过生成的Java类对这些数据进行解释就可以了。
FlatBuffers的原理大体如此。
Done。


