操作系统:Centos7.4
(Tensorflow Object Detection API学习)介绍了Tensorflow Object Detection API的安装和使用,用的是官方提供的数据模型。本章介绍下,如何训练使用自己的数据模型。
参考官方文档
1. 概述
要在Tensorflow Object Detection API中使用自己的数据集,必须先把它转换为TFRecord文件格式。下面概述如何写一个生成TFRecord文件的脚本。
Label Maps
- 每个数据集都有一个与之相关的label map。
- 该label map定义了从字符串类名到整数类Ids的映射。
- label map应该是一个StringIntLabelMap文本框架。
- 样本label map可以在object_detection/data中找到。
- label map应始终从ID 1开始。
数据集要求
数据集中的每个样例都必须有以下信息:
- 一张jpeg或png格式的RGB图片
- 图像边框的列表。每个边界框应该包含:
由四个浮点数[ymin,xmin,ymax,xmax]定义的边界框坐标(原点位于左上角)。请注意,我们将标准化的坐标(x / width,y / height)存储在TFRecord数据集中。
边界框中的对象的类。
示例图片
以上示例图片有以下的label map:
item {
id: 1
name: 'Cat'
}
item {
id: 2
name: 'Dog'
}
我们可以使用下面的代码为这个图像生成一个tf.Example proto:
def create_cat_tf_example(encoded_cat_image_data):
   """Creates a tf.Example proto from sample cat image.

  Args:
    encoded_cat_image_data: The jpg encoded data of the cat image.

  Returns:
    example: The created tf.Example.
  """

  height = 1032.0
  width = 1200.0
  filename = 'example_cat.jpg'
  image_format = b'jpg'

  xmins = [322.0 / 1200.0]
  xmaxs = [1062.0 / 1200.0]
  ymins = [174.0 / 1032.0]
  ymaxs = [761.0 / 1032.0]
  classes_text = ['Cat']
  classes = [1]

  tf_example = tf.train.Example(features=tf.train.Features(feature={
      'image/height': dataset_util.int64_feature(height),
      'image/width': dataset_util.int64_feature(width),
      'image/filename': dataset_util.bytes_feature(filename),
      'image/source_id': dataset_util.bytes_feature(filename),
      'image/encoded': dataset_util.bytes_feature(encoded_image_data),
      'image/format': dataset_util.bytes_feature(image_format),
      'image/object/bbox/xmin': dataset_util.float_list_feature(xmins),
      'image/object/bbox/xmax': dataset_util.float_list_feature(xmaxs),
      'image/object/bbox/ymin': dataset_util.float_list_feature(ymins),
      'image/object/bbox/ymax': dataset_util.float_list_feature(ymaxs),
      'image/object/class/text': dataset_util.bytes_list_feature(classes_text),
      'image/object/class/label': dataset_util.int64_list_feature(classes),
  }))
  return tf_example
转换脚本类似如下写法:
import tensorflow as tf

from object_detection.utils import dataset_util


flags = tf.app.flags
flags.DEFINE_string('output_path', '', 'Path to output TFRecord')
FLAGS = flags.FLAGS


def create_tf_example(example):
  # TODO(user): Populate the following variables from your example.
  height = None # Image height
  width = None # Image width
  filename = None # Filename of the image. Empty if image is not from file
  encoded_image_data = None # Encoded image bytes
  image_format = None # b'jpeg' or b'png'

  xmins = [] # List of normalized left x coordinates in bounding box (1 per box)
  xmaxs = [] # List of normalized right x coordinates in bounding box
             # (1 per box)
  ymins = [] # List of normalized top y coordinates in bounding box (1 per box)
  ymaxs = [] # List of normalized bottom y coordinates in bounding box
             # (1 per box)
  classes_text = [] # List of string class name of bounding box (1 per box)
  classes = [] # List of integer class id of bounding box (1 per box)

  tf_example = tf.train.Example(features=tf.train.Features(feature={
      'image/height': dataset_util.int64_feature(height),
      'image/width': dataset_util.int64_feature(width),
      'image/filename': dataset_util.bytes_feature(filename),
      'image/source_id': dataset_util.bytes_feature(filename),
      'image/encoded': dataset_util.bytes_feature(encoded_image_data),
      'image/format': dataset_util.bytes_feature(image_format),
      'image/object/bbox/xmin': dataset_util.float_list_feature(xmins),
      'image/object/bbox/xmax': dataset_util.float_list_feature(xmaxs),
      'image/object/bbox/ymin': dataset_util.float_list_feature(ymins),
      'image/object/bbox/ymax': dataset_util.float_list_feature(ymaxs),
      'image/object/class/text': dataset_util.bytes_list_feature(classes_text),
      'image/object/class/label': dataset_util.int64_list_feature(classes),
  }))
  return tf_example


def main(_):
  writer = tf.python_io.TFRecordWriter(FLAGS.output_path)

  # TODO(user): Write code to read in your dataset to examples variable

  for example in examples:
    tf_example = create_tf_example(example)
    writer.write(tf_example.SerializeToString())

  writer.close()


if __name__ == '__main__':
  tf.app.run()
2. 训练自己的模型
2.1 准备工作
- 安装TensorFlow和TensorFlow Object Detection API
- 为了不修改原API源码结构(/home/tensorflow_install/models),新建目录:/home/tensorflow_suredata
2.2 训练数据集准备
准备VOC格式的数据集,如何制作VOC格式数据集
数据集是PASCAL VOC格式的,不是上面说的需要的TFRecord格式,需要转换格式,API已经提供了转换代码:object_detection/dataset_tools/create_pascal_tf_record.py
-
把object_detection/data/pascal_label_map.pbtxt 拷贝到/home/tensorflow_suredata/,并修改里面内容为自己的数据集里内容,如我的内容为:
item {
id: 1
name: 'cocacola'
}
item {
id: 2
name: 'weiquan'
}
item {
id: 3
name: 'tongyi'
}
item {
id: 4
name: 'qingdaochunsheng'
} -
下载并解压SSDMobilenet模型:
cd /home/tensorflow_suredata
wget http://download.tensorflow.org/models/object_detection/ssd_mobilenet_v1_coco_2017_11_17.tar.gz
tar -xvf ssd_mobilenet_v1_coco_2017_11_17.tar.gz -
将ssd_mobilenet_v1_coco_2017_11_17中的下列文件拷贝到/home/tensorflow_suredata/目录下:

-
在/home/tensorflow_suredata目录下新建VOCdevkit目录,并在VOCdevkit目录下新建VOC2017目录,并将你的数据集中的所有内容拷贝到/home/tensorflow_suredata/VOCdevkit/VOC2017目录下:
#新建目录
mkdir -p /home/tensorflow_suredata/VOCdevkit/VOC2017

-
将
/home/tensorflow_install/models/research/object_detection/dataset_tools/create_pascal_tf_record.py 拷贝到/home/tensorflow_suredata/目录下,并修改以下内容:- YEARS = ['VOC2007', 'VOC2012', 'merged']
修改为:
YEARS = ['VOC2007', 'VOC2012', 'VOC2017', 'merged'] - def dict_to_tf_example(data,
修改为:
def dict_to_tf_example(year,data, - img_path = os.path.join(data['folder'], image_subdirectory, data['filename'])
修改为:
img_path = os.path.join(year, image_subdirectory, data['filename']) - years = ['VOC2007', 'VOC2012']
修改为:
years = ['VOC2007', 'VOC2012', 'VOC2017'] - examples_path = os.path.join(data_dir, year, 'ImageSets', 'Main',
'aeroplane_' + FLAGS.set + '.txt')
修改为:
examples_path = os.path.join(data_dir, year, 'ImageSets', 'Main',
FLAGS.set + '.txt') - tf_example = dict_to_tf_example(data, FLAGS.data_dir, label_map_dict,FLAGS.ignore_difficult_instances)
修改为:
tf_example = dict_to_tf_example(year, data, FLAGS.data_dir, label_map_dict,FLAGS.ignore_difficult_instances)
- YEARS = ['VOC2007', 'VOC2012', 'merged']
-
生成用于训练和验证的tf_record文件(切换到/home/tensorflow_suredata目录):
- 生成pascal_train.record:
python create_pascal_tf_record.py --data_dir=/home/tensorflow_suredata/VOCdevkit --label_map_path=/home/tensorflow_suredata/pascal_label_map.pbtxt --year=VOC2017 --set=train --output_path=/home/tensorflow_suredata/pascal_train.record - 生成pascal_val.record:
python create_pascal_tf_record.py --data_dir=/home/tensorflow_suredata/VOCdevkit --label_map_path=/home/tensorflow_suredata/pascal_label_map.pbtxt --year=VOC2017 --set=val --output_path=/home/tensorflow_suredata/pascal_val.record
会生成如下两个文件:

- 生成pascal_train.record:
-
修改config文件
将/home/tensorflow_install/models/research/object_detection/samples/configs/ssd_mobilenet_v1_pets.config复制到/home/tensorflow_suredata/并重命名为ssd_mobilenet_v1_pascal.config,根据实际情况修改以下内容:- fine_tune_checkpoint: "/home/tensorflow_suredata/model.ckpt"
- input_path: "/home/tensorflow_suredata/pascal_train.record"
- label_map_path: "/home/tensorflow_suredata/pascal_label_map.pbtxt"
- input_path: "/home/tensorflow_suredata/pascal_val.record"
- label_map_path: "/home/tensorflow_suredata/pascal_label_map.pbtxt"
- num_steps: 20000
- num_steps:5000
num_steps:训练步数。如果数据集较小,可以修改为较小。pets数据集包含7393张图片设置为20万次,当前数据集只有100张,设置为5000次应该差不多。可以在训练的时候查看loss增减情况来修改步数。
2.3 训练数据集
在/home/tensorflow_suredata/目录下执行以下命令开始训练:
python /home/tensorflow_install/models/research/object_detection/train.py --logtostderr --train_dir=/home/tensorflow_suredata/output --pipeline_config_path=/home/tensorflow_suredata/ssd_mobilenet_v1_pascal.config
看到如下输出,表示正在训练:

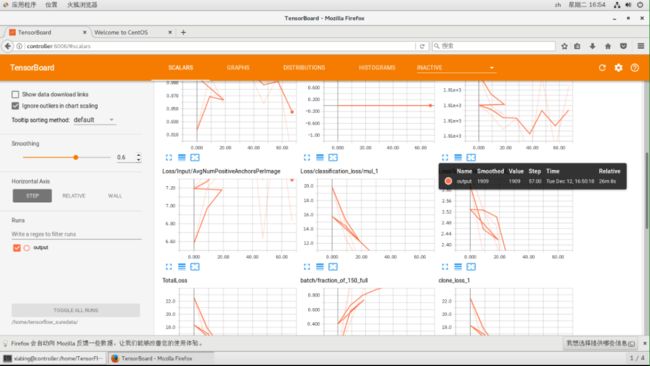
2.4 可视化log
可以一边训练一边查看训练的log,从中可以看到Loss的趋势。
执行以下命令:
tensorboard --logdir=/home/tensorflow_suredata/
打开训练机web后台:
http://192.168.1.201:6006
看到训练信息如下所示:
2.5 评估模型
在/home/tensorflow_suredata/目录下新建目录evaluation,执行以下命令:
python /home/tensorflow_install/models/research/object_detection/eval.py --logtostderr --checkpoint_dir=/home/tensorflow_suredata/output --pipeline_config_path=/home/tensorflow_suredata/ssd_mobilenet_v1_pascal.config --eval_dir=/home/tensorflow_suredata/evaluation
2.6 生成可被调用的模型
训练完成后,会在/home/tensorflow_suredata/output目录下生成以下几个文件(我这个训练步数是3000):

执行以下命令生成可被调用的模型:
python /home/tensorflow_install/models/research/object_detection/export_inference_graph.py --input_type image_tensor --pipeline_config_path /home/tensorflow_suredata/ssd_mobilenet_v1_pascal.config --trained_checkpoint_prefix /home/tensorflow_suredata/output/model.ckpt-3000 --output_directory /home/tensorflow_suredata/savedModel
生成以下几个文件:

2.7 调用生成的模型
在/home/tensorflow_suredata/目录下新建object_detection_test.py加入以下代码,注意里面路径要写对:
import numpy as np
import os
import six.moves.urllib as urllib
import sys
import tarfile
import tensorflow as tf
import zipfile

from collections import defaultdict
from io import StringIO
from matplotlib import pyplot as plt
from PIL import Image

## This is needed to display the images.
#%matplotlib inline

# This is needed since the notebook is stored in the object_detection folder.
sys.path.append("..")

from utils import label_map_util

from utils import visualization_utils as vis_util

# What model to download.
#MODEL_NAME = 'ssd_mobilenet_v1_coco_2017_11_17'
#MODEL_FILE = MODEL_NAME + '.tar.gz'
#DOWNLOAD_BASE = #'http://download.tensorflow.org/models/object_detection/'
MODEL_NAME = 'output'

# Path to frozen detection graph. This is the actual model that is used for the object detection.
PATH_TO_CKPT = MODEL_NAME + '/frozen_inference_graph.pb'

# List of the strings that is used to add correct label for each box.
PATH_TO_LABELS = pascal_label_map.pbtxt

NUM_CLASSES = 4

#download model
#opener = urllib.request.URLopener()
#opener.retrieve(DOWNLOAD_BASE + MODEL_FILE, MODEL_FILE)
#tar_file = tarfile.open(MODEL_FILE)
#for file in tar_file.getmembers():
#  file_name = os.path.basename(file.name)
#  if 'frozen_inference_graph.pb' in file_name:
#    tar_file.extract(file, os.getcwd())

#Load a (frozen) Tensorflow model into memory.
detection_graph = tf.Graph()
with detection_graph.as_default():
  od_graph_def = tf.GraphDef()
  with tf.gfile.GFile(PATH_TO_CKPT, 'rb') as fid:
    serialized_graph = fid.read()
    od_graph_def.ParseFromString(serialized_graph)
    tf.import_graph_def(od_graph_def, name='')
#Loading label map
label_map = label_map_util.load_labelmap(PATH_TO_LABELS)
categories = label_map_util.convert_label_map_to_categories(label_map, max_num_classes=NUM_CLASSES, use_display_name=True)
category_index = label_map_util.create_category_index(categories)
#Helper code
def load_image_into_numpy_array(image):
  (im_width, im_height) = image.size
  return np.array(image.getdata()).reshape(
      (im_height, im_width, 3)).astype(np.uint8)

# For the sake of simplicity we will use only 2 images:
# image1.jpg
# image2.jpg
# If you want to test the code with your images, just add path to the images to the TEST_IMAGE_PATHS.
PATH_TO_TEST_IMAGES_DIR = 'test_images'
#TEST_IMAGE_PATHS = [ os.path.join(PATH_TO_TEST_IMAGES_DIR, 'image{}.jpg'.format(i)) for i in range(1, 3) ]
TEST_IMAGE = sys.argv[1]
print 'the test image is:', TEST_IMAGE

# Size, in inches, of the output images.
IMAGE_SIZE = (12, 8)

with detection_graph.as_default():
  with tf.Session(graph=detection_graph) as sess:
    # Definite input and output Tensors for detection_graph
    image_tensor = detection_graph.get_tensor_by_name('image_tensor:0')
    # Each box represents a part of the image where a particular object was detected.
    detection_boxes = detection_graph.get_tensor_by_name('detection_boxes:0')
    # Each score represent how level of confidence for each of the objects.
    # Score is shown on the result image, together with the class label.
    detection_scores = detection_graph.get_tensor_by_name('detection_scores:0')
    detection_classes = detection_graph.get_tensor_by_name('detection_classes:0')
    num_detections = detection_graph.get_tensor_by_name('num_detections:0')
    #for image_path in TEST_IMAGE_PATHS:
    image = Image.open(TEST_IMAGE)
    # the array based representation of the image will be used later in order to prepare the
    # result image with boxes and labels on it.
    image_np = load_image_into_numpy_array(image)
    # Expand dimensions since the model expects images to have shape: [1, None, None, 3]
    image_np_expanded = np.expand_dims(image_np, axis=0)
    image_tensor = detection_graph.get_tensor_by_name('image_tensor:0')
    # Each box represents a part of the image where a particular object was detected.
    boxes = detection_graph.get_tensor_by_name('detection_boxes:0')
    # Each score represent how level of confidence for each of the objects.
    # Score is shown on the result image, together with the class label.
    scores = detection_graph.get_tensor_by_name('detection_scores:0')
    classes = detection_graph.get_tensor_by_name('detection_classes:0')
    num_detections = detection_graph.get_tensor_by_name('num_detections:0')
    # Actual detection.
    (boxes, scores, classes, num_detections) = sess.run(
        [boxes, scores, classes, num_detections],
        feed_dict={image_tensor: image_np_expanded})
    # Visualization of the results of a detection.
    vis_util.visualize_boxes_and_labels_on_image_array(
        image_np,
        np.squeeze(boxes),
        np.squeeze(classes).astype(np.int32),
        np.squeeze(scores),
        category_index,
        use_normalized_coordinates=True,
        line_thickness=8)

    print(scores)
    print(classes)
    print(category_index)

    final_score = np.squeeze(scores)
    count = 0
    for i in range(100):
        if scores is None or final_score[i] > 0.5:
            count = count + 1
    print 'the count of objects is: ', count

    plt.figure(figsize=IMAGE_SIZE)
    plt.imshow(image_np)
    plt.show()
调以下命令检测图片(我的测试图片为/home/test_images/1.jpg):
python /home/tensorflow_suredata/object_detection_test.py /home/test_images/1.jpg
识别结果:

参考:
Disclaimer
This answer is not meant to be the right or only way of training the object detection module. This is simply I sharing my experience and what has worked for me. I'm open to suggestions and learning more about this as I am still new to ML in general.
TL;DR
- Create your own PASCAL VOC format dataset
- Generate TFRecords from it
- Configure a pipeline
- Visualize
Each section of this answer consists of a corresponding Edit (see below). After reading each section, please read its Edit as well for clarifications. Corrections and tips were added for each section.
Tools used
LabelImg: A tool for creating PASCAL VOC format annotations.
1. Create your own PASCAL VOC dataset
PS: For simplicity, the folder naming convention of my answer follows that of Pascal VOC 2012
A peek into the May 2012 dataset, you'll notice the folder as having the following structure
+VOCdevkit +VOC2012 +Annotations +ImageSets +Action +Layout +Main +Segmentation +JPEGImages +SegmentationClass +SegmentationObject
For the time being, amendments were made to the following folders:
Annotations: This is were all the images' corresponding XML files will be placed in. Use the suggested tool above to create the annotations. Do not worry about
JPEGImages: Location of your actual images. Make sure they are of type JPEG because that's what is currently supported in order to create TFRecords using their provided script.
ImageSets->Main: This simply consists of text files. For each class, there exists a corresponding train.txt, trainval.txt and val.txt. Below is a sample of the contents of the aeroplane_train.txt in the VOC 2012 folder
2008_000008 -1
2008_000015 -1
2008_000019 -1
2008_000023 -1
2008_000028 -1
2008_000033  1
The structure is basically image name followed by a boolean saying whether the corresponding object exists in that image or not. Take for example image 2008_000008 does not consist of an aeroplane hence marked with a -1 but image 2008_000033 does.
I wrote a small Python script to generate these text files. Simply iterate through the image names and assign a 1 or -1 next to them for object existence. I added some randomness among my text files by shuffling the image names.
The {classname}_val.txt files consist of the testing validation datasets. Think of this as the test data during training. You want to divide your dataset into training and validation. More info can be found here. The format of these files is similar to that of training.
At this point, your folder structure should be
+VOCdevkit +VOC2012 +Annotations --(for each image, generated annotation) +ImageSets +Main --(for each class, generated *classname*_train.txt and *classname*_val.txt) +JPEGImages --(a bunch of JPEG images)
1.1 Generating label map
With the dataset prepared, we need to create the corresponding label maps. Navigate to models/object_detection/data and open pascal_label_map.pbtxt.
This file consists of a JSON that assigns an ID and name to each item. Make amendments to this file to reflect your desired objects.
2. Generate TFRecords
If you look into their code especially this line, they explicitly grab the aeroplane_train.txt only. For curios minds, here's why. Change this file name to any of your class train text file.
Make sure VOCdevkit is inside models/object_detection then you can go ahead and generate the TFRecords.
Please go through their code first should you run into any problems. It is self explanatory and well documented.
3. Pipeline Configuration
The instructions should be self explanatory to cover this segment. Sample configs can be found in object_detection/samples/configs.
For those looking to train from scratch as I did, just make sure to remove the fine_tune_checkpointand from_detection_checkpoint nodes. Here's what my config file looked like for reference.
From here on you can continue with the tutorial and run the training process.
4. Visualize
Be sure to run the eval in parallel to the training in order to be able to visualize the learning process. To quote Jonathan Huang
the best way is to just run the eval.py binary. We typically run this binary in parallel to training, pointing it at the directory holding the checkpoint that is being trained. The eval.py binary will write logs to an
eval_dirthat you specify which you can then point to with Tensorboard.You want to see that the mAP has "lifted off" in the first few hours, and then you want to see when it converges. It's hard to tell without looking at these plots how many steps you need.
EDIT I (28 July '17):
I never expected my response to get this much attention so I decided to come back and review it.
Tools
For my fellow Apple users, you could actually use RectLabel for annotations.
Pascal VOC
After digging around, I finally realized that trainval.txt is actually the union of training and validation datasets.
Please look at their official development kit to understand the format even better.
Label Map Generation
At the time of my writing, ID 0 represents none_of_the_above. It is recommended that your IDs start from 1.
Visualize
After running your evaluation and directed tensorboard to your Eval directory, it'll show you the mAP of each category along with each category's performance. This is good but I like seeing my training data as well in parallel with Eval.
To do this, run tensorboard on a different port and point it to your train directory
tensorboard --logdir=${PATH_TO_TRAIN} --port=${DESIRED_NUMBER}