- Pre-Notify
- 项目目录
- express.js 和 application.js
- app对象之http服务器
- app对象之路由功能
- 注册路由
- 接口实现
- 分发路由
- 接口实现
- router
- 测试用例1与功能分析
- 功能实现
- router和route
- layer
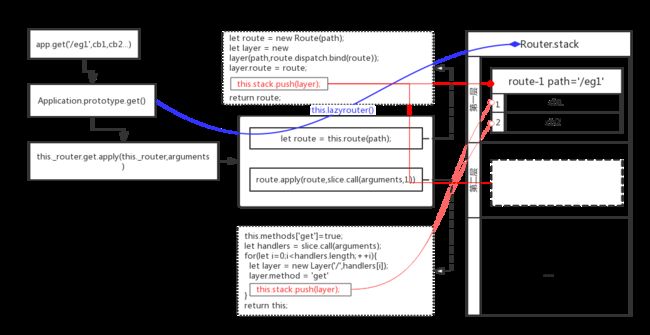
- 注册路由
- 注册流程图
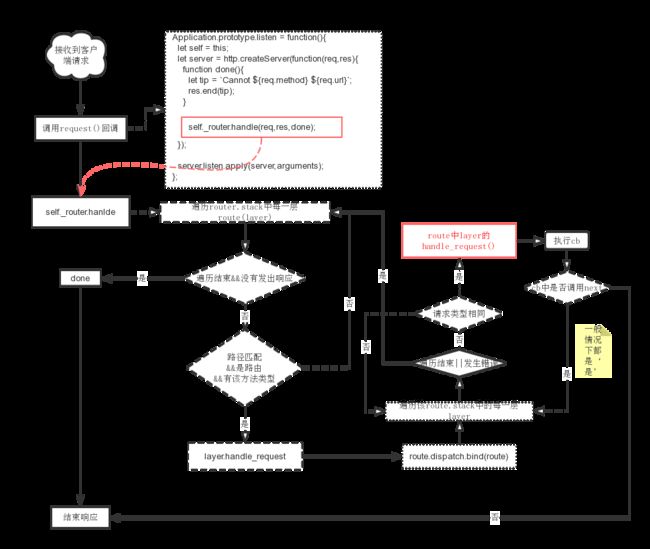
- 路由分发
- 分发流程图
- 测试用例2与功能分析
- 功能实现
- Q
- 为什么选用next递归遍历而不选用for?
- 我们从Express的路由系统设计中能学到什么?
- 源码
Pre-Notify
阅读本文前可以先参考一下我之前那篇简单版的express实现的文章。
Express深入理解与简明实现
相较于之前那版,此次我们将实现Express所有核心功能。
预计分为:路由篇(上、下)、中间件篇(上、下)、炸鸡篇~
(づ ̄ 3 ̄)づ Let's Go!
项目目录
iExpress/
|
|
| - application.js  #app对象
|
| - html.js         #模板引擎
|
| - route/
|   | - index.js    #路由系统(router)入口
|   | - route.js    #路由对象
|   | - layer.js    #router/route层
|
| - middle/
|   | - init.js     #内置中间件
|
| - test-case/
|    | - 测试用例文件1
|    | - ...
|
·- express.js       #框架入口
express.js 和 application.js
在简单版Express实现中我们已经知道,将express引入到项目后会返回一个函数,当这个函数运行后会返回一个app对象。(这个app对象是原生http的超集)
其中,express.js模块导出的就是那个运行后会返回app对象的函数
// test-case0.js
let express = require('./express.js');
let app = express(); //app对象是原生http对象的超集
...
app.listen(8080); //调用的其实就是原生的server.listen
上个版本中因为实现的功能较简单,只用了一个express.js文件就搞定了,而在这个版本中我们需要专门用一个模块application.js来存放app相关的部分
//express.js
const Application = require('./application.js'); //app

function createApplication(){
    return new Application(); //app对象
}

module.exports = createApplication;
app对象之http服务器
app对象 最重要的一个作用是用来启动一个http服务器,通过app.listen方法我们能间接调用到原生的.listen方法来启动一个服务器。
//application.js
function Application(){}
Application.prototype.listen = function(){
    function done(){}
    let server = http.createServer(function(req,res,done){
        ...
    })
    server.listen.apply(server,arguments);
}
app对象之路由功能
app对象的另外一个重要作用,也就是Express框架的主要作用是实现路由功能。
路由功能是个虾?
路由功能能让服务器针对客户端不同的请求路径和请求方法做出不同的回应。
而要实现这个功能我们需要做两件事情:注册路由 和 路由分发
[warning] 为了保证app对象作为接口层的清晰明了,app对象只存放接口,而真正实现部分是委托给路由系统(router.js)来处理的。
注册路由
当一个请求来临时,我们可以依据它的请求方式和请求路径来决定服务器是否给予响应以及怎么响应。
而我们怎么让服务器知道哪些请求该给予响应以及怎样响应呢?
这就是注册路由所要做的事情了。
在服务器启动时,我们需要对服务器想要给予回应的请求做上记录,先存起来,这样在请求来临的时候服务器就能对照这些记录分别作出响应。
[warning]注意
每一条记录都对应一条请求,记录中一般都包含着这条请求的请求路径和请求方式。但一条请求不一定只对应一条记录(中间件、all方法什么的)。
接口实现
我们通过在 app对象 上挂载.get、.post这一类的方法来实现路由的注册。
其中.get方法能匹配请求方式为get的请求,.post方法能匹配请求方式为post的请求。
请求方式一共有33种,每一种都对应一个app下的方法,emmm...我们不可能写33遍吧?So我们需要利用一个methods包来帮助我们减少代码的冗余。
const methods = require('methods');
// 这个包是http.METHODS的封装,区别在于原生的方法名全文大写,后者全为小写。

methods.forEach(method){
    Application.prototype[method] = function(){
        //记录路由信息到路由系统(router)
        this._router[method].apply(this._router,slice.call(arguments));
        return this; //支持app.get().get().post().listen()连写
    }
}

//以上代码是以下的简写
Application.prototype.get = fn
Application.prototype.post = fn
...
[info] 可以发现,app.get等只是一个对外接口,实际要做的事情我们都是委托给router这个类来做的。
分发路由
当请求来临时我们就需要依据记录的路由信息来作出对应的响应了,这个过程我们称之为分发路由/dispatch
上面是广义的分发路由的含义,但其实分发路由其实包括两个过程,匹配路由 和 分发路由。
- 匹配路由
当一个请求来临时,我们需要知道我们所记录的路由信息中是否囊括这条请求。(如果没有囊括,一般来说服务器会对客户端作出一个提示性的回应) - 分发路由
当路由匹配上,则会执行被匹配上的路由信息中所存储的回调。
接口实现
Application.prototype.listen = function(){
    let self = this;

    let server = http.createServer(function(req,res){
        function done(){ //没有匹配上路由时的回调
            res.end(`Cannot ${req.method} ${req.url}`);
        }
        //将路由匹配的具体处理交给路由系统的handle方法
        //handle方法中会对匹配上的路由再进行路由分发
        self._router.handle(req,res,done);
    })
    server.listen.apply(server,arguments);
}
router
测试用例1与功能分析
const express = require('../lib/express');
const app = express();

app
  .get('/hello',function(req,res,next){
    res.write('hello,');
    next();
  },function(req,res,next){
    res.write('world');
    next();
  })
  .get('/other',function(req,res,next){
    console.log('不会走这里');
    next();
  })
  .get('/hello',function(req,res,next){
    res.end('!');
  })
.listen(8080,function(){
  let tip = `server is running at 8080`;
  console.log(tip);
});

<<< 输出
hello,world!
相较于之前简单版的express实现,完整的express还支持同一条路由同时添加多个cb,以及分开对同一条路由添加cb。
这是怎么办到的呢?
最主要的是,我们存储路由信息时,将路由和方法组织成了一种类似于二维数组的二维数据形式
即在router(路由容器)里存放一层层route,而又在每一层route(路由)里再存放一层层callbcak。
这样我们通过遍历router中的route,匹配上一个route后,就能在这个route下找到所这个route注册的callbacks。
功能实现
router和route
在
router(路由容器)里存放一层层route,而又在每一层route(路由)里再存放一层层callbcak。
首先我们需要在有两个构造函数来生产我们需要的router和route对象。
//router/index.js
function Router(){
    this.stack = [];
}
//router/route.js
function Route(path){
    this.path = path;
    this.stack = [];
    this.methods = {};
}
接着,我们在Router和Route中生产出的对象下都开辟了一个stack,这个stack用来存放一层层的层/layer。这个layer(层),在Router和Route中所存放的东东是不一样的,在router中存放的是一个层层的route(即Router的实例),而route中存放的是一层层的方法。
它们各自的stack里存放的对象大概是长这样的
//router.stack
[
    {
        path
        handler
    }
    ,{
        ...
    }
]

//route.stack
[
    {
        handler
    }
    ,{
        ...
    }
]
可以发现,这两种stack里存放的对象都包含handler,并且第一种还包含一个path。
第一种包含path,这是因为在router.stack遍历时是匹配路由,这就需要比对path。
而两种都需要有一个handler属性是为什么呢?
我们很容易理解第二个stack,route.stack里存放的就是我们设计时准备要存放的callbacks,那第一个stack里的handler存放的是什么呢?
当我们路由匹配成功时,我们需要接着遍历这个路由,这个route,这就意味着我们需要个钩子在我们路由匹配成功时执行这个操作,这个遍历route.stack的钩子就是第一个stack里对象所存放的handler(即是下文中的route.dispatch方法)。
layer
实际项目中我们将router.stack和route.stack里存放的对象们封装成了同一种对象形式——layer
一方面是为了语义化,一方面是为了把对layer对象(原本的routes对象和methods对象)进行操作的方法都归纳到layer对象下,以便维护。
// router/layer.js
function Layer(path,handler){
    this.path = path;  //如果这一层代表的存放的callbcak,这为任意路径即可
    this.handler =handler;
}
//路由匹配时,看路径是否匹配得上
Layer.prototype.match = function(path){
    return this.path === path?true:false;
}
注册路由
//在router中注册route

http.METHODS.forEach(METHOD){
    let method = METHOD.toLowercase();
    Router.prototype[method] = function(path){
        let route = this.route(path); //在router.stack里存储一层层route
        route[method].apply(route,slice.call(arguments,1)); //在route.stack里存储一层层callbcak
    }
}

Router.prototype.route = function(path){
    let route = new Route(path);
    let layer = new Layer(path,route.dispatch.bind(route)); //注册路由分发函数,用以在路由匹配成功时遍历route.stack
    layer.route = route; //用以区分路由和中间件
    this.stack.push(layer);

    return route;
}
//在route中注册callback

http.METHODS.forEach(METHOD){
    let method = METHOD.toLowercase();
    Route.prototype[method] = function(){
        let handlers = slice.call(arguments);
        this.methods[method] = true; //用以快速匹配
        for(let i=0;i
注册流程图
路由分发
整个路由分发就是遍历我们之前用router.stack和route.stack所组成的二维数据结构的过程。
我们将遍历router.stack的过程称之为匹配路由,将遍历route.stack的过程称之为路由分发。
匹配路由:
// router/index.js

Router.prototype.handle = function(req,res,done){
    let self = this,i = 0,{pathname} = url.parse(req.url,true);
    function next(err){ //err主要用于错误中间件 下一章再讲
        if(i>=self.stack.length){
            return done;
        }
        let layer = self.stack[i++];
        if(layer.match(pathname)){ //说明路径匹配成功
            if(layer.route){ //说明是路由
                if(layer.route.handle_method){ //快速匹配成功,说明route.stack里存放有对应请求类型的callbcak
                    layer.handle_request(req,res,next);
                }else{
                    next(err);
                }
            }else{ //说明是中间件
                //下一章讲先跳过
                next(err);
            }
        }else{
            next(err);
        }
    }
    next();
}
路由分发
上面在我们最终匹配路由成功时,会执行layer.handle_request方法
// layer.js中

Layer.prototype.handle_request = function(req,res,next){
    this.handler(req,res,next);
}
此时的handler为route.dispatch (忘记的同学可以往上查看注册路由部分)
//route.js中

Route.prototype.dispatch = function(req,res,out){ //注意这个out接收的是遍历route.stack时的next()
    let self = this,i =0;

    function next(err){
        if(err){ //说明回调执行错误,跳过当前route.stack的遍历交给错误中间件来处理
            return out(err);
        }
        if(i>=self.stack.length){
            return out(err); //说明当前route.stack遍历完成,继续遍历router.stack,进行下一条路由的匹配
        }
        let layer = self.stack[i++];
        if(layer.method === req.method){
            self.handle_request();
        }else{
            next(err);
        }
    }
    next();
}
分发流程图
测试用例2与功能分析
const express = require('express');
const app = express();

app
  .route('/user')
  .get(function(req,res){
    res.end('get');
  })
  .post(function(req,res){
    res.end('post');
  })
  .put(function(req,res){
    res.end('put');
  })
  .delete(function(req,res){
    res.end('delete');
  })
.listen(3000);
以上是一种resful风格的借口写法,如果理清了我们上面的东东,其实这个实现起来相当简单。
无非就是在调用.route()方法的时候返回我们的route(route.stack里的一层),这样再调用.get等其实就是调用Route.prototype.get等了,就能够顺利往这一层的route里添加不同的callbcak了。
功能实现
//application.js中

Application.prototype.route = function(){
    this.lazyrouter();
    let route = this._router.route(path);
    return route;
}
另外要注意的是,需要让 route.prototype[method] 返回route以便连续调用。
So easy~
Q
为什么选用next递归遍历 而不 选用for?
emmm...我想说express源码是这么设计的,嗯,这个答案好不好?ლ(′◉❥◉`ლ)
其实可以用for的哦,我有试过的啦,
修改router/index.js 下的 handle方法如下
 let self = this
    ,{pathname} = url.parse(req.url,true);

  for(let i=0;i=self.stack.length){
      return done();
    }
    let layer = self.stack[i];
    if(layer.match(pathname)){
      if(!layer.route){

      }else{

        if(layer.route&&layer.route.handle_method(req.method)){
          // let flag = layer.handle_request(req,res);

for(let j=0;j 我们调用.get等方法时就不再需要传递next和传入next参数
app
  .get('/hello',function(req,res){
    res.write('hello,');
    // this.stop = true;
    this.error = true; //交给错误处理中间件来处理。。 中间件还没实现,但原则上来说是能行的
    // next();
  },function(req,res,next){
    res.write('world');
    this.stop = true; //看这里!!!!!!!!!!!!layer遍历将在这里结束
    // next();
  })
  .get('/other',function(req,res){
    console.log('不会走这里');
    // next();
  })
  .get('/hello',function(req,res){
    res.end('!');   //不会执行,在上面已经结束了
  })
.listen(8080,function(){
  let tip = `server is running at 8080`;
  console.log(tip);
});
在上面这段代码中this.stop=true的作用就相当于不调用next(),而不在回调身上挂载this.stop时就相当于调用了next()。
原理很简单,就是在遍历每一层route.stack时(注意是route的stack不是router的stack),检查layer.handler是否设置了stop,如果设置了就停止遍历,不论是路由layer(router.stack)的遍历还是callbacks layer(route.stack)的遍历。
那么问题来了,有什么理由非要用next来遍历吗?
答案是:
for无法支持异步,而next能!这里的支持异步是指,当一个callbcak执行后需要拿到它的异步结果在下一个callbcak执行时用到。嗯...for就干不成这事了,for无法感知它执行的函数中是否调用了异步函数,也不知道这些异步函数什么能执行完毕。
我们从Express的路由系统设计中能学到什么?
emmm...私认为layer这个抽象还是不错的,把对每一层(不关心它具体是route还是callback)的层级相关操作都封装挂载到这个对象下,嗯。。。回顾了一下类诞生的初衷~
当然next这种钩子式递归遍历也是可以的,我们知道了它的应用场景,支持异步~
emmm...学到什么...我们不仅要模仿写一个框架,更重要的是,嗯..要思考!要思考!同学们,学到了个什么,要学以致用...嗯...嘿哈!
所以我半夜还在码这篇文章到底学到了个虾??emmm...
世界那么大——
源码
//express.js

const Application= require('./application.js');
const Router = require('./router');

function createApplication(){
  return new Application;
}

createApplication.Router = Router;

module.exports = createApplication;
//application.js
const http = require('http');
const url = require('url');
const Router = require('./router');

function Application(){

}

Application.prototype.lazyrouter = function(){
  if(!this._router){
    this._router= new Router();
  }
};


http.METHODS.forEach(function(METHOD){
  let method = METHOD.toLowerCase();
  Application.prototype[method] = function(){
    this.lazyrouter();
    this._router[method].apply(this._router,arguments);
    return this;
  }
});

Application.prototype.listen = function(){
  let self = this;
  let server = http.createServer(function(req,res){
    function done(){
      let tip = `Cannot ${req.method} ${req.url}`;
      res.end(tip);
    }
    self._router.handle(req,res,done);
  });

  server.listen.apply(server,arguments);
};

module.exports = Application;
//router/index.js
//这一部分兼容了一些后一章要将的内容

let http = require('http');
const Route = require('./route.js');
const Layer = require('./layer.js');
const slice = Array.prototype.slice;
const url = require('url');

function Router(){
  function router(){
    router.handle(req,res,next);
  }
  Object.setPrototypeOf(router,proto);
  router.stack = [];
  router.paramCallbacks = [];
  return router;
}

let proto = Object.create(null);

proto.route = function(path){
  let route = new Route(path)
    ,layer = new Layer(path,route.dispatch.bind(route));
  layer.route = route;
  this.stack.push(layer);

  return route;
};

http.METHODS.forEach(function(METHOD){
  let method = METHOD.toLowerCase();
  proto[method] = function(path){
    let route = this.route(path); //注册路由层
    route[method].apply(route,slice.call(arguments,1)); //注册路由层的层
  }
});

proto.handle = function(req,res,done){
  let index = 0,self = this
    ,removed
    ,{pathname} = url.parse(req.url,true);
  function next(err){
    if(index>=self.stack.length){
      return done();
    }
    if(removed){
      req.url = removed+req.url;
      removed = '';
    }
    let layer = self.stack[index++];

    if(layer.match(pathname)){
      if(!layer.route){

      } else{
        if(layer.route&&layer.route.handle_method(req.method)){
          layer.handle_request(req,res,next);
        }else{
          next(err);
        }
      }
    }else{
      next(err);
    }
  }

  next();
};

module.exports = Router;
// router/route.js
let http = require('http');
let Layer = require('./layer.js');
let slice = Array.prototype.slice;

function Route(path){
  this.path = path;
  this.methods = {};
  this.stack = [];
}

http.METHODS.forEach(function(METHOD){
  let method = METHOD.toLowerCase();
  Route.prototype[method] = function(){
    let handlers = slice.call(arguments);
    this.methods[method] = true;

    for(let i=0;i=self.stack.length){
      return out(); //当前路由的layer已经遍历完 跳出 继续匹配下一条路由
    }

    let layer = self.stack[index++];

    if(layer.method === req.method.toLowerCase()){
      layer.handle_request(req,res,next);
    }else{
      next(err);
    }
  }
  next();
};

module.exports = Route;
// router/layer.js
function Layer(path,handler){
  this.path = path;
  this.handler = handler;
}

Layer.prototype.match = function(path){
  return path === this.path?true:false;
};

Layer.prototype.handle_request = function(req,res,next){
  this.handler(req,res,next);
};

Layer.prototype.handle_error = function(err,req,res,next){
  if(this.handler.length !=4){
    return next(err);
  }
  this.handler(err,req,res,next);
};

module.exports = Layer;

