之前写好了OC版,这次发个Swift版,流程差不多,就是协议方法名字不一样啦,细小的差别大概就是参数名的细微变动啦,比方说“UUID”变成了“uuid”,详情如下。
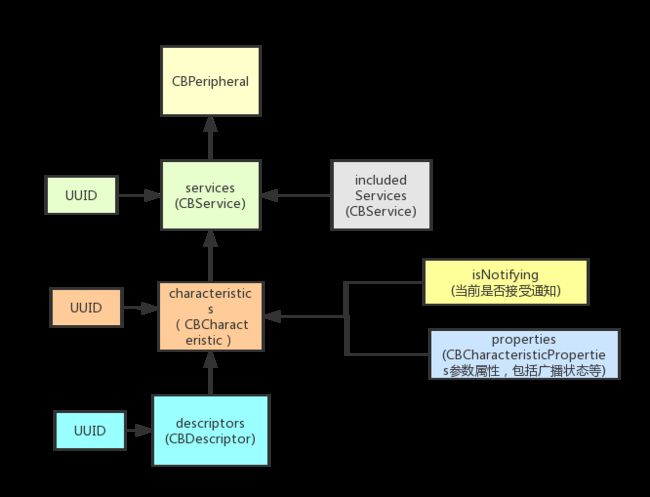
iOS BLE开发调用的是CoreBluetooth系统原生库,基本用到的类有:
CBCentralManager //系统蓝牙设备管理对象
CBPeripheral //外围设备
CBService //外围设备的服务或者服务中包含的服务
CBCharacteristic //服务的特性
CBDescriptor //特性的描述符
他们之间的关系如图:
下面开始代码部分:
1、初始化:
manager = CBCentralManager.init(delegate: self, queue: DispatchQueue.main)
2、调用蓝牙,走协议方法:
开始扫描外围设备
    func centralManagerDidUpdateState(_ central: CBCentralManager){
        switch central.state {
        case .unknown:
            print("CBCentralManagerStateUnknown")
        case .resetting:
            print("CBCentralManagerStateResetting")
        case .unsupported:
            print("CBCentralManagerStateUnsupported")
        case .unauthorized:
            print("CBCentralManagerStateUnauthorized")
        case .poweredOff:
            print("CBCentralManagerStatePoweredOff")
        case .poweredOn:
            print("CBCentralManagerStatePoweredOn")

        }
    }
管理者central有state属性,
unknown,
CBCentralManagerStateResetting,
unsupported,//不支持蓝牙
unauthorized,//未获取权限
poweredOff,//蓝牙关
poweredOn//蓝牙开
状态为 poweredOn 开始扫描周围设备:
manager.scanForPeripherals(withServices: nil, options: nil)
第一个参数类型为CBUUID 的数组,可以通过UUID来筛选设备,
传nill扫描周围所有设备,
3、找到设备就会调用如下方法
    func centralManager(_ central: CBCentralManager, didDiscover peripheral: CBPeripheral, advertisementData: [String : Any], rssi RSSI: NSNumber){
        //这里自己去设置下连接规则
        if  peripheral.name?.hasPrefix("p"){
            //[peripheral.name == :@""]

            //找到的设备必须持有它,否则CBCentralManager中也不会保存peripheral,那么CBPeripheralDelegate中的方法也不会被调用!!
            discoveredPeripheralsArr.append(peripheral)
        }
    }
_discoverPeripherals是我自己的成员变量数组;
一个主设备最多能连7个外设,每个外设最多只能给一个主设备连接,连接成功,失败,断开会进入各自的委托
连接外设成功的委托:
func centralManager(_ central: CBCentralManager, didConnect peripheral: CBPeripheral)
外设连接失败的委托:
func centralManager(_ central: CBCentralManager, didFailToConnect peripheral: CBPeripheral, error: Error?)
断开外设的委托:
func centralManager(_ central: CBCentralManager, didDisconnectPeripheral peripheral: CBPeripheral, error: Error?)
4、连接上后我们就停止扫描,并查找Peripheral的service
func centralManager(_ central: CBCentralManager, didConnect peripheral: CBPeripheral){
        connectedPeripheral = peripheral
        //外设寻找service
        peripheral .discoverServices(nil)

        peripheral.delegate = self
        self.title = peripheral.name
        manager .stopScan()
    }
5、扫描到service,我们走协议方法
func peripheral(_ peripheral: CBPeripheral, didDiscoverServices error: Error?){
        if (error != nil){
            print("查找 services 时 \(peripheral.name) 报错 \(error?.localizedDescription)")
        }
        for service in peripheral.services! {
            //需要连接的 CBCharacteristic 的 UUID
            if service.uuid.uuidString == ServiceUUID1{
                peripheral.discoverCharacteristics(nil, for: service)
            }
        }
    }
在做该类项目时,外设需求往往有一个UUID来确定需要连接的服务,对应这边service的UUID,而不是peripheral的UUID
(在使用lightblue模拟测试时,可以添加service并设置其UUID来模拟测试,如下图)
6、读取和设置characteristic
获取到service会走
    func peripheral(_ peripheral: CBPeripheral, didDiscoverCharacteristicsFor service: CBService, error: Error?){
        if error != nil{
            print("查找 characteristics 时 \(peripheral.name) 报错 \(error?.localizedDescription)")
        }
        //获取Characteristic的值,读到数据会进入方法:
        for characteristic in service.characteristics! {
            peripheral .readValue(for: characteristic)

            //设置 characteristic 的 notifying 属性 为 true , 表示接受广播
            peripheral.setNotifyValue(true, for: characteristic)
        }
    }
    //获取Characteristic的值,读到数据会进入方法:
    func peripheral(_ peripheral: CBPeripheral, didUpdateValueFor characteristic: CBCharacteristic, error: Error?){
        let resultStr = NSString(data: characteristic.value!, encoding: String.Encoding.utf8.rawValue)

        print("characteristic uuid:\(characteristic.uuid)   value:\(resultStr)")

        if lastString == resultStr{
            return;
        }

        // 操作的characteristic 保存
        self.savedCharacteristic = characteristic
    }
"setNotifyValue"是用来设置characteristic的一个notifying属性,设置为YES可以接受外围的广播通知
我们项目的场景是,设置notifying = Yes后,发送某些字符串,然后通过方法
func peripheral(_ peripheral: CBPeripheral, didUpdateValueFor characteristic: CBCharacteristic, error: Error?)
不断获取新数据。
7、获取到characteristic后就可以写入数据啦~
//写数据方法如下,需要把它加到需要的位置
    func viewController(_ peripheral: CBPeripheral,didWriteValueFor characteristic: CBCharacteristic,value : Data ) -> () {

        //只有 characteristic.properties 有write的权限才可以写入
        if characteristic.properties.contains(CBCharacteristicProperties.write){
            //设置为  写入有反馈
            self.connectedPeripheral.writeValue(value, for: characteristic, type: .withResponse)
        }else{
            print("写入不可用~")
        }
    }
写数据会回调方法:
    func peripheral(_ peripheral: CBPeripheral, didWriteValueFor characteristic: CBCharacteristic, error: Error?){
        if error != nil{
            print("写入 characteristics 时 \(peripheral.name) 报错 \(error?.localizedDescription)")
        }

        let alertView = UIAlertController.init(title: "抱歉", message: "写入成功", preferredStyle: UIAlertControllerStyle.alert)
        let cancelAction = UIAlertAction.init(title: "好的", style: .cancel, handler: nil)
        alertView.addAction(cancelAction)
        alertView.show(self, sender: nil)
        lastString = NSString(data: characteristic.value!, encoding: String.Encoding.utf8.rawValue)

    }
这个地方要注意,因为写入成功后仍然会调用:
func peripheral(_ peripheral: CBPeripheral, didUpdateValueFor characteristic: CBCharacteristic, error: Error?)
可能会导致数据无限发送,要加个发送完之后的阻塞。
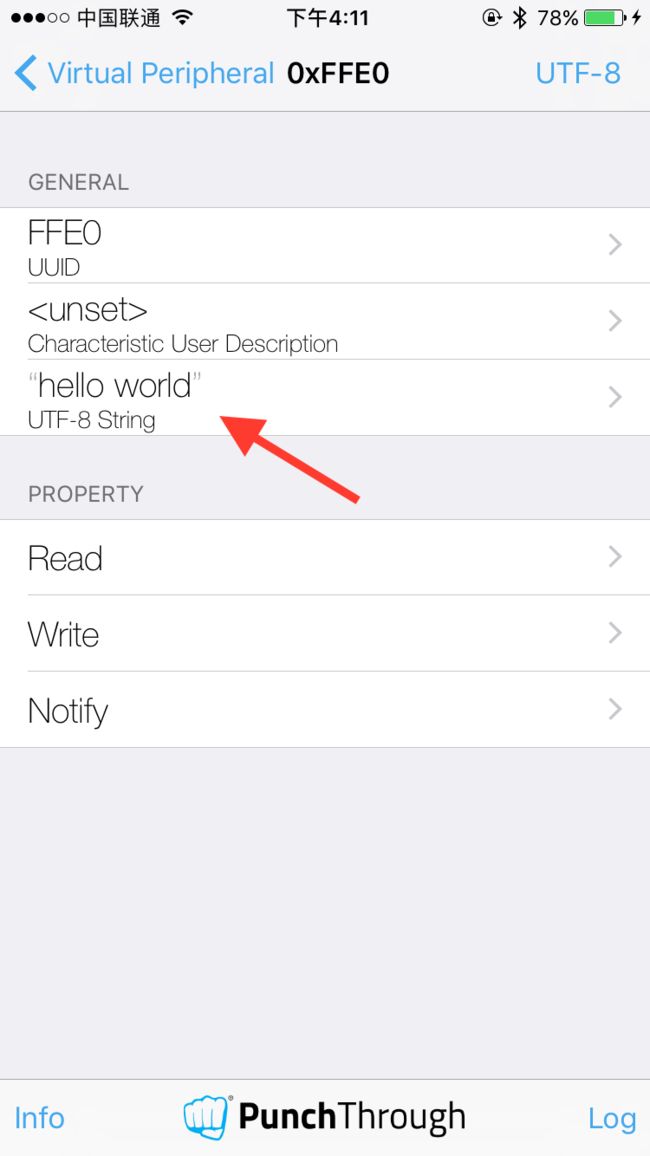
此时可以通过lightblue进行测试,测试前为了方便,先将右上角的hex改为我们常用的编码方式UTF-8,每次写入成功都会将此处的value改变,如图:
我的BLE开发大概写到这,欢迎下载 Demo
Objective-C 版本请点击 :
【iOS】BLE蓝牙开发


