写在前面的几句话
上面一篇介绍了下简单的堆叠式布局,但是实现上相对来说还是比较简单,而且效果也并没有特别好,那么这一篇呢,就对堆叠式布局进行更加深入的讲解,主要是通过对子控件的测量和布局,通过这篇的讲解,大家应该可以实现出各种不同风格的堆叠式的布局
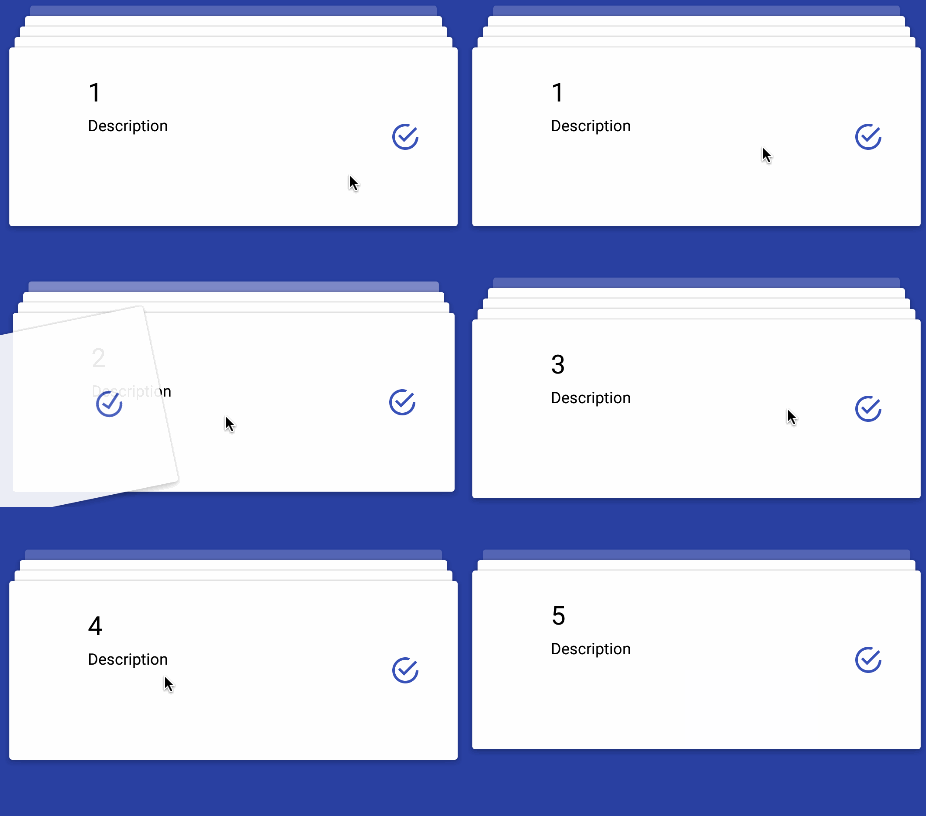
首先看一下最终实现的效果
是不是看起来酷炫了很多,没错,揍是这么炫酷,
那其实简单分析一下是怎么实现的,
从静态到动态,首先将第一个初始的界面实现出来
通过这张图,我们可以看出来其实是5个item堆叠起来的,随着item的position越往后,那么他的宽和高会有一定的变化,最后一个item的透明度和其他4个的透明度不相同。
第一步呢就是修改之前的attachChildViews方法里面的添加子View个数的限制,修改为<5
由于在子View绘制之前需要将子View的相关宽高和位置进行修改,所以在重写onMeasure与onLayout的方法以满足我们的需要
Step1.重写onMeasure方法
首先通过onMeasure方法来看看,对宽高的修改
通过截图我们可以分析一下在onMeasure中究竟需要做一些什么?
父布局的高度需要调整
子View的宽度需要调整
父布局的高度的调整
上代码通过代码分析
private int itemsMarginTop = dp2px(8);
//获取父控件的高度
private int calculateWrapContentHeight(){
    int maxChildHeight = 0;
    for (int index = 0; index < getChildCount(); index++){
        final View childView = getChildAt(index);
        measureChildView(childView);
        if (childView.getVisibility() != View.GONE){
            maxChildHeight = Math.max(childView.getMeasuredHeight(),maxChildHeight);
        }
    }
    int itemsElevationPadding = itemsMarginTop * getViewsCount();
    int measuredHeight = maxChildHeight + getPaddingTop() + getPaddingBottom() + itemsElevationPadding;
    return measuredHeight;
}

//
private int getViewsCount() {
     return (getChildCount() - 1);
}
通过代码来看呢,主要是先遍历子View寻找出item高度最大的一个,虽然我使用的item高度都是一致的,但是也不排除会有高度不一致的需求,然后把这个子View最大的高度加上getPaddingTop()与getPaddingBottom(),最后加上每个item之间间隔的高度就好了,这样父控件的高度就计算出来了。
子View的宽度的调整
上代码通过代码分析
//测量子View的宽高
private void configureChildViewsMeasureSpecs(int widthMeasureSpec){
    int childWidthMeasureSpec;
    int childHeightMeasureSpec;
    final int parentWidth = MeasureSpec.getSize(widthMeasureSpec)
            - getPaddingLeft()
            - getPaddingRight();
    int viewWidth;
    int viewHeight;
    for (int index = getViewsCount(); index >= 0; index--){
        final View childView = getChildAt(index);
        measureChildView(childView);
        viewWidth = caculateViewWidth(parentWidth, index);
        viewHeight = childView.getMeasuredHeight();
        childWidthMeasureSpec = MeasureSpec.makeMeasureSpec(viewWidth, MeasureSpec.EXACTLY);
        childHeightMeasureSpec = MeasureSpec.makeMeasureSpec(viewHeight, MeasureSpec.EXACTLY);
        childView.measure(childWidthMeasureSpec, childHeightMeasureSpec);
    }
}

private int itemsMarginLeftRight = dp2px(8);

//测量子View的宽
private int caculateViewWidth(float parentWidth,int index){
    float viewWidth = calculateTheoreticalViewWidth(parentWidth,index);
    return (int)viewWidth;
}

private float calculateTheoreticalViewWidth(float parentWidth,int index){
    return (parentWidth - (itemsMarginLeftRight * (getViewsCount() - index)));
}
其实上面分析过程中主要是宽度的调整,所以通过当前的index去算得子View的宽度,获取到子View的新的宽高后通过measure方法将子View的宽高设置
所以onMeasure方法如下
protected void onMeasure(int widthMeasureSpec, int heightMeasureSpec) {
    int viewWidth = MeasureSpec.getSize(widthMeasureSpec);
    int viewHeight = calculateWrapContentHeight();
    setMeasuredDimension(viewWidth, viewHeight);
    configureChildViewsMeasureSpecs(widthMeasureSpec);
}
Step2.重写onLayout方法
在OnLayout方法中主要是对子控件的位置进行定位,在OnMeasure中我们其实已经对宽高进行了测量,高度不变,宽度是根据不同的index不一样,通过初始的静态图,我们可以发现需要对Top和Left的位置定位就好了。
上代码通过代码分析
protected void onLayout(boolean changed, int left, int top, int right, int bottom) {
    int childLeft;
    int childTop;
    int childRight;
    int childBottom;
    for (int index = getViewsCount(); index >= 0; index--){
            final View childView = getChildAt(index);
            childLeft = calculateViewLeft(left, right, childView.getMeasuredWidth(), index);
            childRight = childLeft + childView.getMeasuredWidth();
            childTop = calculateViewTop(bottom, childView.getMeasuredHeight(), index);
            childBottom = childTop + childView.getMeasuredHeight();
            childView.layout(childLeft, childTop, childRight, childBottom);
    }
    if (getChildCount() > 1){
        getChildAt(0).setAlpha(0.2);
    }
}

//计算子控件的left
private int calculateViewLeft(int parentLeft, int parentRight, int childWith, int zIndex) {
    int center = parentLeft + ((parentRight - parentLeft) / 2);
    int result = center - (childWith / 2);
    return result;
}

//计算子控件的top
private int calculateViewTop(int parentBottom, int viewHeight, int zIndex) {
    int viewTop = calculateTheoreticalViewTop(parentBottom, viewHeight, zIndex);
    return viewTop;
}

private int calculateTheoreticalViewTop(int parentBottom, int viewHeight, int zIndex){
    int topMinimumOffset = itemsMarginTop;
    int viewTop = parentBottom - getPaddingBottom() - viewHeight - (topMinimumOffset
            * (getViewsCount() - zIndex));
    return viewTop;
}
看看计算子控件的left的方法很简单,其实就是通过父View的宽度和子View的宽度确定
而计算子控件的Top方法则需要把每个item之间间隔的高度给计算上
这样其实每个View的位置就会有不同了,然后把最底层的View的透明度设置就可以了
到这里呢,堆叠式的布局就实现了,那我们简单看下效果把
不过看起来是不是很生硬,效果也不好,确实是这样,后面呢主要是对效果的优化
Step3.动效优化
通过最上面的图可以分析到,随着手指的运动,第一个子View会随着运动并且透明度有变化,这个其实上一篇文章已经实现了的,那么后面的View其实也随着手指的运动会发生变化,所以我们可以通过手指的运动的distance来进行后面View的动画,通过不断的requestLayout()让这个布局不停的重绘,
首先把上一篇文章中的关于onTouchListener的方法贴上来
private void initEvent(final View item)
{
    //设置item的重心,主要是旋转的中心
    item.setPivotX(getScreenWidth(getContext()) / 2);
    item.setPivotY(getScreenHeight(getContext()) * 2);
    item.setOnTouchListener(new View.OnTouchListener() {
        float touchX, distanceX;//手指按下时的坐标以及手指在屏幕移动的距离

        @Override
        public boolean onTouch(View v, MotionEvent event) {
            switch (event.getAction()) {
                case MotionEvent.ACTION_DOWN:
                    touchX = event.getRawX();
                    break;
                case MotionEvent.ACTION_MOVE:
                    distanceX = event.getRawX() - touchX;

                    item.setRotation(distanceX * mRotateFactor);
                    //alpha scale 1~0.1
                    //item的透明度为从1到0.1
                    item.setAlpha(1 - (float) Math.abs(mItemAlphaFactor * distanceX));
                    break;
                case MotionEvent.ACTION_UP:

                    if (Math.abs(distanceX) > mLimitTranslateX) {
                        //移除view
                        removeViewWithAnim(item, distanceX < 0);
                    } else {
                        //复位
                        item.setRotation(0);
                        item.setAlpha(1);
                    }
                    break;
            }
            return true;
        }
    });
}

public void removeViewWithAnim( final View view, boolean isLeft)
{
    view.animate()
            .alpha(0)
            .rotation(isLeft ? -90 : 90)
            .setDuration(400).setListener(new AnimatorListenerAdapter() {
        @Override
        public void onAnimationEnd(Animator animation) {
            adapter.remove(view.getTag());
            adapter.notifyDataSetChanged();
        }
    });
}
这里有有一个distanceX,通过这个值来使全部的View运动起来
首先通过这个dinstancX来计算在X轴分析运动对于整个宽度的比例
private float calculateCurrentLeftRightOffsetFactor() {
    float offsetFactor = ((float)offsetLeftRight / getMeasuredHeight());
    if (offsetFactor > 1) {
        offsetFactor = 1f;
    }
    return offsetFactor;
}
通过这个比例我们就可以动态的取改变子控件的宽度,Top的值,以及透明度
改变子控件的宽度
那就要改变之前测量子View宽度的方法了
//测量子View的宽
private int caculateViewWidth(float parentWidth,int index){
    float viewWidth = calculateTheoreticalViewWidth(parentWidth,index);
    if (index < viewIndex){
        int nextViewIndex = index + 1;
        float nextViewWidth = calculateTheoreticalViewWidth(parentWidth, nextViewIndex);
        float offsetFactor = calculateCurrentLeftRightOffsetFactor();
        viewWidth += (nextViewWidth - viewWidth) * offsetFactor;
    }
    return (int)viewWidth;
}
这里的viewIndex是我们选中的Item标志,所以当位于我们选中Item后面的子View的宽度会进行变化,变化主要通过View之间宽度的差值和前面的算得的比例进行计算得出,那么这样就得到了View宽度的变化
改变子控件Top的值
改变Top值的方法和上面一样的,所以就不做介绍了,也是要修改之前的测量Top值的方法了,直接贴上代码
//计算子控件的top
private int calculateViewTop(int parentBottom, int viewHeight, int zIndex) {
    int viewTop = calculateTheoreticalViewTop(parentBottom, viewHeight, zIndex);
    if (offsetLeftRight > 0 && zIndex < viewIndex) {
        int nextViewIndex = zIndex + 1;
        final View nextView = getChildAt(nextViewIndex);
        int nextViewTop = calculateTheoreticalViewTop(parentBottom,
                nextView.getMeasuredHeight(),
                nextViewIndex);
        float offsetFactor = calculateCurrentLeftRightOffsetFactor();
        viewTop += (nextViewTop - viewTop) * offsetFactor;
    }
    return viewTop;
}
改变子控件透明度
直接贴代码咯
if (getChildCount() > 1) {
    float viewAlpha = 0.20f;
    if (offsetLeftRight > 0) {
        viewAlpha = calculateCurrentLeftRightOffsetFactor();
    }
    if (viewAlpha < 0.2f) {
        viewAlpha = 0.2f;
    }
    getChildAt(0).setAlpha(viewAlpha);
}
最后在removeViewWithAnim里面添加一些东西就好了如下
public void removeViewWithAnim( final View view, boolean isLeft)
{
    view.animate()
            .alpha(0)
            .rotation(isLeft ? -90 : 90)
            .setDuration(400).setListener(new AnimatorListenerAdapter() {
        @Override
        public void onAnimationEnd(Animator animation) {
            offsetLeftRight = 0;
            viewIndex = 0;
            adapter.remove(view.getTag());
            adapter.notifyDataSetChanged();
        }
    });
}
到这里基本就实现了动态运动的效果咯,运行看一下
动态是动态了,可是是不是没有那么顺滑呢?
主要原因是在于随着手指运动后就戛然而止了,因为我们运动的距离肯定没有屏幕这么宽的,所以我们需要在removeViewWithAnim加一个Animator去延续这个动作
OK贴上代码
public void removeViewWithAnim( final View view, boolean isLeft,float rotation)
{

    ValueAnimator animator = ValueAnimator.ofInt(offsetLeftRight, getMeasuredWidth());
    animator.setInterpolator(new AccelerateInterpolator());
    animator.setDuration(300/90 * (90 - (int)Math.abs(rotation)));
    animator.addUpdateListener(new ValueAnimator.AnimatorUpdateListener() {
        @Override
        public void onAnimationUpdate(ValueAnimator animation) {
            offsetLeftRight = (int) animation.getAnimatedValue();
            requestLayout();
        }
    });
    animator.start();

    view.animate()
            .alpha(0)
            .rotation(isLeft ? -90 : 90)
            .setDuration(300/90 * (90 - (int)Math.abs(rotation))).setListener(new AnimatorListenerAdapter() {
        @Override
        public void onAnimationEnd(Animator animation) {
            offsetLeftRight = 0;
            viewIndex = 0;
            adapter.remove(view.getTag());
            adapter.notifyDataSetChanged();
        }
    });
}
为了更好的体验呢,相对的也修改了一下别的东西
OK完毕,再看一下效果
前几个体验还是很好的,但是后面的是不是就跑偏了,为什么呢,看一下,主要是整个高度的问题,和透明度的问题,所以在进行一下修改
private int calculateWrapContentHeight(){
    int maxChildHeight = 0;
    for (int index = 0; index < getChildCount(); index++){
        final View childView = getChildAt(index);
        measureChildView(childView);
        if (childView.getVisibility() != View.GONE){
            maxChildHeight = Math.max(childView.getMeasuredHeight(),maxChildHeight);
        }
    }
    int itemsElevationPadding = itemsMarginTop * 5;
    int measuredHeight = maxChildHeight + getPaddingTop() + getPaddingBottom() + itemsElevationPadding;
    return measuredHeight;
}

if (getChildCount() > 4) {
    float viewAlpha = 0.20f;
    if (offsetLeftRight > 0) {
        viewAlpha = calculateCurrentLeftRightOffsetFactor();
    }
    if (viewAlpha < 0.2f) {
        viewAlpha = 0.2f;
    }
    getChildAt(0).setAlpha(viewAlpha);
}
在运行看一看效果
Bingo,完成,到这里就已经完成所有的效果拉,等等,忘了一点东西,那个点击View的事件好像还是没有什么动画效果的,其实上面的动画效果已经写好了,调用下就可以了
completeView.setOnClickListener(new View.OnClickListener() {
    @Override
    public void onClick(View v) {
        StackMoreLayout stackLayout = (StackMoreLayout)parent;
        stackLayout.removeViewWithAnim(convertView,false,0);
    }
});
到这里才算真正的把所有的都完成了,不容易呀,哈哈
写在后面的几句话
相信通过这篇文章,大家对堆叠式布局的理解以及运用应该更加深刻了把,通过这篇文章的方式我们可以实现各种不同的效果,可以更加的炫酷,那到这里就基本把稍复杂点的堆叠式布局讲完了,后面如果有更加深入的理解和学习,我也会贴出来和大家一起分享。


