1.调试日志UE_LOG和打印输出GEngine->AddOnScreenDebugMessage
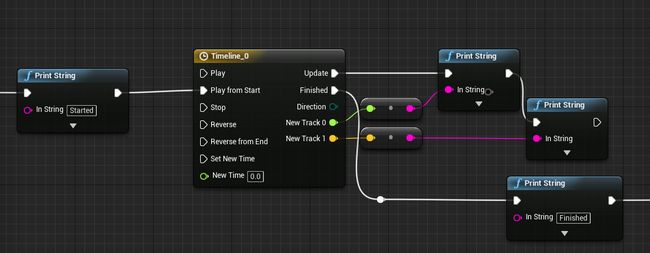
蓝图里的PrintString,这里可以用做
    if (GEngine)
    {
        GEngine->AddOnScreenDebugMessage(-1,200,FColor(23,233,4,255), OtherActor->GetName());
    }
如果要输出Log,可以用
UE_LOG(LogTemp, Warning, TEXT("Your message"));
参考更多: 如何使用UE_LOG
2.抓取PlayerState, 此处的PlayerState是 AFPSShooterPlayerState
    if (GEngine)
    {
        AFPSShooterPlayerState* curState = Cast(PlayerState);
        if (curState)
        {
            int a = curState->GetGold();
            GEngine->AddOnScreenDebugMessage(1, 1,FColor::Red,FString::FromInt(a));
        }
    }
参考更多: How to access custom PlayerState inside Character
参考更多: 如何配置android的adb环境变量
4.VR模式下镜像显示适配,重点看mode3和mode4
if (WindowMirrorMode == 1)
        {// Native mode: single eye
            // need to clear when rendering only one eye since the borders won't be touched by the DrawRect below
            RHICmdList.ClearColorTexture(BackBuffer, FLinearColor::Black, FIntRect());
            RendererModule->DrawRectangle(
                RHICmdList,
                ViewportWidth / 4, 0,
                ViewportWidth / 2, ViewportHeight,
                0.1f, 0.2f,
                0.3f, 0.6f,
                FIntPoint(ViewportWidth, ViewportHeight),
                FIntPoint(1, 1),
                *VertexShader,
                EDRF_Default);
        }
        else if (WindowMirrorMode == 2)
        {// Native mode: stereo
            RendererModule->DrawRectangle(
                RHICmdList,
                0, 0,
                ViewportWidth, ViewportHeight,
                0.0f, 0.0f,
                1.0f, 1.0f,
                FIntPoint(ViewportWidth, ViewportHeight),
                FIntPoint(1, 1),
                *VertexShader,
                EDRF_Default);
        }
        else if (WindowMirrorMode == 3)
        {// Self-defined Horizontal
            RendererModule->DrawRectangle(
                RHICmdList,
                0, 0,
                ViewportWidth, ViewportHeight,
                0.006f, 0.2825f,
                0.44f, 0.4425f,
                FIntPoint(ViewportWidth, ViewportHeight),
                FIntPoint(1, 1),
                *VertexShader,
                EDRF_Default);
        }
        else if (WindowMirrorMode == 4)
        {// Self-defined Vertical
            RendererModule->DrawRectangle(
                RHICmdList,
                0, 0,
                ViewportWidth, ViewportHeight,
                0.1f, 0.2f,
                0.3f, 0.6f,
                FIntPoint(ViewportWidth, ViewportHeight),
                FIntPoint(1, 1),
                *VertexShader,
                EDRF_Default);
        }
对应的配置文件修改位置
project folder -> Saved -> Config -> Windows -> Engine.ini
Change:
[SteamVR.Settings]
WindowMirrorMode=0 // 0可以换为1-4的整数
[补全 - 针对 Oculus CV1 和 HTC Vive的优化]
Vive用了以上代码以后,建议在Console里面用命令 “hmd mirror 3” 和 “hmd mirror 4”调用上述代码的修改结果;
Oculus需要使用 “hmd mirror mode 3”和“hmd mirror mode 4”达到某种神奇的效果。
参考更多: UE4 + HTC Vive Fullscreen VR Tutorial
5.用代码实现一次Timeline
官方4.15编辑器,继承Actor Component便于添加到Actor中重用。代码如下,经测试可以使用。
//头文件
#include "Components/ActorComponent.h"
#include "Components/TimelineComponent.h"// for MyTimeline
#include "MyTimelineComp.generated.h"
UCLASS( ClassGroup=(Custom), meta=(BlueprintSpawnableComponent) )
class MYLEARNING415_API UMyTimelineComp : public UActorComponent
{
    GENERATED_BODY()
public:
    // Sets default values for this component's properties
    UMyTimelineComp();

protected:
    // Called when the game starts
    virtual void BeginPlay() override;

    FTimeline* MyTimeline;
    UCurveFloat* fCurve;
    UCurveVector* vCurve;

    /** Update时的float回调的函数变量 */
    FOnTimelineFloat MyTimelineFloatFunction;

    /** Update时的vector回调的函数变量 */
    FOnTimelineVector MyTimelineVectorFunction;

    /** Finish时回调的函数变量 */
    FOnTimelineEvent MyTimelineFinishedFunc;

    /** Update时的float回调的函数 */
    UFUNCTION()
    void TimelineFloatReturn(float value);

    /** Update时的vector回调的函数 */
    UFUNCTION()
    void TimelineVectorReturn(FVector vector);

    /** Finish时回调的函数 */
    UFUNCTION()
    void TimelineFinished();
public:
    /** 启动这个方法 */
    void StartTimeline();

    // Called every frame
    virtual void TickComponent(float DeltaTime, ELevelTick TickType, FActorComponentTickFunction* ThisTickFunction) override;
};
//实现文件,启动方法是 void UMyTimelineComp::StartTimeline()
#include "MyLearning415.h"
#include "Engine.h"
#include "MyTimelineComp.h"


// Sets default values for this component's properties
UMyTimelineComp::UMyTimelineComp()
{
    //确保更新方法能运行
    //更新方法: void UMyTimelineComp::TickComponent(float DeltaTime, ELevelTick TickType, FActorComponentTickFunction* ThisTickFunction)
    PrimaryComponentTick.bCanEverTick = true;

    //从Content Browers中获取curve float
    static ConstructorHelpers::FObjectFinder CurveFloat(TEXT("CurveFloat'/Game/Misc/FC_Timeline.FC_Timeline'"));
    if (CurveFloat.Object) {
        fCurve = CurveFloat.Object;
    }

    //从Content Browers中获取curve vector
    static ConstructorHelpers::FObjectFinder CurveVector(TEXT("CurveVector'/Game/Misc/VC_Timeline.VC_Timeline'"));
    if (CurveVector.Object) {
        vCurve = CurveVector.Object;
    }

    //构造Timeline,并且设定时间长度
    MyTimeline = new FTimeline();
    MyTimeline->SetTimelineLength(1.0f);

    //绑定Update时的float回调的函数
    MyTimelineFloatFunction.BindUFunction(this, "TimelineFloatReturn");
    MyTimeline->AddInterpFloat(fCurve, MyTimelineFloatFunction);

    //绑定Update时的vector回调的函数
    MyTimelineVectorFunction.BindUFunction(this, "TimelineVectorReturn");
    MyTimeline->AddInterpVector(vCurve, MyTimelineVectorFunction);

    //绑定Finish时回调的函数
    MyTimelineFinishedFunc.BindUFunction(this, "TimelineFinished");
    MyTimeline->SetTimelineFinishedFunc(MyTimelineFinishedFunc);
}


// Called when the game starts
void UMyTimelineComp::BeginPlay()
{
    Super::BeginPlay();

}


void UMyTimelineComp::TimelineFloatReturn(float value)
{// 随Timeline每帧返回float
    GEngine->AddOnScreenDebugMessage(-3, 1, FColor::Cyan, FString::SanitizeFloat(value));
}

void UMyTimelineComp::TimelineVectorReturn(FVector vector)
{// 随Timeline每帧返回vector
    GEngine->AddOnScreenDebugMessage(-2, 1, FColor::Red, vector.ToString());
}

void UMyTimelineComp::TimelineFinished()
{// Timeline结束的时候调用
    GEngine->AddOnScreenDebugMessage(-1, 1, FColor::Green, TEXT("Finished"));
}

void UMyTimelineComp::StartTimeline()
{// 这次我们用的方法是从头播放。
    if (MyTimeline != nullptr) {
        GEngine->AddOnScreenDebugMessage(-1, 1, FColor::Green, TEXT("Started"));
        MyTimeline->PlayFromStart();
    }
}

// Called every frame
void UMyTimelineComp::TickComponent(float DeltaTime, ELevelTick TickType, FActorComponentTickFunction* ThisTickFunction)
{
    Super::TickComponent(DeltaTime, TickType, ThisTickFunction);

    GEngine->AddOnScreenDebugMessage(0, 1, FColor::Yellow, TEXT("Tick"));

    if (MyTimeline != nullptr && MyTimeline->IsPlaying())
    {//每一帧更新这个Timeline
        MyTimeline->TickTimeline(DeltaTime);
    }
}
参考文章: [Unreal Engine : Timeline を C++ コードで作成・実行する]
6. 同步玩家的转向
方法一: 使用Pawn.h中的变量RemoteViewPitch同步玩家的Pitch
    // pawn.h
    /** Replicated so we can see where remote clients are looking. */
    UPROPERTY(replicated)
    uint8 RemoteViewPitch;
    // pawn.cpp
void APawn::SetRemoteViewPitch(float NewRemoteViewPitch)
{
    // Compress pitch to 1 byte
    NewRemoteViewPitch = FRotator::ClampAxis(NewRemoteViewPitch);
    RemoteViewPitch = (uint8)(NewRemoteViewPitch * 255.f/360.f);
}
    // MyCharacter.cpp, the implementation
void MyCharacter::Tick(float DeltaTime)
{
    Super::Tick(DeltaTime);

    if (!IsLocallyControlled())
    {
        FRotator NewRot = CameraComponent->RelativeRotation;
        NewRot.Pitch = RemoteViewPitch * 360.0f / 255.0;

        CameraComponent->SetRelativeRotation(NewRot);
    }

}
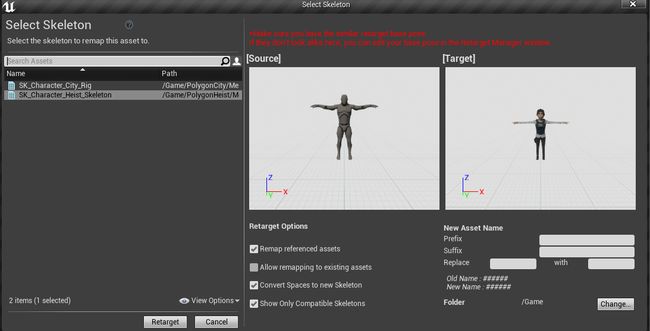
7. 重定向人形动画骨骼
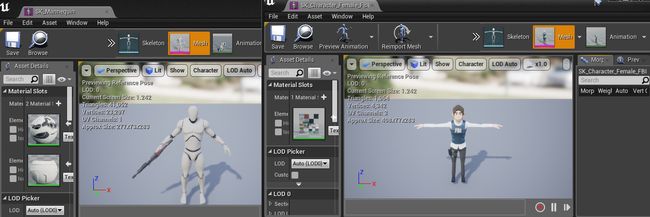
项目中使用的人形骨骼,有可能和Mannequin骨骼不一样;但是,我们从市场上买来人形的动作都是Mannequin骨骼的。下面,简单说下怎么导入Mannequin骨骼(Mannequin骨骼)的动作给项目中使用的骨骼(自定义骨骼)。
-
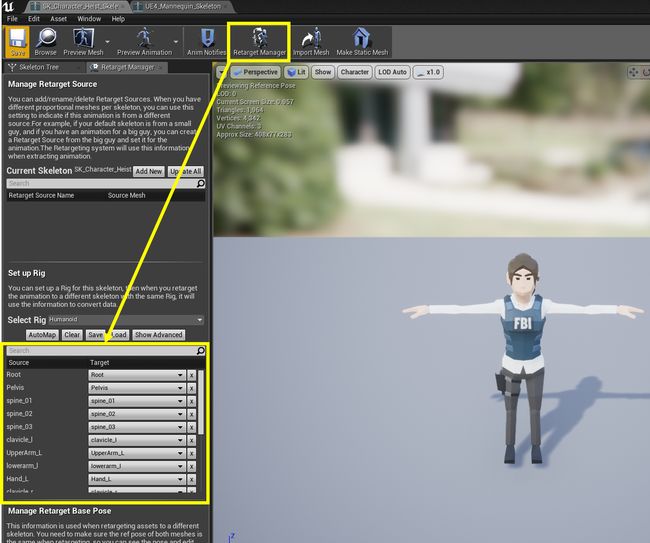
首先检查“骨骼编辑器”中的Regtarget Manager的设定是否对应正确。这个需要分别检查Mannequin骨骼和自定义骨骼的设定。
-
在“骨骼编辑器”中,调整Mannequin骨骼至T-pose
-
在“骨骼编辑器”中,修改Mannequin骨骼Pose。注:修改后,按下“Hide Pose”按钮,姿势将复原;再次按下就又成了T-pose,请保持姿势为T-pose(其实这个T-pose不太标准)
-
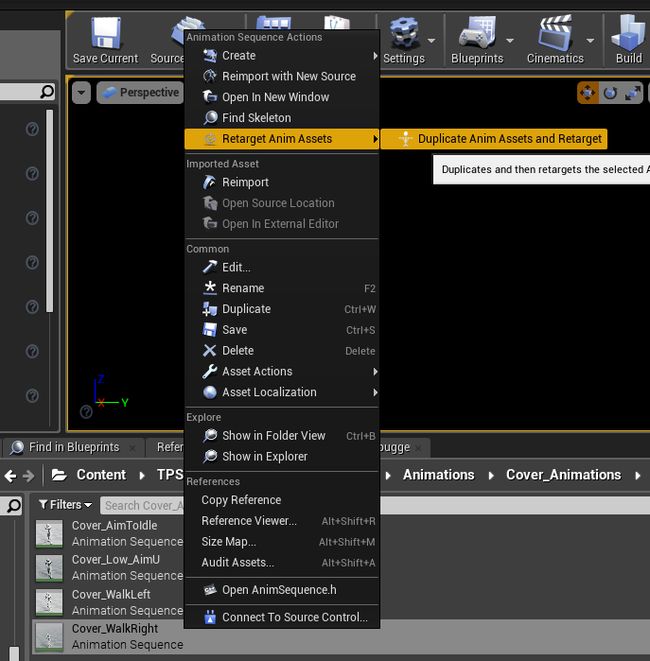
重定向人形动画骨骼,即导入动作。注:可多选
参考视频: [Skeleton Assets: Anim Retargeting Different Skeletons | 03 | v4.8 Tutorial Series | Unreal Engine]
