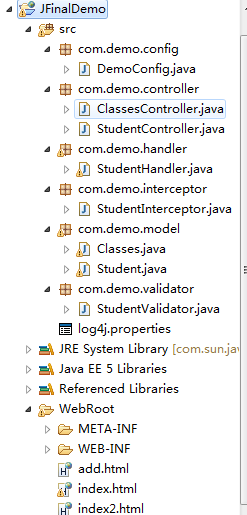
上一节介绍了jfinal框架的简单搭建,这节通过一个小例子了解jfinal的结构和特点
1、建数据库(我用的是oracle数据库,其他的相对也差不多)
create table CLASSES
(
 classesid      NUMBER not null,
 classesname    VARCHAR2(20),
 classesaddress VARCHAR2(50)
);
-- Create table
create table STUDENT
(
 studentid   NUMBER not null,
 studentname VARCHAR2(10),
 studentage  NUMBER,
 studentsex  VARCHAR2(2),
 classesid   NUMBER
);
alter table STUDENT
 add constraint FK_CLASSESID foreign key (CLASSESID)
新建项目,我用的myeclipse,先把jar包导入
2、实体类
Classes.java
package com.demo.model;

import com.jfinal.plugin.activerecord.Model;

public class Classes extends Model {
   public static final Classes dao = new Classes();
}
Student.java
package com.demo.model;

import com.jfinal.plugin.activerecord.Model;

public class Student extends Model {
   public static final Student dao = new Student();

   public Classes getClasses() {
       return Classes.dao.findById(get("classesid"));
   }

}
什么这是实体类?没错!!~ ActiveRecord 是 jfinal 最核心的组成部分之一,通过 ActiveRecord 来操作数据库,将极大地减少代码量,极大地提升开发效率,配置在后面,我这里用的是Model,Model 是 ActiveRecord 中最重要的组件之一,它充当 MVC 模式中的 Model部分。
以上代码中的 User 通过继承 Model,便立即拥有的众多方便的操作数据库的方法。在 User 中声明的 dao 静态对象是为了方便查询操作而定义的,该对象并不是必须的。 基于ActiveRecord 的 Model 无需定义属性, 无需定义 getter、 setter方法,无需 XML 配置,无需 Annotation 配置,极大降低了代码量。Model常见方法见官方API。
JFinal还有 独创 Db + Record 模式,Db 类及其配套的 Record 类, 提供了在 Model 类之外更为丰富的数据库操作功能。使用 Db 与 Record 类时,无需对数据库表进行映射,Record 相当于一个通用的 Model。Db常见方法见官方API。
3、DemoConfig.java
package com.demo.config;

import com.demo.controller.ClassesController;
import com.demo.controller.StudentController;
import com.demo.model.Classes;
import com.demo.model.Student;
import com.jfinal.config.Constants;
import com.jfinal.config.Handlers;
import com.jfinal.config.Interceptors;
import com.jfinal.config.JFinalConfig;
import com.jfinal.config.Plugins;
import com.jfinal.config.Routes;
import com.jfinal.plugin.activerecord.ActiveRecordPlugin;
import com.jfinal.plugin.activerecord.CaseInsensitiveContainerFactory;
import com.jfinal.plugin.activerecord.dialect.OracleDialect;
import com.jfinal.plugin.c3p0.C3p0Plugin;

public class DemoConfig extends JFinalConfig {

   @Override
   public void configConstant(Constants me) {
   }

   @Override
   public void configHandler(Handlers me) {
       // TODO Auto-generated method stub

   }

   @Override
   public void configInterceptor(Interceptors me) {
       // TODO Auto-generated method stub

   }

   @Override
   public void configPlugin(Plugins me) {
       C3p0Plugin cp = new C3p0Plugin("jdbc:oracle:thin:@localhost:1521:orcl",
               "test", "test");
       // 配置Oracle驱动
       cp.setDriverClass("oracle.jdbc.driver.OracleDriver");
       me.add(cp);
       ActiveRecordPlugin arp = new ActiveRecordPlugin(cp);
       me.add(arp);
       // 配置Oracle方言
       arp.setDialect(new OracleDialect());
       // 配置属性名(字段名)大小写不敏感容器工厂
       arp.setContainerFactory(new CaseInsensitiveContainerFactory());
       arp.addMapping("student", "studentid", Student.class);
       arp.addMapping("classes", "classesid", Classes.class);
   }

   @Override
   public void configRoute(Routes me) {
       me.add("/", StudentController.class);
       me.add("/student", StudentController.class);
       me.add("/classes", ClassesController.class);
   }

}
我这里是oracle数据库的配置,oracle有些特别的地方,如表列名会自动转成大写,配置个免大小写的工厂,方便开发等。这里要注意url,驱动,方言,在给个mysql数据库的配置对比下
public class DemoConfig extends JFinalConfig {
public void configPlugin(Plugins me) {
C3p0Plugin  cp  =  new  C3p0Plugin("jdbc:mysql://localhost/db_name",
"userName", "password");
me.add(cp);
ActiveRecordPlugin arp = new ActiveRecordPlugin(cp);
me.add(arp);
arp.addMapping("user", User.class);
arp.addMapping("article", "article_id", Article.class);
}
}
4、StudentController.java
package com.demo.controller;

import java.util.List;

import com.demo.interceptor.StudentInterceptor;
import com.demo.model.Student;
import com.demo.validator.StudentValidator;
import com.jfinal.aop.Before;
import com.jfinal.core.Controller;

public class StudentController extends Controller {
   @Before(StudentInterceptor.class)
   public void index() {
       List list = Student.dao.find("select * from student");
       setAttr("studentList", list);
       render("/index.html");
   }

   public void add() {
       render("/add.html");
   }

   public void delete() {
       // 获取表单域名为studentID的值
       // Student.dao.deleteById(getPara("studentID"));
       // 获取url请求中第一个值
       Student.dao.deleteById(getParaToInt());
       forwardAction("/student");
   }

   public void update() {
       Student student = getModel(Student.class);
       student.update();
       forwardAction("/student");
   }

   public void get() {
       Student student = Student.dao.findById(getParaToInt());
       setAttr("student", student);
       render("/index2.html");
   }

   @Before(StudentValidator.class)
   public void save() {
       Student student = getModel(Student.class);
       student.set("studentid", "mysequence.nextval").save();
       forwardAction("/student");
   }

}
获取studentid那里有多种方法,这个要和前台传参写法一致,Controller 提供了 getPara 系列方法,官网api里很详细
jfinal用的是原生态sql语句,简单,方便,setAttr("studentList", list);把结果集放到request范围里,
jfinal也有直接获取表单里分装成对象的方法 getModel(Student.class);就是,和struts2一样,表单name对应上就可以了,非常方便
添加那里对于oracle用序列维护studentid student.set("studentid", "mysequence.nextval").save(); jfinal有多种返回方式,也可以返回json数据,render 系列方法,官网api里很详细
5、interceptor和validator(可以不加)
StudentInterceptor.java
package com.demo.interceptor;

import com.jfinal.aop.Interceptor;
import com.jfinal.core.ActionInvocation;

public class StudentInterceptor implements Interceptor {

   public void intercept(ActionInvocation ai) {
       System.out.println("Before action invoking");
       ai.invoke();
       System.out.println("After action invoking");
   }

}
StudentValidator.java
[[图片上传中...(image-2d09fd-1514102168223-6)]](javascript:void(0); "复制代码")
package com.demo.validator;

import com.jfinal.core.Controller;
import com.jfinal.validate.Validator;

public class StudentValidator extends Validator {

   //在校验失败时才会调用
   @Override
   protected void handleError(Controller controller) {
       controller.keepPara("student.studentname");//将提交的值再传回页面以便保持原先输入的值
       controller.render("/add.html");
   }

   @Override
   protected void validate(Controller controller) {
       //验证表单域name,返回信息key,返回信息value
       validateRequiredString("student.studentname", "studentnameMsg",
               "请输入学生名称!");
   }

}
6、页面
我这里用的是FreeMarker模板引擎
index.html
       index.html


       添加


                   姓名


                   年龄


                   性别


                   班级


                   操作


           <#list studentList as student>


                   ${student.studentname}


                   ${student.studentage}


                   ${student.studentsex}


                   ${student.getClasses().classesname}


                   删除
                   修改
index2.html
index2.html
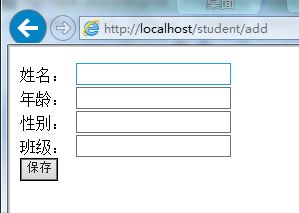
add.html
add.html


