编译ffmpeg
首先下载ffmpeg压缩包.
终端进入下载的ffmpeg文件夹,输入命令: ./build-ffmoeg.sh 进行编译

图片.png
然后就是漫长的等待...编译完成后,会多出一个FFmpeg-iOS文件夹,将这个文件直接拖入工程项目中.

图片.png

图片.png
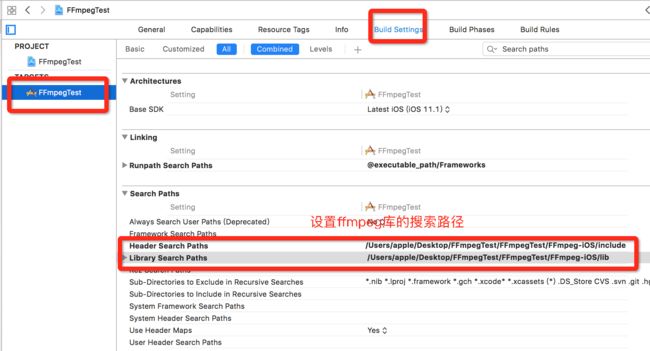
设置头文件路径
图片.png
导入依赖库

图片.png
试着写一段代码,编译成功,就可以开始使用了

图片.png
,
视频解码
    //创建一个视图展示解码后的一帧帧图片
    [self.view addSubview:self.imageView];

    //网络视频url
    NSString *path = @"http://baobab.wdjcdn.com/1451897812703c.mp4";

    //注册所有解码器
    av_register_all();
    avcodec_register_all();

    //对网络组件进行全局初始化,若是解码本地视频,可以不初始化
    avformat_network_init();

    //分配一个空间,提供给打开的视频文件
    pFormatCtx = avformat_alloc_context();

    //打开视频文件
    if(avformat_open_input(&pFormatCtx, [path UTF8String], NULL, NULL)){
        printf("can not open video\n");
        return;
    }

    //检查流数据
    if(avformat_find_stream_info(pFormatCtx, NULL)){
        printf("can not find stream info \n");
        return;
    }
    //根据数据流,找到第一个完整的视频流
    videoIndex = -1;
    if((videoIndex = av_find_best_stream(pFormatCtx, AVMEDIA_TYPE_VIDEO, -1, -1, &pCodec, 0)) < 0){
        printf("can not find first stream\n");
        return;
    }

    //第一个视频流,根据流找到解码器
    stream = pFormatCtx->streams[videoIndex];
    pCodecCtx = stream->codec;

    //寻找解码器
    pCodec = avcodec_find_decoder(pCodecCtx->codec_id);
    if(pCodecCtx == NULL){
        printf("can not find codec");
        return;
    }

    //打开解码器
    if(avcodec_open2(pCodecCtx, pCodec,NULL) < 0){
        printf("Couldn't open codec.\n");
        return;
    }

    //获取视频的帧数
    double fps;
    if(stream->avg_frame_rate.den && stream->avg_frame_rate.num) {
        fps = av_q2d(stream->avg_frame_rate);
    } else { fps = 30;}

    //分配一个缓冲区,缓存解码的数据,必须使用av_frame_free()释放内存
    pFrame = av_frame_alloc();

    output_width = pCodecCtx->width;
    output_height = pCodecCtx->height;


    //创建定时器 开始一帧帧解码 并且把解码后的图片暂时在imageView上
    [NSTimer scheduledTimerWithTimeInterval: 1 / fps
                                     target:self
                                   selector:@selector(displayNextFrame:)
                                   userInfo:nil
                                    repeats:YES];


    [self seekTime:0];
-(void)displayNextFrame:(NSTimer *)timer{

    if (![self stepFrame]) {
        [timer invalidate];
        return;
    }
    //显示解码后的帧图片,用定时器刷新每一帧图片的方式不对(性能超级差),这里只是展示作用
    //正确的方式应该用openGL来渲染解码后的每帧图片
    self.imageView.image = [self imageFromAVPicture:picture width:output_width height:output_height];
}


- (void)seekTime:(double)seconds {

    AVRational timeBase = pFormatCtx->streams[videoIndex]->time_base;
    int64_t targetFrame = (int64_t)((double)timeBase.den / timeBase.num * seconds);
    avformat_seek_file(pFormatCtx,
                       videoIndex,
                       0,
                       targetFrame,
                       targetFrame,
                       AVSEEK_FLAG_FRAME);
    avcodec_flush_buffers(pCodecCtx);
}
/**
 通过定时器循环调用这个方法将
 解码的视频流转为RGB图片,
 @return image
 */
- (UIImage *)imageFromAVPicture:(AVPicture)pict width:(int)width height:(int)height {

    avpicture_free(&picture);
    avpicture_alloc(&picture, AV_PIX_FMT_RGB24, output_width, output_height);

//    sws_getContext():
//    使用参数初始化SwsContext结构体。
//    sws_scale():转换一帧图像。
//    sws_freeContext():释放SwsContext结构体。
    struct SwsContext * imgConvertCtx = sws_getContext(pFrame->width,
                                                       pFrame->height,
                                                       AV_PIX_FMT_YUV420P,
                                                       output_width,
                                                       output_height,
                                                       AV_PIX_FMT_RGB24,
                                                       SWS_FAST_BILINEAR,
                                                       NULL,
                                                       NULL,
                                                       NULL);
    sws_scale(imgConvertCtx,
              pFrame->data,
              pFrame->linesize,
              0,
              pFrame->height,
              picture.data,
              picture.linesize);
    sws_freeContext(imgConvertCtx);


    CGBitmapInfo bitmapInfo = kCGBitmapByteOrderDefault;
    CFDataRef data = CFDataCreateWithBytesNoCopy(kCFAllocatorDefault,pict.data[0],pict.linesize[0] * height,kCFAllocatorNull);

    CGDataProviderRef provider = CGDataProviderCreateWithCFData(data);
    CGColorSpaceRef colorSpace = CGColorSpaceCreateDeviceRGB();

    CGImageRef cgImage = CGImageCreate(output_width,
                                       output_height,
                                       8,
                                       24,
                                       picture.linesize[0],
                                       colorSpace,
                                       bitmapInfo,
                                       provider,
                                       NULL,
                                       NO,
                                       kCGRenderingIntentDefault);
    CGColorSpaceRelease(colorSpace);
    UIImage *image = [UIImage imageWithCGImage:cgImage];
    CGImageRelease(cgImage);
    CGDataProviderRelease(provider);
    CFRelease(data);
    return image;
}

效果图.png