前言
在前面两小节中(学习ARKit(一)、学习ARKit(二)),我们介绍了简单的介绍了AR与ARKit的相关概念以及ARKit的工作原理与流程。下面我们用一个实际的例子来看一下ARKit具体是如何做的(本小节主要是做一个基于ARKit的平面检测)。
ARKitDemo
- 首先创建工程,XCode默认帮我们搭建好了一个AR框架,即下图中的Augmented Reality App,当然我们也可以自己创建Single View App来创建应用。我们就用AR框架来创建一个应用ARDemo。
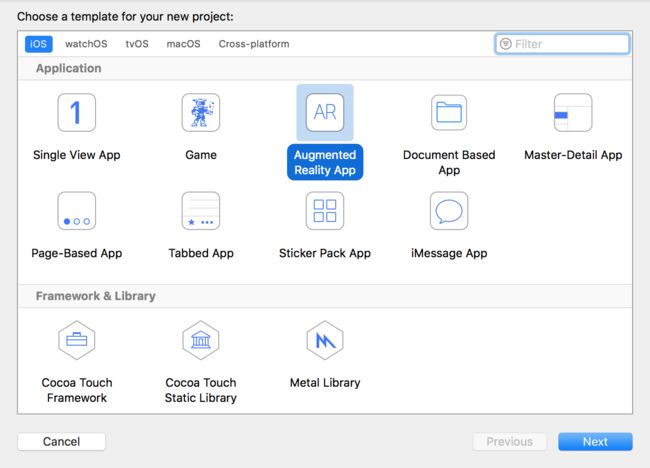
1.png
下图2中,我们注意选择SceneKit,其他的都和创建普通应用一样。
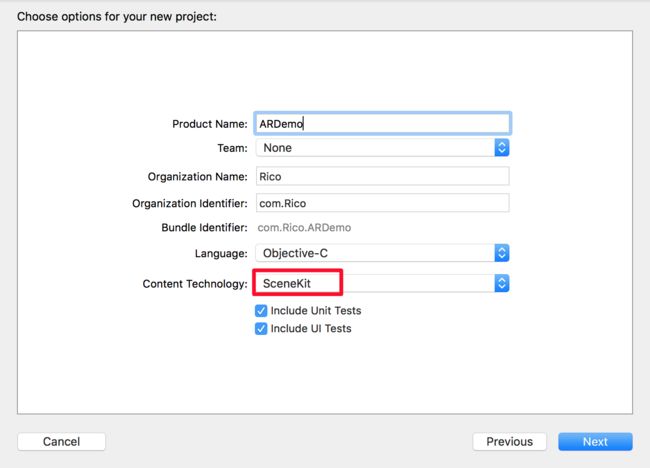
2.png
我们创建的AR应用,默认就是一个小的demo,创建好即可运行,会在屏幕上展示一架飞机(和SceneKit差不多)。在storyboard中,系统默认帮我们添加了一个ARSCNView,这个view就是我们展示AR的view。
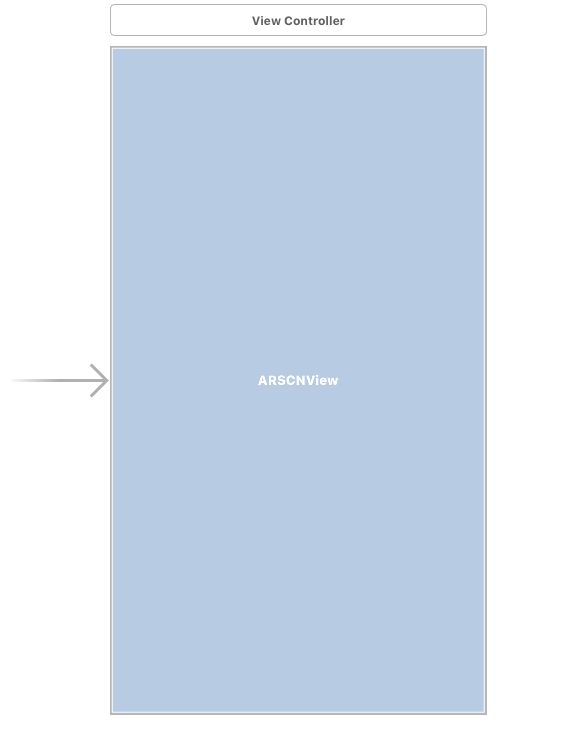
3.png
在系统默认的代码中,我们可以看到,系统设置了sceneView的代理,显示统计信息,在sceneView上面加载了一个ship.scn的场景。在viewWillAppear中,创建AR配置,然后开启session。苹果建议我们在viewWillAppear中开启session,而不是viewDidLoad中。
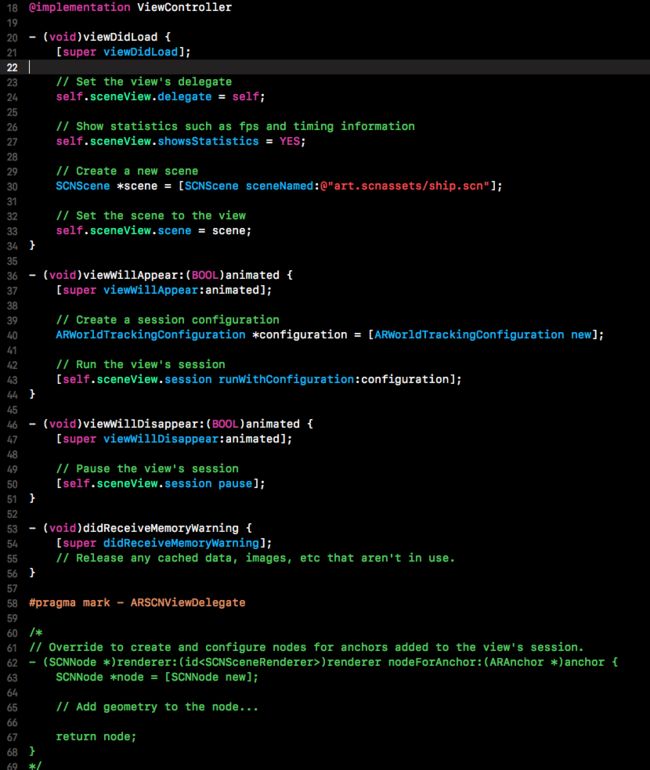
4.png
- 因为做平面检测,所以我们创建一个Plane类作为平面模型。主要是根据anchor与材质来初始化一个平面,然后在检测过程中,实时更新平面的位置大小以及纹理范围。下面贴出代码:
#import
#import

@interface Plane : SCNNode

@property (nonatomic, strong) ARPlaneAnchor *anchor;//平面的锚点,记录了平面的位置信息
@property (nonatomic, strong) SCNBox *planeGeometry;//SCNBox较容易后面的操作,而没有选取SCNPlane

//初始化平面
- (instancetype)initWithAnchor:(ARPlaneAnchor *)anchor isHidden:(BOOL)hidden withMaterial:(SCNMaterial *)material;
//更新平面的位置
- (void)update:(ARPlaneAnchor *)anchor;
//设置平面的纹理范围
- (void)setTextureScale;
//获取平面材质
+ (SCNMaterial *)getMaterial:(NSString *)materialName;
//移除平面
- (void)remove;

@end

@implementation Plane

- (instancetype)initWithAnchor:(ARPlaneAnchor *)anchor isHidden:(BOOL)hidden withMaterial:(SCNMaterial *)material {
    self = [super init];
    if(self) {
       self.anchor = anchor;
       //获取平面的长和宽(注意在ARKit中的坐标系)
       double width = anchor.extent.x;
       double length = anchor.extent.z;

       double planeHeight = 0.01;
       //设置平面的几何体 SCNBox的对象
       self.planeGeometry = [SCNBox boxWithWidth:width height:planeHeight length:length chamferRadius:0];
       //设置平面的材质
       SCNMaterial *transparentMaterial = [SCNMaterial new];
       transparentMaterial.diffuse.contents = [UIColor colorWithWhite:1.0 alpha:0.0];

       if (hidden) {
           self.planeGeometry.materials = @[transparentMaterial,transparentMaterial,transparentMaterial,transparentMaterial,transparentMaterial,transparentMaterial]
        ;
       }else {
           self.planeGeometry.materials = @[transparentMaterial,transparentMaterial,transparentMaterial,transparentMaterial,material,transparentMaterial]
        ;
       }
       //将设置好的几何体封装成一个SCNNode对象,然后添加到该平面node的子节点中
       SCNNode *planeNode = [SCNNode nodeWithGeometry:self.planeGeometry];
       //设置平面node的位置
       planeNode.position = SCNVector3Make(0, -planeHeight/2, 0);
       //设置平面的纹理范围
       [self setTextureScale];
       [self addChildNode:planeNode];
   }
    return self;
}

+ (SCNMaterial *)getMaterial:(NSString *)materialName {
    SCNMaterial *material = [SCNMaterial new];
    material.lightingModelName = SCNLightingModelPhysicallyBased;
    material.diffuse.contents = [UIImage imageNamed:[NSString stringWithFormat:@"./art.scnassets/Materials/%@/%@-albedo.png",materialName,materialName]];
    material.roughness.contents = [UIImage imageNamed:[NSString stringWithFormat:@"./art.scnassets/Materials/%@/%@-roughness.png",materialName,materialName]];
    material.metalness.contents = [UIImage imageNamed:[NSString stringWithFormat:@"./art.scnassets/Materials/%@/%@-metal.png",materialName,materialName]];
    material.normal.contents = [UIImage imageNamed:[NSString stringWithFormat:@"./art.scnassets/Materials/%@/%@-normal.png",materialName,materialName]];
    //设置材料将纹理图像平铺在表面上
    material.diffuse.wrapS = SCNWrapModeRepeat;
    material.diffuse.wrapT = SCNWrapModeRepeat;
    material.roughness.wrapS = SCNWrapModeRepeat;
    material.roughness.wrapT = SCNWrapModeRepeat;
    material.metalness.wrapT = SCNWrapModeRepeat;
    material.metalness.wrapS = SCNWrapModeRepeat;
    material.normal.wrapS = SCNWrapModeRepeat;
    material.normal.wrapT = SCNWrapModeRepeat;

    return material;
}

- (void)update:(ARPlaneAnchor *)anchor {
    //根据获取到的anchor来更新平面的位置信息
    self.planeGeometry.width = anchor.extent.x;
    self.planeGeometry.length = anchor.extent.z;
    self.position = SCNVector3Make(anchor.center.x, 0, anchor.center.z);
    SCNNode *planeNode = [self.childNodes firstObject];
    [self setTextureScale];
}

- (void)setTextureScale {
    //设置平面纹理贴图范围
    CGFloat width = self.planeGeometry.width;
    CGFloat length = self.planeGeometry.length;

    SCNMaterial *material = self.planeGeometry.materials[4];
    float scaleFactor = 1;
    SCNMatrix4 matrix = SCNMatrix4MakeScale(width * scaleFactor, length * scaleFactor, 1);
    material.diffuse.contentsTransform = matrix;
    material.roughness.contentsTransform = matrix;
    material.metalness.contentsTransform = matrix;
    material.normal.contentsTransform = matrix;
}

- (void)remove {
    [self removeFromParentNode];
}
@end
有的属性可能介绍的不是很清楚,大家可以自行去苹果官网查对应资料。
- 接下来就是在ViewController中,创建我们的场景、视图。具体代码如下:(删除了之前创建项目时,系统自动创建的场景,保留了sceneView)
#import
#import
#import
#import "Plane.h"

@interface ViewController : UIViewController

@property (nonatomic, strong) NSMutableDictionary *planes; //保存平面信息
@property (nonatomic, strong) ARWorldTrackingConfiguration *arConfiguration; //AR会话追踪配置
@property (nonatomic, assign) ARTrackingState currentTrackingState; //当前AR跟踪状态

- (void)setupScene; //设置场景信息
- (void)setupLights; //设置灯光信息

@end

@interface ViewController ()

@property (nonatomic, strong) IBOutlet ARSCNView *sceneView;

@end

@implementation ViewController

- (void)viewDidLoad {
    [super viewDidLoad];

    self.currentTrackingState = ARTrackingStateNormal;

    [self setupScene];
    [self setupLights];
}

- (void)viewWillAppear:(BOOL)animated {
    [super viewWillAppear:animated];

    // Run the view's session
    [self.sceneView.session runWithConfiguration:self.arConfiguration];
    self.sceneView.debugOptions = ARSCNDebugOptionShowFeaturePoints;
}

- (void)viewWillDisappear:(BOOL)animated {
    [super viewWillDisappear:animated];

    // Pause the view's session
    [self.sceneView.session pause];
}

- (ARWorldTrackingConfiguration *)arConfiguration {
    if (_arConfiguration != nil) {
        return _arConfiguration;
    }
    _arConfiguration = [ARWorldTrackingConfiguration new];
    _arConfiguration.lightEstimationEnabled = YES;
    _arConfiguration.planeDetection = ARPlaneDetectionHorizontal;
    return _arConfiguration;
}

- (void)setupScene {
    //设置sceneView的代理,创建场景
    self.sceneView.delegate = self;
    self.sceneView.antialiasingMode = SCNAntialiasingModeMultisampling4X;

    SCNScene *scene = [SCNScene new];
    self.sceneView.scene = scene;
    self.planes = [NSMutableDictionary new];
}

- (void)setupLights {
    //关闭sceneView默认光照
    self.sceneView.autoenablesDefaultLighting = NO;
    self.sceneView.automaticallyUpdatesLighting = NO;
    //设置场景内周围环境纹理贴图,用于照明效果
    UIImage *env = [UIImage imageNamed:@"./art.scnassets/environment.jpg"];
    self.sceneView.scene.lightingEnvironment.contents = env;
}

//ARSCNViewDelegate代理的下面几个方法,主要是针对平面的实时监测做出相应的添加、更新、删除等。依据session获取到的anchor来进行操作。对于不同的平面是根据anchor的identifier来区分的,然后再进行平面的合并。
#pragma mark - ARSCNViewDelegate

- (void)renderer:(id)renderer updateAtTime:(NSTimeInterval)time {
    ARLightEstimate *estimate = self.sceneView.session.currentFrame.lightEstimate;
    if (!estimate) {
        return;
    }

    CGFloat intensity = estimate.ambientIntensity / 1000.0;
    self.sceneView.scene.lightingEnvironment.intensity = intensity;
}

- (void)renderer:(id)renderer didAddNode:(SCNNode *)node forAnchor:(ARAnchor *)anchor {
    if (![anchor isKindOfClass:[ARPlaneAnchor class]]) {
        return;
    }

    Plane *plane = [[Plane alloc]initWithAnchor:anchor isHidden:NO withMaterial:[Plane getMaterial:@"tron"]];
    [self.planes setObject:plane forKey:anchor.identifier];
    [node addChildNode:plane];
}

- (void)renderer:(id)renderer didUpdateNode:(SCNNode *)node forAnchor:(ARAnchor *)anchor {
    Plane *plane = [self.planes objectForKey:anchor.identifier];
    if (!plane) {
        return;
    }
    [plane update:(ARPlaneAnchor *)anchor];
}

- (void)renderer:(id)renderer didRemoveNode:(SCNNode *)node forAnchor:(ARAnchor *)anchor {
    Plane *plane = [self.planes objectForKey:anchor.identifier];
    if (plane) {
        [self.planes removeObjectForKey:anchor.identifier];
    }
}


@end
最终的效果录了一个简单的视频有兴趣的可以看一下。
以上基本上就完成了一个简单的AR平面检测,有问题可以在下面回复交流。