这节课的内容主要是自动旋转,Objective C中的Protocols, 手势识别,Happiness Demo。
Autorotation
当你的设备旋转的时候,你可以用户界面是否和蛇别一起旋转,通过实现以下方法:
- (BOOL)shouldAutorotateToInterfaceOrientation:(UIInterfaceOrientation)orientation
{
return UIInterfaceOrientationIsPortrait(orientation); // only support portrait
return YES; // support all orientations
return (orientation != UIInterfaceOrientationPortraitUpsideDown); // anything but
}
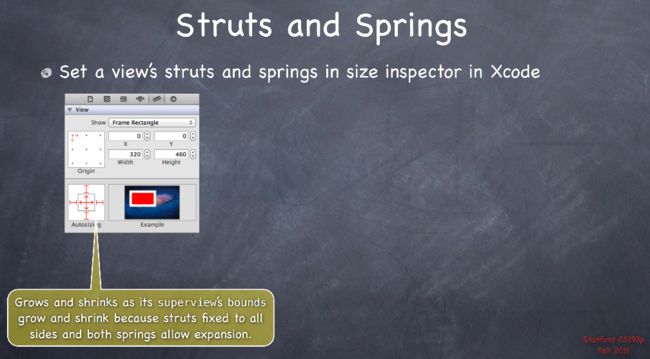
Struts and Springs
可以通过设置view的struts and springs来控制旋转,红色的I是struts,红色的箭头是springs。
随着superview的bounds 缩放而缩放: 只在水平方向进行缩放: 固定大小,贴在左上角:通常随着UIView的bounds改变,不需要重新画,但是你也可以控制:
- struts和spring之后将drawing移动到指定位置
@property (nonatomic) UIViewContentMode contentMode;
UIViewContentMode{Left,Right,Top,Right,BottomLeft,BottomRight,TopLeft,TopRight}
- 缩放属性控制
UIViewContentModeScale{ToFill,AspectFill,AspectFit} // bit stretching/shrinking
分别是填充,内容填充,内容适应。 toFill是默认的模式,它会自动缩放像素点填满新的空间,可能会造成图形扭曲。
- 指定区域拉伸
@property (nonatomic) CGRect contentStretch;
初始化UIView
协议
@protocol Foo  // implementors must implement Other and NSObject too
- (void)doSomething; // implementors must implement this (methods are @required by default)
@optional
- (int)getSomething; // implementors do not have to implement this
- (void)doSomethingOptionalWithArgument:(NSString *)argument; // also optional
@required
- (NSArray *)getManySomethings:(int)howMany; // back to being “must implement”
@property (nonatomic, strong) NSString *fooProp; // note that you must specify strength
@end
协议通常在自己的头文件或者要求其他类实现委托的类定义,如何使用:
类可以在@interface中声明它们实现了一个委托, 必须实现那些强制实现的类
#import “Foo.h” // importing the header file that declares the Foo @protocol
@interface MyClass : NSObject  // MyClass is saying it implements the Foo @protocol
...
@end
可以定义有协议要求的id变量:
id obj = [[MyClass alloc] init];
也可以在方法的参数中要求实现协议:
@property (nonatomic, weak) id myFooProperty; // properties too!
协议的主要作用: 实现委托和数据源,
手势识别UIGestureRecognizer
UIGestureRecognizer是抽象类,需要自己实现具体的子类。手势识别分为两部, 创建手势,将其附加到UIView上,然后当手势别识别时进行实时处理。第一步由Controller完成,第二部由UIView自己完成。代码实例:
(void)setPannableView:(UIView *)pannableView
{
          _pannableView = pannableView;
          UIPanGestureRecognizer *pangr =
              [[UIPanGestureRecognizer alloc] initWithTarget:pannableView action:@selector(pan:)];
          [pannableView addGestureRecognizer:pangr];
}
识别手势之后,可以有View或者Controller处理手势,View一般处理View的修改,而Controller处理手势如何修改模型。
只有UIView实例可以识别手势(因为UIViews处理所有的触屏输入),任何对象都可以让UIView识别手势(通过在UIView中加入recognizer), 任何对象可以处理手势的识别(通过成为手势动作的作用目标)。
- UITapGestureRecognizer: 轻触手势,常用于给没有点击事件的控件添加该手势达到类似于button点击事件的效果。
#import "TapViewController.h"

@interface TapViewController ()

@end

@implementation TapViewController

- (void)viewDidLoad {
    [super viewDidLoad];

    [self test];
}

- (void)test {

    UIImageView * imageView = [[UIImageView alloc] initWithFrame:CGRectMake(0, 0, 150, 100)];
    imageView.center = self.view.center;
    imageView.userInteractionEnabled = YES;
    imageView.image = [UIImage imageNamed:@"c001"];
    [self.view addSubview:imageView];

    UITapGestureRecognizer * tap = [[UITapGestureRecognizer alloc] initWithTarget:self action:@selector(tapImage:)];
    [imageView addGestureRecognizer:tap];
}

- (void)tapImage:(UITapGestureRecognizer *)tap {

    UIImageView * imageView = (UIImageView *)tap.view;

    static int flag = 0;
    flag ^= 1;
    if (flag) {

        imageView.frame = CGRectMake(0, 0, 300, 200);
        NSLog(@"点击了图片放大!");
    } else {

        imageView.frame = CGRectMake(0, 0, 150, 100);
        NSLog(@"点击了图片缩小!");
    }
    imageView.center = self.view.center;
}
@end
- UIPanGestureRecognizer: 拖拽手势,常用于需要对控件进行手动拖拽以改变控件的frame的场景中
#import "PanViewController.h"

@interface PanViewController ()

// 图片初始中心点
@property (nonatomic) CGPoint startImageCenter;
// 手势初始中心点
@property (nonatomic) CGPoint startGCenter;

@end

@implementation PanViewController

- (void)viewDidLoad {
    [super viewDidLoad];

    [self test];
}

- (void)test {

    UIImageView * imageView = [[UIImageView alloc] initWithFrame:CGRectMake(20, 80, 200, 150)];
    imageView.userInteractionEnabled = YES;
    imageView.image = [UIImage imageNamed:@"c001"];
    [self.view addSubview:imageView];

    UIPanGestureRecognizer * pan = [[UIPanGestureRecognizer alloc] initWithTarget:self action:@selector(panImage:)];
    [imageView addGestureRecognizer:pan];
}

- (void)panImage:(UIPanGestureRecognizer *)pan {

    UIImageView * imageView = (UIImageView *)pan.view;

    if (pan.state == UIGestureRecognizerStateBegan) {

        //记录中心位置
        self.startImageCenter = imageView.center;
        self.startGCenter = [pan locationInView:self.view];
        return;
    }

    //非开始阶段
    //获得手势移动的距离 现在的位置
    CGPoint nowGCenter = [pan locationInView:self.view];
    float x = nowGCenter.x - self.startGCenter.x;
    float y = nowGCenter.y - self.startGCenter.y;
    //计算imageview的相对位移
    imageView.center = CGPointMake(self.startImageCenter.x+x, self.startImageCenter.y+y);
- UISwipeGestureRecognizer:轻扫手势,常用于对控件往对应的方向有滑动操作时的场景中
#import "SwipeViewController.h"

@interface SwipeViewController ()

@end

@implementation SwipeViewController

- (void)viewDidLoad {
    [super viewDidLoad];

    [self test];
}

- (void)test {

    UIImageView * imageView = [[UIImageView alloc] initWithFrame:CGRectMake(20, 80, 200, 150)];
    imageView.center = self.view.center;
    imageView.userInteractionEnabled = YES;
    imageView.image = [UIImage imageNamed:@"c001"];
    [self.view addSubview:imageView];

    UISwipeGestureRecognizer * swipe1 = [[UISwipeGestureRecognizer alloc] initWithTarget:self action:@selector(swipeImage:)];
    //设置扫的方向
    swipe1.direction = UISwipeGestureRecognizerDirectionUp;
    [imageView addGestureRecognizer:swipe1];

    UISwipeGestureRecognizer * swipe2 = [[UISwipeGestureRecognizer alloc] initWithTarget:self action:@selector(swipeImage:)];
    //设置扫的方向
    swipe2.direction = UISwipeGestureRecognizerDirectionLeft;
    [imageView addGestureRecognizer:swipe2];

    UISwipeGestureRecognizer * swipe3 = [[UISwipeGestureRecognizer alloc] initWithTarget:self action:@selector(swipeImage:)];
    //设置扫的方向
    swipe3.direction = UISwipeGestureRecognizerDirectionDown;
    [imageView addGestureRecognizer:swipe3];

    UISwipeGestureRecognizer * swipe4 = [[UISwipeGestureRecognizer alloc] initWithTarget:self action:@selector(swipeImage:)];
    //设置扫的方向
    swipe4.direction = UISwipeGestureRecognizerDirectionRight;
    [imageView addGestureRecognizer:swipe4];
}

-(void)swipeImage:(UISwipeGestureRecognizer *)swipe{
    //实现要添加的功能
    NSLog(@"扫到了图片");
    UIImageView * imageView = (UIImageView *)swipe.view;

    if (swipe.direction == UISwipeGestureRecognizerDirectionLeft) {

        imageView.center = CGPointMake(imageView.center.x - 40, imageView.center.y);
        NSLog(@"图片向左移动了");
    }else if (swipe.direction == UISwipeGestureRecognizerDirectionRight) {

        imageView.center = CGPointMake(imageView.center.x + 40, imageView.center.y);
        NSLog(@"图片向右移动了");
    }else if (swipe.direction == UISwipeGestureRecognizerDirectionDown) {

        imageView.center = CGPointMake(imageView.center.x, imageView.center.y + 40);
        NSLog(@"图片向下移动了");
    }else if (swipe.direction == UISwipeGestureRecognizerDirectionUp) {

        imageView.center = CGPointMake(imageView.center.x, imageView.center.y - 40);
        NSLog(@"图片向上移动了");
    }
}
@end
- UILongPressGestureRecognizer:长按手势,常用于对控件进行长按操作时的场景中
#import "LongPressViewController.h"

@interface LongPressViewController ()

@end

@implementation LongPressViewController

- (void)viewDidLoad {
    [super viewDidLoad];

    [self test];
}

- (void)test {

    UIImageView * imageView = [[UIImageView alloc] initWithFrame:CGRectMake(0, 0, 150, 100)];
    imageView.center = self.view.center;
    imageView.userInteractionEnabled = YES;
    imageView.image = [UIImage imageNamed:@"c001"];
    [self.view addSubview:imageView];

    UILongPressGestureRecognizer * longPress = [[UILongPressGestureRecognizer alloc] initWithTarget:self action:@selector(longPressImage:)];
    // 长按时间
    longPress.minimumPressDuration = 2;
    [imageView addGestureRecognizer:longPress];
}


-(void)longPressImage:(UILongPressGestureRecognizer *)longPress{

    UIImageView * imageView = (UIImageView *)longPress.view;

    if (longPress.state == UIGestureRecognizerStateBegan) {

        NSLog(@"长按了这张图片");
        [UIView animateWithDuration:1.0 animations:^{

            imageView.frame = CGRectMake(0, 0, 300, 200);
            imageView.center = self.view.center;
        }];
    }

    if (longPress.state == UIGestureRecognizerStateEnded) {

        NSLog(@"长按结束");
        [UIView animateWithDuration:1.0 animations:^{

            imageView.frame = CGRectMake(0, 0, 150, 100);
            imageView.center = self.view.center;
        }];
    }
}
@end
- UIRotationGestureRecognizer:旋转手势,常用于对控件的旋转操作的场景中
#import "RotationViewController.h"

@interface RotationViewController ()

// 图片初始角度
@property (nonatomic, assign) float startRotation;
@end

@implementation RotationViewController

- (void)viewDidLoad {
    [super viewDidLoad];

    [self test];
}

- (void)test {

    UIImageView * imageView = [[UIImageView alloc] initWithFrame:CGRectMake(0, 0, 300, 200)];
    imageView.center = self.view.center;
    imageView.userInteractionEnabled = YES;
    imageView.image = [UIImage imageNamed:@"c001"];
    [self.view addSubview:imageView];

    UIRotationGestureRecognizer * rotation = [[UIRotationGestureRecognizer alloc] initWithTarget:self action:@selector(rotationImage:)];
    [imageView addGestureRecognizer:rotation];
}

-(void)rotationImage:(UIRotationGestureRecognizer *)rotation{

    UIImageView * imageView = (UIImageView *)rotation.view;

    // 旋转图片
    imageView.transform = CGAffineTransformMakeRotation(rotation.rotation + self.startRotation);

    if (rotation.state == UIGestureRecognizerStateEnded) {

        self.startRotation += rotation.rotation;
    }
}
@end
- UIPinchGestureRecognizer:捏合缩放手势,常用于对图片的捏合缩放的操作场景中
#import "PinchViewController.h"

@interface PinchViewController ()

// 图片初始缩放系数
@property (nonatomic, assign) float startScale;
@end

@implementation PinchViewController

- (void)viewDidLoad {
    [super viewDidLoad];

    [self test];
}

- (void)test {

    self.startScale = 1.0;
    UIImageView * imageView = [[UIImageView alloc] initWithFrame:CGRectMake(0, 0, 300, 200)];
    imageView.center = self.view.center;
    imageView.userInteractionEnabled = YES;
    imageView.image = [UIImage imageNamed:@"c001"];
    [self.view addSubview:imageView];

    UIPinchGestureRecognizer * pinch = [[UIPinchGestureRecognizer alloc] initWithTarget:self action:@selector(pinchImage:)];
    [imageView addGestureRecognizer:pinch];
}


-(void)pinchImage:(UIPinchGestureRecognizer *)pinch{

    UIImageView * imageView = (UIImageView *)pinch.view;

    // 缩放图片
    imageView.transform = CGAffineTransformMakeScale(pinch.scale * self.startScale, pinch.scale * self.startScale);

    if (pinch.state == UIGestureRecognizerStateEnded) {

        self.startScale *= pinch.scale;
        if (self.startScale >= 2.0) {

            self.startScale = 2.0;
            [UIView animateWithDuration:0.3 animations:^{

                imageView.transform = CGAffineTransformMakeScale(self.startScale, self.startScale);
            }];
        } else if (self.startScale <= 0.5) {

            self.startScale = 0.5;
            [UIView animateWithDuration:0.3 animations:^{

                imageView.transform = CGAffineTransformMakeScale(self.startScale, self.startScale);
            }];
        }
    }
}
@end
Reference
- https://www.jianshu.com/p/b887af45d5de


