- 设计模式 23 访问者模式
WineMonk
#设计模式设计模式访问者模式
设计模式23创建型模式(5):工厂方法模式、抽象工厂模式、单例模式、建造者模式、原型模式结构型模式(7):适配器模式、桥接模式、组合模式、装饰者模式、外观模式、享元模式、代理模式行为型模式(11):责任链模式、命令模式、解释器模式、迭代器模式、中介者模式、备忘录模式、观察者模式、状态模式、策略模式、模板方法模式、访问者模式文章目录设计模式23访问者模式(VisitorPattern)1定义2结构3
- Android面试从新手到架构师,一篇解析就够(1),跳槽字节跳动
m0_60607609
程序员androidjava面试后端
5.抽象工厂模式:结构型(7):描述如何将类或对象按某种规则组成更大的结构1.桥接模式:对于两个或以上纬度独立变化的场景,将抽象与具体实现分离,实例:用不同颜色画不同形状2.外观模式:对外有一个统一接口,外部不用关心内部子系统的具体实现,这是"迪米特原则"的典型应用3.适配器模式:改变类的接口,使原本由于接口不匹配而无法一起工作的两个类能够在一工作,实例:RecycleView的Adapter不管
- Java基础 --- 多线程&JUC,以及一些常用的设计模式总结
lzhlizihang
java设计模式
文章目录一、多线程1、线程和进程的区别2、创建多线程的四种方式3、集合中的线程安全二、设计模式1、单例模式2、装饰者模式(IO流缓冲流)3、适配器模式4、模板模式一、多线程1、线程和进程的区别进程是操作系统资源分配的基本单位,而线程是处理器任务调度和执行的基本单位,一个进程可以运行多个线程多进程:操作系统中同时运行的多个程序多线程:在同一个进程中同时运行的多个任务2、创建多线程的四种方式Runna
- Java设计模式之单例模式/饿汉式/懒汉式/DCL双重检测锁模式/静态内部类实现单例模式/使用反射破坏单例模式/枚举类实现单例模式
ZaynFox
#JavaSE
一、概念设计模式:是在大量的实践中总结和理论化之后优选的代码结构、编程风格、以及解决问题的思考方式。设计模式就像是经典的棋谱,不同的棋局,我们用不同的棋谱,免去我们自己再思考和摸索。共有23种设计模式:创建型模式,共5种:工厂方法模式、抽象工厂模式、单例模式、建造者模式、原型模式。结构型模式,共7种:适配器模式、装饰器模式、代理模式、外观模式、桥接模式、组合模式、享元模式。行为型模式,共11种:策
- Unity3d学习笔记
明月海子
Mecanin动画系统.pngNavigation导航系统.pngShader渲染基础.png面向对象六大原则.png策略模式Strategy.png工厂模式Factory产品工厂.png观察者Observer.png结构设计模式总结.png模板方法模式TemplateMethod.png适配器模式Adapter.png外观模式Facade.png职责连模式ChainofResponsibilit
- 软考 - 系统架构设计师 - 设计模式
小林想被监督学习
系统架构设计师系统架构设计模式
目录概念创建型设计模式抽象工厂模式(AbstractFactoryPattern)优点缺点应用场景总结构建器模式(BuilderPattern)优点缺点应用场景工厂方法模式(factorymethod)优点缺点应用场景原型模式(prototype)优点缺点应用场景单例模式(Singleton)优点缺点应用场景结构型设计模式适配器模式(Adapter)优点缺点应用场景桥接模式(Bridge)优点缺点
- java设计模式---中介者模式
奔跑的扫地僧
Java设计模式java
首先我们了解下设计模式的总览:GoF提出的设计模式总共有23种,根据目的准则分类分为三大类:创建型模式,共五种:单例模式、工厂方法模式、抽象工厂模式、建造者模式、原型模式。结构型模式,共七种:适配器模式、装饰模式、代理模式、外观模式、桥接模式、组合模式、享元模式。行为型模式,共十一种:策略模式、模板方法模式、观察者模式、迭代器模式、责任链模式、命令模式、备忘录模式、状态模式、访问者模式、中介者模式
- 2024最新Android大厂面试真题大全(附答案)
imtokenmax合约众筹
2024年程序员面试android面试职场和发展
五、架构设计和设计模式1.谈谈你对Android设计模式的理解2.MVCMVPMVVM原理和区别3.你所知道的设计模式有哪些?4.项目中常用的设计模式5.手写生产者/消费者模式6.写出观察者模式的代码7.适配器模式,装饰者模式,外观模式的异同?8.用到的一些开源框架,介绍一个看过源码的,内部实现过程。9.谈谈对RxJava的理解10.Rxjava发送事件步骤11.RxJava的作用,与平时使用的异
- 软考-常见的23种设计模式整理
ppliu600
软件架构数据仓库数据库数据挖掘
参考:23种设计模式总结设计模式可以将复用别人的解决方案。一、设计模式的分类创建型模式,共5种:单例模式、工厂方法模式、抽象工厂模式、建造者模式、原型模式。结构型模式,共7种:适配器模式、组合模式、代理模式、享元模式、外观模式、桥接模式、装饰器模式、行为型模式,共11种:观察者模式、策略模式、模板方法模式、迭代子模式、责任链模式、命令模式、备忘录模式、状态模式、访问者模式、中介者模式、解释器模式。
- 【小结】利用filter做统一编码转换
桌面很乱
思路一:静态代理在filter中做一个内部类继承HttpServletRequestWrapper(此类采用了适配器模式,全部方法均为引用构造方法中传递的ServletRequest),进行静态代理(装饰者模式)。注意区分get和post请求的编码处理方式。加强(重写)request.getParameter(Stringkey),最后将包装过的request对象(MyRequest)传递给ser
- Python之最常用的16种设计模式
ModelBulider
Python基础(千锋篇)python设计模式javascript
文章目录一、设计模式与面向对象介绍1.1设计模式1.2复习:面向对象1.3接口二、面向对象设计SOLID原则三、设计模式分类四、创造型模式4.1简单工厂模式4.2工厂方法模式4.3抽象工厂模式4.4建造者模式4.5单例模式4.6创建型模式小结五、结构型模式5.1适配器模式5.2桥模式5.3组合模式5.4外观模式5.5代理模式六、行为型模式6.1责任链模式6.2观察者模式6.3策略模式6.4模板方法
- 深入解析:23种软件设计模式详解及其分类(创建型、结构型、行为型)附代码示例DEMO
J^T
设计模式C/C++设计模式装饰器模式组合模式观察者模式单例模式23种设计模式
目录引言一、创建型模式1.简单工厂模式(SimpleFactoryPattern)2.抽象工厂模式(AbstractFactoryPattern)3.单例模式(SingletonPattern)4.建造者模式(BuilderPattern)5.原型模式(PrototypePattern)二、结构型模式1.适配器模式(AdapterPattern)2.桥接模式(BridgePattern)3.装饰器
- 【设计模式】第四章:原型模式详解及应用案例
Bummon.
设计模式原型模式设计模式
系列文章【设计模式】七大设计原则【设计模式】第一章:单例模式【设计模式】第二章:工厂模式【设计模式】第三章:建造者模式【设计模式】第四章:原型模式【设计模式】第五章:适配器模式【设计模式】第六章:装饰器模式【设计模式】第七章:代理模式【设计模式】第八章:桥接模式【设计模式】第九章:外观模式/门面模式【设计模式】第十章:组合模式【设计模式】第十一章:享元模式【设计模式】第十二章:观察者模式【设计模式
- 八、适配器模式
磊-
设计模式适配器模式
适配器模式(AdapterPattern)是一种结构型设计模式,它允许不兼容的接口之间进行合作。适配器模式通过创建一个适配器类来转换一个接口的接口,使得原本由于接口不兼容无法一起工作的类可以一起工作。
- 设计模式总结:适配器、桥接、组合和迭代器模式
空青726
设计模式迭代器模式java后端架构面试考研
在之前的对话中,我们讨论了五种常见的Java设计模式:单例、工厂、策略、装饰器和观察者模式。现在,让我们继续探索其他四种设计模式:适配器、桥接、组合和迭代器模式。适配器模式概念:适配器模式是一种结构型设计模式,用于将一个类的接口转换为另一个类期望的接口。适配器模式可以让原本由于接口不兼容而不能一起工作的类可以进行交互。使用场景:当你需要将一个类的接口转换为另一个类期望的接口时。当你想要重用一些现有
- 初识Java设计模式学习
「已注销」
Java设计模式eclipsejava设计模式springstruts
Title:Java设计模式学习Author:ychhh_文章目录@[toc]设计模式概述设计模式目的七大原则单一职责原则接口隔离原则依赖倒转原则(面向接口编程)里氏替换原则开闭原则迪米特法则合成复用原则UML类图设计模式基本概念单例模式饿汉式懒汉式双重检查静态内部类枚举类单例模式注意工厂模式简单工厂模式工厂方法模式抽象工厂模式原型模式建造者模式适配器模式对象适配器接口适配器(缺省适配器模式)桥接
- 设计模式-结构性模式
$驽马十驾$
设计模式
结构型模式1.适配器模式(AdapterPattern)2.桥接模式(BridgePattern)3.装饰器模式(DecoratorPattern)步骤1:定义咖啡接口步骤2:具体的咖啡类步骤3:装饰器抽象类步骤4:具体的装饰器类步骤5:使用装饰器4.组合模式(CompositePattern)4.1定义组件接口4.2实现基本的图形4.3实现复合图形4.4客户端代码5.外观模式(FacadePat
- 设计模式 15 解释器模式
WineMonk
#设计模式设计模式解释器模式
设计模式15创建型模式(5):工厂方法模式、抽象工厂模式、单例模式、建造者模式、原型模式结构型模式(7):适配器模式、桥接模式、组合模式、装饰者模式、外观模式、享元模式、代理模式行为型模式(11):责任链模式、命令模式、解释器模式、迭代器模式、中介者模式、备忘录模式、观察者模式、状态模式、策略模式、模板方法模式、访问者模式文章目录设计模式15解释器模式(InterpreterPattern)1定义
- 设计模式 18 备忘录模式
WineMonk
#设计模式设计模式备忘录模式
设计模式18创建型模式(5):工厂方法模式、抽象工厂模式、单例模式、建造者模式、原型模式结构型模式(7):适配器模式、桥接模式、组合模式、装饰者模式、外观模式、享元模式、代理模式行为型模式(11):责任链模式、命令模式、解释器模式、迭代器模式、中介者模式、备忘录模式、观察者模式、状态模式、策略模式、模板方法模式、访问者模式文章目录设计模式18备忘录模式(MementoPattern)1定义2结构3
- 23种设计模式(GOF)
gb4215287
javajava
设计模式(GOF)分为三种类型,共23类。1、单例模式(Singleton)2、原型模式(Prototype)简单工厂模式(SimpleFactoryMode)3、工厂方法模式(FactoryMethod)4、抽象工厂模式(AbstractFactory)5、建造者模式(Builder)6、代理模式(Proxy)7、适配器模式(Adapter)8、桥接模式(Bridge)9、装饰器模式(Decor
- 设计模式- 代理模式(Proxy Pattern)结构|原理|优缺点|场景|示例
TsengOnce
设计模式设计模式代理模式
设计模式(分类)设计模式(六大原则)创建型(5种)工厂方法抽象工厂模式单例模式建造者模式原型模式结构型(7种)适配器模式装饰器模式代理模式外观模式桥接模式组合模式享元模式行为型(11种)策略模式模板方法模式观察者模式迭代器模式责任链模式命令模式备忘录模式状态模式访问者模式中介者模式代理模式(ProxyPattern)是一种结构型设计模式,它为其他对象(被代理对象)提供一个代理对象,并由代理对象控制
- 简谈设计模式之适配器模式
Yonagi833
设计模式设计模式适配器模式java
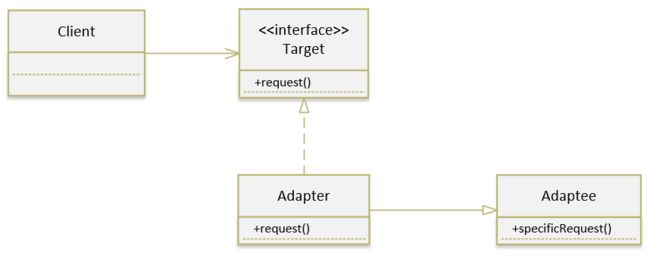
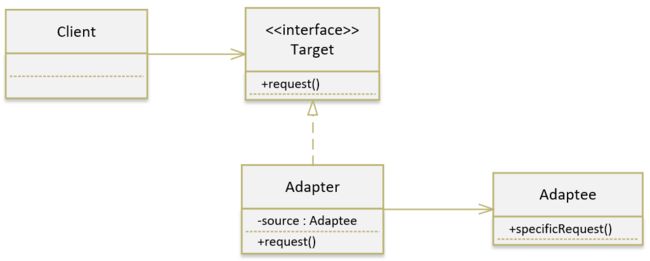
适配器模式是结构型设计模式之一,用于将一个类的接口转换成客户期望的另一个接口.通过使用适配器模式,原本由于接口不兼容而无法一起工作的类可以协同工作适配器模式通常有两种实现方式类适配器模式(ClassAdapterPattern):使用继承来实现适配器。**对象适配器模式(ObjectAdapterPattern)**:使用组合来实现适配器。适配器模式结构目标接口:当前系统业务所期待的接口,可以是抽
- 设计模式 11 享元模式
WineMonk
#设计模式设计模式享元模式
设计模式11创建型模式(5):工厂方法模式、抽象工厂模式、单例模式、建造者模式、原型模式结构型模式(7):适配器模式、桥接模式、组合模式、装饰者模式、外观模式、享元模式、代理模式行为型模式(11):责任链模式、命令模式、解释器模式、迭代器模式、中介者模式、备忘录模式、观察者模式、状态模式、策略模式、模板方法模式、访问者模式文章目录设计模式11享元模式(FlyweightPattern)1定义2结构
- 结构型模式:代理/适配器/装饰者/桥接/外观模式
架构师成长进阶空间
外观模式
5,结构型模式结构型模式描述如何将类或对象按某种布局组成更大的结构。它分为类结构型模式和对象结构型模式,前者采用继承机制来组织接口和类,后者釆用组合或聚合来组合对象。由于组合关系或聚合关系比继承关系耦合度低,满足“合成复用原则”,所以对象结构型模式比类结构型模式具有更大的灵活性。结构型模式分为以下7种:代理模式适配器模式装饰者模式桥接模式外观模式组合模式享元模式5.1代理模式5.1.1概述由于某些
- 【Java设计模式】Java 中的适配器模式:无缝集成不兼容系统
道长不会写代码
Java设计模式java设计模式适配器模式
文章目录Java中的适配器模式:无缝集成不兼容系统一、概述二、适配器设计模式的别名三、适配器设计模式的意图四、适配器模式的详细解释及实际示例五、Java中适配器模式的编程示例六、Java中何时使用适配器模式七、适配器模式的优点和权衡八、Java中适配器模式的实际应用九、源码下载Java中的适配器模式:无缝集成不兼容系统一、概述在Java开发中,适配器模式(AdapterPattern)是一种非常有
- 游戏开发设计模式之原型模式
Ctrl+CV九段手
游戏开发设计模式设计模式原型模式pythonjavac++c#游戏开发
目录原型模式的实现步骤原型模式的优点原型模式的应用场景总结原型模式在游戏开发中的具体应用案例是什么?如何在不同编程语言中实现原型模式?JavaC#PythonC++JavaScript原型模式与其他创建型设计模式(如建造者模式、适配器模式)的比较优劣是什么?原型模式的优点:原型模式的缺点:建造者模式的优点:建造者模式的缺点:适配器模式的优点:适配器模式的缺点:总结:在大型游戏项目中,原型模式对开发
- 设计模式(Kotlin)
找藉口是失败者的习惯
设计模式kotlin开发语言
设计模式创造型设计模式(5种)1、工厂方法模式2、抽象工厂模式3、单例模式4、建造者模式5、原型模式结构型设计模式(7种)1、适配器模式2、桥接模式3、组合模式4、装饰者模式5、外观模式6、享元模式7、代理模式行为型模式(11种)1、模板方法模式2、策略模式3、状态模式4、观察者模式5、备忘录模式6、迭代器模式7、访问者模式8、解释器模式9、责任链模式10、命令模式11、中介者模式以下我会以And
- 【Kotlin设计模式】Kotlin实现适配器模式
一方贝地
Kotlin设计模式kotlin设计模式适配器模式
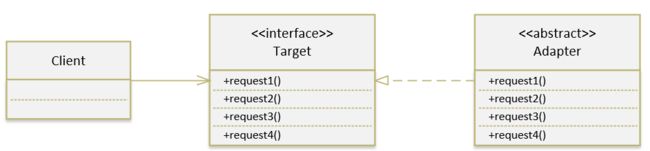
前言适配器模式(AdapterPattern)的核心将某个类的接口转换成客户端期望的另一个接口表示,使得客户端能够通过自己期望的接口与不兼容的类进行交互。适配器模式有三种实现方式,分别是类适配器模式、对象适配器模式、接口适配器模式。我们假设有个视频输出盒子,当前只能接收和输出HDMI信号,现在客户的输入设备只能输出VGA信号,则我们可以通过转换器(要适配的类),将VGA信号转换成HDMI信号做输出
- Java 22种设计模式详解
冲上云霄的Jayden
Javajava设计模式单例模式工程模式代理模式适配器模式桥接模式
22种设计模式详解创建型模式单例模式工厂方法模式抽象工厂模式建造者模式原型模式结构型模式适配器模式桥接模式组合模式装饰器模式装饰器模式与桥接模式代理模式代理模式与装饰器模式外观模式享元模式享元模式原理:享元模式角色:示例代码:行为型模式模板方法模式原理角色示例代码命令模式迭代器模式观察者模式中介者模式备忘录模式解释器模式状态模式策略模式访问者模式设计模式通常分为三类:创建型(Creational)
- 设计模式 7 桥接模式
WineMonk
#设计模式设计模式桥接模式
设计模式7创建型模式(5):工厂方法模式、抽象工厂模式、单例模式、建造者模式、原型模式结构型模式(7):适配器模式、桥接模式、组合模式、装饰者模式、外观模式、享元模式、代理模式行为型模式(11):责任链模式、命令模式、解释器模式、迭代器模式、中介者模式、备忘录模式、观察者模式、状态模式、策略模式、模板方法模式、访问者模式文章目录设计模式7桥接模式(BridgePattern)1定义2结构3示例代码
- ztree设置禁用节点
3213213333332132
JavaScriptztreejsonsetDisabledNodeAjax
ztree设置禁用节点的时候注意,当使用ajax后台请求数据,必须要设置为同步获取数据,否者会获取不到节点对象,导致设置禁用没有效果。
$(function(){
showTree();
setDisabledNode();
});
- JVM patch by Taobao
bookjovi
javaHotSpot
在网上无意中看到淘宝提交的hotspot patch,共四个,有意思,记录一下。
7050685:jsdbproc64.sh has a typo in the package name
7058036:FieldsAllocationStyle=2 does not work in 32-bit VM
7060619:C1 should respect inline and
- 将session存储到数据库中
dcj3sjt126com
sqlPHPsession
CREATE TABLE sessions (
id CHAR(32) NOT NULL,
data TEXT,
last_accessed TIMESTAMP NOT NULL,
PRIMARY KEY (id)
);
<?php
/**
* Created by PhpStorm.
* User: michaeldu
* Date
- Vector
171815164
vector
public Vector<CartProduct> delCart(Vector<CartProduct> cart, String id) {
for (int i = 0; i < cart.size(); i++) {
if (cart.get(i).getId().equals(id)) {
cart.remove(i);
- 各连接池配置参数比较
g21121
连接池
排版真心费劲,大家凑合看下吧,见谅~
Druid
DBCP
C3P0
Proxool
数据库用户名称 Username Username User
数据库密码 Password Password Password
驱动名
- [简单]mybatis insert语句添加动态字段
53873039oycg
mybatis
mysql数据库,id自增,配置如下:
<insert id="saveTestTb" useGeneratedKeys="true" keyProperty="id"
parameterType=&
- struts2拦截器配置
云端月影
struts2拦截器
struts2拦截器interceptor的三种配置方法
方法1. 普通配置法
<struts>
<package name="struts2" extends="struts-default">
&
- IE中页面不居中,火狐谷歌等正常
aijuans
IE中页面不居中
问题是首页在火狐、谷歌、所有IE中正常显示,列表页的页面在火狐谷歌中正常,在IE6、7、8中都不中,觉得可能那个地方设置的让IE系列都不认识,仔细查看后发现,列表页中没写HTML模板部分没有添加DTD定义,就是<!DOCTYPE html PUBLIC "-//W3C//DTD XHTML 1.0 Transitional//EN" "http://www.w3
- String,int,Integer,char 几个类型常见转换
antonyup_2006
htmlsql.net
如何将字串 String 转换成整数 int?
int i = Integer.valueOf(my_str).intValue();
int i=Integer.parseInt(str);
如何将字串 String 转换成Integer ?
Integer integer=Integer.valueOf(str);
如何将整数 int 转换成字串 String ?
1.
- PL/SQL的游标类型
百合不是茶
显示游标(静态游标)隐式游标游标的更新和删除%rowtyperef游标(动态游标)
游标是oracle中的一个结果集,用于存放查询的结果;
PL/SQL中游标的声明;
1,声明游标
2,打开游标(默认是关闭的);
3,提取数据
4,关闭游标
注意的要点:游标必须声明在declare中,使用open打开游标,fetch取游标中的数据,close关闭游标
隐式游标:主要是对DML数据的操作隐
- JUnit4中@AfterClass @BeforeClass @after @before的区别对比
bijian1013
JUnit4单元测试
一.基础知识
JUnit4使用Java5中的注解(annotation),以下是JUnit4常用的几个annotation: @Before:初始化方法 对于每一个测试方法都要执行一次(注意与BeforeClass区别,后者是对于所有方法执行一次)@After:释放资源 对于每一个测试方法都要执行一次(注意与AfterClass区别,后者是对于所有方法执行一次
- 精通Oracle10编程SQL(12)开发包
bijian1013
oracle数据库plsql
/*
*开发包
*包用于逻辑组合相关的PL/SQL类型(例如TABLE类型和RECORD类型)、PL/SQL项(例如游标和游标变量)和PL/SQL子程序(例如过程和函数)
*/
--包用于逻辑组合相关的PL/SQL类型、项和子程序,它由包规范和包体两部分组成
--建立包规范:包规范实际是包与应用程序之间的接口,它用于定义包的公用组件,包括常量、变量、游标、过程和函数等
--在包规
- 【EhCache二】ehcache.xml配置详解
bit1129
ehcache.xml
在ehcache官网上找了多次,终于找到ehcache.xml配置元素和属性的含义说明文档了,这个文档包含在ehcache.xml的注释中!
ehcache.xml : http://ehcache.org/ehcache.xml
ehcache.xsd : http://ehcache.org/ehcache.xsd
ehcache配置文件的根元素是ehcahe
ehcac
- java.lang.ClassNotFoundException: org.springframework.web.context.ContextLoaderL
白糖_
javaeclipsespringtomcatWeb
今天学习spring+cxf的时候遇到一个问题:在web.xml中配置了spring的上下文监听器:
<listener>
<listener-class>org.springframework.web.context.ContextLoaderListener</listener-class>
</listener>
随后启动
- angular.element
boyitech
AngularJSAngularJS APIangular.element
angular.element
描述: 包裹着一部分DOM element或者是HTML字符串,把它作为一个jQuery元素来处理。(类似于jQuery的选择器啦) 如果jQuery被引入了,则angular.element就可以看作是jQuery选择器,选择的对象可以使用jQuery的函数;如果jQuery不可用,angular.e
- java-给定两个已排序序列,找出共同的元素。
bylijinnan
java
import java.util.ArrayList;
import java.util.Arrays;
import java.util.List;
public class CommonItemInTwoSortedArray {
/**
* 题目:给定两个已排序序列,找出共同的元素。
* 1.定义两个指针分别指向序列的开始。
* 如果指向的两个元素
- sftp 异常,有遇到的吗?求解
Chen.H
javajcraftauthjschjschexception
com.jcraft.jsch.JSchException: Auth cancel
at com.jcraft.jsch.Session.connect(Session.java:460)
at com.jcraft.jsch.Session.connect(Session.java:154)
at cn.vivame.util.ftp.SftpServerAccess.connec
- [生物智能与人工智能]神经元中的电化学结构代表什么?
comsci
人工智能
我这里做一个大胆的猜想,生物神经网络中的神经元中包含着一些化学和类似电路的结构,这些结构通常用来扮演类似我们在拓扑分析系统中的节点嵌入方程一样,使得我们的神经网络产生智能判断的能力,而这些嵌入到节点中的方程同时也扮演着"经验"的角色....
我们可以尝试一下...在某些神经
- 通过LAC和CID获取经纬度信息
dai_lm
laccid
方法1:
用浏览器打开http://www.minigps.net/cellsearch.html,然后输入lac和cid信息(mcc和mnc可以填0),如果数据正确就可以获得相应的经纬度
方法2:
发送HTTP请求到http://www.open-electronics.org/celltrack/cell.php?hex=0&lac=<lac>&cid=&
- JAVA的困难分析
datamachine
java
前段时间转了一篇SQL的文章(http://datamachine.iteye.com/blog/1971896),文章不复杂,但思想深刻,就顺便思考了一下java的不足,当砖头丢出来,希望引点和田玉。
-----------------------------------------------------------------------------------------
- 小学5年级英语单词背诵第二课
dcj3sjt126com
englishword
money 钱
paper 纸
speak 讲,说
tell 告诉
remember 记得,想起
knock 敲,击,打
question 问题
number 数字,号码
learn 学会,学习
street 街道
carry 搬运,携带
send 发送,邮寄,发射
must 必须
light 灯,光线,轻的
front
- linux下面没有tree命令
dcj3sjt126com
linux
centos p安装
yum -y install tree
mac os安装
brew install tree
首先来看tree的用法
tree 中文解释:tree
功能说明:以树状图列出目录的内容。
语 法:tree [-aACdDfFgilnNpqstux][-I <范本样式>][-P <范本样式
- Map迭代方式,Map迭代,Map循环
蕃薯耀
Map循环Map迭代Map迭代方式
Map迭代方式,Map迭代,Map循环
>>>>>>>>>>>>>>>>>>>>>>>>>>>>>>>>>>>>>>>>
蕃薯耀 2015年
- Spring Cache注解+Redis
hanqunfeng
spring
Spring3.1 Cache注解
依赖jar包:
<!-- redis -->
<dependency>
<groupId>org.springframework.data</groupId>
<artifactId>spring-data-redis</artifactId>
- Guava中针对集合的 filter和过滤功能
jackyrong
filter
在guava库中,自带了过滤器(filter)的功能,可以用来对collection 进行过滤,先看例子:
@Test
public void whenFilterWithIterables_thenFiltered() {
List<String> names = Lists.newArrayList("John"
- 学习编程那点事
lampcy
编程androidPHPhtml5
一年前的夏天,我还在纠结要不要改行,要不要去学php?能学到真本事吗?改行能成功吗?太多的问题,我终于不顾一切,下定决心,辞去了工作,来到传说中的帝都。老师给的乘车方式还算有效,很顺利的就到了学校,赶巧了,正好学校搬到了新校区。先安顿了下来,过了个轻松的周末,第一次到帝都,逛逛吧!
接下来的周一,是我噩梦的开始,学习内容对我这个零基础的人来说,除了勉强完成老师布置的作业外,我已经没有时间和精力去
- 架构师之流处理---------bytebuffer的mark,limit和flip
nannan408
ByteBuffer
1.前言。
如题,limit其实就是可以读取的字节长度的意思,flip是清空的意思,mark是标记的意思 。
2.例子.
例子代码:
String str = "helloWorld";
ByteBuffer buff = ByteBuffer.wrap(str.getBytes());
Sy
- org.apache.el.parser.ParseException: Encountered " ":" ": "" at line 1, column 1
Everyday都不同
$转义el表达式
最近在做Highcharts的过程中,在写js时,出现了以下异常:
严重: Servlet.service() for servlet jsp threw exception
org.apache.el.parser.ParseException: Encountered " ":" ": "" at line 1,
- 用Java实现发送邮件到163
tntxia
java实现
/*
在java版经常看到有人问如何用javamail发送邮件?如何接收邮件?如何访问多个文件夹等。问题零散,而历史的回复早已经淹没在问题的海洋之中。
本人之前所做过一个java项目,其中包含有WebMail功能,当初为用java实现而对javamail摸索了一段时间,总算有点收获。看到论坛中的经常有此方面的问题,因此把我的一些经验帖出来,希望对大家有些帮助。
此篇仅介绍用
- 探索实体类存在的真正意义
java小叶檀
POJO
一. 实体类简述
实体类其实就是俗称的POJO,这种类一般不实现特殊框架下的接口,在程序中仅作为数据容器用来持久化存储数据用的
POJO(Plain Old Java Objects)简单的Java对象
它的一般格式就是
public class A{
private String id;
public Str