一、概述
我们在编程时,如果界面中有不少的TextField(如某一个应用程序的注册界面,会需要填写不少的内容),此时,很容易会造成当键盘出现后,遮挡住部分TextField的情况而造成输入的不便。本文主要就是解决,如何通过代码解决键盘遮挡住textField的问题。
我将主要的实现方法封装为一个接口,然后在一个视图控制器中调用该方法来演示一个小实例。将实现方法封装为一个接口还有一个好处,就是未来我需要编写一个键盘不遮挡textView输入的方法时,可以直接编辑到这个文件中,方便其它的类调用。
二、实现原理
- 当键盘出现时,首先计算键盘的高度keyboardHeight;
- 然后判断当前的输入源(即要编辑的textField)的Y轴坐标及高度;
- 计算“输入源的Y轴坐标+输入源的高度”是否大于等于“设备的屏幕高度-keyboardHeight”;
- 第三步结算的结果是大于等于,则说明键盘遮挡住了全部或者部分输入源,此时需要将整个界面上移;
- 当输入源不再进行输入操作且键盘消失时,需要再将界面移回到原始状态。
三、实现方法
如第一节中说明,我将实现界面上移操作的方法封装为一个接口,然后在另外的一个类中调用该接口。我们将该接口创建为SCView,它继承自UIView。
1. SCView.h文件的设计
#import

@interface SCMoveView : UIView


@property (nonatomic, assign) float keyboardHeight;  //获取键盘的高度

@property (nonatomic, assign) float viewMovedHeight;  //view移动的的高度

- (void)addKeyboardWillShowNotification;

- (void) moveTheViewUpForTheTextField : (UITextField*)aTextField onTheView : (UIView*)theView;  //开始编辑textField时上移整个View


- (void) moveTheViewDownForTheTextField : (UITextField*)aTextField onTheView : (UIView*)theView;  //结束编辑TextField时下移整个View


@end
各个属性及方法的解释如下:
1.1
@property (nonatomic, assign) float keyboardHeight;  //获取键盘的高度

@property (nonatomic, assign) float viewMovedHeight;  //view移动的的高度
首先我们需要获取键盘的高度,然后计算界面要移动的高度。我无法估计是否会在其它类中调用这两个属性,所以我先将其设置为公有属性。
1.2
- (void)addKeyboardWillShowNotification;
在这个方法中,我们将注册键盘出现的通知,用于监视键盘的状态。我们需要在调用SCMoveView接口的类中,先实现这个方法。
1.3
- (void) moveTheViewUpForTheTextField : (UITextField*)aTextField onTheView : (UIView*)theView
当键盘出现时,会调用该方法。在该方法中,判断“输入源的Y轴坐标+输入源的高度”是否大于等于“设备的屏幕高度-keyboardHeight”,并决定界面是否要上移。我们需要设置一个标签moveTag,当界面不移动时,该标签是一个值A;当界面移动后,该标签是另外一个值B。
1.4
- (void) moveTheViewDownForTheTextField : (UITextField*)aTextField onTheView : (UIView*)theView;
当键盘消失时会调用该方法。在该方法中,判断moveTag的值是否为B,如果是,则说明界面有了移动,需要将其还原;还原后还需要将moveTag的值设置会A。
2. SCView.m文件的设计
#import "SCMoveView.h"

#define deviceScreenWidth [[UIScreen mainScreen]bounds].size.width

#define deviceScreenHeight [[UIScreen mainScreen]bounds].size.height

@implementation SCMoveView

int moveTag = 0;

- (void)addKeyboardWillShowNotification {

    //增加监听,当键盘出现时获取消息

    [[NSNotificationCenter defaultCenter] addObserver:self
                                             selector:@selector(keyboardDidShow:)
                                                 name:UIKeyboardDidShowNotification
                                               object:nil];

}

- (void) moveTheViewUpForTheTextField : (UITextField*)aTextField onTheView : (UIView*)theView {  //开始编辑textField时上移整个View

    if(aTextField.frame.origin.y + aTextField.frame.size.height >= deviceScreenHeight - _keyboardHeight) {

        //设置动画
        [UIView beginAnimations:@"Animation" context:nil];
        [UIView setAnimationDuration:0.20];
        [UIView setAnimationBeginsFromCurrentState: YES];

        //获取View要移动的高度

        _viewMovedHeight = aTextField.frame.origin.y + aTextField.frame.size.height - _keyboardHeight + 30;

        //设置视图移动的位移
        theView.frame = CGRectMake(theView.frame.origin.x, theView.frame.origin.y - _viewMovedHeight, theView.frame.size.width, theView.frame.size.height);


        //设置动画结束
        [UIView commitAnimations];

        moveTag = 1;

    }

}


- (void) moveTheViewDownForTheTextField : (UITextField*)aTextField onTheView : (UIView*)theView {  //结束编辑TextField时下移整个View

    if(moveTag == 1) {

        //设置动画
        [UIView beginAnimations:@"Animation" context:nil];
        [UIView setAnimationDuration:0.20];
        [UIView setAnimationBeginsFromCurrentState: YES];

        //设置视图移动的位移
        theView.frame = CGRectMake(theView.frame.origin.x, theView.frame.origin.y + _viewMovedHeight, theView.frame.size.width, theView.frame.size.height);
        //设置动画结束
        [UIView commitAnimations];

        moveTag = 0;
    }


}

- (void)keyboardDidShow:(NSNotification *)aNotification
{
    NSDictionary *userInfo = [aNotification userInfo];
    NSValue *aValue = [userInfo objectForKey:UIKeyboardFrameEndUserInfoKey];
    CGRect keyboardRect = [aValue CGRectValue];

    _keyboardHeight = keyboardRect.size.height;  //获取出现的键盘的高度

}

@end
各个代码块的解释如下:
2.1
#define deviceScreenWidth [[UIScreen mainScreen]bounds].size.width

#define deviceScreenHeight [[UIScreen mainScreen]bounds].size.height
这段代码为获取设备屏幕的高度和宽度。
2.2
int moveTag = 0;
设置的标签,用于表征界面是否移动——当moveTag值为0时,界面未移动;当值为1时,界面有了移动。
2.3
- (void)addKeyboardWillShowNotification {

    //增加监听,当键盘出现时获取消息

    [[NSNotificationCenter defaultCenter] addObserver:self
                                             selector:@selector(keyboardDidShow:)
                                                 name:UIKeyboardDidShowNotification
                                               object:nil];

}
增加监听,当键盘出现时获取消息。在调用SCMoveView接口的类中,需要先实现该方法。我们将在2.7中实现这个通知的方法。
2.4
- (void) moveTheViewUpForTheTextField : (UITextField*)aTextField onTheView : (UIView*)theView {  //开始编辑textField时上移整个View

    if(aTextField.frame.origin.y + aTextField.frame.size.height >= deviceScreenHeight - _keyboardHeight) {

        //设置动画
        [UIView beginAnimations:@"Animation" context:nil];
        [UIView setAnimationDuration:0.20];
        [UIView setAnimationBeginsFromCurrentState: YES];

        //获取View要移动的高度

        _viewMovedHeight = aTextField.frame.origin.y + aTextField.frame.size.height - _keyboardHeight + 30;

        //设置视图移动的位移
        theView.frame = CGRectMake(theView.frame.origin.x, theView.frame.origin.y - _viewMovedHeight, theView.frame.size.width, theView.frame.size.height);


        //设置动画结束
        [UIView commitAnimations];

        moveTag = 1;

    }

}
当键盘出现时,调用该方法。在
if(aTextField.frame.origin.y + aTextField.frame.size.height >= deviceScreenHeight - _keyboardHeight)
语句中,我们判断“输入源的Y轴坐标+输入源的高度”是否大于等于“设备的屏幕高度-keyboardHeight”。如果是,则通过
_viewMovedHeight = aTextField.frame.origin.y + aTextField.frame.size.height - _keyboardHeight + 30;
代码获取获取视图要移动的距离,然后通过
theView.frame = CGRectMake(theView.frame.origin.x, theView.frame.origin.y - _viewMovedHeight, theView.frame.size.width, theView.frame.size.height);
方法将当前视图移动到所需要的距离。因为我们希望视图的移动是动画效果平滑过渡的,所以我们将这个方法写在了一段动画代码中:
//设置动画
[UIView beginAnimations:@"Animation" context:nil];
[UIView setAnimationDuration:0.20];
[UIView setAnimationBeginsFromCurrentState: YES];

//获取View要移动的高度
......

//设置视图移动的位移
......

//设置动画结束
[UIView commitAnimations];
2.5
moveTag = 1;
设置标签值,以确定界面有了移动。我们将会在下面的方法中用到该标签值。
2.6
- (void) moveTheViewDownForTheTextField : (UITextField*)aTextField onTheView : (UIView*)theView {  //结束编辑TextField时下移整个View

    if(moveTag == 1) {

        //设置动画
        [UIView beginAnimations:@"Animation" context:nil];
        [UIView setAnimationDuration:0.20];
        [UIView setAnimationBeginsFromCurrentState: YES];

        //设置视图移动的位移
        theView.frame = CGRectMake(theView.frame.origin.x, theView.frame.origin.y + _viewMovedHeight, theView.frame.size.width, theView.frame.size.height);
        //设置动画结束
        [UIView commitAnimations];

        moveTag = 0;
    }


}
当键盘消失时,调用该方法。在
if(moveTag == 1)
中,我们先判断界面是否有了移动,如果是,则执行下面的将界面移会原始状态的代码,这段代码与移动视图的代码比较相似,不再解释。两者不同的区别就是界面最终的Y轴坐标是多少。最后我们还需要将moveTag的值设置为0,表示界面处于原始状态未移动。
2.7
- (void)keyboardDidShow:(NSNotification *)aNotification
{
    NSDictionary *userInfo = [aNotification userInfo];
    NSValue *aValue = [userInfo objectForKey:UIKeyboardFrameEndUserInfoKey];
    CGRect keyboardRect = [aValue CGRectValue];

    _keyboardHeight = keyboardRect.size.height;  //获取出现的键盘的高度

}
我们实现在2.3中注册的通知方法——当键盘出现时,计算键盘的高度,并将其赋值给_keyboardHeight属性。该属性的值被上面的移动界面方法使用。
3. ViewController.h文件的设计
我们在根视图控制器中使用SCMoveView接口,完成当键盘遮挡住输入源时,界面移动的工作。
#import

#import "SCMoveView.h"

@interface ViewController : UIViewController

@property (nonatomic, strong) SCMoveView *moveView;

@property(nonatomic, strong) UILabel *emailOrTelphoneLabel;
@property(nonatomic, strong) UILabel *userNameLabel;
@property(nonatomic, strong) UILabel *passwordLabel;
@property(nonatomic, strong) UILabel *confirempasswordLabel;
@property(nonatomic, strong) UITextField *emailOrTelphoneTextField;   //email或手机号
@property(nonatomic, strong) UITextField *userNameTextField;   //用户名
@property(nonatomic, strong) UITextField *passwordTextField;   //密码
@property(nonatomic, strong) UITextField *confiremPasswordTextField;   //确认密码

@property (nonatomic, strong) UITextField *atext;

@end
以往惯例,我们需要先在ViewController.h文件中包含“SCMoveView.h”头文件,然后创建一个SCMoveView的实例,以调用SCMoveView中的接口(因为我们在SCMoveView中创建的方法都是实例方法)。
我们同时还需要该类支持UITextFieldDelegate协议。
然后编写一些标签和textField的属性。
4. ViewController.m文件的设计
#import "ViewController.h"

#define deviceScreenWidth [[UIScreen mainScreen]bounds].size.width

#define deviceScreenHeight [[UIScreen mainScreen]bounds].size.height

@interface ViewController ()

@end

@implementation ViewController

- (void)viewDidLoad {
    [super viewDidLoad];
    // Do any additional setup after loading the view, typically from a nib.

    _moveView = [[SCMoveView alloc]init];

    [_moveView addKeyboardWillShowNotification];   //先注册通知


    //设置一个全屏幕button,当点击背景时,隐藏键盘

    UIButton *backgroundBtn = [UIButton buttonWithType:UIButtonTypeCustom];

    [backgroundBtn setFrame:CGRectMake(0, 0, deviceScreenWidth, deviceScreenHeight)];

    [backgroundBtn setBackgroundColor:[UIColor blueColor]];

    [backgroundBtn setAlpha:0.15];

    [backgroundBtn addTarget:self action:@selector(backgroundBtnPressed:) forControlEvents:UIControlEventTouchUpInside];

    [self.view addSubview:backgroundBtn];


    //初始化_emailOrTelphoneTextField和_emailOrTelphoneLabel

    _emailOrTelphoneLabel = [[UILabel alloc]initWithFrame:CGRectMake(0, 130, deviceScreenWidth - 230, 40)];

    [_emailOrTelphoneLabel setFont:[UIFont fontWithName:@"Arial" size:17.0]];

    [_emailOrTelphoneLabel setTextAlignment:NSTextAlignmentRight];

    [_emailOrTelphoneLabel setTextColor:[UIColor blackColor]];

    [_emailOrTelphoneLabel setText:@"手机号:"];

    //_emailOrTelphoneLabel.hidden = YES;

    [self.view addSubview:_emailOrTelphoneLabel];

    _emailOrTelphoneTextField = [[UITextField alloc] initWithFrame:CGRectMake(deviceScreenWidth - 225, 130, 200, 40)];

    [_emailOrTelphoneTextField setTextAlignment:NSTextAlignmentLeft];

    [_emailOrTelphoneTextField setFont:[UIFont fontWithName:@"Arial" size:17.0]];

    [_emailOrTelphoneTextField setTextColor:[UIColor blackColor]];

    [_emailOrTelphoneTextField setBorderStyle:UITextBorderStyleRoundedRect];

    [_emailOrTelphoneTextField setPlaceholder:@"输入手机号"];

    //_emailOrTelphoneTextField.hidden = YES;

    _emailOrTelphoneTextField.delegate = self;

    [self.view addSubview:_emailOrTelphoneTextField];


    //初始化userNameTextField和_userNameLabel

    _userNameLabel = [[UILabel alloc]initWithFrame:CGRectMake(0, 190, deviceScreenWidth - 230, 40)];

    [_userNameLabel setFont:[UIFont fontWithName:@"Arial" size:17.0]];

    [_userNameLabel setTextAlignment:NSTextAlignmentRight];

    [_userNameLabel setTextColor:[UIColor blackColor]];

    [_userNameLabel setText:@"用户名:"];

    [self.view addSubview:_userNameLabel];

    _userNameTextField = [[UITextField alloc] initWithFrame:CGRectMake(deviceScreenWidth - 225, 190, 200, 40)];

    [_userNameTextField setTextAlignment:NSTextAlignmentLeft];

    [_userNameTextField setFont:[UIFont fontWithName:@"Arial" size:17.0]];

    [_userNameTextField setTextColor:[UIColor blackColor]];

    [_userNameTextField setBorderStyle:UITextBorderStyleRoundedRect];

    [_userNameTextField setPlaceholder:@"输入用户名"];

    [self.view addSubview:_userNameTextField];

    _userNameTextField.delegate = self;


    //初始化_passwordTextField和_passwordLabel

    _passwordLabel = [[UILabel alloc]initWithFrame:CGRectMake(0, 250, deviceScreenWidth - 230, 40)];

    [_passwordLabel setFont:[UIFont fontWithName:@"Arial" size:17.0]];

    [_passwordLabel setTextAlignment:NSTextAlignmentRight];

    [_passwordLabel setTextColor:[UIColor blackColor]];

    [_passwordLabel setText:@"密码:"];

    [self.view addSubview:_passwordLabel];

    _passwordTextField = [[UITextField alloc] initWithFrame:CGRectMake(deviceScreenWidth - 225, 250, 200, 40)];

    [_passwordTextField setTextAlignment:NSTextAlignmentLeft];

    [_passwordTextField setFont:[UIFont fontWithName:@"Arial" size:17.0]];

    [_passwordTextField setTextColor:[UIColor blackColor]];

    [_passwordTextField setBorderStyle:UITextBorderStyleRoundedRect];

    [_passwordTextField setPlaceholder:@"输入密码"];

    [self.view addSubview:_passwordTextField];

    _passwordTextField.delegate = self;


    //初始化_confiremPasswordTextField和_confirempasswordLabel

    _confirempasswordLabel = [[UILabel alloc]initWithFrame:CGRectMake(0, 310, deviceScreenWidth - 230, 40)];

    [_confirempasswordLabel setFont:[UIFont fontWithName:@"Arial" size:17.0]];

    [_confirempasswordLabel setTextAlignment:NSTextAlignmentRight];

    [_confirempasswordLabel setTextColor:[UIColor blackColor]];

    [_confirempasswordLabel setText:@"确认密码:"];

    [self.view addSubview:_confirempasswordLabel];

    _confiremPasswordTextField = [[UITextField alloc] initWithFrame:CGRectMake(deviceScreenWidth - 225, 310, 200, 40)];

    [_confiremPasswordTextField setTextAlignment:NSTextAlignmentLeft];

    [_confiremPasswordTextField setFont:[UIFont fontWithName:@"Arial" size:17.0]];

    [_confiremPasswordTextField setTextColor:[UIColor blackColor]];

    [_confiremPasswordTextField setBorderStyle:UITextBorderStyleRoundedRect];

    [_confiremPasswordTextField setPlaceholder:@"确认密码"];

    [self.view addSubview:_confiremPasswordTextField];

    _confiremPasswordTextField.delegate = self;

    //初始化_atext

    _atext = [[UITextField alloc] initWithFrame:CGRectMake(deviceScreenWidth - 225, 370, 200, 40)];

    [_atext setTextAlignment:NSTextAlignmentLeft];

    [_atext setFont:[UIFont fontWithName:@"Arial" size:17.0]];

    [_atext setTextColor:[UIColor blackColor]];

    [_atext setBorderStyle:UITextBorderStyleRoundedRect];

    [_atext setPlaceholder:@"确认密码"];

    [self.view addSubview:_atext];

    _atext.delegate = self;

}


- (void)backgroundBtnPressed : (UIButton*)sender {

    [_emailOrTelphoneTextField resignFirstResponder];

    [_userNameTextField resignFirstResponder];

    [_passwordTextField resignFirstResponder];

    [_confiremPasswordTextField resignFirstResponder];

    [_atext resignFirstResponder];


}

- (void)textFieldDidBeginEditing:(UITextField*)textField
{

    [_moveView moveTheViewUpForTheTextField:textField onTheView:self.view];


}

- (void)textFieldDidEndEditing:(UITextField*)textField
{

    [_moveView moveTheViewDownForTheTextField:textField onTheView:self.view];
}


- (void)didReceiveMemoryWarning {
    [super didReceiveMemoryWarning];
    // Dispose of any resources that can be recreated.
}


@end
各个代码块的解释如下:
3.1
#define deviceScreenWidth [[UIScreen mainScreen]bounds].size.width

#define deviceScreenHeight [[UIScreen mainScreen]bounds].size.height
这段代码为获取设备屏幕的高度和宽度。
3.2
- (void)viewDidLoad {
    [super viewDidLoad];
    // Do any additional setup after loading the view, typically from a nib.

    _moveView = [[SCMoveView alloc]init];

    [_moveView addKeyboardWillShowNotification];   //先注册通知


    //设置一个全屏幕button,当点击背景时,隐藏键盘

    UIButton *backgroundBtn = [UIButton buttonWithType:UIButtonTypeCustom];

    [backgroundBtn setFrame:CGRectMake(0, 0, deviceScreenWidth, deviceScreenHeight)];

    [backgroundBtn setBackgroundColor:[UIColor blueColor]];

    [backgroundBtn setAlpha:0.15];

    [backgroundBtn addTarget:self action:@selector(backgroundBtnPressed:) forControlEvents:UIControlEventTouchUpInside];

    [self.view addSubview:backgroundBtn];

    //初始化_emailOrTelphoneTextField和_emailOrTelphoneLabel

    ......

    //初始化userNameTextField和_userNameLabel

    ......


    //初始化_passwordTextField和_passwordLabel

    ......

    //初始化_confiremPasswordTextField和_confirempasswordLabel

    ......

    //初始化_atext

    ......

}
首先我们初始化_moveView并调用SCMoveView中的方法:
[_moveView addKeyboardWillShowNotification];
来注册键盘出现时的通知。
接下来,我们添加一个按钮到当前View中,当我们点击这个按钮时,所有的输入源都取消第一响应者,键盘消失。
最后我们实现各个标签和textField。注意,我们需要设置所有的textField的代理为自身,以便调用UITextFieldDelegate协议中的方法。
3.3
- (void)backgroundBtnPressed : (UIButton*)sender {

    [_emailOrTelphoneTextField resignFirstResponder];

    [_userNameTextField resignFirstResponder];

    [_passwordTextField resignFirstResponder];

    [_confiremPasswordTextField resignFirstResponder];

    [_atext resignFirstResponder];

}
点击非标签和textField的界面背景按钮时,触发该方法,所有的textField取消第一响应者,键盘消失。
4.4
- (void)textFieldDidBeginEditing:(UITextField*)textField
{

    [_moveView moveTheViewUpForTheTextField:textField onTheView:self.view];


}
UITextFieldDelegate协议中的方法,当开始编辑textField时调用该方法。该方法中的内容是调用SCMoveView中的moveTheViewUpForTheTextField:onTheView:方法,以确定是否要将界面上移。
4.5
- (void)textFieldDidEndEditing:(UITextField*)textField
{

    [_moveView moveTheViewDownForTheTextField:textField onTheView:self.view];
}
UITextFieldDelegate协议中的方法,当结束编辑textField并键盘消失时调用该方法。该方法中的内容是调用SCMoveView中的moveTheViewDownForTheTextField:onTheView:方法,以确定如果界面上移了,就在将其还原到原始坐标状态。
四、效果图
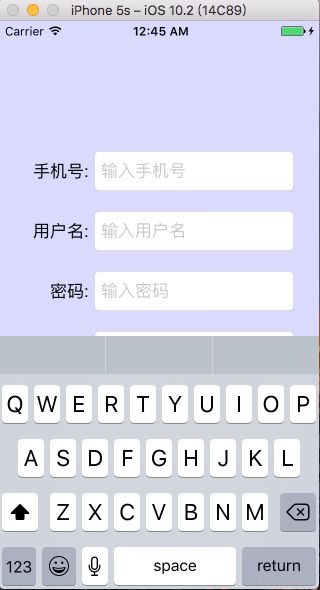
图1表示,如果不使用SCMoveView中的方法时,如果点击atext这个textField时,键盘将会遮挡住atext。
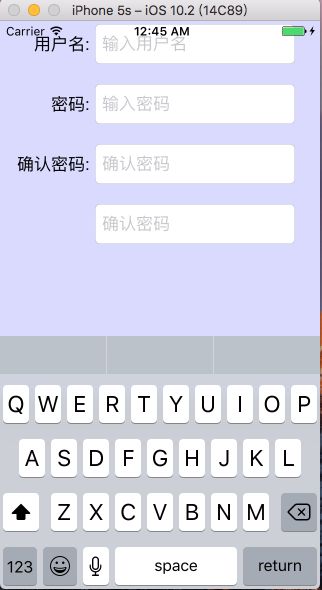
图2表示,使用SCMoveView中的方法时,如果点击atext这个textField时,界面将会上移,键盘将不会遮挡住atext。
五、一些问题
使用这种方法时,当界面加载后,如果我第一次点击的就是atext这个输入源,那么界面时不会移动的;只有从第二次及之后的操作中点击会被键盘遮挡住的输入源,才会出现界面上移的情况。目前还没有想出来具体的原因及解决办法。如果有哪位朋友能解释一下或者由方法解决掉这个bug,请回复或者私聊我,感激不尽。

